background image

21

Manufactured under license from Dolby Laboratories.
‘Dolby’ ‘Pro Logic’ and the double-D symbol are
trademarks of Dolby Laboratories.

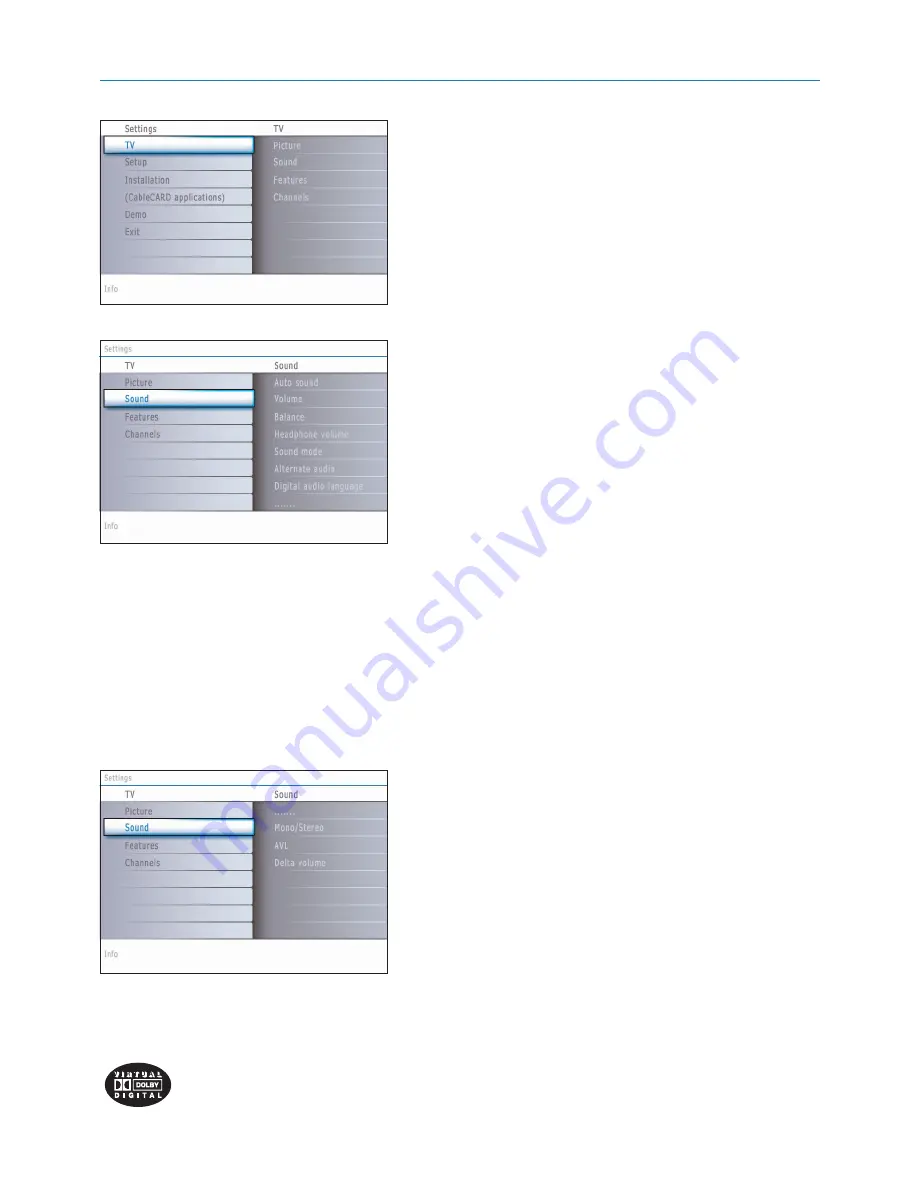
Sound menu

&

Select 

Sound

in the TV Settings menu.

é

Press the cursor right to enter the sound menu.

Select the menu items with the cursor up/down and adjust the settings
with the cursor left/right.
Remember, control settings are at normal mid-range levels when the bar
scale is entered.

Auto sound

Select 

Auto sound 

to display a list of predefined sound settings, each

corresponding with specific factory settings of Treble and Bass.

&

Press the cursor right to enter the list.

é

Press the cursor up/down to select a predefined sound setting.

Personal

refers to the personal preference settings of sound in the sound

menu.

Note: The moment you are in a predefined Auto sound setting and you modify a
setting in the Sound menu, all values of the menu will overwrite the previously
made personal setting.

Volume

This will adjust the sound output level.

Balance

This will adjust the output of the right and left speakers to obtain the best
stereo reproduction for your listening position.

Headphone volume

This controls the level of sound through the headphones.

Sound mode

This selects the modes for more spatial or surround sound reproduction
dependent on the broadcast signals or signals from external inputs
received.

Alternate audio 

(only selectable with analog broadcast signals)

This gives you the possibility to swap between the Main and Second audio
Program (SAP) when it is available.

Digital Audio  language 

(only selectable with digital broadcast signals)

This allows you to select your language preference in case of multilingual
audio track programs if available with digital broadcast signal.

Note: The default language for the digital channels is the installed menu language.

Mono/Stereo

This selects, per TV channel, Mono or Stereo sound when analog stereo
broadcasts are available.

AVL (Automatic Volume Leveler) 

(only available with analog broadcast and

non-Digital signals)

This automatically reduces the volume differences between channels and
programs, providing a more constant overall level.This will also reduce the
dynamics of sound.

Delta volume

This allows you to correct for any permanent volume differences between
TV channels or external sources.

Summary of Contents for 37PF7320A

Page 1: ...tration Card at once Know these safety symbols This bolt of lightning indicates uninsulated material within your unit may cause an electrical shock For the safety of everyone in your household please do not remove product covering The exclamation point calls attention to features for which you should read the enclosed literature closely to prevent operating and maintenance problems WARNING To redu...

Page 2: ...d international global safety standards for tilt and stability properties of its cabinets design Do not compromise these design standards by applying excessive pull force to the front or top of the cabinet which could ultimately overturn the product Also do not endanger yourself or children by placing electronic equipment toys on the top of the cabinet Such items could unsuspectingly fall from the...

Page 3: ...cord a program from monitor out 36 To select connected devices 36 Audio and video equipment buttons 37 Before Calling Service 38 Tips 39 Annex 1 Philips TV software upgrade with portable memory 40 Annex 2 Philips TV Slideshow Format with background music 42 Annex 3 Philips TV USB 44 R End of life directives Philips is paying a lot of attention to producing environmentally friendly in green focal a...

Page 4: ... TV is provided with a special slot called a CableCARD which means that you do not need a separate set top box to receive digital cable SDTV and HDTV programs However it is still possible to connect a set top box to your TV The CableCARD which will be available from your cable system operator is designed only for that particular digital cable TV system If you need to get digital cable TV from a di...

Page 5: ...y Note this connection will supply stereo sound to the TV if it is being broadcast by the station you are watching Cable box with RF IN OUT Connect the incoming cable TV signal to the cable IN jack 1 on the back of the cable box Connect a coaxial cable not supplied from the TO TV jack on the back of the cable box to the CABLE ANTENNA 75 Ω x jack 2 at the bottom of the TV Note Your cable box may ha...

Page 6: ...the station you are watching Direct Broadcast Satellite DBS Satellite systems offer many of the same premium channels as cable systems and often at a lower price To get these channels you ll need to install a small dish antenna outside There are 2 main DBS systems DirecTV DishNetwork These systems require separate proprietary set top receiver boxes to decode their signals and send them to your dig...

Page 7: ... Press to display the My Content menu on or off see p 8 OK to activate a setting to display the list of channels stored according to the selection made in the Installation mode Antenna or Cable p 10 starts playing content in the Home Multimedia Browser application p 27 MENU Settings menu on off see p 10 VOL Volume Press or to adjust the volume MUTE Interrupt the sound or restore it A CH Press to a...

Page 8: ...Wide screen Automatic makes the picture fill the screen as much as possible Super zoom removes the black bars on the sides of 4 3 programs with minimal distortion When in Movie expand 14 9 Movie expand 16 9 or Super zoom picture format you can make subtitles visible with the cursor up down Note With HD sources not all screen formats will be available FAVORITES VIEW To display a list of all channel...

Page 9: ...When a letter or number has been entered the cursor automatically advances to the next character position after the specified time out or by pressing the cursor right Also the cursor up down can be used to enter alphanumeric information When finished press the OK button to confirm the entry Move to the left panel 1 space Ò 1 space Ò 1 etc 2 a b c A B C 2 a b c etc 3 d e f D E F 3 d e f etc 4 g h i...

Page 10: ... associated with the currently selected channel in the left panel the right panel will remain empty Multimedia Contains the locally connected devices on which content pictures audio files is stored See Multimedia browser p 26 Should your remote be lost or broken you can still change some of the basic settings with the buttons on the right side of your TV Press the power switch B to switch the TV o...

Page 11: ...r the right panel The content of the right panel is moved to the left panel and the right panel shows the content of the newly highlighted item in the left panel Note In some cases it is important that the picture can be watched while adjusting the settings This means that when the highlight is on the right side panel the other menu items hide away When the cursor left is pressed again the hidden ...

Page 12: ...nna signals and will search for antenna TV NTSC and ATSC channels available in your local area When Cable is selected the TV will detect cable company supplied signals and will search for cable TV NTSC ATSC QAM modulated channels available in your area Make sure that registration with your cable TV provider and connection of equipment are completed Press the green button Next on the remote control...

Page 13: ...m channels under a single major channel number which can be selected by pressing the digit remote control direct acces channel number entry Important After the installation of the TV channels has been done always make a selection in the Installation menu between Antenna or Cable whether you want to watch Antenna TV channels or Cable TV channels If you make use of a signal splitter do not forget to...

Page 14: ...r Dual screen with the cursor up down Now when the PIP button on the remote control is pressed and when PIP is selected the TV shows a full screen of video with a pip window of video on top of it Dual screen is selected the TV splits the screen into two equally sized screens Press the cursor left right to highlight the PIP window or the left right screen in Dual screen Press the CH PAGE button to ...

Page 15: ...ansmitted T 1 2 3 or 4 Often used for channel guide schedules bulletin board information for Closed Captions programs news weather informations or stock market reports Not all Caption services are necessarily being used by a TV channel during the transmission of a Closed Caption program See Closed Caption in the TV Features menu see p 22 to turn the Caption service On or Off Note This television p...

Page 16: ...lt Automatic Small Standard or Large and press the OK button to confirm Style Select this option to select the font style of caption display according to your own preference Select Default Monospaced serif Serif Monospaced sans serif Sans serif Casual Cursive or Small caps Text Select this option to select the text color or the opacity of the text box of caption display according to your own prefe...

Page 17: ...rd allows a cable operator to disseminate emergency alert information related to state and local level emergencies and warnings in a cost effective and efficient way while minimizing disruption of programming An Emergency alert message will have one of the following priorities Low Medium High or Maximum The Emergency alert message with priority High or Maximum will always be presented Low or Mediu...

Page 18: ...ed the source type e g DVD this source will automatically be selected when your remote control is in DVD mode see p 6 and when you press the AV button on the remote control Digital Audio Select Digital Audio In when the TV expects digital audio for a connected device to come from a Digital audio input Make your selection of the source to which the device with digital audio input has been connected...

Page 19: ...lock mode is set to Manual With the cursor buttons select and enter the correct time and day If Auto clock mode Manual has been selected and no clock search has been done the system will keep the entered time and day Time zone only available when Auto clock mode is set to Automatic This function allows you to select your local time zone Broadcasted time information will correct the clock display f...

Page 20: ...ARD You may also be able to order call ahead pay per view events Note do not insert a PCMCIA card into the CableCARD interface slot Insert your CableCARD é Select CableCARD applications in the Settings menu Press the cursor right to enter the list of available CableCARD applications offered by the cable provider A CableCARD application is initiated when you select an application item and when you ...

Page 21: ... the one that best suits your own viewing conditions Most consumers will find that Natural is the correct choice Contrast This will adjust the intensity of bright parts in the picture but keep the dark parts unchanged Brightness This will adjust the light output of the complete picture which will mainly affect the darker areas of the picture Color This will adjust the saturation level of the color...

Page 22: ... the cursor right é Select On or Off in order to activate de activate Color enhancement with the cursor right Tint Allows you to select the color mix hue of the picture Picture format This menu item performs the same as the FORMAT button on the remote control See Use of the remote control p 6 Active Control The TV continuously measures and corrects all incoming signals in order to provide the best...

Page 23: ... to obtain the best stereo reproduction for your listening position Headphone volume This controls the level of sound through the headphones Sound mode This selects the modes for more spatial or surround sound reproduction dependent on the broadcast signals or signals from external inputs received Alternate audio only selectable with analog broadcast signals This gives you the possibility to swap ...

Page 24: ...p 14 This text can either be permanently displayed assuming that the service is available in the broadcast or only when mute is active Press the cursor right after having selected Closed captions é Select On Off or On during mute Sleeptimer This sets a time period after which the TV automatically turns to standby Select Sleeptimer é Press the cursor right Select a value with the cursor up down The...

Page 25: ... ratings lock Your TV is equipped with a V chip This allows you to control access to individual programs based on their movie and TV ratings All settings apply to all AV inputs except HDMI The program content advisory data are sent by the broadcaster or program provider Select TV ratings lock with the cursor down A list appears showing the age based TV ratings and a corresponding content based rat...

Page 26: ...strong language TV 14 programs contain elements that may not be suitable for children under 14 years of age These programs include one or more of the following intense violence intense sexual situations suggestive dialogue and strong language TV MA programs are designed to be viewed by adults and may be unsuitable for children under the age of 17 These programs may contain graphic violence explici...

Page 27: ... item is selected When any other item has been selected all ratings below are selected as well thus all movies with those ratings will be locked Preferred channels A channel when installed is marked as preferred by default and added to the channel list This feature provides the ability to remove a channel number from the channel list Select Preferred channels with the cursor down é Press the curso...

Page 28: ...ect see the manual of your camera Philips cannot be responsible if your USB device is not supported Viewing content from a USB device Inserting a USB device Note USB devices are not supplied with this TV Insert a USB device in the USB connector at the left side of the TV When a USB device is inserted the Multimedia browser menu is displayed automatically see further If your USB device does not fit...

Page 29: ...he USB device under Multimedia with the cursor up down The Multimedia browser will allow the user to browse content stored on the inserted USB device Press the cursor right The 2 panel browser will be shown with the left panel containing the content types Music Picture The right panel will display the content that is available of the selected content type Press the cursor up down to select a conte...

Page 30: ...V3 YPbPr and Digital Audio Side VIDEO or S VIDEO and L R Audio L Pr H R Pb V DIGITAL AUDIO IN Y Pr Pb L Y R S VIDEO S VIDEO AV2 AV3 AV1 VIDEO VIDEO Cable CARD INTERFACE HDMI HDMI 1 2 ANTENNA CABLE 75 Cable CARD INTERFACE HDMI HDMI 1 2 ANTENNA CABLE L Pr H R Pb V Y R L Pr Pb L Y R S VIDEO S VIDEO AV2 AV3 MONITOR OUT AV1 VIDEO IROUT VIDEO DIGITAL AUDIO OUT VIDEO 75 DIGITAL AUDIO IN R L MONITOR OUT V...

Page 31: ...al splitter and or Cable TV converter box 1 to the RF IN socket of your recorder é Connect another RF cable 2 from the output OUT of your recorder to the TV s CABLE ANTENNA 75 Ω x jack Better playback quality can be obtained if you also connect the Video Audio Left and Right only for stereo devices AV cables 3 to the VIDEO AUDIO L and R input jacks of AV2 If your recorder has an S VHS video jack F...

Page 32: ...ecorder p 33 Connect the RF antenna cable 1 of the RF IN socket of your other AV device é Connect the RF output of the AV device to the RF input of the recorder 2 Connect another RF cable 4 from the output OUT of your recorder to the TV s input CABLE ANTENNA 75 Ω x jack To obtain better quality also connect theVideo or S Video Audio left and Audio right cables of both devices to AV1 VIDEO or S VID...

Page 33: ...3 Use an optional signal splitter é Connect one of the cable TV signal splitter outputs 1 to the cable box s IN jack Connect the other cable TV signal splitter output 2 to the CABLE ANTENNA 75 Ω x plug on the bottom of the TV Connect the cable box s OUT jack 3 to the recorders RF IN socket Connect the Video Audio Left and Right only for stereo sound recorder AV cables 4 to the VIDEO audio L and R ...

Page 34: ... AV1 jacks as described above Connect another RF cable 3 from the output out of your recorder to the TV s input CABLE ANTENNA x jack Connect the satellite antenna cable or the Cable TV cable 1 to the satellite receiver s or cable box s IN jack é Connect the Video Audio left and right AV cables 2 to the VIDEO L and R audio input jacks of AV1 If your satellite receiver or cable box has an S Video ja...

Page 35: ... R Pb BY G input 1 jacks and to the H and V jacks of AV1 2 é Connect the audio cables to the L and R AUDIO jacks of AV1 3 Devices with an S Video connector Connect an S Video cable to the AV1 or AV2 S VIDEO input 1 Note When using the S VIDEO connector do not connect any device to the AV VIDEO input that you are using é Connect the audio cables to the device s AUDIO L and R jacks and to the L and ...

Page 36: ...20 x 480i Enhanced Definition TV EDTV 640 720 x 480p High Definition TV HDTV 1920x1080i 1280x720p PC VGA 640x480 60 Hz SVGA 800x600 60 Hz XGA 1280x768 60 Hz Notes If necessary you can adjust the picture position to the center of the screen with the cursor keys Due to legal requirements it is possible that with certain copy protected PCM audio qualities from a device connected to the HDMI input the...

Page 37: ...input 1 and AUDIO inputs 3 Do not connect cable 1 and 2 at the same time This may cause picture distortion Headphone Insert the plug into the headphone socket L as shown é Press the MUTE button on the remote control to switch off the internal loudspeakers of the TV The headphone impedance must be between 8 and 4000 Ohm The headphone socket has a 3 5 mm jack In the Sound menu select Headphone volum...

Page 38: ...quires the user to be notified that any changes or modifications made to this device that are not expressly approved by Philips Consumer Electronics may void the user s authority to operate the equipment Cables Connections to this device must be made with shielded cables with metallic RFI EMI connector hoods to maintain compliance with FCC Rules and Regulations Canadian notice This Class B digital...

Page 39: ...uency AMP cursor up down to select the next or the previous disc CD cursor left right to select the previous or following track CD Notes If no action is being undertaken within 60 seconds the remote control returns to TV mode After an action in the selected system mode the remote control will remain in this mode for 60 seconds and will then return to TV mode or press the SELECT button to return to...

Page 40: ...e picture position to the center of the screen with the cursor left right or up down buttons on the remote control This may be needed due to slight differences in output signals from different brands and types of HD sources boxes Notes Most High Definition receiver boxes also have picture positioning controls in their menu systems If the TV cursor controls run out of range before the picture is co...

Page 41: ...roduct number which you can find at the back of your television set ready before calling Care of the screen Do not touch push or rub or strike the screen with anything hard as this may scratch mar or damage the screen permanently And please do not rub with dust clothes with chemical treatment Do not touch the surface with bare hands or greasy cloth some cosmetics are detrimental to the screen Unpl...

Page 42: ...able memory is supported New software can be obtained from your dealer or can be downloaded from the www philips com support website Go to www philips com support using the web browser on your PC é Follow the procedure to find the information and the software related to your TV Select the latest software upgrade file and download it to your PC Decompress the ZIP file and copy the file autorun upg ...

Page 43: ...re Automatic software upgrade procedure Power off your TV and remove all memory devices é Insert the USB portable memory that contains the downloaded software upgrade Switch on your TV with the POWER button on your remote control At startup the TV will scan the USB portable memory until it finds the update content The TV will automatically go to the upgrade mode After a few seconds it will display...

Page 44: ...ortable memory Select the slideshow file and press the OK button to start the slide show To stop a slide show press the button General Rules The slideshow will use plain ASCII XML syntax to allow the creation and editing of the slideshow files using simple tools All references to network content must be based on the global address of the content Content on a Portable Memory PM doesn t have a globa...

Page 45: ...ag The TV application can force the use of one or multiple predefined display times Identifies the slides to show Identifies the URL of the individual slide Supported XML tags The following table gives a description of the XML syntax xml version 1 0 encoding ISO 885h9 1 philips slideshow version 1 0 title Philips AlbumFile title audio Music Nature mp3 audio slide duration 50 slide duration slides ...

Page 46: ...a and the TV isn t working you can try the solutions below to resolve your problem Make sure your digital camera is switched on and verify if the configuration of your digital camera is correct see the manual of your digital camera for more information Some digital cameras allow you to switch off the USB interface Make sure that the USB interface is switched on before connecting to the TV If you h...

Page 47: ...of receipt can be provided A product used for commercial or institutional purposes including but not limited to rental purposes Product sold AS IS or RENEWED CARRY IN SHIP IN WARRANTY For Carry In warranty repair take the product to a Philips authorized service center for repair When the product has been repaired you must pick up the unit at the center For Ship In warranty repair ship the product ...

Page 48: ...46 ...

Reviews: