background image

3139 246 14854

English

13

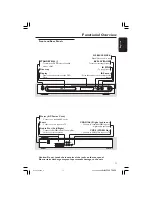
OPEN/CLOSE

STOP

STOP

PLAY/

PLAY/PAUSE

PAUSE

IR

DVD VIDEO / CD

S

TANDBY

-

ON

Getting Started

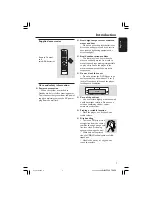
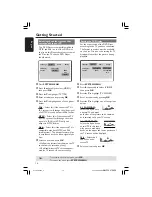
Step 1:  Inserting batteries into
the Remote Control

1

3

2

1

Open the battery compartment.

2

Insert two batteries type R03 or AAA,
following the indications (

+-

) inside

the compartment.

3

Close the cover.

Using the Remote Control to
operate the Player

1

Aim the Remote Control
directly at the remote
sensor (iR) on the front
panel.

2

Do not put any objects
between the Remote
Control and the DVD
Player while operating the
DVD Player.

CAUTION!
– Remove batteries if they are
exhausted or if the Remote Control
is not being used for a long time.
– Do not use old and new or
different types of batteries in
combination.
– Batteries contain chemical
substances, so they should be
disposed properly.

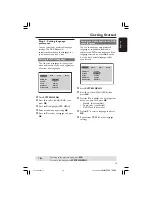
Step 2:

Setting up the TV

IMPORTANT!

Make sure you have completed all
the necessary connections. (See
page 8-9 “Connecting TV”).

1

Turn on the TV and set to the correct
video-in channel.  You should see the DVD
background screen on the TV.

2

Usually these channels are between the
lowest and highest channels and may be
called FRONT, A/V IN, or VIDEO. See your
TV manual for more details.

Or, you may go to channel 1 on your

TV, then press the Channel down button
repeatedly until you see the Video In
channel.

Or, the TV Remote Control may have a

button or switch that chooses different
video modes.

Or, set the TV to channel 3 or 4 if you

are using an RF modulator.

3

If you are using external equipment, (eg.
audio system or receiver), turn it on and
select the appropriate input source for
the DVD Player output. Refer to the
equipment owner’s manual for detail.

01-30 xDV430_4

23/12/2004, 5:42 PM

13

Summary of Contents for 430

Page 1: ...3139 246 14854 Model 430 DVD VIDEO PLAYER User Manual Manuel de l utilisateur Bedienungsanleitung Gebruiksaanwijzingen Manual del usuario 01 30 xDV430_4 23 12 2004 5 42 PM 1 ...

Page 2: ...tral N brown live L As these colours may not correspond with the colour markings identifying the terminals in your plug proceed as follows Connect the blue wire to the terminal marked N or coloured black Connect the brown wire to the terminal marked L or coloured red Do not connect either wire to the earth terminal in the plug marked E or e or coloured green or green and yellow Before replacing th...

Page 3: ...aget SF Luokan 1 laserlaite Varoitus Laitteen käyttäminen muulla kuin tässä käyttöohjeessa mainitulla tavalla saattaa altistaa käyttäjän turvallisuusluokan 1 ylittävälle näkymättömälle lasersäteilylle Oikeus muutoksiin varataan Laite ei saa olla alttiina tippu ja roiskevedelle Huom Toiminnanvalitsin on kytketty toisiopuolelle eikä se kytke laitetta irti sähköverkosta Sisäänrakennettu verkko osa on...

Page 4: ...your DVDVIDEO player and enter below the Serial No Retain this information for future reference Model No 430 Serial No _______________ Environmental Information All unnecessary packaging has been omitted The packaging has been made easy to separate into three materials cardboard box polystyrene foam buffer and polyethylene bags protective foam sheet Your DVD player consists of materials which can ...

Page 5: ...ING SYNLIG OCH OSYNLIG LASERSTRÅLNING NÄR DENNA DEL ÄR ÖPPNAD BETRAKTA EJ STRÅLEN VARO AVATTAESSA OLET ALTTIINA NÄKYVÄLLE JA NÄKYMÄTTÖMÄLLE LASER SÄTEILYLLE ÄLÄ KATSO SÄTEESEEN VORSICHT GEFAHRVON SICHTBARER UND UNSICHTBARER LASERSTRAHLUNG BEI GEÖFFNETEM GEHÄUSE ATTENTION RAYONNEMENT LASERVISIBLE ET INVISIBLE EN CAS D OUVERTURE EXPOSITION DANGEREUSE AU FAISCEAU English 6 Français 31 Nederlands 57 E...

Page 6: ...o Subtitle and DVD menu language 15 Disc Operations Playable Discs 16 Region Codes 16 Playing discs 17 Using Disc Menu 17 Basic playback controls 18 19 Pausing playback 18 Selecting track chapter 18 Resuming playback from the last stopped point 18 Zoom 18 Repeat 18 Repeat A B 18 Slow Motion 19 Forward Reverse Searching 19 Preview 19 Special DVD features 20 Selecting aTitle 20 Camera Angle 20 Chang...

Page 7: ...isc Leave the player in the warm environment until the moisture evaporates Do not block the vents Do not operate the DVD Player in an enclosed cabinet allow about 2 5 cm 1 inch of free space all around the player for adequate ventilation 2 5 cm 1 inches 2 5 cm 1 inches 2 5 cm 1 inches PHILIPS Care of the cabinet Use a soft cloth slightly moistened with a mild detergent solution Do not use a soluti...

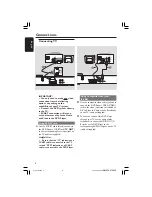
Page 8: ... supplied Helpful Hint Ensure that the TV indication on SCART cable is connected to theTV set and DVD indication on SCART cable is connected to the DVD Player AUDIO IN V Pr Cr U Pb Cb Y S VIDEO IN VIDEO IN COMPONENT VIDEO IN AUDIO OUT V Pr Cr U Pb Cb Y S VIDEO IN VIDEO IN COMPONENT VIDEO IN 2 1 Using CompositeVideo jacks CVBS 1 Use the composite video cable yellow to connect the DVD Player s CVBS ...

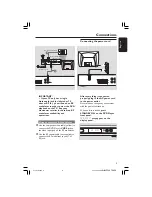
Page 9: ...F modulator to your TV s RF jack AUDIO IN R L VIDEO IN TO TV INT IN CH3 CH4 2 1 RF coaxial cable to TV Back of RF Modulator example only Antenna or Cable TV signal AUDIO IN S VIDEO IN VIDEO IN SCART RGB IN AC MAINS AUDIO OUT V Pr Cr U Pb Cb Y S VIDEO IN VIDEO IN COMPONENT VIDEO IN After everything is connected properly plug in the AC power cord to the power outlet Never make or change any connecti...

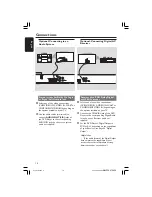
Page 10: ...al AV Receiver AUDIO IN COAXIAL OPTICAL AV Receiver Receiver has a PCM Dolby Digital or MPEG2 decoder 1 Select one of the video connections CVBSVIDEO IN S VIDEO IN SCART or COMPONENTVIDEO IN depending on the options available on your TV 2 Connect the COAXIAL jack of the DVD Player to the corresponding Digital Audio In jack on your Receiver cable not supplied 3 Set the DVD Player s Digital Output t...

Page 11: ... Scart Connect to Scart input of aTV Audio Out Left Right Connect toAUDIO inputs of an amplifier receiver or stereo system OPEN CLOSE Open Close the disc tray 2 PLAY PAUSE To start or interrupt playback 9 STOP To stop playback IR Sensor Point the remote control towards this sensor STANDBY ON B To switch the DVD Player to Standby mode or ON Disc tray Display Shows the current status of the DVD Play...

Page 12: ...odes REPEAT A B Repeats playback a specific section on a disc AUDIO To access audio language system menu PREVIEW To search chapter track during playback MUTE Disables or enables sound output DISPLAY Displays information onTV screen during playback T To search or select next chapter or track PAUSE To pause playback temporarily frame by frame playback 1 2 3 4 Selects an item in the menu fast forward...

Page 13: ...in chemical substances so they should be disposed properly Step 2 Setting up theTV IMPORTANT Make sure you have completed all the necessary connections See page 8 9 ConnectingTV 1 Turn on the TV and set to the correct video in channel You should see the DVD background screen on the TV 2 Usually these channels are between the lowest and highest channels and may be called FRONT A V IN orVIDEO See yo...

Page 14: ... Follow the instructions show on the TV to confirm the selection if any If a blank distortedTV screen appears wait for 15 seconds for auto recovery Getting Started TIPS To return to the previous menu press OK To remove the menu press SYSTEM MENU Setting theTV Display Set the aspect ratio of the DVD Player according to the TV you have connected The format you select must be available on the disc If...

Page 15: ... and press OK Getting Started Setting the Audio Subtitle and DVD menu language You can choose your own preferred language or soundtrack from audio subtitles and DVD menu languages If the language selected is not available on the disc the disc s default language will be used instead Language OSD Menu Subtitle Audio DVD Menu DivX Subtitle Audio Rating Video English Off English English Standard 1 Pre...

Page 16: ...ccurate motion compensation Global Motion Compensation GMC playback Helpful Hints It may not be possible to play CD R RW or DVD R RW in all cases due to the type of disc or condition of the recording If you are having trouble playing a certain disc remove the disc and try a different one Improper formatted disc will not play on this DVD Player TIPS The operating features described here might not b...

Page 17: ...e TV see Using the Disc Menu If the disc is locked by parental control you must enter your four digit password See page 25 6 At any time simply press STOP to stop playback Disc Operations Using the Disc Menu Depending on the disc a menu may appear on the TV screen once you load the disc To select a playback feature or item Use the 1 2 3 4 or numeric keypad 0 9 on the Remote Control then press PLAY...

Page 18: ...from the last point Press STOP 9 to cancel the resume mode Repeat DVD VCD Press REPEAT continuously to choose a Repeat mode during playback REPEAT CHAPTER DVD to repeat playback of the current chapter REPEAT TITLE DVD to repeat playback of the current title REPEAT SINGLE VCD to repeat playback of the current track REPEAT ALL VCD to repeat playback of all the disc OFF DVD VCD to cancel the repeat m...

Page 19: ...playback to select the required speed 1 2 1 4 1 8 or 1 16 backward or forward Sound will be muted 2 To return to normal speed press PLAY B Preview DVD VCD The Time Search function allows you to start playing at any chosen time on the disc 1 Press PREVIEW 2 Use 1 2 keys to select an option 3 Enter hours minutes and seconds from left to right in the time edit box using remote control numerical key p...

Page 20: ...guage For DVD Press AUDIO repeatedly to select different audio languages Subtitles Press SUBTITLE repeatedly to select different subtitle languages Playing a DivX disc This DVD player supports the DivX movie playback that you download from your computer onto a CD R RW see page 26 for more information 1 Load a DivX disc Playback will start automatically If not press PLAY B 2 If the DivX movie conta...

Page 21: ...rs on the top left hand corner on the TV screen Playback selection During playback you can Press S T to select another file in the current folder Use 1 2 3 4 on the remote to rotate flip the picture files Press B repeatedly to pause resume playback Playing MP3 JPEG Picture CD This player can playback MP3 JPEG or Picture CD files on a personally recorded CD R RW disc or commercial CD IMPORTANT You ...

Page 22: ...reen For details see page 15 Audio Subtitle DVD Menu These menus contain various language options for audio subtitle and DVD menu which may be recorded on the DVD disc For details see page 15 Setting the DivX Subtitle font You can set the font type that supports the recorded DivX subtitle 1 In LANGUAGE press OK to enter the submenu 2 Press 3 4 to highlight DIVX SUBTITLE 3 Enter its submenu by pres...

Page 23: ...ighlight one of the options below OFF Turn off the digital output ALL If you have connected your DIGITAL AUDIO OUT to a multi channel decoder receiver PCM Only if your receiver is not capable of decoding multi channel audio 4 Select an item and press OK Helpful Hint If DIGITAL OUTPUT is set to All all audio settings except MUTE are invalid Video Setup 1 Press SYSTEM MENU 2 Press 2 repeatedly to se...

Page 24: ...back a disc recorded at the sampling rate of 96kHz that can only be achieved in Stereo Classic mode 4 Select an item and press OK Helpful Hint LPCM Output can be selected only when PCM is activated Night Mode turning on off In this mode the high volume outputs are softened and low volume outputs are brought upward to an audible level It is useful for watching your favourite action movie without di...

Page 25: ...n the disc This feature lets you set a playback limitation level The rating levels are from 1 to 8 and are country dependent You can prohibit the playing of certain discs that are not suitable for your children or have certain discs played with alternative scenes 1 In RATING press OK to enter the submenu 2 Press 3 4 to highlight RATING then press OK to sel ect a rating level for the disc inserted ...

Page 26: ...sonal settings to the factory defaults and all your personal settings will be erased 1 In RATING press OK to enter the submenu 2 Press 3 4 to highlight DEFAULT then select RESET 3 Press OK to confirm All settings will now reset to factory defaults DivX registration This DVD Player provides you the DivX VOD Video On Demand registration code that allows you to rent and purchase videos using the DivX...

Page 27: ...ANCE DA Converter 24 bit 192 kHz DVD fs 96 kHz 4Hz 44kHz fs 48 kHz 4Hz 22kHz CD VCD fs 44 1kHz 4Hz 20kHz Signal Noise 1kHz 90 dB Dynamic range 1kHz 90 dB Crosstalk 1kHz 100 dB Distortion noise 1kHz 80 dB MPEG MP3 MPEG Audio L3 CONNECTIONS Scart Output Euroconnector Video Output Cinch yellow Audio Output L R Cinch white red Digital Output 1 coaxial IEC60958 for CDDA LPCM IEC61937 for MPEG 1 2 Dolby...

Page 28: ... DVD Player sTVType is set to match that of the Disc and yourTV No sound or distorted sound Adjust the volume Check that the speakers are connected correctly No audio at digital output Check the digital connections Check if your receiver can decode MPEG 2 or DTS and if not please make sure the digital output is set to PCM Check if the audio format of the selected audio language matches your receiv...

Page 29: ...ay not be permitted by the disc operating commands during playback Refer to the instructions of the disc jacket DVD Player cannot read Use a commonly available cleaning CD DVD to CDs DVDs clean the lens before sending the DVD Player for repair Menu items cannot be selected Press STOP twice before selecting System Menu Depending on the disc availability some menu items cannot be selected Unable to ...

Page 30: ...nnels of digital audio front left and right surround left and right center and subwoofer JPEG A very common digital still picture format A still picture data compression system proposed by the Joint Photographic Expert Group which features small decrease in image quality in spite of its high compression ratio MP3 A file format with a sound data compression system MP3 is the abbreviation of Motion ...

Reviews: