background image

3

P

RODUCT

H

IGHLIGHTS

Active Control, APAC, Easy Tune, and Incredible Surround are trademarks of Philips Consumer Electronics North America. IntelliSense is a
registered trademark of Philips Consumer Electronics North America. Copyright 2002 Philips Consumer Electronics. 
*Manufactured under license from Dolby Laboratories. “Dolby” and the double-D symbol are trademarks of Dolby Laboratories.

Philips HD Pix optics system 

answers the demand for extreme resolution HD with cutting-edge processing and display tech-

nology, including microphosphor CRTs, hybrid projection lenses, first-surface mirrors, fine-pitched lenticular screens, and Philips
wideband amplifier.

Auto IntelliSense

®

Focus 

Automatically adjusts the picture convergence at the push of a key. After reviewing a special test pat-

tern, optical sensors send position information to the controller, which then corrects the picture. Auto IntelliSense

®

Focus responds to

the natural and man-made magnetic field conditions where the projection TV is located, so you always enjoy the best possible pic-
ture.

100Hz Digital Scan 

eliminates picture flickering and line jitter, offering a stable picture for relaxed viewing (no eye strain). The

100Hz digital scan option can be selected in the onscreen menu.

Progressive Scan 

doubles the number of visible picture lines per field by displaying all picture frame lines at once. This mini-

mizes the visibility of the scan lines. The progressive scan option can be selected in the onscreen menu.

High-definition Inputs 

allow you to connect digital equipment with 1080i and 480p signals for 60Hz and 576p signals for 50Hz. The

AV4 sockets are for YPbPr or RGB+HV sync connections, plus audio. The AV5 sockets are for RGB (or YPbPr with adaptor) DB15 con-
nections, plus audio.

Component Video  Inputs 

support advanced video input—such as DVD video—for superb colour performance.

Active Control™

continuously measures and corrects all incoming signals with automatic digital noise reduction and auto sharp-

ness to provide the best possible picture.

Automatic Phosphor Aging Compensation (APAC™) 

functions like a screen saver for your TV. Nonmoving images

can be bad for a television screen. If a video image remains stationary, it can eventually leave a permanent after-image. Video games
and the stationary black bars around some movies are examples of sources of concern. Philips APAC technology addresses this prob-
lem. Periodically, APAC automatically shifts your television picture in increments that are very small and yet large enough to blur
image retention that can lead to screen burn. Coupled with the Philips Auto Screen Format feature, APAC helps provide you protec-
tion from the dreaded screen burn.

Protective Screen Filter (if provided; availability varies)

gives the best possible picture while still protecting your investment.

Specifically formulated by Philips for HD displays, this protective screen filter helps prevent accidental damage to the delicate front lenticu-
lar screen.

Dolby* Virtual Surround

uses two speakers to simulate the surround effect produced by a multichannel system.

Digital Comb Filter 

makes the finest colour details purer and sharper. It eliminates disturbing cross-colour (Moiré) effects

between different colours that you normally see with striped clothing worn on camera. The digital comb filter works by electronical-
ly separating the chroma (colour) and luminance (black and white) components of the TV signal, preventing cross-colour interfer-
ence.

Dual-window,Two-tuner Picture-in-picture (PIP) 

allows you to watch two shows, side by side. No video recorder is necessary

for tuning PIP pictures. Your set’s two separate tuners let you select two shows and display both in windows of equal proportion.

Supporting Features

Digital Colour Transient Improvement (CTI)

Digital Histogram

Picture Freeze

Auto Aspect Ratio Adaptation (and 16:9 compress, expand 4:3)

Incredible Surround™

Automatic Volume Leveler (AVL)

Independent Headphone Volume Control

Easy Tune™ (Auto Search, Auto Tune, and Auto Install)

Alternate Channel

Smart Surf

Low-power standby (<1 W)

Summary of Contents for 43PP8421

Page 1: ...Rear projection Rear projection HDTV Monitor HDTV Monitor 43PP8421 ...

Page 2: ...n the red light below the TV screen is flashing continuously a bright white line is displayed across the screen cleaning the TV screen never use abrasive cleaning agents use a slightly damp chamois leather or soft cloth a lightning storm is occurring the set is left unattended for a prolonged period Never attempt to repair a defective TV yourself Always consult a skilled service person Battery Usa...

Page 3: ...nals with automatic digital noise reduction and auto sharp ness to provide the best possible picture Automatic Phosphor Aging Compensation APAC functions like a screen saver for your TV Nonmoving images can be bad for a television screen If a video image remains stationary it can eventually leave a permanent after image Video games and the stationary black bars around some movies are examples of s...

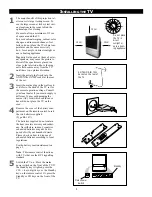
Page 4: ... the rear of the set 3 Insert the mains plug in the wall sock et Refer to the back of the TV set for the correct operation voltage Consult your local dealer if your main supply is different To prevent damaging the mains AC cord which could cause hazard do not place the TV on the cord 4 Remove the cover of the battery com partment on the remote control Insert the two batteries supplied Type R6 1 5V...

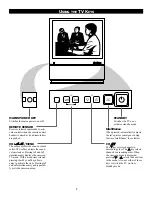
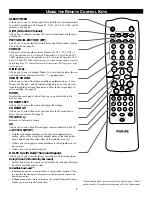
Page 5: ...a menu item selected pressing the A or A key allows entry to activate the item Pressing A and A simultaneously and repeated ly exits the onscreen menu CH fi fi The fi fi key selects channels in descending order The key selects channels in ascending order When the onscreen menu is displayed pressing fi fi or selects the next item in the menu Also use either of these keys to switch the TV on from Standby ...

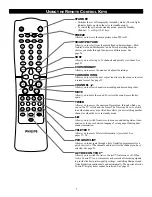
Page 6: ...ain menu Also allows you to go backwards in the menu system CURSOR LEFT Allows you to access the menus and adjust the settings CURSOR UP Allows you to select the next or previous item in the menu and to select a screen format See page 22 VOLUME Increases or decreases volume AV Allows you to select the different signal sources connected to the TV i STATUS EXIT Displays the channel number sound and ...

Page 7: ... sound press the key again TIMER Allows you to access the onscreen Timer menu through which you can set the TV s clock and the Timer The Timer can be set to switch to another channel at a specified time while you are watching another channel or when the set is in standby mode I II Allows you to switch from stereo to mono sound during stereo trans mission or to choose between language I or language...

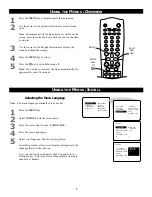
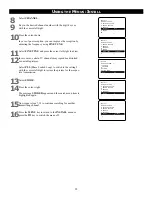
Page 8: ... by model 1 Press the MENU key 2 Select INSTALL with the cursor down 3 Press the cursor right to select LANGUAGE 4 Press the cursor right again 5 Select your language with the cursor up down From this point on all onscreen displays will appear in the language that you have chosen Now you can search for and store the TV channels in two different ways with Auto Store or Manual Store tuning in channe...

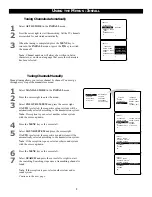
Page 9: ...NU key or the cursor left 5 Select SOUND SYSTEM and press the cursor right If AUTO is selected the respective sound system will be automatically selected according to the transmission system Note If the reception is poor select another sound system with the cursor up down 6 Press the MENU key or the cursor left 7 Select SEARCH and press the cursor left or right to start the searching Searching sto...

Page 10: ...espec tive transmission 13Select STORE 14Press the cursor right The message STORED appears and the search menu item is highlighted again 15Now repeat steps 7 14 to continue searching for another transmitting channel 16Press the MENU key to return to the INSTALL menu or press the m key to switch the menu off 10 USING THE MENUS INSTALL INSTALL MANUAL STORE COLOUR SYSTEM SOUND SYSTEM SEARCH CHANNEL 1...

Page 11: ...umn you want to swap to 6 Press the cursor down and select EXCHANGE 7 Press the cursor right The message EXCHANGED appears and the selected channels are exchanged 8 Repeat steps 3 7 until all TV channels are allocated as you like 9 Press the MENU key to return to the INSTALL menu or press the m key to switch the menu off USING THE MENUS INSTALL INSTALL LANGUAGE FROM AUTO STORE TO MANUAL STORE EXCH...

Page 12: ... up down 4 Press the cursor right to skip the selected channel The message SKIPPED is displayed 5 Press the cursor up down to select another channel and repeat step 4 6 Press the cursor left or the MENU key to return to the INSTALL menu or the m key to switch the menu off Note To add back channels to the list repeat steps 1 4 and press the m key to switch the menu off USING THE MENUS INSTALL INSTA...

Page 13: ...STALL menu 3 Press the cursor right to enter the menu 4 Key in the selected character with the cursor up down 5 Move to the next character with the cursor right and key in the next character You can key in up to a maximum of five characters 6 Press the MENU key to store the named channel USING THE MENUS INSTALL INSTALL AUTO STORE MANUAL STORE SORT CHANNEL EDIT G NAME PERSONAL G G INSTALL AUTO STOR...

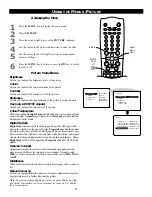
Page 14: ...f the picture ColourTemperature Offers the options Normal Warm and Cool Make your selection with the cursor left right Normal keeps whites white Warm makes whites reddish Cool makes whites bluish Digital Options Digital Scan eliminates picture flickering and line jitter offering a stable picture for relaxed viewing no eye strain Progressive doubles the number of visible picture lines per field by ...

Page 15: ......

Page 16: ...E BLUE Note If various images in the picture have red outlines select CONVERGE RED If various images in the picture have blue outlines select CONVERGE BLUE 3 Use the cursor right left up or down to adjust the cross hair until the color outline is gone The adjustment is auto matically saved in the TV s memory when you exit the adjust mode 4 Press the MENU key to return or the m key to switch the me...

Page 17: ...justments Select SAVE MULTIPOINT and press the cursor left or right To undo your multipoint adjustments Select UNDO MULTIPOINT and press the cursor left or right To restore the TV s picture convergence to factory settings select RESTORE FACTORY and press the cursor left or right 9 Press the MENU key to return or the m key to switch the menu off to Navigate EXIT to Adjust SAVE MULTIPOINT UNDO MULTI...

Page 18: ...VOLUME or BALANCE with the cursor up down 4 Press the cursor left right to adjust 5 Press the MENU key to return Accessing the Menu 1 Press the MENU key to display the main menu 2 Select SOUND with the cursor down 3 Press the cursor right to access the SOUND submenu 4 Use the cursor in the up down directions to select an item 5 Use the cursor in the left right directions to make adjust ments or se...

Page 19: ... 2 Press the cursor right to enter the Timer Setting the Timer 1 Press the cursor right again to enter TIME mode 2 Key in the current time with the digit keys You must use 24 hour or military time For example 2 15 p m is 14 15 If you entered an incorrect digit Complete the actual time with arbitrary numbers then start again 3 Press the cursor left to exit TIME mode Continue to the next page F PICT...

Page 20: ...ou want to activate the timer on the selected channel and the selected time every day or only once Displaying the Time 1 Select DISPLAY with the cursor down 2 Press the cursor right to select ON or OFF according to if you want to display the current time on the TV screen or not 3 Press the MENU key to return or the m key to switch the menu off USING THE MENUS FEATURES FEATURES TIMER TIME G START T...

Page 21: ...ed channel From now on the locked channel s can be accessed only via the remote control 5 Repeat steps 1 4 to unlock a locked channel To clear all locked channels at once select CLEAR ALL in the CHILD LOCK menu and press the cursor right The message CLEARED will appear 6 Press the MENU key to return or the m key to switch the menu off 21 USING THE MENUS FEATURES FEATURES TIMER ACCESS CODE CHILD LO...

Page 22: ...ifics to the right 4 3 format displays the 4 3 picture using the full surface of the screen AUTO format make the picture fill the screen as much as possible EXPAND 4 3 format expands movie images recorded in the letterbox format The black bars at the top and bottom of the screen are expanded thus filling the entire TV screen COMPRESS 16 9 allows you to show widescreen high definition video sources...

Page 23: ...that currently interest you You can have up to 10 chan nels in the SURF list Five channels are shown in the list at one time Cursor down up as necessary to see all the channels in the list 1 Select a channel you want to add to the Surf list 2 Press the SURF key 3 Cursor right to add the selected channel to the Surf list 4 Repeat steps 1 3 to add more channels to the Surf list 5 Press the m key to ...

Page 24: ... Emphasizes soft colours This option is desirable for playing com puter games Smart Sound Options Personal Sound settings are based on your preferences Voice Brings voices to the forefront emphasizing them Moves music to the background Music Emphasizes music over voices Theatre Provides a balance between voices and music Note The PERSONAL settings are the ones that you make using the PICTURE or SO...

Page 25: ...ore the TV will turn itself off An onscreen countdown will appear during the last minute before the TV switches off Ten seconds before the Sleep Timer switches the TV off GOOD BYE will be displayed on the TV screen Notes To see how many minutes remain before the TV shuts itself off press the m key Changing the channel or volume during the last minute of a Sleep Timer setting will cancel Sleep SLEE...

Page 26: ...time you press this key the PIP window moves to another corner of the main screen Freezing the PIP screen Press the r key The picture in the PIP window stands still Press the r key again to unfreeze the PIP screen Switching Screens Press the p key The main screen and the PIP window exchange places Selecting PIP Channels and External Sources Press the keys PIP CH UP DN to select a PIP TV channel or...

Page 27: ...le the precapturing of the page numbers referred to in the displayed page and the precapturing of all the subpages Switching Teletext on and off 1 Press the b b key to switch the teletext on The main index page appears on the screen together with two information lines at the top and one option line at the bottom of the screen 2 Press the b b key again to overlay the teletext page on the TV program...

Page 28: ...xt page is on screen Use the cursor left right to select the previous or the follow ing subpage With the y y Key Enter the subpage number yourself Press y Enter the desired subpage with the digit keys for example 3 for the third page of seven subpages The TV searches for the selected subpage To rotate subpages automatically Press y again to cancel the entered digit key for the sub page Now the sub...

Page 29: ... equipment having com ponent video outputs such as DVD players laser disc players video game players satellite receivers or other equipment Use the INPUT AV 1 L eft and R ight AUDIO sockets for sound connec tions 3 S VIDEO super video sockets compatible with 480i and 576i signals Use to connect peripherals having Super VHS S VHS outputs such as VCRs DVD players laser disc players video game player...

Page 30: ...h as digital set top boxes or DVD players with progressive scan capability You can connect equipment with YPbPr component video or RGB outputs to the AV4 sockets H and V Sync connections may or may not be required for RGB connections Use the AV4 L eft and R ight AUDIO sockets for sound connections See the handbook for the digital equipment you are connecting 2 AV5 use to connect digital equipment ...

Page 31: ...DEO and AUDIO L mono and R inputs of INPUT AV 2 Note In case of mono equipment only the left loudspeaker reproduces sound Use a mono to stereo adaptor not supplied for sound reproduction via the internal loudspeakers The MONITOR OUT connectors can be used for daisy chain ing or recording programmes from your TV See page 32 S VHS Video quality with an S VHS video recorder is obtained by connecting ...

Page 32: ... your TV does not disturb recording Recording a Programme onYourVideo Recorder Connected to MONITOR OUT from Audio Video Equipment Connected to AV1 AV2 or to the Sockets on the Side of theTV AV3 1 Switch on the equipment 2 Select the correct external source on your TV and on your video recorder 3 Set your video recorder to record You record what you are watching on the screen Do not switch channel...

Page 33: ...cables to the VIDEO and AUDIO L mono and AUDIO R input of the INPUT AV 2 sockets Note In case of mono equipment only the left loudspeaker reproduces sound Use a mono to stereo adaptor not supplied for sound reproduction via the internal loudspeakers 3 Connect the RF output of the A V peripheral equipment to the RF input on the video recorder 4 When a video recorder is not connected to MONITOR OUT ...

Page 34: ...efinition Inputs When you have digital equipment with 1080i or 480p signal output 60Hz or 576p signal output 50Hz connect it to the AV4 or AV5 inputs on your TV Examples of such equipment are digital set top boxes and progressive scan DVD players Connecting to AV4 Connect digital equipment with component video output usually labeled Y Pb Pr or with RGB output phono type connectors to the AV4 input...

Page 35: ...ono or both the AUDIO L and R for stereo Headphone 1 Insert the plug into the headphone socket at the right side of the TV 2 Press H on the remote control to switch off the internal loud speakers of the TV Notes The headphone impedance must be between 8 and 4000 Ohms The headphone socket has a 3 5 mm socket In the SOUND menu select HEADPHONE to adjust the head phone volume and balance G TYPICAL CA...

Page 36: ... audio cable from the SUBWOOFER output of the TV to the Low Level Input sockets on the powered subwoofer 5 Adjust volume for the surround sound amplifier and powered subwoofer at those pieces of equipment VIDEO S VIDEO L Pb Pr VIDEO S VIDEO L AUDIO L R AUDIO L R G Y R Pr B Pb V H SYNC L R AUDIO L R AUDIO AV4 480p 1080i 60Hz 576p 50Hz AV5 RGB 480p 1080i 60Hz 576p 50Hz INPUT AV 2 SUBWOOFER MONITOR O...

Page 37: ...ut you desire AV4 or AV5 2 Press the MENU key to display the menu 3 Press the cursor right to enter the INSTALL menu 4 Cursor down until the high definition input AV4 or AV5 is selected 5 The current colour space setting appears to the right of AV4 or AV5 To change the setting cursor left or right 6 Press the m key to switch the menu off 2 1 A V 4 A V 5 PICTURE LANGUAGE SOUND AUTO STORE FEATURES M...

Page 38: ...or to the side of theTV AV3 Press the AV key repeatedly to select AV1 CVI AV2 AV3 AV4 or AV5 according to where you connected your equipment at the back or the side of your TV Select CVI to view the playback of DVD discs if you used the INPUT AV 1 component video input sockets Y Pb Pr and AUDIO L mono and R inputs TV Channels Enter the channel number of the TV channel you want to watch with the di...

Page 39: ...the entire screen PLACEMENT OF THE TV See page 4 CLEANING To avoid possible shock hazard be sure the TV is unplugged from the electrical outlet before cleaning Regularly dust the TV with a dry nonscratching duster to keep the TV clean When cleaning the TV take care not to scratch or damage the screen surface Avoid wearing jewelry or using anything abrasive Do not use household cleaners Wipe the fr...

Page 40: ... again Be sure you have made connections correctly If you have connected digital equipment to the AV4 or AV5 sockets check the colour space setting on the equipment or TV and change the setting on either if necessary Check to be sure the TV is not placed too near speakers or magnetic objects Adjust the TV s convergence Horizontal dotted lines This may be caused by electrical interference from appl...

Page 41: ...installation 9 10 menu language 8 n naming channels 13 p picture adjustments 14 picture in picture pip 26 pip position 26 r recording 32 33 s screen format 22 sleeptimer 25 smart picture and smart sound 24 sorting channels 11 sound adjustments 18 stereo I II key 7 storing TV channels 9 10 S VHS 32 35 Switching the TV on 4 t teletext 27 28 troubleshooting before calling service 40 v video recorder ...

Page 42: ...UT AV 2 CVBS S Video and audio L R AV 4 YPbPr or RGB HV accepting 1080i and 480p 60Hz 576p 50Hz and audio L R AV 5 RGB or YPbPr with adaptor DB15 accepting 1080i and 480p 60Hz 576p 50Hz and audio L R ANTENNA IN 75Ω coaxial CENTER CHANNEL AMP INPUT and AMP SWITCH SUBWOOFER output Side AV3 CVBS S Video and Audio L R stereo headphone out 3 5 mm socket Reception Tuning system PLL Color transmission sy...

Page 43: ...s as a consumer In the event of difficulty please contact the Philips Information Centre in any country see enclosed addresses CONDICIONES DE GARANTIAS INTERNATIONALES Philips garantiza este producto durante 1 año a partir de la fecha de adquisición contra defectos debidos a una imper fecta fabricación o malos materiales Esta garantía cubre tanto las piezas de recambio como la mano de obra Las rep...

Page 44: ... Philips Electronics Ireland Ltd Newstead Clonskeagh Dublin 14 Phone 01 7640000 Fax 01 7640175 ITALY Philips S P A Servicio Consumatori Philips Piazza IV Novembre 3 I 20124 Milano Phone 167 820026 linea verde Fax 02 67522660 LUXEMBURG Philips Luxemburg S A 19 21 rte d Arlon L 8001 Strassen Phone 44 38 38 1 Fax 45 39 88 the NETHERLANDS Philips Consumenten Belangen Antwoordnummer 500 NL 5600VB Eindh...

Page 45: ...RGENTINA Philips Argentina S A Centro de Información al Usarío Vedia 3892 1430 Buenos Aires Phone 01 5442047 Fax 01 5452928 BRASIL Philips da Amazona Indústria Electrônica Ltda Rua Jacerú 151 Brooklin 04705 000 Sao Paulo SP Phone 800123123 Fax 011 5315973 CHILI Philips Chilena S A Avenida Santa Maria 0760 P O Box 2687 Santiago de Chile Phone 02 730 2000 Fax 02 777 6730 COLOMBIA Industrias Philips ...

Page 46: ... 021 4726839 Fax 021 4726843 Philips Authorized Service Centre 801 Dong Feng Road East Guangzhou 510080 Phone 020 7766990 Fax 020 7766990 Philips Authorized Service Centre Bejing Jing Pu Elec Service Station 6 F Guo Hu Department Store Xan Wu Men West Street Bejing 100053 Phone 01 3021589 Fax 01 3021589 Philips Authorized Service Centre 148 Fu Jian Road M Shanghai 200001 Phone 021 3281005 38275 Fa...

Page 47: ...44 PHILIPPINES Philips Electronics and Lighting Inc 106 Valero St Salcedo Village Makati Metro Manilla Phone 02 8100161 Fax 02 8173474 SINGAPORE Philips Singapore Private Ltd Consumer Service Dept Lorong 1 Toa Payoh P O Box 340 Singapore 319762 Phone 3502000 Fax 2508037 TAIWAN Philips Taiwan Ltd Consumer Products Division 4F 1 5 Lane 768 Pateh Rd Sec 4 P O Box 22978 Taipei Phone 02 7882856 Fax 02 ...

Page 48: ...48 ...
Reviews: