background image

6

C

ONNECTING THE 

A

UDIO

/V

IDEO  

S

OCKETS 

(P

LAYBACK

)

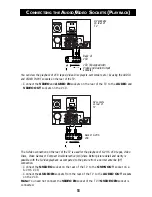
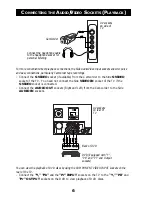
For more convenient direct playback connections, the Side Audio/Video Input sockets allow for quick
and easy connections, particularly Camcorder tape recordings.

– Connect the S-VIDEO socket (if available) from the Camcorder to the Side S-VIDEO

socket of the TV.  You need not connect the Side VIDEO IN socket of the TV if the
S-VIDEO socket is connected.

– Connect the AUDIO OUT sockets (Right and Left) from the Camcorder to the Side

AUDIO IN sockets.

You can view the playback of DVD discs by using the COMPONENT VIDEO INPUT sockets on the
rear of the TV.
– Connect the “Y,” “Pb” and the “Pr” INPUT sockets on the TV to the “Y,” “Pb” and

“Pr” OUTPUT sockets on the DVD to view playback of DVD discs.

Connect the headphone cable

to the headphone socket for

personal listening

Camcorder

AV sockets

on rear of

TV

Back of DVD

DVD (Equipped with “Y”,

“Pb” and “Pr” and Output

sockets)

OUT

AUDIO

Y

L

OUT

R

Pb

Pr

AV sockets

on side of

TV

Summary of Contents for 43PP925

Page 1: ...ProjectionTelevision 43 50 55 Instructions for Use 43PP925 50PP925 55PP925 3135 015 22191 ...

Page 2: ... FUNCTIONS OF TV CONTROLS 12 13 SELECTING THE MENU LANGUAGE TUNER MODE AND AUTOMATIC TUNING OF CHANNELS 14 FINE TUNING OF CHANNELS 15 EDITING OF CHANNELS 16 NAMING OF CHANNELS 17 USING THE PICTURE MENU 18 USING THE SOUND MENU 19 CONVERGENCE Converge Red Blue 20 Multipoint Red Blue 21 22 Undo Multipoint 23 ACTIVATING THE TIMER 24 25 ACTIVATING THE CHILD LOCK Access Code 26 Change Code 27 Lock Chann...

Page 3: ...be rectified if you know what to do Symptom What you should do Colour patch Switch off the TV by the mains power button Wait for 20 uneveness minutes before switching on again Check the TV is not placed too near speakers or magnetic objects No power Check the TV s AC power cord is plugged into the mains socket If there is still no power disconnect plug Wait for 60 seconds and re insert plug Switch...

Page 4: ...e wall socket For correct mains voltage refer to the type sticker at the rear of the set Note This diagram is not representative of the actual plug and socket Using the Remote Control Battery Usage CAUTION To prevent battery leakage which may result in bodily injury or damage to the remote Install ALL batteries correctly and as marked on the remote control Do not mix batteries OLD and NEW or CARBO...

Page 5: ...discs Better picture detail and clarity is possible with the S Video playback as compared to the picture from a normal antenna RF connection Connect the S VIDEO socket on the rear of the TV to the S VHS OUT socket on a S VHS VCR Connect the AUDIO IN sockets from the rear of the TV to the AUDIO OUT sockets on the VCR Note You need not connect the VIDEO IN socket of the TV if S VIDEO IN socket is co...

Page 6: ...DEO socket is connected Connect the AUDIO OUT sockets Right and Left from the Camcorder to the Side AUDIO IN sockets You can view the playback of DVD discs by using the COMPONENT VIDEO INPUT sockets on the rear of the TV Connect the Y Pb and the Pr INPUT sockets on the TV to the Y Pb and Pr OUTPUT sockets on the DVD to view playback of DVD discs Connect the headphone cable to the headphone socket ...

Page 7: ...ecording from one VCR to another VCR Connect the sockets of the VCR which you wish to record from to the corresponding sockets at either AV1 or AV2 Connect the sockets of the receiving VCR to the MONITOR OUTPUT sockets on the rear of the TV VCR Equipped with Video and Audio Input sockets AV sockets on rear of TV ANTENNA OUT IN OUT IN AUDIO R L VIDEO IN OUT ANTENNA OUT IN OUT IN AUDIO R L VIDEO IN ...

Page 8: ... speakers and the rear surround sound speakers to the receiver Note To use a receiver with Dolby Pro Logic or Dolby Digital with your TV the TV s AUDIO OUT control must be set to FIXED Refer to the sections on Using the Picture Menu and Using the Sound Menu You must have the AMP SWITCH on the rear of the TV in the EXT position for the center channel speakers to operate Rear of TV Front Speaker Fro...

Page 9: ... the R or L Low Level Input sockets Note If you use a single cable to make the connection to the powered subwoofer you will need to increase the volume on the back of the subwoofer to compensate for the absence of the second cable The powered subwoofer trim must be adjusted from the external powered subwoofer 90 150 Hz Crossover Frequency Volume 1 10 180o Phase 0o R L Low Level Input High Level In...

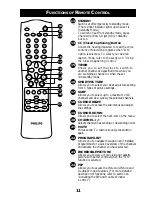
Page 10: ... menu from screen 7 CURSOR UP Allows you to select the next item on the menu 8 CURSOR LEFT Allows you to access the sub menus and adjust the settings 9 VOLUME Increases or decreases volume 10 A CH Allows you to alternate between the last viewed channel and the present channel 11 VIRTUAL DOLBY SURROUND Allows you to select Stereo Incredible Surround or Virtual Dolby Surround sound when transmission...

Page 11: ...ct your desired picture setting from 5 types of picture settings 17 SURF Allows you to select up to a maximum of 10 channels and view quickly the selected channels 18 CURSOR RIGHT Allows you to access the sub menus and adjust the settings 19 CURSOR DOWN Allows you to select the next item on the menu 20 CHANNEL Selects channel in ascending or descending order 21 MUTE Mutes sound To restore sound pr...

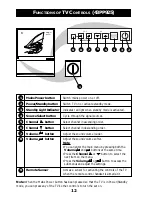
Page 12: ... activated 4 Source Select button Cycle through the signal sources 5 Channel button Select channel in ascending order 6 Channel button Select channel in descending order 7 Volume button Adjust the sound volume louder 8 Volume button Adjust the sound volume softer Note You can enter the main menu by pressing both the Volume and buttons at the same time Press the Channel or button to select the next...

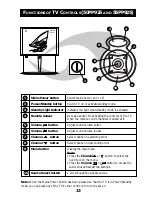
Page 13: ...ontrol handset is aimed at it 5 Volume button Adjust sound volume softer 6 Volume button Adjust sound volume louder 7 Channel button Select channel in ascending order 8 Channel button Select channel in descending order 9 Menu button Display the main menu Note Press the Channel or button to select the next item on the menu Press the Volume or button to access the sub menus and adjust the settings 1...

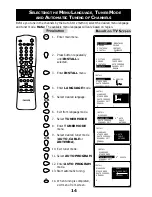
Page 14: ...ed tuner mode AUTO CABLE or ANTENNA 10 Exit tuner mode 11 Select AUTO PROGRAM 12 Enter AUTO PROGRAM mode 13 Start automatic tuning 14 When tuning is completed exit menu from screen I N S T A L L L A N G U A G E E N G L I S H T U N E R M O D E A U T O P R O G R A M C H A N N E L E D I T M A N U A L Ñ É É I N S T A L L L A N G U A G E E N G L I S H T U N E R M O D E A U T O P R O G R A M C H A N N E...

Page 15: ...s 9 Exit menu from screen MENU SURF MENU SURF MENU SURF OR É I N S T A L L L A N G U A G E F I N E T U N E T U N E R M O D E S T O R E A U T O P R O G R A M C H A N N E L E D I T M A N U A L Ñ É I N S T A L L M A N U A L F I N E T U N E 0 STORE Ñ É I N S T A L L M A N U A L F I N E T U N E STORE Ñ É I N S T A L L M A N U A L S T O R E F I N E T U N E STORE STORED Ñ É I N S T A L L M A N U A L F I ...

Page 16: ...s 1 to 5 as in Editing of Channels Select the channel you want to add back by the CURSOR UP or CURSOR DOWN button Press the CURSOR RIGHT button to activate adding back of channel Exit menu from screen by the OSD button MENU SURF MENU SURF MENU SURF OR I N S T A L L L A N G U A G E 3 T U N E R M O D E 4 A U T O P R O G R A M 5 C H A N N E L E D I T 6 M A N U A L 7 É Ñ I N S T A L L L A N G U A G E ...

Page 17: ... CURSOR RIGHT button and select in the next character You can enter up to a maximum of 5 characters 9 Store named channel 10 Exit menu from screen MENU SURF MENU SURF MENU SURF OR MENU INSTALL TUNER MODE AUTO PROGRAM CHANNEL EDIT MANUAL NAME PERSONAL É Ñ INSTALL TUNER MODE AUTO PROGRAM CHANNEL EDIT MANUAL NAME PERSONAL É Ñ I N S T A L L T U N E R M O D E A U T O P R O G R A M C H A N N E L E D I T...

Page 18: ...dots on the picture from weak signal broadcast Selecting the ON option will make the picture clearer Incredible Selecting the ON option enhances the Picture details in the picture The result is a more dynamic and vivid picture Convergence Allows you to adjust how the red green and blue colour components of the picture come together on the screen USING THE PICTURE MENU The picture menu allows you t...

Page 19: ...t your external audio system to Auxiliary mode to play sound from your TV Speakers Allows you to turn the TV s speakers ON or OFF Bass Boost Increases the low frequency range This creates a deeper fuller sound USING THE SOUND MENU The sound menu allows you to make adjustments to the sound It also allows you to select and activate other features in the menu 1 Press the MENU button to enter main men...

Page 20: ...o NTSC or from NTSC to PAL you may need to readjust Convergence for the new signal source 1 Enter main menu 2 Enter PICTURE menu 3 Press button repeatedly until CONVERGENCE is selected 4 Enter CONVERGENCE menu 5 Enter CONVERGE RED mode 6 Adjust cross image until colour outline is gone 7 Exit menu from screen Note You can adjust CONVERGE BLUE similar to the way you would adjust CONVERGE RED PICTURE...

Page 21: ...ce from PAL to NTSC or from NTSC to PAL you may need to readjust Convergence for the new signal source 1 Enter main menu 2 Enter PICTURE menu 3 Press button repeatedly until CONVERGENCE is selected 4 Enter CONVERGENCE menu 5 Press button repeatedly until MULTIPOINT RED is selected 6 Enter NAVIGATE mode P I C T U R E H U E C O L O U R T E M P N R I N C R P I C T U R E C O N V E R G E N C E É C O N ...

Page 22: ...screen Note You can adjust MULTIPOINT BLUE similarly to the way you would adjust MULTIPOINT RED ADJUST OSD NAV I GATE P I C T U R E C O N V E R G E N C E C O N V E R G E R E D C O N V E R G E B L U E M U L T I P O I N T R E D M U L T I P O I N T B L U E S A V E M U L T I P O I N T É P I C T U R E C O N V E R G E N C E C O N V E R G E R E D C O N V E R G E B L U E M U L T I P O I N T R E D M U L T ...

Page 23: ... N C E É C O N V E R G E R E D C O N V E R G E B L U E M U L T I P O I N T R E D M U L T I P O I N T B L U E S A V E M U L T I P O I N T P I C T U R E C O N V E R G E N C E C O N V E R G E R E D C O N V E R G E B L U E M U L T I P O I N T R E D M U L T I P O I N T B L U E S A V E M U L T I P O I N T É P I C T U R E C O N V E R G E N C E C O N V E R G E B L U E M U L T I P O I N T R E D M U L T I P...

Page 24: ...ode 7 Key in the time you want the programme to be switched on 8 Exit from START TIME mode 9 Select STOP TIME 10 Enter STOP TIME mode 11 Key in the time you want the programme to be switched off 5 1 3 2 4 6 7 9 8 0 5 1 3 2 4 6 7 9 8 0 5 1 3 2 4 6 7 9 8 0 FEATURES TIMER TIME START TIME STOP TIME CHANNEL A CTIVATE FEATURES TIMER TIME 1 2 3 0 START TIME STOP TIME CHANNEL A CTIVATE FEATURES TIMER TIME...

Page 25: ...30 seconds before the timer is activated a message indicating the time left for the channel switch will appear on the screen To disable the channel switch press any button on the remote control 5 1 3 2 4 6 7 9 8 0 FEATURES TIMER TIME START TIME STOP TIME CHANNEL 3 A CTIVATE FEATURES TIMER TIME START TIME STOP TIME CHANNEL 8 A CTIVATE FEATURES TIMER TIME START TIME STOP TIME CHANNEL A CTIVATE OFF F...

Page 26: ...y in access code 0711 0711 is the default access code A message INCORRECT will appear 7 Key in 0711 the second time When the message CORRECT appears the CHILD LOCK menu is now accessible You can now proceed to change the access code of your choice 5 1 3 2 4 6 7 9 8 0 5 1 3 2 4 6 7 9 8 0 MENU SURF MENU SURF MENU SURF FEATURES TIMER TIME CHILD LOCK START TIME PIP STOP TIME CLOSED CAP CHANNEL BLUE MU...

Page 27: ...y the new access code only once If you have forgotten the new access code key in 0711 twice to enter the child lock menu Upon entering the child lock menu you can proceed to change code again 5 1 3 2 4 6 7 9 8 0 5 1 3 2 4 6 7 9 8 0 FEATURES CHILD LOCK LOCK CHANNEL ENTER CHANGE CODE NEW CODE CLEAR ALL X X X X FEATURES CHILD LOCK LOCK CHANNEL CONFIRM CHANGE CODE CODE CLEAR ALL X X X X FEATURES CHILD...

Page 28: ...se if CV1 source is locked AV1 source is also automatically locked as they share the same audio input If you attempt to enter the INSTALL menu after locking a channel a message Enter ACCESS CODE will appear on the screen You need to enter the ACCESS CODE to enable you to enter the INSTALL menu 5 1 3 2 4 6 7 9 8 0 OR MENU SURF MENU SURF MENU SURF OSD F E A T U R E S T I M E R T I M E C H I L D L O ...

Page 29: ...CHANNEL menu Repeat step 1 to 7 as in ACTIVATING THE CHILD LOCK LOCK CHANNEL Select the channel you want to unlock by the or CURSOR UP DOWN buttons Press the CURSOR RIGHT button to unlock channel the keylock symbol will disappear MENU SURF MENU SURF MENU SURF 5 1 3 2 4 6 7 9 8 0 FEATURES TIMER TIME CHILD LOCK START TIME PIP STOP TIME CLOSED CAP CHANNEL BLUE MUTE ACTIVATE É FEATURES TIMER ACCESS CO...

Page 30: ...CAPTION MODE 9 Select CC DISPLAY 10 Select ON to display Closed Captioning on screen 11 Exit menu from screen F E A T U R E S T I M E R T I M E C H I L D L O C K S T A R T T I M E P I P S T O P T I M E C L O S E D C A P C H A N N E L B L U E M U T E A C T I V A T E É F E A T U R E S T I M E R C A P T I O N M O D E C H I L D L O C K C C D I S P L A Y P I P C L O S E D C A P B L U E M U T E É É MENU...

Page 31: ...e is often used for channel guides schedules or bulletin board information when programmes with Closed Captioning are shown The complete screen is used for displaying the text IMPORTANT 1 Not all television programmes and product commercials are made for broadcast with Closed Captioning information included Neither are all Closed Captioning modes Caption 1 to 4 or TEXT 1 to 4 necessarily being use...

Page 32: ...r you have completed adding the selected channels to the surf list exit menu from screen Note To view the the selected channels in the surf list press the SURF button repeatedly to cycle through the channels How to delete a channel from the surf list 1 Press the SURF button to display surf list 2 Press the SURF button repeatedly to cycle through the surf list and select the channel you want to del...

Page 33: ...gh a list of installed programmes for a quick overview of the channels and activate the channel you have selected 1 Press the PROGRAM LIST button to display the list of installed programmes The current channel is highlighted 2 Press the CURSOR UP or CURSOR DOWN button to cycle through the programme list and highlight the channel number you want to activate 3 Press the CURSOR RIGHT button to activa...

Page 34: ...oft colours suitable for playing computer games surfing etc Note The PERSONAL setting is the setting that you set up using the Picture menu in the main menu This is the only setting in the Smart Picture settings that can be changed All the other settings are pre set at the factory Definition of Sound Settings PERSONAL Sound settings are set to your preference VOICE Emphasize high tone treble boost...

Page 35: ... PIP On Off button to switch on PIP mode A normal size PIP screen appears Press the button the second time to change the normal size PIP screen to a smaller size Press the button the third time to switch to Double Window screens in 4 3 format ON OFF ON OFF ON OFF How to hear PIP sound Press the PIP On Off button to switch on PIP mode Connect the headphone cable to the headphone socket to hear PIP ...

Page 36: ...l mode For example you may want to write down some information from the PIP screen freezing the screen will allow you time to do so Press the PIP Freeze button the second time to unfreeze the PIP screen 2 3 4 PIP Freeze PIP Unfreeze ON OFF CH CH ON OFF FREEZE FREEZE V DOLBY A CH PROG LIST INCR PICT STEREO SAP ON OFF POSITION FREEZE SWAP PIP CH PIP CH CH V DOLBY A CH PROG LIST INCR PICT STEREO SAP ...

Page 37: ...u 4 Press the CURSOR DOWN button repeatedly until PIP is selected 5 Press the CURSOR RIGHT button to enter PIP menu 6 Press the CURSOR LEFT or CURSOR RIGHT button to adjust HUE setting to your desired level 7 Press the OSD button to exit menu from screen Note Hue adjustments in the PIP programmes will only take effect if programmes are in NTSC mode MENU PICTURE TIMER SOUND CHILD LOCK FEATURES PIP ...

Page 38: ... 15 W TV System NTSC M Set Dimensions Width 950 cm 1130 cm 1222 cm Depth 540 cm 613 cm 612 cm Height 1142 cm 1476 cm 1549 cm Net weight of set approx 58 kg approx 83 kg approx 90 kg Note For OperatingVoltage Frequency Power Consumption andVersion Number refer to the type number at the rear of the set ...

Reviews: