3.
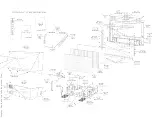
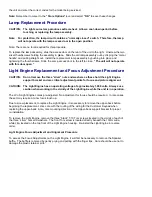
Remove (6) T10 Torx screws (O) securing the input power panel to the power assembly bracket.
Main Power Panel (Item 1010)
1.
Remove (2) T20 Torx screws (N) attaching the power assembly bracket (Item 0117) to the base
assembly (Item 0038).
2.
Slide the power assembly rearward as far a possible.
Note: It may be necessary to release cable harnesses to gain adequate access.
3.
Remove (6) T10 Torx screws (P) securing the main power panel to the power assembly bracket.
SSB Panel (Item 1185)
1.
Remove (3) T10 Torx screws (Q) securing the SSB bracket (0072).
2.
Remove all ribbon cables from the scaler panel and the system board.
3.
Release the (2) metal clips located at either end of the SSB panel 80 pin connector, and tilt the
SSB panel to the right.
4.
Slide the SSB panel from its connector.
Scaler Panel (1052)
1.
Remove (2) Torx screws (R) from the bottom of the small signal assembly securing it to the
cabinet base.
2.
Remove (14) T10 Torx screws (S) securing the cinch plate to the small signal assembly.
3.
Remove (4) hex screws. Two each at the DVI and RGB-HV input connectors.
4.
Remove the cinch plate.
5.
Disconnect the main video cable by unscrewing the (2) thumbscrews and disconnect the (2)
ribbon cables.
6.
Slide the scaler panel rearward to disconnect from its connector on the system board.
Cinch Panel (1016)
1.
Remove (2) Torx screws (R) from the bottom of the small signal assembly securing it to the
cabinet base.
2.
Remove (14) T10 Torx screws (S) securing the cinch plate to the small signal assembly.
3.
Remove (4) hex screws. Two each at the DVI and RGB-HV input connectors.
4.
Slide the cinch panel rearward to disconnect from its connector on the system board.
Audio Panel (1012)
1.
Remove (2) Torx screws (R) from the bottom of the small signal assembly securing it to the
cabinet base.
2.
Slide the small signal assembly rearward to allow access to the front of the assembly.
3.
Remove (4) T10 Torx screws (T) securing the audio panel to the small signal assembly bracket.
4.
Remove the (4) cable harnesses.
System Board (1020)
Summary of Contents for 55PL9524/37
Page 10: ...Page 9 of 15 2004 08 09 ...
Page 23: ...Display The Main Cabinet Exploded View ...
Page 34: ......
Page 35: ......
Page 36: ......
Page 37: ...IIC BUS SIGNAL DIAGRAM ...
Page 39: ......
Page 40: ......
Page 41: ......
Page 42: ......
Page 43: ......
Page 44: ......
Page 45: ......
Page 46: ......
Page 47: ......
Page 48: ......
Page 49: ......
Page 50: ......
Page 51: ......
Page 52: ......
Page 53: ......
Page 54: ......
Page 55: ......
Page 56: ......
Page 57: ......
Page 58: ......
Page 59: ......
Page 60: ......
Page 61: ......
Page 62: ......
Page 63: ......
Page 64: ......
Page 65: ......
Page 66: ......
Page 67: ......
Page 68: ......
Page 69: ......
Page 70: ......
Page 71: ......
Page 72: ......
Page 73: ......
Page 74: ......
Page 75: ......
Page 76: ......
Page 77: ......
Page 78: ......
Page 79: ......
Page 80: ......
Page 81: ......
Page 82: ......
Page 83: ......
Page 84: ......
Page 87: ... W INPUT POWER PANEL Bottom View Return to Circuit Board TOC ...
Page 89: ... U1 MAIN POWER PANEL Bottom View Return to Circuit Board TOC ...
Page 91: ... K SYSTEM BOARD Bottom View Return to Circuit Board TOC ...
Page 92: ...Refer to the next page for Bottom Side View B SSB PANEL Top View Return to Circuit Board TOC ...
Page 93: ... B SSB PANEL Bottom View Return to Circuit Board TOC ...
Page 95: ... SL SCALER PANEL Bottom View Return to Circuit Board TOC ...
Page 97: ... F DW PIP PANEL Bottom View Return to Circuit Board TOC ...
Page 99: ... CB1 3D COMB FILTER PANEL Bottom View Return to Circuit Board TOC ...
Page 101: ... V REAR JACK PANEL Bottom View Return to Circuit Board TOC ...
Page 103: ... O1 SIDE JACK PANEL Bottom View Return to Circuit Board TOC ...
Page 105: ... LS LED SENSOR PANEL Bottom View Return to Circuit Board TOC ...
Page 107: ... P1 LED KEYBOARD PANEL Bottom View Return to Circuit Board TOC ...
Page 109: ... TS1 THERMAL SENSOR PANEL Bottom View Return to Circuit Board TOC ...
Page 111: ... AA1 AUDIO AMPLIFIER PANEL Bottom View Return to Circuit Board TOC ...
Page 112: ...Refer to the next page for Bottom Side View Return to Circuit Board TOC ...
Page 113: ...Return to Circuit Board TOC ...
Page 115: ... 7665 Page 1 P1 P2 P3 P4 P5 P6 P7 C1 C2 C3 C4 C5 C6 F30 F31 F32 L14 L15 L16 V31 ...
Page 116: ... 7665 Page 2 V32 F14 I 6 L 8 V 1 V 2 V 6 V 7 V 8 V 9 V10 L1 L2 L3 L4 L5 L6 L7 L8 L9 ...
Page 117: ... 7665 Page 3 F17 F18 F19 F20 L12 V19 V20 V21 V28 V29 V30 B51 B52 B53 B54 B55 B57 B58 B60 A15 ...
Page 121: ... 7665 Page 7 F2 F14 F15 F16 F17 F18 V19A V20A F 3 F 4 F 5 F 6 F 7 F 8 F 9 F10 F11 F12 F13 A1 ...
Page 122: ... 7665 Page 8 A2 A3 A4 A5 A6 A7 A8 ...
Page 124: ...Overall Cabinet Exploded View Page 1 of 5 ...
Page 125: ...Cabinet Detail 1 Exploded View Page 2 of 5 ...
Page 126: ...Cabinet Detail 2 Exploded View Page 3 of 5 ...
Page 127: ...Power Supply Assembly Exploded View Page 4 of 5 ...

