background image

English

   - 7 -

CEC

This function allows to control the CEC-enabled 

devices, that are connected through HDMI ports by 

using the remote control of the TV.
The 

CEC

 option in the 

Settings>More

 menu should 

be set as 

Enabled

 at first. Press the 

Source

 button 

and select the HDMI input of the connected CEC 

device from the 

Sources list

 menu. When new CEC 

source device is connected, it will be listed in source 

menu with its own name instead of the connected 

HDMI  ports  name(such  as  DVD  Player,  Recorder 

1 etc.).
The TV remote is automatically able to perform the 

main functions after the connected HDMI source has 

been selected.
To terminate this operation and control the TV via the 

remote again, press and hold the “0-Zero” button on 

the remote control for 3 seconds. This feature can 

also be enabled or disabled under the 

Settings>More


menu.
The TV supports also ARC(Audio Return Channel) 

feature. This feature is an audio link meant to replace 

other cables between the TV and the audio system 

(A/V receiver or speaker system).
When ARC is active, TV does not mute its other audio 

outputs automatically. So you need to decrease TV 

volume to zero manually, if you want to hear audio 

from  connected  audio  device  only  (same  as  other 

optical or co-axial digital audio outputs). If you want 

to  change  connected  device’s  volume  level,  you 

should select that device from the source list. In that 

case volume control keys are directed to connected 

audio device.

Note: ARC is supported only via the HDMI1 input.

System Audio Control

Allows an Audio Amplifier/Receiver to be used with 

the  TV.  The  volume  can  be  controlled  using  the 

remote control of the TV. To activate this feature set 

the 

Speakers

 option in the 

Settings>More

 menu as 

Amplifier

. The TV speakers will be muted and the 

sound of the watched source will be provided from 

the connected sound system.

Note: The audio device should support System Audio Control 

feature and 

CEC option should be set as Enabled.

Change TV settings

To access the options listed below;

1- 

Press the 

Menu

 button

2- 

Highlight your selection

3- 

Press 

OK

 to confirm

Display options

Mode:

 Changes the picture mode to one of the 

following: 

Cinema

Game(*)

Sports

Dynamic

 and 

Natural

.

(*) 

Game mode option may not be available depending on 

the current source selection.

Contrast:

 Sets the light and dark values of the image.

Brightness:

 Sets the brightness value of the image.

Sharpness:

  Sets  the  sharpness  value. A  high 

sharpness value may result in a clearer, crisper image 

depending on the content.

Colour:

 Sets the color value.

Backlight:

 Controls the brightness of the backlight. 

The backlight function will be inactive if the 

Energy 

Saving

 is set to an option other then 

Custom

.

Sound options

Volume: 

Adjusts volume level.

Equalizer:

 Changes the equalizer mode.

Balance:

 Adjusts whether the sound is coming mainly 

from the right or left speakers.

Headphone: 

Sets  headphone  volume. This  option 

will be inactive if the 

Headphone/Lineout

 option is 

set to 

Lineout

.

Sound Mode: 

Sets the preferred sound mode.

AVL:

 Sets a limit to maximum volume output.

Headphone/Lineout: 

This option should be set to 

Headphone

 if you have headphones or 

Lineout

 if you 

have external amplifier connected to the headphone 

jack.

Dynamic Bass: 

Enables or disables the Dynamic 

Bass. Increases the range of bass.

Surround Sound:

  Surround sound mode can be 

changed as 

On

 or 

Off

Digital Out:

 Sets digital out audio type.

Configuring parental settings

This feature is for restricting access to selected 

content. It is controlled by a pin number defined by you. 

These settings are located in the 

Settings>Parental


menu.

Note: Default PIN may be set to 0000 or 1234. If you have 

defined  the  PIN(is  requested  depending  on  the  country 

selection)  during  the 

First  Time  Installation  use  the  PIN 

that you have defined. Some options may not be available 

depending on the country selection in the 

First Time 

Installation.

Menu lock:

 Menu lock setting enables or disables 

the menu access. 

Maturity lock (optional):

  If  this  option  is  set, TV 

gets the maturity information from the broadcast and 

if this maturity level is disabled, disables access to 

the broadcast.

Summary of Contents for 65HFL2879T/12

Page 1: ......

Page 2: ... browser menu 6 CEC 7 Change TV settings 7 Display options 7 Sound options 7 Configuring parental settings 7 Electronic program guide EPG 8 Update your TV 8 Troubleshooting Tips 9 PC input typical display modes 10 AV and HDMI signal compatibility 10 Supported Video File Formats for USB Mode 11 Supported Picture File Formats for USB Mode 11 Supported Audio File Formats for USB Mode 12 Supported Sub...

Page 3: ...V from tilting Do not over tighten the screws and mount the stand rubbers properly The TV set is intended for household and similar general use but may also be used in public places Markings on the Product The following symbols are used on the product as a marker for restrictions and precautions and safety instructions Each explanation shall be considered where the product bears related marking on...

Page 4: ... television set Educating children about the dangers of climbing on furniture to reach the television set or its controls If your existing television set is being retained and relocated the same considerations as above should be applied WALL MOUNTING WARNINGS Read the instructions before mounting your TV on the wall The wall mount kit is optional You can obtain from your local dealer if not suppli...

Page 5: ...ollow the on screen instructions for coloured button functions 17 Yellow button Follow the on screen instructions for coloured button functions 18 Volume 19 Mute Completely turns off the volume of the TV 20 Programme Page in TXT mode 21 Return Back Returns to previous screen opens index page in TXT mode 22 OK Confirms user selections holds the page in TXT mode views channel list 23 Info Displays i...

Page 6: ...in the TV will turn on Notes If you turn the TV off this cycle starts again beginning with the volume setting Main menu OSD cannot be displayed via control button Switching on off To switch the TV on To switch on the TV from standby mode either Press the Standby button Programme or a numeric button on the remote control Press the middle of the side function switch on the TV in Note If the TV has b...

Page 7: ...e country selection Play media files from a USB drive You can play photo music and movie files stored on a USB disk by connecting it to your TV Connect a USB disk to one of the USB inputs located on the rear side of the TV The USB device will be automatically recognized by the TV and Media Browser menu will be displayed You can also access to Media Browser menu from the main TV menu Press the Menu...

Page 8: ...ge TV settings To access the options listed below 1 Press the Menu button 2 Highlight your selection 3 Press OK to confirm Display options Mode Changes the picture mode to one of the following Cinema Game Sports Dynamic and Natural Game mode option may not be available depending on the current source selection Contrast Sets the light and dark values of the image Brightness Sets the brightness valu...

Page 9: ...ns Next Time Slice Green button Displays the events of next time slice Options OK button Displays event options Now Next Schedule Options OK button Displays event options Event Details Info button Displays detailed information about selected events Filter Blue button Views filtering options Event Options In EPG menu press the OK button to open the Event Options menu Select Channel In EPG menu usin...

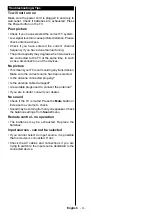
Page 10: ...ture This means yourTV is not receiving any transmission Make sure the correct source has been selected Is the antenna connected properly Is the antenna cable damaged Are suitable plugs used to connect the antenna If you are in doubt consult your dealer No sound Check if the TV is muted Press the Mute button or increase the volume to check Sound may be coming from only one speaker Check the balanc...

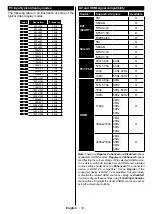
Page 11: ...M O NTSC4 43 O NTSC3 58 O RGB 50 60 O Side AV PAL O SECAM O NTSC4 43 O NTSC3 58 O PC YPbPr 480i 480p 60Hz O 576i 576p 50Hz O 720p 50Hz 60Hz O 1080i 50Hz 60Hz O HDMI 480i 480p 60Hz O 576i 576p 50Hz O 720p 50Hz 60Hz O 1080i 50Hz 60Hz O 1080p 24Hz 25Hz 30Hz 50Hz 60Hz O 3840x2160p 24Hz 25Hz 30Hz 50Hz 60Hz O 4096x2160p 24Hz 25Hz 30Hz 50Hz 60Hz O Note There are Regular Enhanced and Disabled options avai...

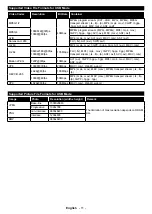
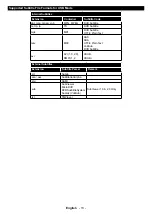
Page 12: ... 1080P 60fps 135Mbps FLV flv MP4 mp4 mov 3GPP 3gpp 3gp MPEG transport stream ts trp tp ASF asf AVI avi MKV mkv Motion JPEG 720P 30fps 10Mbps AVI avi 3GPP 3gpp 3gp MP4 mp4 mov MKV mkv ASF asf VP8 1080P 30fps 20Mbps MKV mkv WebM webm HEVC H 265 4K2K 60fps 100Mbps MP4 mp4 mov MKV mkv MPEG transport stream ts trp tp 1080P 60fps 50Mbps MP4 mp4 mov MKV mkv MPEG transport stream ts trp tp 3GPP 3gpp 3gp V...

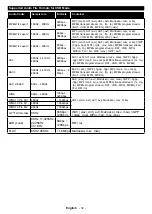
Page 13: ...KHz 44 1KHz 48KHz 32Kbps 640Kbps AC3 ac3 AVI avi Matroska mkv mka 3GPP 3gpp 3gp MP4 mp4 mov m4a MPEG transport stream ts trp tp MPEG program stream DAT VOB MPG MPEG EAC3 32KHz 44 1KHz 48KHz 32Kbps 6 Mbps EAC3 ec3 3GPP 3gpp 3gp MP4 mp4 mov m4a MPEG transport stream ts trp tp MPEG program stream DAT VOB MPG MPEG AAC HEAAC 8KHz 48KHz AAC aac AVI avi Matroska mkv mka 3GPP 3gpp 3gp MP4 mp4 mov m4a MPEG...

Page 14: ...itle ts trp tp TS DVB Subtitle mp4 MP4 DVD Subtitle UTF 8 Plain Text mkv MKV ASS SSA UTF 8 Plain Text VobSub DVD Subtitle avi AVI 1 0 2 0 DMF0 1 2 XSUB XSUB External Subtitles Extension Subtitle Parser Remark srt Subrip ssa ass SubStation Alpha smi SAMI sub SubViewer MicroDVD DVDSusbtitleSystem SubIdx VobSub SubViewer 1 0 2 0 Only txt TMPlayer ...

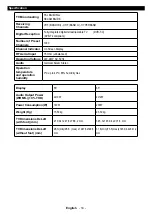
Page 15: ...play RF Aerial Input 75 Ohm unbalanced Operating Voltage 220 240V AC 50Hz Audio German Nicam Stereo Operation temperature and operation humidity 0ºC up to 40ºC 85 humidity max Display 55 65 Audio Output Power WRMS 10 THD 2x10W 2x12W Power Consumption W 140W 200W Weight Kg 15 50 kg 23 30 kg TV Dimensions DxLxH with foot mm 219 9x1247 8x768 2 mm 345 3x1459 4x901 6 mm TV Dimensions DxLxH without foot...

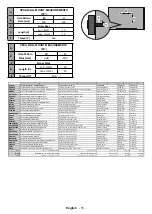
Page 16: ... Reikäkuvion koot mm Ruuvinkoot Pituus x Kierre Y Norsk VESA VEGGMONTERINGSMÅL Hullmønster størrelser mm Skruestørrelser Lengde x Tråd Y Dansk VESA VÆGMONTERINGS MÅL Hulmønster størrelser mm Skruestørrelser Længde X Tråd Y Русский РАЗМЕРЫ НАСТЕННОГО КРЕПЛЕНИЯ VESA Размеры системы отверстий Размеры винтов Длина Х Резьба Y беларуская ПАМЕРЫ НАСЦЕННАГА МАЦАВАННЯ VESA Памеры сістэмы адтулін Памеры він...

Page 17: ......

Reviews: