background image

PIP SOURCE SELECT

HELP

EXIT

ANT A

AUX 1

AUX 3

ANT B 

AUX 2

PICTURE SOURCE SELECT

HELP

EXIT

ANT A

AUX 1

AUX 3

ANT B 

AUX 2

CLEAR

CH

FF

©©

©

STOP                      

POWER

ENTER

STATUS

REW

§§

PLAY 

MENU

1

2

3

4

5

6

7

8

9

7

TV/VCR

SLEEP

SMART

POWER

VCR

CBL

TV

SIZE

FREEZE

SWAP

POS

ON/OFF

VOL

REC                      

MUTE

SURF

PAUSE II

M

~

!

M

O

D

E

2 TUNER PIP

A

B

§

§

3

4

5

N

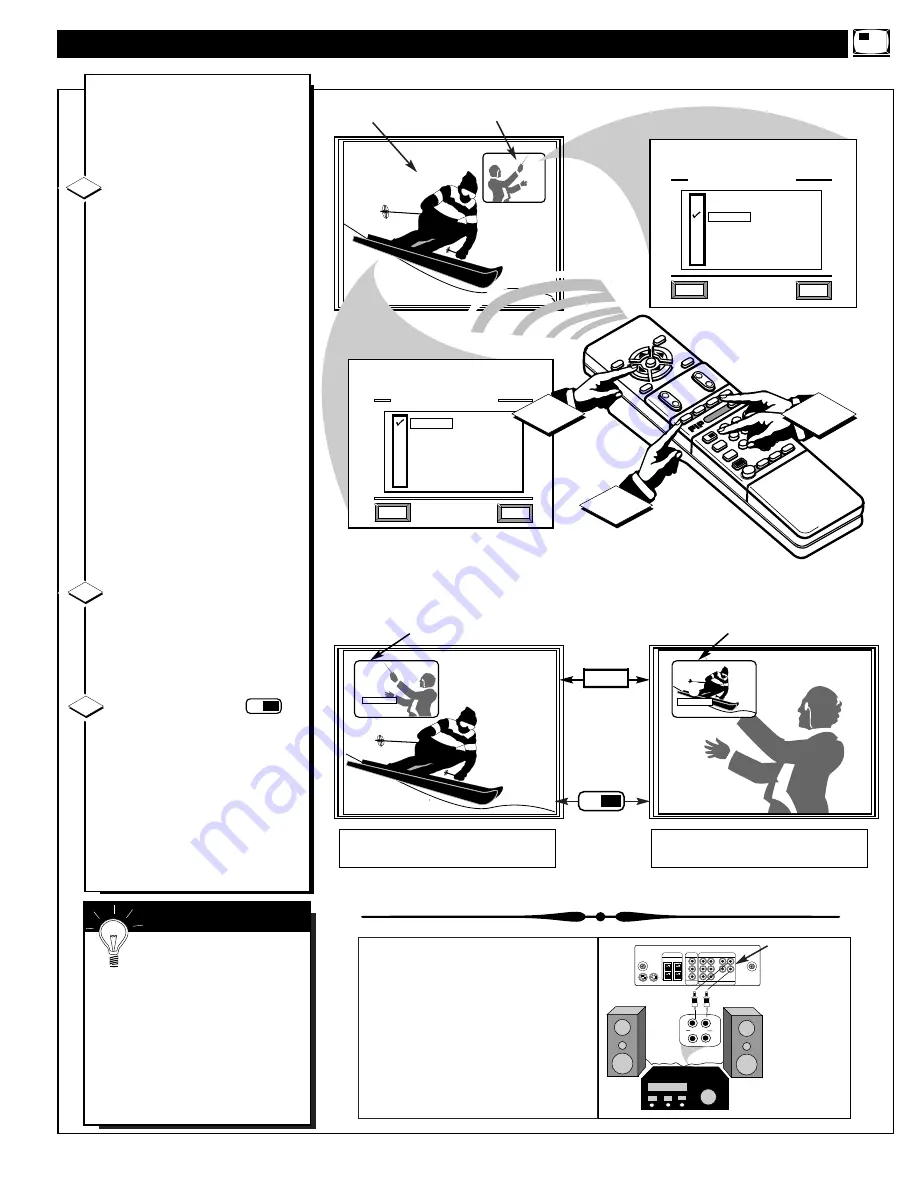
ow that you have completed
the required connections on

the previous page you are ready to
follow the simple steps shown
below.

Turn the TV ON.  

Place the TV's PIP SOURCE
SELECT control to "ANT B"-

With FEATURES MENU (4 
of 5) on screen, move the RED
highlight with the MENU (M)

buttons. Then press the 

MENU button.

Press the MENU 

▲▼ 

and 

MENU (M) buttons to 
highlight and select the
ANT B" (

U

) item. 

Also place the TV's Main 
screen PICTURE SOURCE 
SELECT control to "ANT A"
-

See the Picture Source option 
FEATURES MENU (1 of 5).

Press the STATUS button to
clear the screen when the above
Menu items have been set.

Press the PIP ON/OFF button

on the remote.

The PIP window should show in
one of the corners of the TV
screen.

Press the SWAP (or              )

buttons on the remote to move the
ANT B and ANT A Input pictures
between the PIP window and
Main screen.

Use the Channel Number or CH

▲▼  

buttons to select desired

programs for viewing. Program
Sound occurs with the channels
displayed on the Main screen.

3

4

5

PIP SOURCE SELECT SET TO "ANT B"

NOTE:  Sound for TV programs
displayed in the PIP window can also
be heard through the use of PIP
AUDIO OUT jacks on the rear of the
TV. Just connect the TV’s Left/Right
PIP AUDIO OUTPUTs to the correct
AUX(iliary) Inputs on an external
stereo sound system (through which
the PIP audio will be played).

43

B

§

§

A

- PIP WINDOW -

- MAIN SCREEN -

MAIN PICTURE SOURCE SELECT SET 

TO "ANT A"

12:34

STEREO

5

W X Y Z

PIP: 8

A N T B

PIP: 5

8

Main Screen is CH 5 from ANT A input.

PIP is CH 8 from ANT B input

Main Screen shows CH 8 from ANT B input.

PIP is CH 5 from ANT A input.

WHITE frame around the PIP window appears

when the ANT B Input is on the Main screen.

BLACK frame around the PIP window appears

when the ANT A Input is on the Main screen.

SWAP

PRESS

PRESS

2 TUNER PIP

B

§

§

A

on remote then
adjust channels
with CH

▲▼ 

or

Number buttons

L

R

S-VIDEO-1    S-VIDEO-2

ANT A / CABLE

75

UHF/VHF

R

L

PIP

ANT B / CABLE

75V UHF/VHF

REAR SURROUND

EXT. SPEAKERS

AUDIO

OUT

VIDEO

OUT

AUDIO INPUT

AUX 1     AUX 2

AUX 1      AUX 2

VIDEO INPUT

AUDIO OUT

VAR          PIP

R

R

L

L

–       8

V

        +

AUX/TV INPUT

PHONO INPUT

L

R

PIP AUDIO
OUTPUT 
will
be monaural
(mono) when
both ANT A and
ANT B are being
used for normal
PIP operation.
See page 26 for
details on other
stereo sound
uses for the PIP
Audio Output
jacks.

S

MART

H

ELP

Remember, if you see the

same picture on the main

screen and in the PIP window,
check to be sure the TV's PIP
Source Select and Main screen
Picture Source select are set for
ANT B and ANT A respectively. 

See the following page on how to
operate other PIP features with the
TV’s remote control.

Summary of Contents for 8P6054C199

Page 1: ...I M P O R T A N T Return Your Warranty Registration Card Within 10 Days See Why Inside O W N E R S M A N U A L P R O J E C T I O N T E L E V I S I O N 1 IB7894 E001 8P6054C ...

Page 2: ...r unit which may cause an electrical shock For the safety of everyone in your household please do not remove product covering s The exclamation point calls attention to features for which you should read the enclosed literature closely to prevent operating and maintenance problems WARNING TO PREVENT FIRE OR SHOCK HAZARD DO NOT EXPOSE THIS EQUIPMENT TO RAIN OR MOISTURE CAUTION To prevent electric s...

Page 3: ...point where they exit from the appliance 12 Cleaning The appliance should be cleaned only as recommended by the manufacturer 13 Power Lines An outdoor antenna should be located away from power lines 14 Outdoor Antenna Grounding If an outside antenna is connected to the receiver be sure the antenna system is grounded so as to provide some protection against voltage surges and built up static charge...

Page 4: ... 2 Basic TV and Remote Control Operation 3 How to Use the On Screen Menu Controls 4 12 1 23 4 5 6 7 8 910 11 For details on product registration warranty and service refer to the other literature included with your TV information packet Please retain all these materials and keep them handy for future reference 1 75V UHF VHF ANT CABLE REAR SURROUND EXT SPEAKERS VCR AUX IN VIDEO AUDIO R L R L 8V R L...

Page 5: ...ustments on a variety of program sources and Smart Surf for quick one button channel selection of up to 10 of your favorite channels FEATURES 12 1 2 3 4 5 6 7 8 9 10 11 As you unpack your TV please note that the following items have been included with your set Owner s Manual Safety Tip Information Factory Service Center Locations Warranty Registration Card Remote Control Transmitter Batteries for ...

Page 6: ...elected control Press the STATUS button to clear the screen 1 2 3 SMART HELP Remember When the bar scale is centered control settings are at normal mid range levels BRIGHTNESS Press or until dark parts of the picture show good detail PICTURE Press or until whitest parts of the picture are as bright as you prefer COLOR Press or to add or eliminate color TINT Press or to obtain natural skin tones Al...

Page 7: ...EW PICTURE MENU EXIT NEXT NORMAL ENHANCED HELP 1 2 1 2 3 CLEARVIEW 1ST TIME SETUP Clearview is a sharpness feature which smoothes out background snow or picture noise without losing picture image detail or crispness Select CLEARVIEW control With the PICTURE MENU on screen move the RED highlight with the MENU M buttons Then press the MENU button Press the MENU buttons to move the RED highlight Pres...

Page 8: ...paths on the TV screen NOTE If no color fringing see Smart Help shows then no Convergence adjustments are necessary for your TV Select CONVERGENCE control With PICTURE MENU 2 of 2 on screen move the RED highlight with the MENU M buttons Then press the MENU button If there is RED or BLUE color fringing on the White cross press the MENU button to continue Press the MENU buttons to move the red or bl...

Page 9: ...1 2 1 2 3 FLESH CORRECTION HELP EXIT ON OFF CONVERGENCE 1ST TIME SETUP Use the Flesh Correction control to keep skin tone hues or facial tint from varying from TV channel to TV channel Select FLESH CORRECTION control With PICTURE MENU 2 of 2 on screen move the RED highlight with the MENU M buttons Then press the MENU button Press the MENU buttons to move the RED highlight Press the MENU button to ...

Page 10: ...th the MENU M buttons Then press the MENU button Press the MENU buttons to move the RED highlight Press the MENU button to turn the desired PICTURE SOURCE control ON U ANT A or B for a picture signal coming from either the ANT enna A or B Input plugs on the TV AUX 1 for a picture signal coming from the AUX 1 Video Input jack on the rear of the TV AUX 2 for a picture signal coming from the AUX 2 Vi...

Page 11: ... dialogue and descriptions for the action on the captioned TV program shows on screen See Important Note on this page TEXT 1 2 3 4 often used for channel guide schedules or bulletin board information for CC programs After making your Caption mode selection press the STATUS button to clear the TV screen The selected Closed Caption mode will be active To cancel set the Closed Captioned feature to OF...

Page 12: ...le TV signal or a normal antenna to its ANTENNA plug NOTE If you went through First Time Setup in your Quick Use Guide this task has already been completed for you Select CABLE CHANNEL TUNING control With the FEATURES MENU on screen move the RED highlight with the MENU M buttons Then press the MENU button Press the MENU buttons to move the RED highlight Press the MENU button to select U the desire...

Page 13: ... through First Time Setup in your Quick Use Guide this task has already been completed for you Select CHANNEL MEMORY START AUTO PROGRAMMING control With the FEATURES MENU on screen move the RED highlight with the MENU M buttons Then press the MENU button Press the MENU button to turn AUTO PROGRAMMING ON The TV shows which channel numbers are SAVED U as they are added into memory Auto programming C...

Page 14: ...en press the MENU button Press the CHANNEL or number buttons to select the channel you want to add or delete Press the MENU button to ADD the channel into the TV s memory Press the MENU button to DELETE the channel from memory Repeat steps 2 and 3 for each channel you wish to add or delete Press the STATUS or MENU button to clear the screen when through ADD DELETE CHANNELS STOP 1 2 3 4 SMART HELP ...

Page 15: ...ock During normal operation the clock appears on the screen with every channel change and when the STATUS button is pressed NOTE If you went through First Time Setup in your Quick Use Guide this task has already been completed for you Select SET CLOCK control With FEATURES MENU 2 of 5 on screen move the RED highlight with the MENU M buttons Then press the MENU button Press the remote s number butt...

Page 16: ...SET CLOCK ON TIMER SET ON TIMER HELP EXIT ON OFF SET ON TIME SET ON TIMER 1 2 1 2 4 5 3 3 1ST TIME SETUP Just like an alarm clock you can set the TV to turn itself on at the same time everyday Select SET ON TIMER control With FEATURES MENU 2 of 5 on screen move the RED highlight with the MENU M buttons Then press the MENU button Press the MENU and MENU M buttons to highlight and select ON U Press ...

Page 17: ...tself off Press the SLEEP button on the remote control Note you can also select the SLEEP control with the TV s on screen FEATURES MENU 2 of 5 Move the RED highlight with the MENU M buttons Then press the MENU button Press the SLEEP button repeatedly to pick the amount of time 15 minutes to 2 hours ahead before the TV will turn itself off The buttons can also be used to set the amount of time Pres...

Page 18: ...1 2 3 4 5 6 7 8 9 0 ON OFF TV VCR VCR CBL TV SWAP FREEZE POS SIZE ENTER MENU M CLEAR SURF MUTE PAUSE II SLEEP SMART POWER M O D E LIGHT 2 TUNER PIP B A MAIN MENU PICTURE FEATURES SOUND HELP EXIT EXIT 1 OF 5 PICTURE SOURCE MORE CLOSED CAPTION FEATURE MENU CHANNEL MEMORY CABLE TUNING EXIT 2 OF 5 MORE HALF HOUR REMINDER FEATURE MENU CHANNEL DISPLAY SLEEP TIMER SET CLOCK ON TIMER CHANNEL DISPLAY HELP ...

Page 19: ...ES MENU 3 of 4 on screen move the RED highlight with the MENU M buttons Then press the MENU button BLOCK CHANNELS and SETUP CODE show on screen Press the MENU and MENU M buttons to highlight and select the SETUP CODE item Press 0 7 1 1 on the remote XXXX shows on the ACCESS CODE SETUP screen as you press the number buttons INCORRECT ACCESS CODE TRY AGAIN will also show on the screen Press 0 7 1 1 ...

Page 20: ...3 of 5 on screen move the RED highlight with the MENU M buttons Then press the MENU button Press the MENU and MENU M buttons to highlight and select the BLOCK CHANNELS item Enter the correct Parental Code number Press Channel or Channel Number buttons to select the channel you want to block Press the MENU button to BLOCK VIEWING on the selected channel Press the MENU button to ALLOW VIEWING on a b...

Page 21: ...he TV s screen move the RED highlight using the MENU M buttons to select CHANNEL LABELS Press the MENU M button Press the MENU and MENU M buttons to highlight and select either MANUAL to create your own label for a channel PRESETS to choose from a list of prewritten channel labels See instruction details on this page Press the STATUS button to clear the screen CHANNEL LABELS MANUAL To create your ...

Page 22: ...or you For our Spanish and French speaking TV owners an on screen LANGUAGE option is present With the LANGUAGE control you can set the TV s on screen features to be shown in either English Spanish or French Select the LANGUAGE DISPLAY control With FEATURES MENU 3 of 5 on screen move the RED highlight with the MENU buttons Then press the MENU M button Press the MENU and MENU M buttons to highlight ...

Page 23: ...MENU CONTROL ADJUSTMENTS STOP REW FF PLAY REC STATUS VOL CH 1 2 3 4 5 6 7 8 9 0 ON OFF TV VCR VCR CBL TV SWAP FREEZE POS SIZE ENTER MENU M CLEAR SURF MUTE PAUSE II SLEEP SMART POWER M O D E LIGHT 2 TUNER PIP B A MAIN MENU PICTURE FEATURES SOUND HELP EXIT HELP EXIT NEXT MIN MAX BASS 1 1 2 3 SOUND MENU BASS BOOST EXIT 1 OF 3 BASS TREBLE MORE BALANCE INCREDIBLE STEREO 1ST TIME SETUP Your TV also has ...

Page 24: ...d MENU M buttons to highlight and turn ON U the STEREO mode Press the STATUS button to clear the screen STOP t o d a y s a n d f o r n e w s a n d t o d a y s a n d f o r n e w s a n d SECOND AUDIO PROGRAM HELP EXIT NORMAL SOUND SECOND PROGRAM SOUND SOUND MENU SECOND AUDIO PROGRAM EXIT 2 OF 3 TV SPEAKERS MORE DISPLAY VOLUME STEREO SECOND PROGRAM SOUND CAN ONLY BE SELECTED U WHEN SAP INFORMATION IS...

Page 25: ...ER M O D E LIGHT 2 TUNER PIP B A MAIN MENU PICTURE FEATURES SOUND HELP EXIT SOUND MENU SECOND AUDIO PROGRAM EXIT 2 OF 3 TV SPEAKERS MORE DISPLAY VOLUME HELP EXIT NEVER DURING ADJUSTMENT 3 1 2 1 2 DISPLAY VOLUME SOUND MENU BASS BOOST EXIT 1 OF 3 BASS TREBLE MORE BALANCE INCREDIBLE STEREO STEREO 1ST TIME SETUP Use the DISPLAY VOLUME control to see the TV s volume level settings on the TV screen Once...

Page 26: ...tons on the TV or remote To hear the TV sound from only the audio system speakers select TV SPEAKERS control With SOUND MENU 2 of 3 on screen move the RED highlight with the MENU M buttons Then press the MENU button Press the MENU and MENU M buttons to highlight and turn OFF U the TV SPEAKERS control You should now only hear TV sound coming from the audio system speakers Press the STATUS button to...

Page 27: ...han the TV s front speakers 2 PRIMARY VIEWING AREA TV REAR SPEAKER REAR SPEAKER BEGIN VARIABLE AUDIO OUTPUT The TV s Variable Audio Output jacks can also be used for Surround Sound Once they are connected to an external hi fi system its speakers can be used for the playback of Surround Sound Connect the R ight and L eft VARIABLE AUDIO OUT jacks on the TV to the R and L Audio Input jacks on your am...

Page 28: ...1 AUDIO IN jacks on the TV Select the AUX 1 PICTURE SOURCE SELECT control on the TV With the FEATURES MENU on screen move the RED highlight with the MENU M buttons Then press the MENU button Press the MENU and MENU M buttons to highlight and select U the AUX 1 mode Turn the VCR ON and press PLAY to view the tape on the TV VCR AUX INPUTS 1 2 3 4 STOP BACK OF TV VIDEO IN YELLOW AUDIO IN RED WHITE If...

Page 29: ...AUDIO IN jacks on the TV Select the AUX 3 PICTURE SOURCE SELECT control on the TV With the FEATURES MENU on screen move the RED highlight with the MENU M buttons Then press the MENU button Press the MENU and MENU M buttons to highlight and select U the AUX 3 mode Turn the Camcorder ON and press PLAY to view the tape on the TV AUX 3 INPUTS 1 2 3 4 STOP FRONT AUDIO VIDEO JACKS Lift Up on Jackpanel C...

Page 30: ...e AUDIO AUX IN 1 jacks on the TV Select the S VIDEO PICTURE SOURCE control With the FEATURES MENU on screen move the RED highlight with the MENU M buttons Then press the MENU button The S VIDEO picture source option appears only when a S VIDEO cable has been connected to the TV Turn the VCR ON and place it in the S VIDEO or S VHS playback mode Insert S VHS cassette tape and playback in a normal ma...

Page 31: ...h have Audio Video Input jacks To record TV programs by using the Audio Video jacks on the TV Connect the VIDEO OUT jack from the TV to the VIDEO IN jack on the VCR Connect the AUDIO OUT jacks R ight and L eft from the TV to the AUDIO IN jacks on the VCR Select the ANTENNA PICTURE SOURCE control on the TV With the FEATURES MENU on screen move the RED highlight with the MENU M buttons Then press th...

Page 32: ...button on the remote Press the MENU M button to select the Smart Picture feature highlighted in RED Press the MENU or buttons to choose any of the preset viewing categories Example Cartoons Movies etc Then press the Menu M button to select the highlighted control Press the STATUS button on the remote to clear the screen 1 2 STOP 3 BEGIN REMOTE CONTROL OPERATION CONTINUED 4 SMART PICTURE SMART HELP...

Page 33: ...ghlight the CUSTOM Smart Picture category Press the MENU M button Press the MENU buttons to move the RED highlight to the control you wish to adjust then press the Menu M Press the STATUS button after you have finished your adjustments to clear the screen 1 2 STOP 3 BEGIN SMART PICTURE REMOTE CONTROL OPERATION CONTINUED The CHANGE LABEL control can be used to change the title of a SMART PICTURE se...

Page 34: ... not go above This makes for an even more consistent sound by reducing the peaks and valleys that can occur during program changes or commercial breaks Press the SMART button on the remote With the SMART Menu on the screen move the RED highlight with the MENU buttons Then press the MENU M button to select the highlighted Smart Sound control Press the MENU or and then the MENU M button to turn the ...

Page 35: ... See explanation of Surf options with the illustration on this page Press STATUS button on the remote control to clear the screen 1 2 3 BEGIN 2 CHANNEL SURF SMART SURF STOP 2 CHANNEL SURF Current and one previous channel in the ring SMART SURF Current and up to nine additional channels available in the ring Note The Channel Surf ring can be used with fewer than ten channels In this way the number ...

Page 36: ...er VCR buttons on the remote If they also work the VCR then the remote is ready and no further steps are needed If NO continue 1 2 3 First look up a TWO DIGIT remote code number for your brand VCR before going through the simple 1 2 3 steps on the following page continue to next page 1 STOP VCR SMART HELP Remember if more than one number is listed you may have to try more than the first two digit ...

Page 37: ...ease the REC RECORD button Within thirty seconds after releasing the REC button press and release the VCR System button Within thirty seconds after releasing the VCR System button ENTER THE TWO DIGIT CODE NUMBER for the desired VCR The remote is now ready to send commands to the VCR Point the remote at the VCR Press the POWER button on the remote to turn the VCR ON 1 2 3 4 STOP VCR SMART HELP Try ...

Page 38: ...and CH number buttons on the remote If they also work the Converter then the remote is ready and no further steps are needed If NO continue 1 2 3 First look up a TWO DIGIT remote code number for your brand Converter before going through the simple 1 2 3 steps on the following page continue to next page 1 STOP Cable Converter SMART HELP Remember if more than one number is listed you may have to try...

Page 39: ...button Within thirty seconds after releasing the REC button press and release the CBL System button Within thirty seconds after releasing the CBL System button ENTER THE TWO DIGIT CODE NUMBER for the desired Converter The remote is now ready to send commands to the Converter Point the remote at the Converter Press the POWER button on the remote to turn the Converter ON 1 2 3 4 STOP Cable Converter...

Page 40: ...nd the desired System VCR or CBL Converter buttons at the same time KEEP HOLDING BUTTONS DOWN Watch the Channel Indicator on the unit Channel Numbers will SCAN UP when the unit has been identified This may take up to two minutes Release the SURF and System VCR or CBL buttons as soon as channel numbers start to scan up The code has been identified and the remote is ready to operate with the VCR or ...

Page 41: ...rn the VCR ON and OFF Record Button Hold the RECORD button down and then press the PLAY button to begin a VCR recording Rewind Button Press to rewind tapes For some VCRs you may need to press STOP button first then REWIND In playback mode hold button down to view picture moving rapidly in reverse Pause Button Press to temporarily stop the tape dur ing a playback or recording Press again to release...

Page 42: ...T plug on a two way Signal Splitter not supplied Connect two lengths of RF Coaxial Cable F type connectors on both ends to the two OUTPUT plugs on the two way Signal Splitter Connect the twin OUTPUT plugs on the Signal Splitter to the ANT A and ANT B Inputs on the rear of the TV continue to next page 2 1 PIP WINDOW Display signal supplied primarily through ANT B Input on rear of TV BACK OF TV SMAR...

Page 43: ...nd for TV programs displayed in the PIP window can also be heard through the use of PIP AUDIO OUT jacks on the rear of the TV Just connect the TV s Left Right PIP AUDIO OUTPUTs to the correct AUX iliary Inputs on an external stereo sound system through which the PIP audio will be played 43 B A PIP WINDOW MAIN SCREEN MAIN PICTURE SOURCE SELECT SET TO ANT A 12 34 STEREO 5 W XY Z PIP 8 A NT B PIP 5 8...

Page 44: ... the main screen picture with the PIP picture See Smart Help note on this page Press FREEZE to hold the current MAIN screen picture in the PIP window Main picture is still active If PIP is currently OFF the PIP window will automatically appear Press FRZ repeatedly to update the frozen PIP with current pictures from the Main screen You cannot reposition a frozen PIP picture Press the PIP ON OFF but...

Page 45: ...TURES MENU 4 of 5 on screen move the RED highlight with the MENU M buttons Then press the MENU button Press the MENU and MENU M buttons to highlight and select the desired U PIP Picture Source ANT A or B for a picture signal coming from either the ANT enna A or B Input plug on the TV Note The remote control s button can also be used to quickly swap between the picture sources for the TV s Main scr...

Page 46: ...The Picture In Picture PIP Color and Tint controls are used to make fine tune adjustments to the color settings for PIP when it is shown on the TV screen Select PIP COLOR or PIP TINT control With FEATURES MENU 5 of 5 on screen move the RED highlight with the MENU M buttons Then press the MENU button Press the MENU buttons to move the RED highlight Press the MENU button to turn U the PIP COLOR or T...

Page 47: ...optional signal splitter and connect the original cable TV signal to both the CABLE IN on the Cable Converter and the ANTENNA plug on the rear of the TV Connect the CABLE OUT on the Converter to the ANT IN on the VCR Connect the VIDEO OUT jack on the VCR to the VIDEO IN jack on the TV Also connect the AUDIO OUT R and L jacks from the VCR to the AUDIO IN jacks on the TV SIGNAL SPLITTER Contact the ...

Page 48: ... back to the help menu 1 2 2 1 1ST TIME SETUP TV HELP MENU The on screen HELP menu offers both Operating Tips and a list of Glossary definitions for different features on your TV These items are given to provide you with more information and details on a select group of feature operations Select HELP on the TV s Main Menu Press the remote s Menu buttons to move UP DOWN and from SIDE TO SIDE within...

Page 49: ...e power surges Should this occur turn the TV back on by pressing the POWER button once or twice or unplug and then replug the power cord at the AC outlet This feature is NOT designed to prevent damage due to high power surges such as those caused by lightning which is not covered by your warranty Cleaning and Care To avoid possible shock hazard be sure the TV is unplugged from the electrical outle...

Page 50: ...reen at the same time The smaller PIP picture is supplied by a VCR or other tuner video playback source The PIP picture can also be moved and swapped with the TV s main screen picture Programming The procedure of adding or deleting channel numbers into the Television s memory circuits In this way the Television remembers only the locally available or desired channel numbers and skips over any unwa...

Page 51: ...o 28 31 42 47 Menu Q U 2 4 Minus Plus Buttons Q U 3 4 Parental Control 19 20 Picture In Picture PIP 42 47 Q U 2 PIP Audio Output jacks 26 43 Picture Source Control 10 45 Precautions Safety 2 3 49 Q U 1 Programming Channels 13 Q U 2 Remote Control 32 41 45 Q U 2 3 4 Remote with VCRs 36 37 40 43 Requesting Service 48 49 52 53 56 RF Coaxial Cable 44 49 Q U 1 Reminder Time and Channel 18 Safety Precau...

Page 52: ...RENEWED 90 DAY LIMITED WARRANTY ...

Reviews: