background image

ZH-TW   

41

連接

車用

注意


安裝產品時請勿擋住進出風口。


如果您將產品放在冷氣機前面,當車用暖氣機開啟
時也會被加熱。請小心不要受傷。

將車用變壓器接上電源線插孔。

(

 1)

將點煙器插頭接上點煙器插座。

(

 2)

1


2

Summary of Contents for AC4030

Page 1: ...Always there to help you Register your product and get support at www philips com welcome AC4030 Question Contact Philips EN User manual 3 ZH TW 使用手冊 30 ...

Page 2: ......

Page 3: ...4 For automobile 14 For home or office 15 Switch on and change the fan speed 15 4 Cleaning your air purifier 18 5 Replacing the anti virus cartridge 19 6 Replacing the AC filter 22 7 Troubleshooting 24 8 Guarantee and service 26 Order parts or accessories 26 9 Notices 27 Electromagnetic fields EMF 27 Compliance with EMF 27 Recycling 28 ...

Page 4: ...itches while driving Do not install the appliance where it could hamper visibility to the front or driving operations or in place where it could be dangerous to passengers Warning Check if the voltage indicated on the bottom or at the rear of the appliance corresponds to an automobile outlet for 12V or to the local power voltage before you connect the appliance This appliance is designed for use i...

Page 5: ...pliance Cleaning and user maintenance shall not be made by children without supervision Do not block the air inlet and outlet e g by placing items on the air outlet or air inlet Do not soak the product in water Disconnect the power and remove the automobile adapter from the cigar socket before replacing the anti virus cartridge replacing the AC filter or cleaning the appliance Disconnect the power...

Page 6: ...n it Do not place the appliance directly below an air conditioner to prevent condensation from dripping onto the appliance Make sure the AC filter and the anti virus cartridge are properly installed before you switch on the appliance Only use the original Philips AC filter and anti virus cartridge specially intended for this appliance Do not use any other Avoid knocking against the appliance the a...

Page 7: ...nder normal operating conditions Do not use the appliance in wet surroundings or in surroundings with high ambient temperatures such as the bathroom toilet or kitchen This appliance does not remove carbon monoxide CO or radon Rn It cannot be used as a safety device in case of accidents with combustion processes and hazardous chemicals The anti virus cartridge may emit a distinct scent If the scent...

Page 8: ...s on your purchase and welcome to Philips To fully benefit from the support that Philips offers register your product at www philips com welcome Read this user manual carefully before you install and use the unit Save it for future reference ...

Page 9: ...EN 9 Overview Check and identify the product parts a b c d g h i e f j k ...

Page 10: ...10 EN a Fan speed button b Light button c Air inlet d Bottom cover e Air outlet f Power in socket g AC filter Activated carbon filter h Anti virus cartridge i Brush j AC DC adapter k Automobile adapter ...

Page 11: ...e the packaging of the anti virus cartridge and insert it in the appliance before you can use it Remove the plastic and the 2 small stickers and place it into the appliance as described below Note Always unplug the purifier before you install the anti virus cartridge Figure 1 Insert the cartridge in the correct position ...

Page 12: ...e front panel cover Figure 3 1 2 3 3 Remove 2 small stickers of the new cartridge before placing it in Figure 4 6 4 To reattach the front panel cover insert the top hooks into the top of the appliance first Then push the panel against the body of the appliance Figure 7 ...

Page 13: ...EN 13 5 Place the bottom cover and turn it anti clockwise to close Figure 8 4 5 6 7 8 ...

Page 14: ...stalling the product If you place the product in front of an air conditioner it might be heated when the car heater is on Be careful not to get injured 1 Connect the automobile adapter to the power in socket Figure 1 2 Connect the cigar plug to the cigar socket Figure 2 1 2 ...

Page 15: ...the power in socket Figure 1 2 Connect the power plug to the power socket Figure 2 1 2 Switch on and change the fan speed Caution When you turn off the engine or take off the key of your car disconnect the cigar plug to prevent the car battery from discharging ...

Page 16: ...levels of fan speed 1 Press the fan speed button to switch on the air purifier The air purifier operates in level 1 fan speed Figure 1 The light indicator illuminates automatically To turn off the light indicator you can press the light button to turn off Figure 4 5 2 Press the fan speed button again to change to higher fan speed Figure 2 ...

Page 17: ...EN 17 3 Press the fan speed button the third time to switch off the air purifier Figure 3 1 x 1 2 x 2 3 x 3 4 x 1 5 x 2 ...

Page 18: ... cleaning agents such as bleach or alcohol to clean any parts of the purifier Regularly clean the inside and outside of the purifier body to prevent dust from collecting 1 Wipe away dust with a soft dry cloth from the body of the purifier 2 Clean the air inlet and the air outlet with the cleaning brush The cleaning brush can be mounted on the side of air purifier s interior after use ...

Page 19: ...ng the anti virus cartridge Note Always unplug the purifier before you replace the anti virus cartridge Figure 1 Replace the anti virus cartridge every 3 months Insert the anti virus cartridge in the correct position ...

Page 20: ...panel cover Figure 3 1 2 3 3 Remove the plastic and 2 small stickers of the new cartridge before placing it in Figure 4 6 4 To reattach the front panel cover insert the top hooks into the top of the appliance first Then push the panel against the body of the appliance Figure 7 ...

Page 21: ...EN 21 5 Place the bottom cover back and turn it anti clockwise to close Figure 8 4 5 6 7 8 ...

Page 22: ... Always unplug the purifier before you replace the AC filter Figure 1 Replace the AC filter every 6 months Insert the filter in the correct position 1 Turn the bottom cover clockwise to open Figure 2 2 Remove the AC filter Figure 3 1 2 3 ...

Page 23: ...EN 23 3 Remove the packaging material of the filter then insert the new filter Figure 4 5 4 Place the bottom cover back and turn it anti clockwise to close Figure 8 4 5 7 ...

Page 24: ...mes out from the air outlet The purifier is not connected to the power supply Connect the purifier into the power supply and switch on Check if the voltage indicated on the bottom or at the rear of the air purifier corresponds to an automobile outlet for 12V or to the local power voltage before you connect the air purifier The airflow that comes out of the air outlet is significantly weaker than b...

Page 25: ...emits a distinct scent This scent comes from the natural ingredients that remove the viruses in the indoor air around you The intensity of the perceived smell decreases if you position the device at a larger distance and or out of direct sunlight at a cooler position Tested for MS2 virus species removal at Intertek Institute USA tested in 11m3 chamber ...

Page 26: ...ldwide guarantee leaflet If there is no Consumer Care Center in your country go to your local Philips dealer Order parts or accessories If you have to replace a part or want to purchase an additional part go to your Philips dealer or visit www philips com support If you have problems obtaining the parts please contact the Philips Consumer Care Center in your country you will find its phone number ...

Page 27: ...cessary health and safety measures for our products to comply with all applicable legal requirements and to stay well within the EMF standards applicable at the time of producing the products Philips is committed to develop produce and market products that cause no adverse health effects Philips confirms that if its products are handled properly for their intended use they are safe to use accordin...

Page 28: ...er household waste Please inform yourself about the local rules on the separate collection of electrical and electronic products The correct disposal of your old product helps prevent potentially negative consequences on the environment and human health ...

Page 29: ......

Page 30: ... TW 目錄 1 重要事項 31 安全 31 2 您的空氣清淨機 35 概覽 36 3 快速入門 38 安裝抗病毒蕊盒 38 連接 41 車用 41 家用或辦公室用 42 開啟電源並變更風速 43 4 清潔空氣清淨機 45 5 更換抗病毒蕊盒 46 6 更換活性碳濾網 49 7 疑難排解 51 8 保固與服務 52 訂購零件或配件 52 9 聲明 53 電磁場 EMF 53 符合 EMF 標準 53 回收 54 ...

Page 31: ...勿讓水或其他液體 或是易燃清潔劑進入產品內 以避免電擊和 或火災 請勿用水 其他液體 或是 易燃 清潔劑清潔產品 以避免電擊和 或火災 請勿在駕駛時操作開關 請勿在會妨礙前方視線 駕駛操作或對乘客造成危害 的位置安裝本產品 警示 在您連接本產品的電源之前 請確認本產品機體底部 或後方所標示的電壓與 12V 車用插座或當地電源電壓 是否相同 本產品是針對使用 12V 電池的車輛而設計 請勿用於 大型卡車 公車或其他使用 24V 電池的車輛 請勿在拔除車用變壓器或連接插頭時拉扯電源線 請僅使用本產品隨附的電源供應器 ...

Page 32: ...或適當指示如何安全使用本產品 以及可能 遭受的危險 請勿讓兒童把玩本產品 若無人在旁監 督 不得讓孩童清潔與維護產品 請勿在出風口或進風口放置物品上 而擋住進出風口 請勿將本產品浸入水中 請先切斷電源並從點煙器插座取下車用變壓器 再更 換抗病毒蕊盒 更換活性碳濾網或清潔本產品 當您長時間不使用本產品時 請切斷電源並從點煙器 插座取下車用變壓器 如果點煙器插座和煙灰缸是整合式裝置 請在點煙器 熄滅後使用本產品 注意 本產品不可用來作為維持良好通風的設備 替代吸塵 器清潔 或當作除臭劑使用 如果供應產品電力的電源插座接頭不良 產品插頭會 發熱 請確定將產品插入接頭良好的插座 請將本產品放置在乾燥平穩的水平面上使用 在車內使用時 建議您將產品置於汽車的置杯架中 ...

Page 33: ...發生水滴凝結的現象 請在開啟產品電源之前 確認活性碳濾網和抗病毒蕊 盒皆已正確安裝 請僅使用本產品專用的原廠飛利浦活性碳濾網和抗病 毒蕊盒 請勿使用其他產品 切勿使用堅硬的物體敲打產品 特別是進風口及出風 口 請勿將手指或任何物體放入出風口 當您使用室內噴霧式驅蟲劑或在充滿油漬 燒香 香 煙的火星或化學煙霧的地方時 請勿使用本產品 請勿在氣體用品 加熱裝置或壁爐附近使用本產品 使用完畢後或進行清潔之前 請務必先拔除電源插頭 請勿在溫差變化極大的室內或車內使用本產品 因為 室溫差距太大會造成本產品內部凝結水珠 在家使用時 請將本產品遠離使用無線電電波的電子 電器至少 2 公尺以避免干擾 例如電視 無線電廣 播 無線電信號控制的時鐘 本產品為家用和車用產品 僅限於在正常操作環境下 使用 ...

Page 34: ...4 ZH TW 請勿在極為潮濕或周遭溫度很高的環境下使用本產 品 例如浴室 廁所或廚房 本產品無法清除一氧化碳 CO 或氡氣 Rn 發生燃 燒意外及危險化學物品意外時 本產品無法當作安全 裝置使用 抗病毒蕊盒可能會散發獨特氣味 如果氣味讓您感到 不適 請增加空氣流通 例如打開窗戶或停止使用產 品 通過美國 Intertek Institute 的去除 MS2 菌種測試 在 11 立方公尺的空間進行測試 ...

Page 35: ...ZH TW 35 2 您的空氣清淨機 感謝您購買本產品 歡迎來到飛利浦的世界 請至 www philips com welcome 註冊您的產品 以獲得飛 利浦提供的完整支援 在您安裝和使用本裝置前 請先詳讀本使用手冊 敬請妥 善保管本手冊 以供日後參考 ...

Page 36: ...36 ZH TW 概覽 清點產品零件 a b c d g h i e f j k ...

Page 37: ...ZH TW 37 a 風速按鈕 b 指示燈按鈕 c 進風口 d 底蓋 e 出風口 f 電源線插孔 g 活性碳濾網 h 抗病毒蕊盒 i 刷具 j 交流電 直流電變壓器 k 車用變壓器 ...

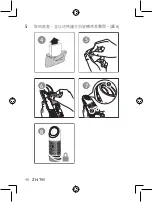
Page 38: ...38 ZH TW 3 快速入門 安裝抗病毒蕊盒 本產品隨附所有配件 但您必須先拆下抗病毒蕊盒的包 裝 並將抗病毒蕊盒插入產品中才能使用 取下塑膠和 2 張小貼紙 再將其裝入產品中 如下所述 備註 請務必先拔掉清淨機的電源插頭 再安裝抗病毒蕊 盒 圖 1 將匣裝入正確的位置 ...

Page 39: ...ZH TW 39 1 以順時鐘方向旋轉開啟底蓋 圖 2 2 拆開正面護板蓋 圖 3 1 2 3 3 在裝入新的匣之前 先取下 2 張小貼紙 圖 4 6 4 若要重新裝入正面護板蓋 先將頂部扣鉤裝入產品 頂部 然後將護板推入產品機體 圖 7 ...

Page 40: ...40 ZH TW 5 裝上底蓋 並以逆時鐘方向旋轉將其關閉 圖 8 4 5 6 7 8 ...

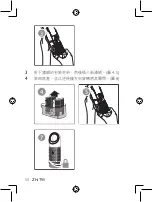
Page 41: ...ZH TW 41 連接 車用 注意 安裝產品時請勿擋住進出風口 如果您將產品放在冷氣機前面 當車用暖氣機開啟 時也會被加熱 請小心不要受傷 1 將車用變壓器接上電源線插孔 圖 1 2 將點煙器插頭接上點煙器插座 圖 2 1 2 ...

Page 42: ...42 ZH TW 家用或辦公室用 1 將交流電 直流電變壓器接上電源線插孔 圖 1 2 將電源插頭接上電源插座 圖 2 1 2 ...

Page 43: ...TW 43 開啟電源並變更風速 注意 當您關閉引擎或取出車鑰匙時 請拔除點煙器插頭 以避免汽車電池放電 備註 如果您在使用空氣清淨機時關閉汽車電源 重新啟 動汽車時 清淨機會以第 1 級的風速運作 風速分為 2 級 1 按下風速按鈕會開啟空氣清淨機電源 空氣清淨機會以第 1 級的風速運作 圖 1 指示燈會自動亮起 若要關閉指示燈 可按下 指示燈按鈕將其關閉 圖 4 5 2 再次按下風速按鈕可提高風速 圖 2 ...

Page 44: ...44 ZH TW 3 第三次按下風速按鈕可關閉空氣清淨機電源 圖 3 1 x 1 2 x 2 3 x 3 4 x 1 5 x 2 ...

Page 45: ...ZH TW 45 4 清潔空氣清淨機 備註 進行清潔前 請務必先拔掉清淨機的電源插頭 切勿讓清淨機浸入水或其他液體中 切勿使用漂白劑或酒精等具磨蝕性 刺激性或易燃 洗劑清潔清淨機的任何部分 定期清潔清淨機機體的內部與外殼 可避免累積灰塵 1 請使用柔軟的乾布擦拭清淨機的機體 2 使用清潔刷清潔進風口及出風口 使用後 可將清潔刷掛在空氣清靜機內部的 側邊 ...

Page 46: ...46 ZH TW 5 更換抗病毒蕊盒 備註 請務必先拔掉清淨機的電源插頭 再更換抗病毒蕊 盒 圖 1 每 3 個月更換一次抗病毒蕊盒 將抗病毒蕊盒裝入正確的位置 ...

Page 47: ...ZH TW 47 1 以順時鐘方向旋轉開啟底蓋 圖 2 2 拆下正面護板蓋 圖 3 1 2 3 3 在裝入新的匣之前 先取下塑膠和 2 張小貼紙 圖 4 6 4 若要重新裝入正面護板蓋 先將頂部扣鉤裝入產品 頂部 然後將護板推入產品機體 圖 7 ...

Page 48: ...48 ZH TW 5 裝回底蓋 並以逆時鐘方向旋轉將其關閉 圖 8 4 5 6 7 8 ...

Page 49: ...ZH TW 49 6 更換活性碳濾網 備註 在更換活性碳濾網之前 請務必拔除清淨機的電源 插頭 圖 1 活性碳濾網應該每6個月更換一次 將濾網裝入正確的位置 1 以順時鐘方向旋轉開啟底蓋 圖 2 2 取出活性碳濾網 圖 3 1 2 ...

Page 50: ...50 ZH TW 3 3 拆下濾網的包裝材料 然後插入新濾網 圖 4 5 4 裝回底蓋 並以逆時鐘方向旋轉將其關閉 圖 8 4 5 7 ...

Page 51: ...空氣 流出 清淨機沒有連接至電源供應器 請將清淨機接上電源 然後開 啟電源 在您連接空氣清淨機的電源之 前 請確認空氣清淨機機體底 部或後方所標示的電壓與 12V 車用插座或當地電源電壓是否 相同 出風口流出的風 速比之前慢很多 查看濾網的更換週期 視需要加 以更換 出風口發出異 味 查看濾網的更換週期 視需要 加以更換 抗病毒蕊盒散發獨特氣味 此氣 味來自用來去除您周遭室內空氣 所含病毒的天然成份 如果您將 裝置放在較遠和 或遠離陽光直 射的較涼爽位置 您所聞到氣味 的強度就會降低 通過美國 Intertek Institute 的去除 MS2 菌種測試 在 11 立方公尺的空間進行測試 ...

Page 52: ...關資訊 或是有任何問題 請造訪飛利浦網 站 www philips com 或聯絡您所在國家 地區的飛利浦客 戶服務中心 您可在全球保證書上找到電話號碼 若當地 沒有客戶服務中心 請洽詢當地的飛利浦經銷商 訂購零件或配件 如果您必須更換零件或想購買其他零件 請聯絡您的飛利 浦經銷商 或造訪 www philips com support 如果您有取得零件方面的問題 請聯絡您所在國家 地區 的飛利浦客戶服務中心 您可在全球保證書上找到電話 號碼 ...

Page 53: ...Koninklijke Philips N V 製造銷售多項消費性產品 這些產 品就如同其他電器 通常能收發電磁訊號 飛利浦的一大企業原則 就是針對自身的產品進行必要的 健康與安全檢測 以符合所有適用的法律規定 以及在產 品生產期間符合適用的 EMF 標準 飛利浦致力於開發 生產及銷售不危害健康的產品 飛利 浦保證 只要依照正確用途並妥善使用 根據現有的科學 研究資料 使用本公司產品並無安全顧慮 飛利浦積極參與國際 EMF 與安全標準的開發 因此得以 掌握標準化的發展 及早將標準化與自身的產品整合 ...

Page 54: ...回收 請勿將您的產品與其他家用廢棄物共同丟棄 請瞭解當地電子 及電器廢棄物的垃圾分類相關法規 正確處理廢棄產品有助於 避免對環境和人類健康帶來負面影響 ...

Page 55: ...地電子 有助於 ...

Page 56: ...Specifications are subject to change without notice 2014 Koninklijke Philips N V All rights reserved 4241 210 17311 ...

Reviews: