background image

EN


User Manual 

2

ZH-T


使用手冊

 20

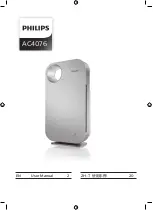
AC4076

Summary of Contents for AC4076

Page 1: ...EN User Manual 2 ZH T 使用手冊 20 AC4076 ...

Page 2: ......

Page 3: ...清潔濾網 更換濾網 清潔濾網 更換濾網 1 ...

Page 4: ... With our air purifier it improves the air quality and ensures you and your family members breathe cleaner air at your home Filtration in a professional and credible way The air purifier has all in one high efficiency formaldehyde removal HEPA filter that ensures the best air quality in your home Stage 1 The pre filter has been treated with antibacterial substances It catches big particles like hu...

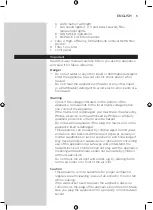
Page 5: ...ips a service centre authorised by Philips or similarly qualified persons in order to avoid a hazard Do not use the appliance if the plug the mains cord or the appliance itself is damaged This appliance can be used by children aged from 8 years and above and persons with reduced physical sensory or mental capabilities or lack of experience and knowledge if they have been given supervision or instr...

Page 6: ...t your fingers or objects into the air outlet Do not use this appliance when you have used indoor smoke type insect repellents or in places with oily residues burning incense or chemical fumes Do not use the appliance near gas appliances heating devices or fireplaces Always unplug the appliance after use and before you clean it Do not use the appliance in a room with major temperature changes as t...

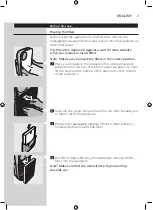
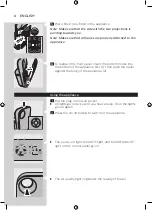
Page 7: ...ion 1 Place your fingers in the recesses of the side panels and gently pull the top part of the front panel towards you Then lift the hooks at the bottom of the panel out of the bottom of the appliance 2 Grab the two projections and pull the pre filter towards you to take it out of the appliance 3 Remove the packaging material of filter 2 high efficiency formaldehyde removal HEPA filter 4 Put filt...

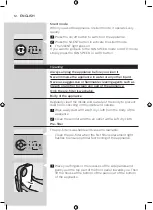
Page 8: ...he bottom hooks into the bottom of the appliance first 1 Then push the panel against the body of the appliance 2 Using the appliance 1 Put the plug in the wall socket All lights go on twice and you hear a beep Then the lights go out again 2 Press the on off button to switch on the appliance The power on light the AUTO light and the AIR QUALITY light on the control panel go on The air quality light...

Page 9: ...gh humidity we advise you to use one of the manual speed settings Fan speed lights filter replacement lights The lights on the right hand side of the control panel have a dual function they either indicate the fan speed or they indicate that the filters should be replaced or cleaned When lights 1 to 2 light up continuously they indicate the current fan speed When light 1 flashes you have to clean ...

Page 10: ...djust the sensitivity level of the air quality sensor One of the fan speed lights flashes to show the set sensitivity level of the air quality sensor 4 Press the on off button to switch off the appliance Note When you change the sensitivity level the appliance automatically starts operating at the set sensitivity level whenever you switch on the appliance Auto mode When the appliance is switched o...

Page 11: ... its surroundings In auto mode the appliance automatically switches to night mode when the room in which it is operating becomes dark When the room has been dark for 3 minutes the lights of the appliance go out the fan speed and noise level are reduced and the energy consumption is minimised If the room becomes bright again for 5 minutes or longer the appliance resumes normal operation Note The ni...

Page 12: ...l to clean any part of the appliance Only the pre filter is washable Body of the appliance Regularly clean the inside and outside of the body to prevent dust from collecting on the inside and outside 1 Wipe away dust with a soft dry cloth from the body of the appliance 2 Clean the air inlet and the air outlet with a soft dry cloth Pre filter The pre filter is washable and vacuum cleanable Clean th...

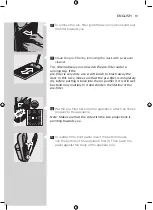
Page 13: ...case make sure that the pre filter is completely dry before putting it back into the air purifier If it is still wet bacteria may multiply in it and shorten the lifetime of the pre filter 4 Put the pre filter back into the appliance Attach all hooks properly to the appliance Note Make sure that the side with the two projections is pointing towards you 5 To reattach the front panel insert the botto...

Page 14: ...air quality sensor outlet with a soft brush 2 Remove the air quality sensor cover 3 Clean the air quality sensor the dust inlet and the dust outlet with a lightly moistened cotton swab 4 Dry them with a dry cotton swab 5 Reattach the air quality sensor cover Filter replacement Filter maintenance This appliance is equipped with the Healthy air protect lock to ensure that the filters are in optimal ...

Page 15: ...tect lock If you do not replace the filter in time the appliance stops operating approx 2 weeks after the filter replacement light started flashing When the appliance is locked it does not operate until you have replaced with the new filter and pressed the reset button Note When filter replacement lights 2 and REPLACE FILTER on the control panel are on continuously the appliance is locked see sect...

Page 16: ...l towards you Then lift the hooks at the bottom of the panel out of the bottom of the appliance 3 To remove filter 1 pre filter grab the two projections and pull the filter towards you 4 To remove filter 2 high efficiency formaldehyde removal HEPA filter grab its tag and pull it towards you 5 Discard the filter that needs to be replaced and unpack the new filter Note Do not touch the pleated filte...

Page 17: ...he appliance again 10 Press the filter reset button with a thin tool Note You do not need to press the filter reset button after cleaning filter 1 pre filter Note You cannot reset the appliance when you replace a filter before its filter replacement light starts flashing Note You cannot reset the appliance if it is not plugged in and switched on Storage To store the mains cord wind it round the co...

Page 18: ...s are not responding Replace the high efficiency formaldehyde removal HEPA filter when the filter replacement light started flashing and the appliance has sounded every 30 minutes after approx 2 weeks Replace the filter and reset the appliance see chapter Filter replacement so that the appliance can operate again No air comes out of the air outlet The appliance is not switched on Put the plug in t...

Page 19: ...d to replace a filter but I already did Perhaps you did not press the filter reset button properly Plug in the appliance press the on off button and press the filter reset button with a flat tool The appliance stops operating although the power on light is still on The built in quality sensor has determined that the air quality is good and that the air does not need to be cleaned anymore When the ...

Page 20: ...清潔濾網 更換濾網 清潔濾網 更換濾網 1 ...

Page 21: ...質 確保您和家人在家呼吸更潔淨的 好空氣 專業可靠的過濾方式 本空氣清淨機採用多功能的複合高效去甲醛HEPA濾網 確保您的 家居環境擁有最佳空氣品質 第 1 階段 預過濾網經抗菌物質處理 可捕捉人類頭髮 寵物毛 髮等較大粒子 第 2 階段 複合高效去甲醛HEPA濾網能有效濾除灰塵 花粉與 大於 20 奈米的超微粒 其中包括病毒與細菌 根據世界衛生 組織的出版物指出 禽鳥類與人類的流感病毒以及退伍軍人菌 Legionella 大於 20 奈米 一般說明 圖 1 A 空氣品質環狀指示燈 B 空氣質量感測器出風口 C 空氣質量感測器 D 空氣質量感測器進風口 E 握柄 F 出風口 G 進風口 H 電源線收納裝置 I 控制面板 1 夜間模式光線感應器 2 空氣品質 AIR QUALITY 開 關按鈕附指示燈 3 電源開 關按鈕附指示燈 4 靜音 SILENT 按鈕附指示燈 5 風速 FAN SPE...

Page 22: ... 身體官能或心智能力退化者 或是 經驗與使用知識缺乏者使用 但需要有人在旁監督或適當指示如 何安全使用本產品 以及可能遭受的危險 請勿讓兒童把玩本產 品 若無人在旁監督 不得讓孩童清潔與維護本產品 請勿在出風口上方或進風口前面放置物品 擋住進出風口 注意 本產品不可用來作為維持良好通風的設備 替代吸塵器清潔 或 烹調時用來當作抽油煙機使用 如果供應產品電力的牆上插座接頭不良 產品插頭會發熱 請確 定將產品插入接頭良好的牆上插座 請將本產品放置在乾燥平穩的水平面上使用 產品的背面及側面須至少保留 20 公分的間隔距離 頂部則至少 保留 30 公分的間隔距離 產品頂部請勿堆放任何物品 請勿坐在產品上 請勿將產品放置在冷氣機正下方 以免冷氣機滴水 造成產品發 生水滴凝結的現象 請在開啟產品電源前 先確認所有濾網皆已正確安裝 請僅使用產品專用的飛利浦原廠濾網 請勿使用其他濾網 切勿使用堅硬的物體敲...

Page 23: ...請勿在極為潮濕或周遭溫度很高的環境下使用本產品 例如浴 室 廁所或廚房 本產品無法清除一氧化碳 CO 或氡氣 Rn 發生燃燒意外及 危險化學物品意外時 本產品無法當作安全裝置使用 電磁場 EMF 本飛利浦產品符合所有電磁場暴露的相關適用標準和法規 第一次使用前 放置濾網 第一次使用前 必須先拆下濾網 2 的包裝 然後按照以下步驟把濾 網 2 放入產品中 秘訣 取出或裝入濾網時 將本產品靠牆擺放可獲得較穩定的支撐 備註 請確定濾網裝入正確的位置 1 將手指放入兩邊護板的凹處 朝自己的方向輕輕拉出正面護板的 頂部 然後將護板底部的扣鉤自產品底部提起 2 抓住預過濾網上兩個凸出部分 朝向自己拉 將其從產品中 取出 3 從包裝材料取出新濾網 ...

Page 24: ...註 請確認有拉片的那一側朝向自己 5 將濾網 1 預過濾網 裝入產品 備註 請確認有兩個凸出部分的那一側朝向自己 備註 請確認所有扣鉤皆已正確裝入產品 6 若要重新裝入正面護板 先將底部扣鉤裝入產品底部 1 然後將護板推入產品機體 2 使用本產品 1 將電源插頭插入牆上插座 所有指示燈亮起兩次 並發出嗶聲 然後指示燈再次熄滅 2 按下開 關按鈕 開啟產品電源 控制面板上的電源開啟指示燈 自動 AUTO 指示燈與空氣品質 AIR QUALITY 指示燈會亮起 1 2 ᴪᨑ ...

Page 25: ...註 當室內濕度等級很高的時候 空氣質量感測器上可能會凝結 水滴 如此一來 即使空氣品質良好 控制面板上的空氣品質 AIR QUALITY 指示燈及空氣品質環狀指示燈可能會顯示空氣品質不 良 在此情況下 自動模式會讓產品風扇高速運轉 您可以清潔空 氣質量感測器來解決此問題 如果高濕度期間經常發生水滴凝結問 題 建議您使用手動風速設定 風速指示燈 濾網更換指示燈 控制面板右側的指示燈有雙重功能 一是指示風速 二是顯示濾 網是否應更換或清潔 指示燈 1 至 2 持續亮起 表示目前風速 指示燈 1 閃爍 表示必須清潔預過濾網 指示燈 2 閃爍 表示必 須更換複合高效去甲醛HEPA濾網 當指示燈 2 和更換濾網 REPLACE FILTER 指示燈持續閃爍 時 必須更換複合高效去甲醛HEPA濾網 且產品已鎖住 請參 閱 濾網更換鎖 單元以取得更多資訊 ᴪᨑ ...

Page 26: ...3 種 標準 敏感 超敏感 污染感測器的設定預設為標準敏感度 空氣質量感測器的敏感度可 依照下列方式調整 1 如果產品已經插電 請將產品的插頭拔下 等待幾分鐘 2 按下空氣品質 AIR QUALITY 按鈕 同時將電源插頭插入電源 插座 產品會發出嗶聲兩次 其中一個風速指示燈會閃爍 顯示空氣質 量感測器目前的敏感度等級 敏感度等級 風速指示燈 敏感度等級 超敏感 敏感 標準 3 按下風速 FAN SPEED 按鈕 調整空氣質量感測器的敏感度 等級 其中一個風速指示燈會閃爍 顯示要設定的空氣質量感測器敏感 度等級 4 按下開 關按鈕 關閉產品電源 備註 若您變更了敏感度等級 產品在開啟電源後 會依照您設定 的敏感度等級 自動開始運作 ᴪᨑ ...

Page 27: ...作 顯 示最低風速設定的風速 FAN SPEED 指示燈不會亮起 在此情況 下 只有電源開啟指示燈與自動 AUTO 指示燈會亮起 備註 內建空氣質量感測器會檢測空氣品質並自動選擇適當的速度 設定 以盡可能確保最佳的室內空氣品質 當空氣乾淨時 產品會 停止運作 當空氣品質降低時 產品會以低風速和低噪音等級開始 運作 將能源消耗降至最低 夜間模式 本產品能因應周遭環境協調運作 在自動模式下 產品所處的室內 光線變暗時 會自動切換到夜間模式 室內光線變暗長達 3 分鐘 產品的指示燈就會熄滅 風速和噪音等級會降低 耗電量也會降至 最低 如果室內光線再度變亮長達 5 分鐘以上 本產品會恢復正常 運作 備註 產品只有在自動模式下運作時 才會啟動夜間模式 風速 如果不使用自動模式 可選擇所需的風速 1 按下開 關按鈕 開啟產品電源 2 按下風速 FAN SPEED 按鈕一次或多次 選擇所需的風速 相對應...

Page 28: ...NT 按鈕 啟動靜音模式 靜音 SILENT 指示燈會亮起 如果想要返回風速 FAN SPEED 模式或自動 AUTO 模式 只要按 下風速 FAN SPEED 按鈕或自動 AUTO 按鈕即可 清潔 進行清潔前 請務必先拔離電源插頭 切勿讓產品浸入水或其他液體中 切勿使用漂白劑或酒精等刺激性或易燃洗劑清潔產品的任何部分 只有預過濾網可水洗 產品機體 定期清理機體內部與外殼 可避免內部與外殼累積灰塵 1 請使用柔軟的乾布擦拭產品的機體 2 請使用柔軟的乾布清潔進風口及出風口 預過濾網 預過濾網可水洗並可用吸塵器清潔 第一個濾網更換指示燈閃爍時 請清洗預過濾網 確保產品發揮 最佳效果 ᴪᨑ ᴪᨑ ᴪᨑ ...

Page 29: ...鉤自產品底部提起 2 若要取出預過濾網 抓住濾網上兩個凸出部分 朝向自己拉出 3 使用吸塵器去除灰塵來清潔預過濾網 秘訣 也可以將預過濾網置於水龍頭下清洗 如果預過濾網很髒 請使用軟刷來清除灰塵 在這種情況下 請先確認預過濾網已完全 乾燥 再裝回空氣清淨機 如果預過濾網未乾 細菌可能會在其中 滋生 造成其使用壽命縮短 4 將預過濾網裝回產品中 將所有扣鉤正確扣入產品 備註 請確認有兩個凸出部分的那一側朝向自己 5 若要重新裝入正面護板 先將底部扣鉤裝入產品底部 1 然後將護板推入產品機體 2 1 2 ...

Page 30: ...氣品 質不良 在此情況下 您必須清潔空氣質量感測器 或使用手動 風速設定 1 請使用軟刷來清潔空氣質量感測器的進風口及出風口 2 取下空氣質量感測器的護蓋 3 請使用略濕的棉棒 清潔空氣質量感測器 進風口和出風口 4 使用乾的棉棒擦乾 5 重新裝入空氣質量感測器的護蓋 更換濾網 保養濾網 本產品配備健康空氣保護鎖功能 可確保濾網在產品運作時處於最 佳狀態 當其中一個濾網阻塞而必須清潔或更換時 對應的濾網更 換指示燈會開始閃爍 若不更換複合高效去甲醛HEPA濾網 產品會 停止運作 然後鎖定 產品鎖定後 對應濾網的濾網更換指示燈會持續亮起 備註 僅在濾網更換指示燈閃爍時才更換濾網 若在濾網更換指示 燈開始閃爍之前就更換濾網 使用壽命計時器不會重設 而會持續 計算原濾網的使用壽命 結果會造成濾網更換指示燈太早開始 閃爍 ...

Page 31: ...始閃爍約 2 週 後停止運作 產品鎖定後 必須更換新濾網 並按下重設按鈕才能 恢復運作 備註 當濾網更換指示燈 2 以及控制面版上的更換濾網 REPLACE FILTER 指示燈持續亮起時 產品已鎖住 請參閱此單元中的 保養 濾網 一節 以取得更多資訊 產品會在多久時間後鎖住 則根據濾網更換警示燈亮起後的運作時 間與所選的速度等級而定 本產品進入鎖定狀態的前 1 天 每隔 30 分鐘會發出嗶聲 提示有 濾網需要更換 本產品鎖住後 按下任一按鈕 都會聽見嗶聲 您可以按下開 關按 鈕以關閉產品電源 如果產品已鎖住 1 檢查哪個濾網需要更換 請參閱 濾網更換指示燈 一節 2 關閉產品電源 並拔除插頭 3 更換對應的濾網 請參閱 更換濾網 一節 ᴪᨑ ᴪᨑ 清潔濾網 更換濾網 清潔濾網 更換濾網 ...

Page 32: ...向輕輕拉出正面護板的 頂部 然後將護板底部的扣鉤自產品底部提起 3 若要取出濾網 1 即預過濾網 抓住濾網上兩個凸出部分 朝向 自己拉出 4 若要取出濾網 2 複合高效去甲醛HEPA濾網 抓住濾網拉片 朝向自己拉出 5 丟棄已用的濾網 拆開新濾網的包裝 備註 請勿碰觸有皺摺的濾網表面或嗅聞濾網 因為它收集了空氣 中的污染物 備註 丟棄舊濾網後務必洗手 6 將濾網 2 複合高效去甲醛HEPA濾網 裝回產品 備註 請確認有拉片的那一側朝向自己 7 將濾網 1 預過濾網 裝回產品 備註 請確認有兩個凸出部分的那一側朝向自己 備註 請確認所有扣鉤皆已正確裝入產品 ...

Page 33: ...爍之前即更換濾網 就無法重設 本產品 備註 如果未插插頭或未開啟電源 您便無法重設本產品 收納 請將電源線纏繞在產品底部的電源線收納裝置上 加以收納 配件 我們提供下列型號的新濾網 濾網 型號 濾網 2 複合高效去甲醛HEPA濾網 AC4147 環境保護 請勿在本產品使用壽命結束後當作一般家庭垃圾廢棄 應交給官 方回收站作循環再用 這樣做有助保護環境 請遵守您的國家 地區回收電器和電子產品的法則 正確處理廢 棄產品有助避免對環境和人體造成負面影響 保固與服務 若您需要相關資訊 或是有任何問題 請造訪飛利浦網站 www philips com 或連絡您所在國家 地區的飛利浦客戶服務中心 您可在全球保證書上找到電話號碼 若當地沒有客戶服務中心 請洽詢當地的飛利浦經銷商 1 2 ...

Page 34: ...材料 請確認已拆下所有包裝材料 即使本產品已經長時間 運作 空氣品質仍未獲得 改善 其中一個濾網尚未裝入產品中 請確認所有濾網都已按照下列順 序正確安裝 濾網從內至外分別為 1 複合高效去甲醛HEPA濾 網 2 預過濾網 空氣質量感測器潮濕 室內的濕度等級很高 造成水珠凝結 請確 認空氣質量感測器乾淨且乾燥 請參閱 清潔 單元 空氣品質環狀指示燈及空 氣品質指示燈的顏色一直 維持不變 空氣質量感測器髒污 清潔空氣質量感測器 請參閱 清潔 單元 室內空氣不夠流通 請開窗 促進空氣對流 我會過敏 需要更乾淨的 空氣 您可以變更空氣質量感測器敏感度 請參閱 使用本產品 單元 讓本產品把空氣清潔得更加徹底 產品噪音很大 請檢查是否已拆下濾網的所有包裝材料 如果產品噪音仍然很大 可將風速變更為較低的速度等級 產品不斷要求更換濾網 但濾網已經更換了 您可能未確實按下濾網重設按鈕 請為本產品插上電源 按...

Page 35: ...ts chemical symbols 電源線組 塑膠外殼 電源板組件 電動機 主電路板組件 設備名稱 飛利浦空氣清淨機 型號 型式 AC4076 80 Equipment name Type designation Type 備考1 超出0 1 wt 及 超出0 01 wt 係指限用物質之百分比含量超出百分比 含量基準值 備考2 係指該項限用物質之百分比含量未超出百分比含量基準值 備考3 係指該項限用物質為排除項目 Note 1 Exceeding 0 1 wt and exceeding 0 01 wt indicate that the percentage content of the restricted substance exceeds the reference percentage value of presence condition Note 2 indicates ...

Page 36: ... 2017 Koninklijke Philips N V All rights reserved 4241 210 17353 ...

Reviews: