5
Safety
This device produces harmful radiation. Direct contact could impair the eyes
and skin. Only check the operation of the UV-C lamp through the air vents at the
top of the unit. The openings will light up blue if the lamp is on.
- When switching on the device for the first time, you may notice a burning smell from
the UV-C lamp for a short time. This odour is similar to the odour you notice when
using a sun bed, and will disappear after a short time.
- Always comply with the electricity company’s regulations with regard to any
permanent connection to the mains. If there is any doubt regarding the connection,
consult a recognised electrician or the electricity company. Always work with an
earth leakage current circuit-breaker (residual current trip).
- Always remove the plug from the socket before carrying out any maintenance or
repair work on the unit. Never insert the plug / pull the plug from the socket when
you are standing in water or if your hands are wet.
- Never submerge this device in water.
- Never install the unit in an area subject to full sunlight.
- Keep children away from this device and from the cable.
- The cable of the device cannot be replaced. The complete unit must be replaced if
there is any damage to the power cable. Never remove the plug, but always leave the
electrical unit intact. An electrical unit with the plug removed will no longer be
covered by the guarantee.
- Once the device has been switched off, the lamp will remain hot for approximately
10 minutes.
- Do not use the device if any of the components are damaged.
- This product can only be used according to the guidelines described in these
instructions for use
Installation of the device
Determine where the device will be installed. When selecting a location for the device,
please bear in mind that the unit must be able to circulate the air in the room freely
and without obstructions. Also ensure that there is a power socket near the selected
location. Install the device in a dry place. Ideally, the unit should be mounted in the
vertical position, with a space of at least 50cm underneath for carrying out maintenance
and for the replacement of the filter and/or lamp.
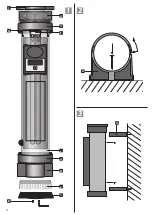
1. Remove the AIR160 Classic together with the supplied pipe clips
(A)
from the
packaging and position the AIR160 Classic with the pipe clips
(A)
at the selected
location so that you can mark where the pipe clips should be fitted onto the solid
back wall.
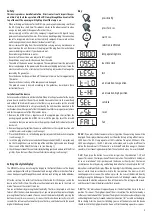
2. Remove the pipe clips
(A)
from the device and fix them at the selected location with
suitable screws and/or plugs (see Drawing 2).
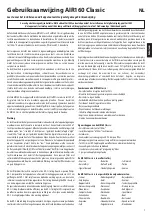
3. Place the AIR160 Classic in the fixed pipe clips
(A)
and click the brackets into place
(see Drawing 2, 3).
4. Insert the plug into the socket and check the operation of the UV-C lamp
(H)
- only
do this through the air vents at the top of the unit! Blue light can be seen through
the air vents of the lid
(I)
if the lamp is on (see Drawing 1).
5. Check the operation of the ventilator
(K)
by holding your hand underneath the filter
grid
(C)
. If you feel an air flow, the ventilator
(K)
is working (see Drawing 1).
Setting the digital display
The AIR160 Classic can be set using the display on the front of the device. The display
can be easily operated with just the one button. Drawing 5 of these instructions for use
shows how to navigate through the menu. Details on each setting can be found below.
After the start-up, the validity of the time will be tested first. When you switch the
device on for the first time, the software will automatically take you to the ‘clock set
mode’. You can set the current time here.
You can set the hours by pressing the button briefly. The time is displayed in a 24-hour
format. After the hours have been correctly set, you can jump to the minute setting by
pressing the button for 3 seconds. You can now set the minutes by briefly pressing the
button as many times as necessary. As soon as the time has been correctly set, wait 5
seconds. The software will automatically save the time, and the dot next to the second
digit will blink every second.
‘8000.’:
If you press the button once in the rest position, the operating hours will be
displayed. The display will automatically start from the factory setting of the timer, i.e.
8,000 hours. The UV-C lamp operates at 100% radiation for up to 8,000 hours. After
8,000 operating hours, the UV-C radiation will weaken, and may be insufficient to
obtain the desired results. If the device is switched off and then on again, the hour
counter will start counting backwards from the value it had when it was switched off.
‘t-LO’:
If you press the button twice in the rest position, the indication ‘t-LO’ will
appear. This means: The low position of the air circulation. The ventilator is hereby set
for an air circulation of 25 m
3
per hour, and the device is virtually silent. The low air
circulation can be set by pressing and holding the button for 3 seconds while the ‘t-LO’
indication is visible on the display. When the hour digits start blinking, you can set the
hour at which the device should switch to the low position. The hours will start
counting upwards as soon as the button is pressed. You can set the desired hour by
briefly pressing the button again. The minutes will start blinking 5 seconds after you
have released the button, and you can then set the minutes. The settings will be saved,
and the current time will be displayed after 5 seconds.
‘t-HI’:
The ‘t-HI’ indication will appear if you press the button three times in the rest
position. This means: The high position of the air circulation. The ventilator hereby is
set for an air circulation of 50 m
3
per hour. The high air circulation can be set by pressing
and holding the button for 3 seconds when the indication ‘t-HI’ is visible on the display.
When the digits for the hours start blinking, you can set the hour at which the device
should switch to the high position. The hours will start counting upwards as soon as
Key
5
sec
press briefly
press for 3 sec.
wait 5 sec.
selection confirmed
lamp operating time
test
air circulation, low position
air circulation, high position
set clock
reset
real-time clock
fail


