8
EN
Wi-Fi connection
Setting up the Wi-Fi connection for the first time
1
Download and install the
Philips Air+
app from the
App Store
or
Google Play
�
2
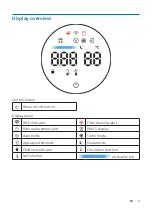
Put the plug of the Air Performer in the power socket and touch
to turn on the Air Performer.
»
The Wi-Fi indicator blinks orange for the first time.
3
Make sure that your smartphone or tablet is successfully connected to your
Wi-Fi network.
4
Launch the
Philips Air+
app and click on
“Connect a New Device”
or press
the
“+”
button at the top of the screen. Follow the onscreen instructions to
connect the Air Performer to your network.
5
Note:
•
These instructions are only valid when the Air Performer is being set up for the first time. If the
network has changed or the setup needs to be performed again, see Chapter “Reset the Wi-Fi
connection” on page 8�
•
If you want to connect more than one Air Performer to your smartphone or tablet, you have to
do it one by one�
•
Make sure that the distance between your smartphone or tablet and the Air Performer is less
than 10 m without any obstructions�
Reset the Wi-Fi connection
Note:
•
Reset the Wi-Fi connection when your default network has changed.
1
Put the plug of the Air Performer in the power socket and press the button
to turn on the Air Performer.
2
Long press for 7 seconds until you hear a beep.
»
The Air Performer enters pairing mode.
»
The Wi-Fi indicator blinks orange.
3
Follow the steps 3-4 in
“Setting up the Wi-Fi connection for the first time”
section.


