background image

8


EN

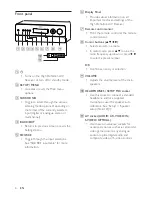
Front panel

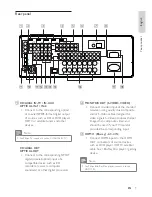
CONNECTORS /OPEN

a b c d e f

h i

g

j
k

a


2

Turns on the High De

fi

 nition A/V 

• 

Receiver or turn off to standby mode.

b

 SETUP / MENU


Accesses or exits the Main menu 

• 

options.

c

 SURROUND

Toggle to select through the various 

• 

listening mode options. Depending on 
the format of the currently selected 
input (digital or analogue, stereo or 
multichannel).  

d

 BACK/EXIT

Returns to previous screen or exits the 

• 

Settings menu. 

e

 SOURCE

Toggle through the input selections.  

• 

See "SOURCE input table" for more 
information. 

f

 Display Panel

Provides visual information on all 

• 

important modes and settings of the 
High De

fi

 nition A/V Receiver.

g

 Remote control sensor

Point the remote control at the remote 

• 

control sensor.

h

 Cursor buttons (

v V b B

)

Selects an item in a menu. 

• 

In radio mode, press 

• 

v V 

to tune the 

radio frequency up/down or press 

b B 

to select a preset number.

 OK

Con

fi

 rms an entry or selection.

• 

i

 VOLUME

Adjusts the volume level of the main 

• 

speakers. 

j

 HEADPHONES / SETUP MIC socket

Use this socket to connect a standard 

• 

headphone and/or a supplied 
microphone used for speaker auto 
calibration. See 'Setup' > 'Speaker 
setup (Smart EQ)'.

k

 AV socket (AUDIO L/R, VIDEO IN,

S-VIDEO, OPTICAL)

Use these convenience sockets for 

• 

occasional sources such as a camcorder,  
video game console, any analogue 
audio or optical digital audio and 
composite video or S-video sources. 

Summary of Contents for AVR9900/12

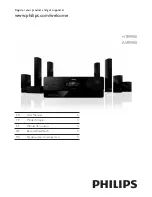
Page 1: ...HTR9900 AVR9900 Register your product and get support at www philips com welcome EN User Manual 3 FR Mode d emploi 3 ES Manual del usuario 3 DE Benutzerhandbuch 3 RU Руководство пользователя 3 ...

Page 2: ... nettkontakten For å redusere faren for brann eller elektrisk støt skal apparatet ikke utsettes for regn eller fuktighet Italia DICHIARAZIONE DI CONFORMITA Si dichiara che l apparecchio HTR9900 AVR9900 Philips risponde alle prescrizioni dell art 2 comma 1 del D M 28 Agosto 1995 n 548 Fatto a Eindhoven Philips Consumer Electronics Philips Glaslaan 25616 JB Eindhoven The Netherlands ...

Page 3: ...aker setup SmartEQ 17 Navigate through the menu 18 Setting up listening modes 18 Listening mode setup 19 Additional Information 21 5 Enjoy 24 Select a play source 24 SOURCE input table 24 Listen to radio 25 Select the radio 25 Tune to a radio station 25 Store a radio preset 25 Choose the tuner mode 25 Name a radio preset 26 View Radio Data System RDS 26 6 Adjust settings 27 Settings menu 27 Source...

Page 4: ...rheating Never install the High Definition A V Receiver in a confined space Always leave a space of at least 4 inches around the High Definition A V Receiver for ventilation Ensure curtains or other objects never cover the ventilation slots on the High Definition A V Receiver Never place the High Definition A V Receiver remote control or batteries near naked flames or other heat sources including ...

Page 5: ... to the EMC directive the mains plug on this product must not be detached from the mains cord cable Trademark notice Manufactured under license under U S Patent s 5 451 942 5 956 674 5 974 380 5 978 762 6 226 616 6 487 535 7 392 195 7 272 567 7 333 929 7 212 872 other U S and worldwide patents issued pending DTS is a registered trademark and the DTS logos Symbol DTS HD and HTS HD Master Audio are ...

Page 6: ...rect access to different source inputs selections d TUNER FM AM Selects FM or AM band e INFO Displays the source information f Philips Blu Ray player control B Starts playback x Stops playback X Pauses playback temporarily m M Fast reverse forward search g TUNER PRESET Press or to step up or down between stored radio tuner presets h H mute Switches off the sound temporarily Press again to restore ...

Page 7: ...Toggle to select desired listening or surround mode r Tuner control MEMORY PROGRAM Saves current station into preset memory Press and hold to start auto search CLEAR Deletes radio preset FM MODE Switches between FM stereo and FM mono SOURCE input table Source Audio Input Video Input Video Output Source 1 BLU PLAYER Blu ray IN Audio 1 IN Blu ray 1 IN HDMI Monitor OUT Source 2 TV Coaxial TV Audio 2 ...

Page 8: ... modes and settings of the High Definition A V Receiver g Remote control sensor Point the remote control at the remote control sensor h Cursor buttons v V b B Selects an item in a menu In radio mode press v V to tune the radio frequency up down or press b B to select a preset number OK Confirms an entry or selection i VOLUME Adjusts the volume level of the main speakers j HEADPHONES SETUP MIC sock...

Page 9: ...ceivers computer soundcard or other digital processors b MONITOR OUT S VIDEO VIDEO Connect to video input of the monitor television using quality dual composite and or S Video cables designed for video signals S Video produces sharper images than composite video and should be used if your TV monitor provides the corresponding input c HDMI 1 Blu ray 2 3 4 IN Connect HDMI inputs to the HDMI OUT conn...

Page 10: ...e left unconnected There is no bass management or other processing other than master volume control available to this 7 1 Channel Input While the multichannel audio outputs of a DVD Video player can be connected to these sockets using the High Definition A V Receiver s own Dolby Digital and DTS decoding and digital analogue converters via a digital connection will usually produce superior results ...

Page 11: ...ilar or the IR output of another device to allow control of the High Definition A V Receiver from a remote location IR OUT 1 2 Both IR OUT 1 and IR OUT 2 have dual features they can act as an infrared command repeater or stand alone as IR OUT Connect the High Definition A V Receiver s IR IN to the IR OUT of ancillary device Connect also the High Definition A V Receiver s IR OUT 1 or IR OUT 2 to an...

Page 12: ...tem DVD recorder or to an outboard audio video processor Connect the AUDIO 5 IN socket to the device s corresponding output AUDIO 6 IN is advisable to connect to a dedicated analogue output of line level audio sources like a CD player or Stereo tuner o RS 232C The RS 232C is meant for product service purposes p SPEAKER CONNECTORS Connect the respective speaker s FRONT L FRONT R CENTER SURROUND R S...

Page 13: ...e to a live wall socket ensure that it is firmly connected to the High Definition A V Receiver s AC Mains input socket first Connect only to the prescribed AC Outlet i e 230V 50 Hz Always disconnect the AC Mains cable plug from the live wall socket first before disconnecting the cable from the High Definition A V Receiver s Mains input socket ...

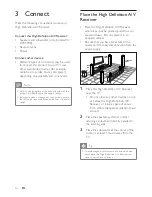
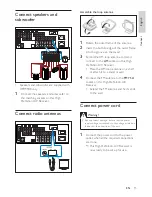
Page 14: ... Place the High Definition A V Receiver where it cannot be pushed pulled over or knocked down Do not place it in an enclosed cabinet Be sure that you have full access to the power cord for easy disconnection from the power supply SURROUND BACK LEFT FRONT RIGHT SURROUND RIGHT SURROUND LEFT FRONT LEFT SURROUND BACK RIGHT SUBWOOFER CENTER RECEIVER 1 Place this High Definition A V Receiver near the TV...

Page 15: ...a cord and connect to the AM socket on this High Definition A V Receiver Place the AM loop antenna on a shelf or attach it to a stand or wall 4 Connect the FM antenna to the FM 75 Ω socket on this High Definition A V Receiver Extend the FM antenna and fix its ends to the wall Connect power cord Warning Risk of product damage Ensure that the power supply voltage corresponds to the voltage printed o...

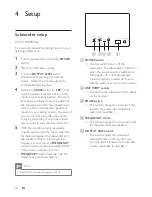
Page 16: ...ofer and the speakers If there is too much low frequency sound turn the FREQUENCY switch counter clockwise towards 80 Hz If more bass is needed turn the FREQUENCY switch towards 160 Hz Adjust for a good even balance Note For HTR9900 the default frequency is 80 Hz 200W AC220 240V 50Hz POWER OFF ON INPUT PHASE 0º 180º FREQUENCY OUTPUT LEVEL MIN MAX 50Hz 160Hz LINE a b c d e a POWER switch Use this s...

Page 17: ...e main listening to the 9900 Please Connect the measurement microphone SmartEQ position at ear height 5 1 7 1 5 Select either 7 1 or 5 1 setup depending on the availability of speakers Auto calibration starts The following parametres are automatically measured and adjusted accordingly Checking Noise Level Checks noise level relative to each speaker and subwoofer Checking Number of Speakers Speaker...

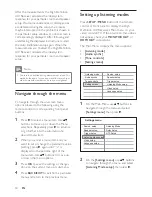
Page 18: ...sub menu of a desired menu item 2 When you are at a menu item and you want to set or change the parametre value setting press B again until ν is displayed on the extreme right of the menu item Use vV buttons to move up or down the menu options 3 Press OK to save the settings or changes done on the current menu or sub menu 4 Press BACK EXIT to exit from a particular menu and return to the previous ...

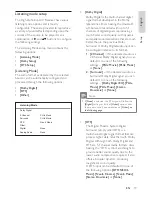
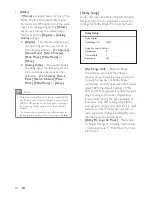
Page 19: ...ensations that are much better than in the previous Dolby Surround A Dolby Digital audio input can be configured relative to its format 2 Channel 1 If the detected audio is a 2 Channel Dolby Digital signal you can default it to one of the following settings PLIIx Movie PLIIx Music or None Surround 2 If the detected audio is a Surround Dolby Digital signal you can default it to one of the following...

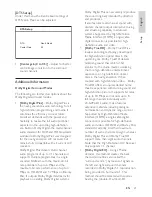
Page 20: ...format will be reflected back to the appropriate setting at the Listening mode setup Dolby Setup Under this menu the Dolby Digital s Dynamic Range Control can be adjusted as well as the settings for Dolby Digital Pro Logic IIx Music Dolby Pro Logic IIx Music Center Width 3 Dyn Range Ctrl 100 Dolby Digital Dolby Setup Dimensions 0 Panorama Off Dyn Range Ctrl Dynamic Range Control You can select the...

Page 21: ... channel output interactive mixing and streaming capability in advanced systems Supported by High Definition Media Interface HDMI a single cable digital connection is possible for high definition audio and video Dolby TrueHD Dolby TrueHD is a lossless encoding technology developed for high definition optical discs in the upcoming era Dolby TrueHD delivers tantalising sound that is bit for bit iden...

Page 22: ...h the conventional DTS format In addition to the 5 1 channels the expanded DTS ES Surround also offers the back surround also sometimes called the surround centre in reproduction providing a total of 6 1 channels The expanded DTS ES Surround includes two formats with two different methods of surround signal recording as follows DTS ES Discrete 6 1 Since the signals of the 6 1 Surround channels inc...

Page 23: ...ources Neo 6 Cinema 1 This method is ideal for the reproduction of movies The decoding takes place by emphasising the separation in order to achieve the same atmosphere with 2 channel as with 6 1 channel sources Neo 6 Music 2 Mainly recommended for music reproduction The right and left front channels do not pass through the decoder and are reproduced directly so there is no loss in sound quality a...

Page 24: ...io 1 IN Blu ray IN HDMI Monitor OUT Source 2 TV Coaxial TV Audio 2 IN Component Video 2 IN Component Video OUT Source 3 HDMI 2 IN Audio 3 IN HDMI 2 IN HDMI Monitor OUT Source 4 Optical 1 IN Audio 4 IN S Video 4 IN S Video Monitor OUT Source 5 Optical 2 IN Audio 5 IN S Video 3 IN Video Monitor OUT Source 6 Coaxial AUX Audio 6 IN Video 4 composite Video Monitor OUT Source 7 Multi 7 1 Input Component...

Page 25: ...mediate recall 1 To store a radio preset first tune the desired frequency see above then press MEMORY PROGRAM button 2 Press b B to select a preset number to be assigned 3 Then press the MEMORY PROGRAM button once again to save the station P_ _ is displayed the two blank spaces correspond to the preset stored number that could be from 01 to the maximum of 30 depending upon the current band 4 Press...

Page 26: ...xit the text entry mode View Radio Data System RDS The Radio Data System RDS permits sending small amounts of digital information using conventional FM radio broadcasts The High Definition A V Receiver supports two RDS modes station name PS mode and radio text RT mode Not every FM station incorporates RDS in its broadcast signal In most areas you will find from one to several RDS enabled stations ...

Page 27: ...p Source setup Settings menu Source setup Listening Mode setup Language setup Speaker setup Source setup Trigger setup Video setup From Settings menu pressing B will direct you to the Source setup menu wherein you could adjust allocate or change the settings of the following Source Setup Normal View The Source Setup NormalView makes it possible to set allocate or change the following settings Anal...

Page 28: ...udio input even if both are present To maintain the analogue audio input for the particular Source select Off at the Digital Audio setting of the same Source menu Gain Gain adjustment allows all sources to play back at the same volume so you don t need to adjust the volume every time a new source is selected It is generally preferable to reduce the level of the loudest source rather than making lo...

Page 29: ...V will be available at 12VTRIGGER OUT port whenever a Source with Trigger Out set to Yes is recalled Another option is None whereby the particular Source is not assigned any Trigger Out Speaker setup After connecting all ancillary sources and other combinations the Speaker setup menu will guide you on how to manage and setup your speakers in order to achieve optimum sound acoustics in your listeni...

Page 30: ...f Note The default frequency setting for each speaker is 80 Hz Speaker Configuration can be managed and adjusted by pressing a combination of B and then vV buttons Set Front Center Surround and Back to L large S small or Off along with their corresponding crossover frequency settings available at Small setting from 50 Hz up to 160 Hz as your sub system s speakers require Set Subwoofer to On or Off...

Page 31: ...urn to sound as loud as the reference Be sure that you remain in the primary listening position while balancing all channels All speakers must be in their final locations before level setting Due to the effects of room acoustics matched pair speakers front surround back will not always calibrate to exactly the same level offset readings You can exit Test mode at any time by pressing the BACK EXIT ...

Page 32: ...vailable without delay the moment Trigger OUT is linked to its assigned setting set Delay to 0s Otherwise one can select through a delay time of 1s to 15s Listening Mode setup Settings menu Listening Mode Dolby Setup DTS Setup Listening Mode setup Language setup Speaker setup Source setup Trigger setup Video setup Please refer to Setup Setting up listening modes Listening Mode Setup for more infor...

Page 33: ...entre channel Dimension 3 to 3 2 Adjust front rear emphasis of the surround effect independently from the relative channel levels Panorama On Off 3 Add a wrap around effect by extending some stereo content into the surround channels Note PLIIx Movie or PLIIx Music modes belongs to Dolby Pro Logic IIx that processes both stereo and 5 1 signals into a 6 1 or 7 1 channel output Pro Logic IIx mode wil...

Page 34: ...anguage setup Speaker setup Source setup Trigger setup Settings menu Video setup Picture setup Picture setup Color 50 Brightness 50 Video modes Custom Contrast 50 Picture setup MPEG Noise reduction Off Cross Color suppresor Off Film Mode detection Off Picture setup can be defaulted to Normal or Custom While at Video modes menu item select Normal to retain the default picture setup settings If you ...

Page 35: ...play resolution and Video format To access these 2 options press B while at the Video format line menu item Display resolution The High Definition A V Receiver has the excellent ability to upconvert standard video definition contents to high definition video signal Depending upon your TV Monitor s resolution capabilities select the applicable resolution settings Auto 576i 576p 720p 1080i and 1080p...

Page 36: ...ttings to its factory defaults Press TUNER FM AM to switch to FM mode then press and hold SURROUND on the front panel until the FACTORY RESET appears on the display panel Sound No sound from all channels Check AC cable connection and outlet No sound from some channels Check speaker cables Check Speaker Configuration menu No sound from surround channels Select appropriate listening mode Correct Spe...

Page 37: ...atio 40 dB Total Harmonic Distortion 1 5 Tuner FM Band Tuning range 87 5 MHz 108 MHz Usable sensitivity Mono 10 dBμ Signal noise ratio Mono 70 dB Signal noise ratio Stereo 65 dB Total Harmonic Distortion Mono 0 3 Total Harmonic Distortion Stereo 0 5 Channel Separation 40 dB RDS decode sensitivity 0 2 Main Unit Unit Dimensions W x H x D 435 x 167 x 394 mm Net Weight 13 3 kg Shipping Weight 16 2 kg ...

Page 38: ...ightness and contrast levels are set optimally adjust the colour control to the level of your preference MPEG Noise reduction This setting is designed to address two specific types of video distortion mosquito noise and blocking artifacts Set the level to High Medium or Low ...

Page 39: ...2009 Philips Consumer Lifestyle All right reserved sgpjp 0904 12 ...

Reviews: