background image

Basic functions

Switching on/off the set

To switch on, adjust the 

source selector

to

DISC/USB, FM

or 

TAPE 

as desired.

To switch off, adjust the 

source selector

to

OFF

.

Adjusting sound 

Adjust the sound with the 

VOLUME 

and

DBB

controls.

Radio reception 

Push the 

source selector

to 

FM

2

Turn 

TUNING

to tune in a radio station.

3

To switch off the radio, adjust the 

source

selector

to 

OFF

.

Helpful hints:

To improve reception 

For 

FM

, extend, incline and turn the 

telescopic antenna. Reduce its length if the
signal is too strong.

Playing a tape 

1

Set the source selector to 

TAPE

.

2

Press 

9 /

to open the cassette holder.

3

Insert a recorded cassette.

4

Press 

1

and playback will start.

5

Adjust the sound using the 

VOLUME

and

DBB

controls.

6

For brief interruptions, press 

;

. Press 

;

again

to resume playback.

By pressing

5

or 

6

, fast winding of the tape

is possible in both directions.

8

To stop playback, press 

9  

/

The keys are automatically released at the

end of the tape.

9

Set the source selector to 

OFF

position

(with the cassette keys released) to switch off
the set.

Note:
– During playback, the keys are automatically

released at the end of a tape and the set is
switched off (unless PAUSE mode 

;

has been

activated.)

– During fast forwarding/rewinding, the keys will

not be released at the end of a tape.To
switch off the set, make sure the cassette
keys are also released.

Cassette recording

General information on cassette
recording 

Recording is permissible insofar as copyright
or other rights of third parties are not
infringed.

This deck is not suitable for recording on
CHROME (IEC II) or METAL (IEC IV) type
cassettes. For recording you should use
NORMAL type cassettes (IEC I) on which
the tabs have not been broken.

Check and tighten slack tape before use
with a pencil to avoid jamming the deck
mechanism.

The recording level is set automatically.

Basic Function/ Radio

Cassette Recorder

AZ1856_Eng_93_CCR  2008.3.12  13:26  Page 8

Summary of Contents for AZ1856

Page 1: ...User Manual ...

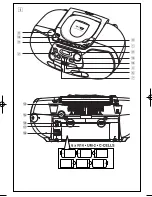
Page 2: ...USB CD USB REC DYNAMIC BASS BOOST USB DELETE 8 FM 9 2 1 3 0 4 5 7 DISC USB 1 ...

Page 3: ...2 ...

Page 4: ...3 9 4 7 8 5 6 0 ...

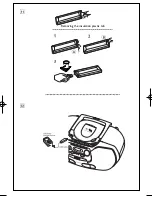
Page 5: ...Removing the insulation plastic tab ...

Page 6: ...volume level Cassette keys interrupts recording or playback 9 stops the tape and to open the casstte holder 5 6 fast winds rewinds the tape 1 starts playback 0 starts recording USB DIRECT connects an external USB mass storage device DBB for a more vivid bass response Back panel See 1 Telescopic antenna improves FM reception 3 5 mm stereo headphone socket Helpful hints The speakers will be muted wh...

Page 7: ...wn on the type plate located on the bottom of the set corresponds to your local power supply If it does not consult your dealer or service center 2 Connect the power cord to the AC MAINS inlet and the wall socket The set is now ready for use 3 To switch the set off completely withdraw the power cord from the wall socket 4 Install the unit near the AC outlet and where the AC power plug can be easil...

Page 8: ... tape is possible in both directions 8 To stop playback press 9 The keys are automatically released at the end of the tape 9 Set the source selector to OFF position with the cassette keys released to switch off the set Note During playback the keys are automatically released at the end of a tape and the set is switched off unless PAUSE mode has been activated During fast forwarding rewinding the k...

Page 9: ...passage 2 Put the CD player in position at the selected passage Recording will start from this exact point when you press 0 3 Press 2 to start recording About MP3 The music compression technology MP3 MPEG1 Audio Layer 3 significantly reduce the digital data of an audio CD while maintaining CD quality sound Getting MP3 files you can either download legal music files from the internet to your comput...

Page 10: ... your album In the pause stop position press 2 to start playback Finding a passage within a track 1 During playback press and hold down or The disc is played at high speed and low volume 2 When you recognize the passage you want release or Normal playback resumes Programming tracks You may store up to 40 tracks in the desired sequence If you like store any track more than once 1 In the stop positi...

Page 11: ...all the features offered by AZ1856 which are explained and instructed in the sections of disc operation Compatible USB mass storage devices With the AZ1856 you can use USB flash memory USB 2 0 or USB 1 1 USB flash player USB 2 0 or USB 1 1 USB device which requires driver installation under Windows XP is not supported Note In some USB flash players or memory devices the stored contents are recorde...

Page 12: ...ment For USB device playing if the display shows OL it means that the USB device is electri cally overloading AZ1856 You need to change a USB device CD Tape Tuner Ripping AZ1856 allows you to copy the music files or spoken contents of a disc tape station to the external USB device CD ripping 1 Adjust the source selector to DISC USB 2 Insert a disc audio CD or MP3 or WMA 3 Press USB CD to enter CD ...

Page 13: ... s During recording if the display shows 2 second flashing Err then tr it means that the file being played is invalid un recordable You need to skip track s During recording if the display shows 2 second flashing Err then dup it means that the file being played has been previously recorded due to the same file name as the previously recorded one You need to skip track Or you need to switch off and...

Page 14: ...should never be touched Sudden changes in the surrounding temperature can cause condensation on the lens of your CD player Playing a CD is then not possible Do not attempt to clean the lens but leave the set in a warm environment until the moisture evaporates Always close the CD door to avoid dust on the lens To clean the CD wipe in a straight line from the center towards the edge using a soft lin...

Page 15: ...e USB device doesn t play on my AZ1856 It is not set in the USB mode Press CD USB to select USB mode The device is not securely connected to AZ1856 s USB direct Re connect the device and make sure that the device is powered on The device is not supported by AZ1856 or the audio file format stored on the device is not supported by AZ1856 Use a compatible device playable audio file format The disc fi...

Page 16: ... a safe volume level Set your volume control at a low setting Slowly increase the sound until you can hear it comfortably and clearly without distortion Listen for reasonable periods of time Prolonged exposure to sound even at normally safe levels can also cause hearing loss Be sure to use your equipment reasonably and take appropriate breaks Be sure to observe the following guidelines when using ...

Page 17: ...rk with this product b If your Mass storage device requires a battery power source please make sure you have a fresh battery in it or charge the USB device first and then plug it into this product again 2 Supported Music type a This device only supports unprotected music with file extension mp3 wma b Music bought from on line music stores are not supported because they are secured by Digital Right...

Page 18: ...Printed in China PDCC ZC ZYL 0812 W CLASS 1 LASER PRODUCT AZ1856 Meet Philips at the Internet http www philips com English ...

Reviews: