background image

Repair Procedures 

12-66 

„

 CardioMD Service Manual 


1MAN0158-H11 04-2005 CSIP Level 1


12.5.3.7


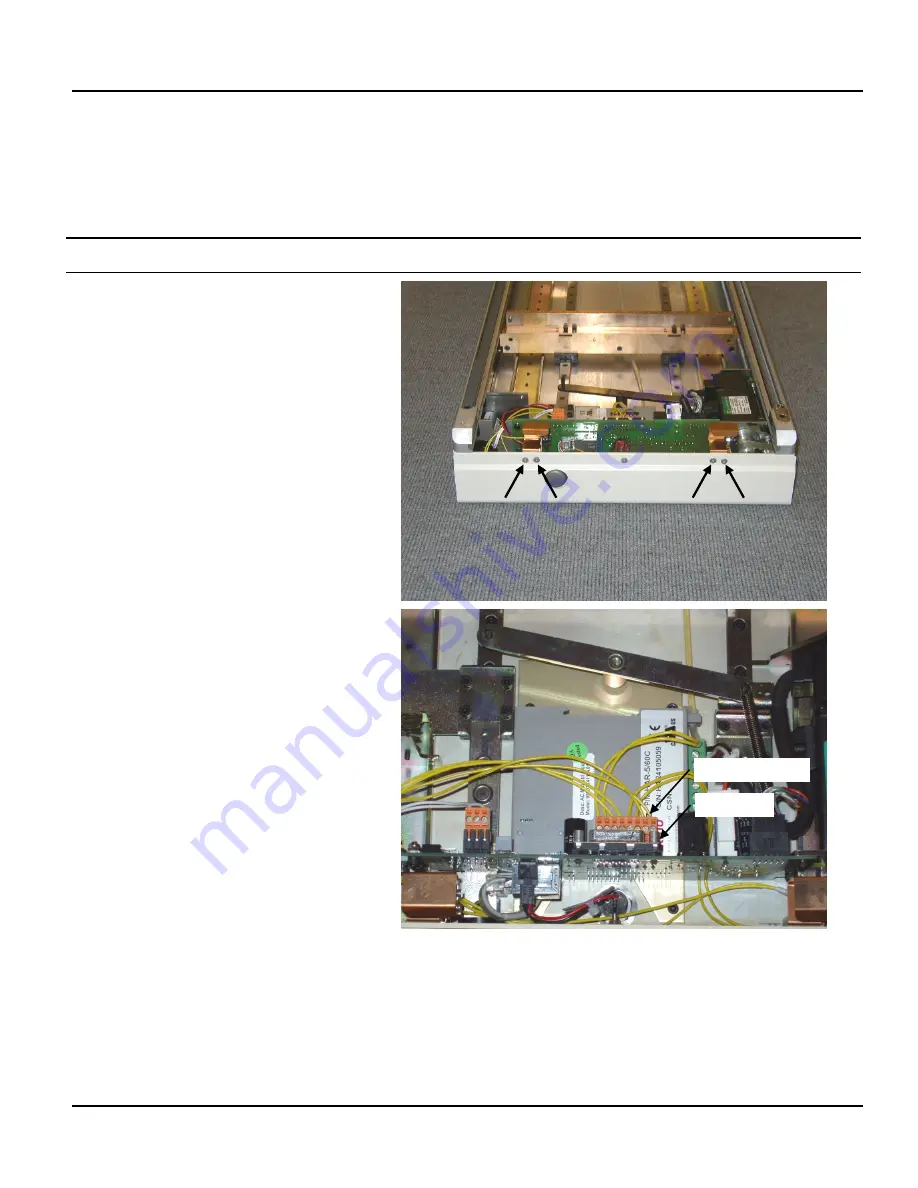
Replacing Collision Sensors 

Collision sensors for the line source compartment are provided in pairs (assemblies). One 
assembly, the longer one, is located furthest away from the motor. The shorter assembly is located 
at the motor end of the line source compartment. The procedure for replacing both assemblies is 
the same. 


Procedure Details 

1.


Use a T08 Torx key to unscrew the two 
collision sensors from the line source 
compartment. 


2.


Locate the orange connector on top of the 
motion controller. 

3.


Unplug the connection to the AC source 
motion board. 


Disconnect 

Orange connector 

Summary of Contents for CARDIOMD

Page 1: ...CARDIOMD SERVICE MANUAL 1MAN0158 H11 04 2005 CSIP Level 1 ...

Page 2: ...orized persons is strictly prohibited Report violation of these requirements to the Philips Legal Department This document must be returned to Philips when the user is no longer licensed and in any event upon Philips first written request COPYRIGHT NOTICE April 2005 Koninklijke Philips Electronics N V All Rights Reserved WARRANTY DISCLAIMER Philips provides this document without warranty of any ki...

Page 3: ...2 2 3 Collimator 2 7 2 2 4 Hand Controller 2 8 2 2 5 Acquisition PC 2 8 3 Detailed Description 3 1 3 1 Introduction 3 2 3 2 Gantry 3 2 3 2 1 AC Power Supply 3 6 3 2 2 Safety Board 3 8 3 2 3 Motion Controllers 3 10 3 2 4 Motor Amplifiers 3 16 3 2 5 Connections Series III Systems 3 16 3 2 6 Connections Series I and II systems 3 20 3 2 7 Hand Controller 3 21 3 2 8 Safety Circuit 3 22 3 3 Detectors 3 ...

Page 4: ... 34 4 4 1 Introduction 4 34 4 4 2 Calibration of Absolute Encoders 4 34 4 4 3 Calibration of Y Ultimate End Stop 4 36 4 4 4 Calibration of Rotation Ultimate End Stop 4 36 4 4 5 Calibration of X Ultimate End Stop 4 36 4 5 Motion Limit Checks 4 39 4 5 1 Introduction 4 39 4 5 2 Verifying Absolute Encoder Calibration 4 39 4 5 3 Verifying Operation within Software Limits 4 40 4 5 4 Verifying Ultimate L...

Page 5: ...duits 6 3 6 2 6 Replacing a Motion Controller 6 4 6 2 7 Replacing the Power Supply 6 5 6 3 Detector Repairs 6 6 6 3 1 General 6 6 6 3 2 Tools 6 6 6 3 3 Removing and Remounting the Detector Cover 6 6 6 3 4 Replacing Detector Power Supply and EDC Board 6 7 6 3 5 Replacing PMT s 6 8 6 3 6 Replacing the Crystal 6 10 6 3 7 Replacing the Collimator ID Cable 6 12 6 3 8 Aligning Collision Sensors on the D...

Page 6: ...ications 8 17 8 2 6 Networking and Cables 8 17 8 2 7 CardioMD Floor Levelness 8 19 8 3 Installation 8 21 8 3 1 Installation Overview 8 21 8 3 2 Tools 8 23 8 3 3 Installation Procedure 8 24 8 3 4 Software Setup 8 75 8 4 Final System Calibration and Performance Testing 8 87 8 4 1 Checking Status LED s 8 87 8 4 2 E Stop Function 8 88 8 4 3 Detector Calibration 8 88 9 Spare Parts 9 1 9 1 Spare Parts L...

Page 7: ...ned Maintenance Schedule 11 2 11 3 Planned Maintenance Procedures 11 3 11 3 1 Inspection Check List from the Operator s Manual 11 3 11 3 2 Inspection of Image Quality 11 3 11 3 3 Check of Motion Limits 11 3 11 3 4 Lubrication 11 4 11 3 5 Deleting Old Log Files 11 5 12 CardioMD AC Option 12 1 12 1 Introduction 12 3 12 2 Overview 12 3 12 2 1 AC Option Bracket 12 4 12 2 2 Line Source Compartment 12 4...

Page 8: ...llation 12 88 12 6 2 Electrical Installation 12 91 12 6 3 Mechanical Installation 12 99 12 6 4 Software Installation 12 105 12 6 5 Getting Ready to Use the CardioMD AC Option 12 109 12 7 AC Option Spare Parts 12 109 12 7 1 Spare Parts Listing 12 109 12 7 2 Location of Spare Parts 12 111 12 7 3 AC Option Accessories 12 115 12 8 Planned Maintenance 12 116 12 8 1 Lubrication 12 116 ...

Page 9: ...ollowing sections Chapter 1 covers safety concerns that must be taken into consideration when operating the CardioMD system Chapter 2 gives a short overview of the CardioMD system Chapter 3 gives a more detailed description of the different components comprising CardioMD Chapter 4 details how to calibrate both the motion axes and the CardioMD detectors Chapter 5 gives guidance to diagnosing Cardio...

Page 10: ...Introduction x CardioMD Service Manual 1MAN0158 H11 04 2005 CSIP Level 1 ...

Page 11: ...AFETY Contents 1 1 Safety Concerns 1 2 2 1 Introduction 1 2 3 1 Safe Operating Practices 1 2 1 3 1 Operator Safety 1 2 1 3 2 Equipment Safety 1 2 1 3 3 IEC Symbols Used 1 2 1 3 4 Definitions 1 3 1 3 5 Restrictions On Use 1 3 1 3 6 Hazards 1 4 1 3 7 Emergency Stop 1 5 ...

Page 12: ... to operate the system if any of the Emergency Stop buttons described in this manual are not functioning properly High voltage and mechanical hazards may be encountered when covers are removed Always inspect the system for hazardous conditions or equipment malfunction prior to operation Watch out for abnormal or inconsistent camera control operation such as intermittent pushbutton operation or int...

Page 13: ...jury or substantial property damage if the instructions are ignored Caution Identifies conditions or actions for which a potential hazard may exist which will or can cause minor personal injury or property damage if the instructions are ignored Note A note is used to inform the user of operator information which is important but not hazard related This symbol indicates information and instructions...

Page 14: ...ipment motion can cause severe injury and equipment damage Precautions To avoid injury or equipment damage Carefully observe all equipment motion as you operate the controls Uncontrolled or unmonitored movements can cause the gantry table or detectors to collide with personnel or other equipment Check for obstructions before initiating any hand controlled motions such as moving the detectors Be ca...

Page 15: ... difference in functionality Note E stop buttons latch mechanically when pressed To release an E stop button turn the button in the clockwise direction Pressing an Emergency Stop button causes the current acquisition to stop Any acquisition motion for example tomography will cease When the Emergency Stop button is released and power to the rest of the system has not been interrupted you can enable...

Page 16: ...Safe Operating Practices 1 6 CardioMD Service Manual 1MAN0158 H11 04 2005 CSIP Level 1 ...

Page 17: ...stem Components 2 2 2 2 1 Gantry 2 2 2 2 1 1 Motions 2 3 2 2 1 2 Covers 2 3 2 2 1 3 Patient Table 2 5 2 2 1 4 Control System 2 5 2 2 1 5 Power Supply 2 6 2 2 1 6 Emergency Stop Buttons 2 6 2 2 1 7 Collision Sensing System 2 6 2 2 2 Detectors 2 7 2 2 3 Collimator 2 7 2 2 4 Hand Controller 2 8 2 2 5 Acquisition PC 2 8 ...

Page 18: ...en the CardioMD acquisition PC and the workstation Note DICOM data transfer between the CardioMD and any workstation other than those specified above is not a valid configuration and is not supported 2 2 System Components The system architecture is illustrated in the schematic block diagram below Table Longitudinal drive Detector Vertical drive Detector Horizontal drive Table Pallet Detector 2 Det...

Page 19: ...drive is located in the arm connecting the detectors to the pillar This drive is used to rotate the detector assembly under the control of the acquisition PC or hand controller The patient table can be moved horizontally along its longitudinal axis This motion is effected by the table drive located underneath the table pallet The table longitudinal motion is used for patient positioning and is con...

Page 20: ... 1 Figure 2 2 CardioMD Series III covers Tower top cover X drive cover Tower side cover Rotate gear cover Gantry base cover Detector side cover Detector 1 Detector 2 Detector side cover Detector top cover Table console front cover Table console rear cover X drive slide cover III ...

Page 21: ...r small room installations a shortened table 200 cm for supine imaging only is provided The capacity of both table versions is 400 lbs 180 kg The height of the table is fixed The table can be moved along its longitudinal axis by means of a motor controlled from the CardioMD hand controller This motion is intended for fine tuning of the patient s position relative to the detectors There is no manua...

Page 22: ... the system moves to the patient load position Motions are controlled by two dual axis motion controllers CANbus controllers coupled in a master slave arrangement using a high speed synchronous communication link between the two The acquisition PC communicates only with the master controller When the master controller receives a motion command it calculates the trajectory of the detectors and the ...

Page 23: ...re integrated and corrected on the fly followed by X Y position calculation and energy calculation Note that the EDC board only processes one event at a time but fast enough to ensure that no information is lost at count rates experienced in clinical use Finally each event is corrected for detector system characteristics such as spatial linearity and local energy response The output from the detec...

Page 24: ...d to receive corrected events from the detector The gantry offers an isolated 115 V AC mains utility max 4 A used for powering the acquisition PC On Series III systems the power cable to the acquisition PC is routed internally Furthermore an ECG gate can be powered from the connector panel on the rear of the table console On Series I and II systems the acquisition PC is powered from the connector ...

Page 25: ... 2 6 Connections Series I and II systems 3 20 3 2 6 1 Side Panel 3 20 3 2 7 Hand Controller 3 21 3 2 7 1 Collision Override 3 22 3 2 8 Safety Circuit 3 22 3 2 8 1 Safety Stop Scenarios 3 22 3 2 8 2 Safety Circuit Block Diagram 3 23 3 3 Detectors 3 24 3 3 1 General 3 24 3 3 2 Automatic PMT Gain Control Autotune 3 24 3 3 3 Dynamic Linearity Correction DynCor 3 24 3 3 4 Detector Layout Outside 3 26 3...

Page 26: ...X Drive Rotate Position Motor Gear Absolute Position Encoder Amplifier Control Position Position Table Motor Control CHA CHB ENC I O Rotate Drive Table Drive In Out Mid position switch I O 180 V 24 V 55 V 180 V Safety Board Collision E Stop Handset I O AC PSU 55 V 180 V Motor 55 V Motor 24 V Motor Stop PC STAND INTERFACE 115 V AC Handset inputs FireWire Firewire EKG To Detector EKG CANbus HSSI Pos...

Page 27: ...or EKG CANbus HSSI Position Position E Stop E Stop 24 V I O Ultimitate motion limit switches X Y Rotate CANbus Handset Figure 3 2 Gantry schematic block diagram CardioMD Series I and II systems On Series I and II CardioMD systems the side panel contains all interface connectors to peripheral devices including the acquisition PC and the hand controller A 115 V AC power supply output is available fo...

Page 28: ...NC ABS ENC HOR VERT ROT INCR ENC CH A ENC CH A ENC CH B ENC CAN BUS 9CBL0661 9CBL0870 3CBL1542 9CBL0875 9CBL0875 9CBL0877 9CBL0880 180 V 55 V 9CBL0874 9CBL0874 9CBL0531 9CBL0531 9CBL0876 9CBL0895 9CBL0896 9CBL0675 9CBL0675 9CBL0884 9CBL0901 9FLT0936 9FLT0936 9FLT0936 9CSA0865 9CBL0882 9CBL0882 9CBL0882 9CBL0881 9CBL0881 9CBL0881 9CSY0771 9CBL0883 9CBL0883 9CBL0883 9CBL0887 9CBL0895 9CBL0896 9CBL08...

Page 29: ...ND ID CRYSTAL mumetal COLLIS 55 V HIGH Z HV 9CBL 0718 9TER 0561 A2 A3 A4 A1 A5 A8 A7 A6 9CBL0868 9CBL 0659 9CBL0871 DETECTOR 1 A9 FIREWIRE SIGNAL TUNE TUNE SIGNAL HV LV VERT AMPL M ROT AMPL M TABLE CONTRL VERT LIMIT HORIZ LIMIT LINEAR CONTROLLER 55 V ROTATE CONTROLLER 55 V 55 V 180 V 55 V 55 V 24 V CAN BUS ABSOLUTE ENCODERS I F 24 V E STOP M OUTPUTS INPUTS OUTPUTS INPUTS CH A OUT CH B OUT CH A OUT...

Page 30: ...power supply is located in the lower left corner in the rear of the table console It powers the entire system except for the processing station The outputs are divided into two groups One group of continuous outputs see Table 3 1 on page 3 7 One group of safety interrupted outputs see Table 3 2 on page 3 7 All low voltage outputs are protected by PTC fuses Note To reset the PTC fuses all loads on ...

Page 31: ...tputs Connector C8 goes to the Safety Stop circuit This input is used to interrupt power to the motors in case of collision motion controller software fault or if one of the E Stop buttons is pressed The electronics within CardioMD including the detectors are operated on uninterruptible 55 V DC Local DC DC converters internal to the electronic modules convert the 55 V DC supply voltage to the volt...

Page 32: ...upply and to the motion controllers The motion controllers issue a message causing the acquisition PC to display a message to the operator Furthermore the safety board acts as a cable distribution point distributing signals The hand controller interfaces directly to the safety board The hand controller Collision Override button and Stop buttons are hardwired to relays in the safety circuit The oth...

Page 33: ...iption 1MAN0158 H11 04 2005 CSIP Level 1 CardioMD Service Manual 3 9 Figure 3 8 Jumpers and switches on the safety board Collision Override Zero Enable Ultimate Stop Override Ultimate Stop Reset Zero R Zero V Zero H ...

Page 34: ...on resets the bi stable Ultimate Limit relay output The relay must be reset after clearance of the motion at the ultimate stop limit Zero Enable ZERO_ENA Push button This button is used to set the calibration points for the absolute encoders for the rotate horizontal and vertical motion calibration points The button must be pressed simultaneously with each of the motion specific set buttons Zero R...

Page 35: ... compare their outputs to the absolute encoders for verification As long as the two encoders for each motion with the exception of the table agree as to the position the motion controllers are happy The table axis has no position encoding or reporting The table longitudinal motion is operated manually from the hand controller and works only at fixed speed Note As part of the automated motions brin...

Page 36: ...tal encoder output directly instead of a resolver output One controller the linear controller the slave controller handles the X and Y axis drives the other the rotate controller the master controller handles the rotate drive and the CANbus interface and thus the communication with the acquisition PC All three absolute encoders are connected to the Rotate Controller via the safety board using the ...

Page 37: ...C The hand controller is connected to the Linear controller s digital input port Further inputs safety signals etc are connected to the Rotate controller s digital input port The communication from and to the acquisition PC takes place via one of the detector EDC boards which translates between the PC s IEEE 1394 FireWire interface and the motion controller s CANbus interface The hardware of the t...

Page 38: ...system operation Switch Function SW 1 5 CANbus node ID address SW 6 Reserved for future use SW 7 Must be OFF SW 8 Used for safety overrule SW 9 Program flash used for firmware updating SW 10 Reset Table 3 4 Motion controller DIP switch allocation Caution With motion controller software release 7MOT0096 N14 and later SW8 on the motion controllers can no longer be used Switch Normal position on X Y ...

Page 39: ... Linear controller receives regular sync messages from the Rotate controller A watch dog function in the Linear controller assures that these messages arrive within a certain time frame If either of the units detects that the other is not running properly runaway condition the signal OUT00 is de activated set HIGH This removes all power from the motors However it is possible to override this asser...

Page 40: ...rdioMD Series III systems have a connector panel on the rear side of the table console See Figure 3 12 on page 3 17 ECG Gate Power Supply An ECG gate can be supplied from this 115 V AC output The output is protected by a circuit breaker A green LED in the panel shows the status of the 115 V output which also supplies the acquisition PC ECG Trigger The ECG Trigger connector is used to connect the R...

Page 41: ...s III 3 2 5 2 Side Panel External As shown in Figure 3 13 one E Stop button is located on the side of the table console Figure 3 13 E Stop button on side of table console CardioMD Series III PC and ECG gate power indicator PC and ECG gate fuse reset button Mains power cable ECG trigger System power on off switch LAN connection ECG gate power cable III ...

Page 42: ...as an interface for all cables to the PC stand with the exception of the Ethernet cable which is routed directly to the console s rear connector panel The internal connector panel also includes a FireWire hub The hub relays all FireWire communication between the detector and the acquisition PC and ensures sufficient signal integrity for all lengths of FireWire cables applied in the various PC Stan...

Page 43: ...nel on the acquisition PC stand Figure 3 15 One E stop button is placed on top of this panel and on the rear of the panel is the connector for the CardioMD hand controller Figure 3 15 LED panel on acquisition PC stand CardioMD Series III Collision indicator Motor power indicator E Stop indicator Interface to hand controller E Stop III ...

Page 44: ...Connector panel on side of table console CardioMD Series I and II Acquisition PC Power The acquisition PC must be powered from this 115 V AC outlet The output is protected by a circuit breaker IEEE 1394 FireWire The IEE 1394 FireWire connector interfaces the acquisition PC to the gantry Motor power indicator E Stop indicator Interface to hand controller Trigger input from ECG gate Button for reset...

Page 45: ...ller The hand controller is connected to the safety board via the side panel The Collision Override and Motion Stop signals are used directly on the safety board where the Stop signal via a relay turns off all motion power The Collision Override signal re enables motion power The Mark and Start buttons are not used by the motion controllers only by the acquisition PC Motion Stop activates a stop a...

Page 46: ...the system has moved into a safe area that is where a collision is no more detected it is possible to use the Motion Enable key again 3 2 8 Safety Circuit A hardwired safety circuit controls all motion power Motion power consists of 180 V DC for Rotate and Y drive 55 V DC for X drive and 24 V DC for table drive These three voltages are passed through a relay inside the main power supply The relay ...

Page 47: ... motor or a cable problem The problem must be identified and fixed first To recover reset both motion controllers and press the Collision Override button on the hand controller Hand controller Stop button pressed Motor power indicator LED is OFF RUNAWAY LED on safety board is OFF Press hand controller Collision Override button E Stop button activated E Stop indicator LED is ON Turn the relevant E ...

Page 48: ...tector provides supply voltages for the analog circuitry and a negative high voltage for the PMT s 3 3 2 Automatic PMT Gain Control Autotune For gain control of the individual PMT s a light reference LED is built into each PMT This LED flashes for 3 µsec every 10 msec and the response from the PMT is sampled and compared to a reference voltage The output from the comparator is fed into a gain cont...

Page 49: ... SIGNAL DYNCOR HIGH LEVEL The nonlinear transfer function is characterized by two break points HIDYN and LODYN The levels of these break points are always proportional to the energy of the events The relative levels are set by a value in the tuning tables These values are factory set and not subject to field adjustments ...

Page 50: ...CBL0870 9CBL0875 9CBL0875 9C B L 0 87 7 9CBL0874 9 C B L 0 8 7 6 3CBL1542 9 C B L 0 8 80 9CBL0718 9CBL0718 9CBL0659 9CBL0659 9 C B L 0 6 6 1 9 C B L 0 6 6 1 9 C B L 0 8 6 8 9CBL0868 9 C B L 0 8 7 1 9C BL 08 71 9CBL0874 9CBL0880 9CBL0877 9CBL0876 TO GANTRY SEE NOTE ABOVE GND 9C B L 0 89 2 9CBL0892 µ METAL CRYSTAL µ METAL CRYSTAL DETECTOR 1 COLLISION BOARD COVER COLLISION 9COL0899 9 C B L 0 9 2 1 GE...

Page 51: ... and the CANbus to the motion controllers It the master EDC board controls the high voltage and reads diagnostic information from the detector power supply unit It writes tuning values to the tune DAC s and drives the autotune circuits It writes gain values to the control DAC s for DynCor and threshold It reads PMT working point values from the PMT s It synchronizes gated acquisitions with externa...

Page 52: ...ven overlapping groups of PMT s in the X direction Each group sum is subjected to a DynCor process and after that a threshold is applied in order to exclude those groups that are far away from the scintillations to eliminate noise The information from those groups is too noisy due to low photon statistics After threshold discrimination the seven group sums are fed into a resistor matrix which feed...

Page 53: ...rd The X E board also carries the drivers for DynCor and threshold signals These signals are copies of the energy signal and are adjustable in amplitude The amplitude adjustments are performed in analog multipliers controlled by DC voltages from dedicated DAC s on the tune board The digital values written to the DAC s are contained in the tuning tables Note that the analog multipliers are supplied...

Page 54: ...atic block diagram of DynCor and threshold drivers 3 3 6 3 Y Board The Y Board sums the output from five overlapping groups of PMT s in the Y direction Each group sum is subjected to a DynCor circuit succeeded by a threshold similar to that on the X E board The five group sums are fed into a resistor matrix which feeds into two summing nodes Y and Y Note that the Y board also carries a 5 V linear ...

Page 55: ... working points in the 24 PMT s 3 3 6 5 Power Board The power board distributes high and low voltages to the six PMT interconnecting strips It also carries driver circuits for the autotune 3 4 Acquisition PC 3 4 1 Tower Acquisition PC The acquisition PC of CardoMD Series I and II systems is a tower PC with the following minimum specifications IBM compatible 550 MHz ATX 512 kb CPU RAM 128 Mb SDRAM ...

Page 56: ...e gantry contains a FireWire cable which is connected to the PC s FireWire interface and to the Firewire connection on the gantry connector panel Local area network ethernet A standard network cable with RJ45 connectors connects the PC to the local area network The cable between the acquisition PC and the gantry contains the network cable which ends in an RJ45 female connector near the gantry conn...

Page 57: ...l Linearity Correction Calibration LinCor 4 22 4 2 7 1 Description 4 22 4 2 7 2 Spatial Linearity Correction Calibration Procedure 4 22 4 2 8 Uniformity Calibration UnifCor 4 25 4 2 8 1 Description 4 25 4 2 8 2 Uniformity Calibration Procedure 4 25 4 2 9 Center of Rotation COR Calibration 4 30 4 2 9 1 Description 4 30 4 2 9 2 Center of Rotation Calibration Procedure 4 30 4 3 Detector Performance T...

Page 58: ...H11 04 2005 CSIP Level 1 4 5 3 Verifying Operation within Software Limits 4 40 4 5 4 Verifying Ultimate Limit Switches 4 41 4 5 4 1 Motion Controller Software 7MOT0096 N14 and Later 4 42 4 5 4 2 Motion Controller Software older than 7MOT0096 N14 4 45 ...

Page 59: ...temperature A complete calibration may be necessary after replacement of following detector parts EDC board PMT X E board Y board Crystal A complete calibration of a CardioMD detector involves the steps listed in Table 4 1 Note The shaded rows indicate the calibrations required at time of installation Calibration Equipment Isotopes point sources Approx duration per detector 1 HVCal high voltage ca...

Page 60: ...able access to the service calibration menu options Note Detector calibrations are saved as correction files on the acquisition PC When any detector calibration is performed the corresponding correction file must not have the attribute read only as would be the case if the correction file for some reason has been copied from a CD ROM There fore before starting detector calibrations verify that the...

Page 61: ... applied for an equal period before calibration is started The detector electronics must also have at least 15 minutes with the cover installed to reach operating temperature The maximum warm up time required is 5 hours Procedure Procedure Details 1 Remove the detector top cover Five LED s inside the detector power supply provide information about the integrity of the output voltages The LED s are...

Page 62: ...5 minutes 4 2 2 2 Background Noise Check Before introducing any sources to the area you must check that there is no major background radiation present that could cause erroneous data during certain calibrations Do check background radiation Procedure Details 1 Verify that there are no unshielded sources of radiation in the room 2 If collimators are mounted on the system remove both collimators 3 O...

Page 63: ...energy pop up 7 Click Start to begin the acquisition The count rate now reflects the background activity Count rate information is provided in the Rate c s field at the top of the window 8 Verify that the counts do not exceed 300 counts per second per detector Note If the count rate exceeds this level attempt to determine the cause of the excessive count rate Take steps to shield the detector appr...

Page 64: ...d isotope energy The images are spatially subdivided into regions each representing the outline of a PMT For each iteration the count rate for all PMT regions in both the low and the high energy window are compared indi vidually and if they are not equal that tube gain is adjusted accordingly When equilibrium has been reached for all tubes the PMT tuning file is stored with the final tun ing value...

Page 65: ...ice pass word currently DDD and click OK The Service Calibrations menu appears 4 Click the High Voltage button Note If the CardioMD AC option is installed on the system all buttons of the Service menu ex cept the Node configuration button are greyed out The transmission scanners must be removed and the system configured to run without the AC option before any service calibrations can be performed ...

Page 66: ...board The HV continues to step upwards until all PMT s have their autotune control loop in their dynamic range which is reflected by the work point value Once this has taken place the HV is increased by another 50 V to ensure that all PMT s have sufficient gain range The HV value is stored on the acquisition PC When the High Voltage calibration is com plete a message appears indicating that the hi...

Page 67: ...e removed before PMT calibration can be performed See Chapter 12 CardioMD AC Option for instructions Note The detector cover must be in place and the detector electronics must be at normal operating temperature before this procedure is started Procedure Details 1 Ensure that the CardioMD system is in the patient load position 2 On the Persistence page click the Tools button 3 When the Calibration ...

Page 68: ...w the top of the exposure hole 1 2 75 3 cm 185 3 cm 1 2 75 2 cm 185 3 cm 12 Place a Tc 99m or Co 57 point source of approximately 40 MBq or 1 0 mCi in the holder 13 Make sure that the entire detector FOV is exposed to the source and that the point source is centered relative to the FOV 14 Remove the collimator from the detector to be calibrated Note The detector undergoing PMT calibra tion must no...

Page 69: ...The range of the PMT gain values is 0 1023 typically between 200 and 800 When the output of all the PMT s is at the same level the calibration is complete A mes sage notifies the user that the calibration is complete 17 Click OK to close the message 18 Remount the collimator on the detector that has just been calibrated 19 Press the hand controller Collision Over ride button to enable power to the...

Page 70: ...ioMD AC Option for instructions 4 2 4 2 Energy Calibration Procedure To be performed When the EDC board X E board or crystal is replaced Detector One detector at a time without collimator Source High Energy Tc 99m 40 MBq or 1 mCi Low Energy Low peak of Tl 201 Ga 67 Ba 133 or Am 241 40 MBq or 1 mCi Total calibration time Approximately 5 minutes per detector Calibration file created C Cardiocam cali...

Page 71: ...ether you enter two minimum or three window values Note It is possible to use Tc 99m and a dif ferent isotope but you must remember to switch sources before clicking OK after the first pass 13 Click Continue 14 Press and hold the hand controller Colli sion Override button for a minimum of 4 seconds before proceeding as follows 15 While still pressing Collision Override click OK to accept automated...

Page 72: ...w 1 spec trum When the message box with the text Itera tion 1 appears Note Do not click OK until the source has been replaced 20 Remove the Tc 99m source and place the other source Tl 201 Ga 67 Ba 133 or Am 241 in the source holder 21 Now click OK When the message box with the text Itera tion 2 appears 22 Click OK to acquire the window 3 spec trum if the field Window 3 was not left blank When all ...

Page 73: ...ped with the AC option the transmission scanners must be removed before a GeoCal calibration can be performed Note GeoCal must be preceded by HV PMT and ECal calibration When GeoCal has been com pleted a PMT update must be performed Note If GeoCal is required on one detector following high voltage calibration perform a GeoCal on the other detector as well 4 2 5 2 Geometry Calibration Procedure To ...

Page 74: ...133 155 Tl 201 167 Ga 67 185 8 Fill in the Low Energy field as follows Ba 133 81 Tl 201 75 Ga 67 92 9 Select the detector to be calibrated 10 Click Continue 11 Press and hold the hand controller Colli sion Override button for a minimum of 4 seconds before proceeding as follows 12 While still pressing Collision Override click OK to accept automated motions bringing the system into position for cali...

Page 75: ...eted the message shown to the right appears 15 Click OK to close the message box Typical GEOCal results are Parameter KX0 1 0 2 Parameter KX1 0 0 01 Parameter KY0 1 0 2 Parameter KY1 0 0 01 Parameter ABSOFFX 0 1 Parameter ABSOFFY 0 1 Parameter RELOFFX 0 1 Parameter RELOFFX 0 1 Note These typical results apply regardless of the isotope used Note After GeoCal a PMT update is required because the siz...

Page 76: ... the transmission scanners must be removed before Energy correction calibration can be performed See Chapter 12 CardioMD AC Option for instructions 4 2 6 2 Energy Correction Procedure To be performed When the EDC board PMT tube X E board Y board or crystal is replaced Detector One detector at a time intrinsic Source Tc 99m or Co 57 40 MBq or 1 mCi in the source holder Total calibration time Approx...

Page 77: ...ws 12 While still pressing Collision Override click OK to accept automated motions bringing the system into position for cali bration of the selected detector Note The hand controller Collision Override button must be kept depressed during all automated motions to enable power to the motors Note Automated motions must be started from the patient load position 13 Place the point source holder at a ...

Page 78: ... applied to the position signals during acquisition Note LinCor must be preceded by HV PMT ECal GeoCal and ECor calibration Note If the CardioMD system is equipped with the AC Option the transmission scanners must be removed before spatial linearity correction calibration can be performed See Chapter 12 Car dioMD AC Option for instructions 4 2 7 2 Spatial Linearity Correction Calibration Procedure...

Page 79: ... the detector to be calibrated 11 Click Continue 12 Press and hold the hand controller Colli sion Override button for a minimum of 4 seconds before proceeding as follows 13 While still pressing Collision Override click OK to accept automated motions bringing the system into position for cali bration of the selected detector Note The hand controller Collision Override button must be kept depressed ...

Page 80: ...0 kcps and that slits are displayed vertically in the im age window 19 Click Start 1 2 75 3 cm 185 3 cm 1 2 75 2 cm 185 3 cm After a few million counts check that all the slits in the phantom are clearly resolved The purpose is to make sure that a defective table is not causing neighbor tubes to pull counts and distort linearity When the calibration in the X direction is done this message pops up ...

Page 81: ...nor variations in sensitivity To compensate for non uniformity CardioMD requires uniformity calibration The flexible scheme of uniformity correction supported by CardioMD enables the user to acquire both intrinsic and extrinsic uniformity correction tables Uniformity correction tables can be ac quired at any isotope peak or combinations with multiple peaks and with specific energy win dows to matc...

Page 82: ...n the patient load position and that the acquisi tion PC is displaying the Persistence page 2 Click the Tools button The Calibration Configuration menu ap pears 3 In the Calibration Configuration menu click Uniformity calibration The Uniformity Calibration page appears 4 Specify the energy settings for the uni formity correction table to be acquired 5 Select Intrinsic 6 Select the detector to be c...

Page 83: ... cm 1 2 75 2 cm 185 3 cm 10 Ensure that the point source is centered relative to the detector field of view Check the position of the activity in the image window on the acquisition PC By pressing F9 you activate the center cross hair in the image window You may find this useful for positioning the source holder 11 Remove the collimator from the selected detector and mount the FOV mask instead 12 ...

Page 84: ...ic Uniformity Calibration Procedure Procedure Details 1 Ensure that the CardioMD system is in the patient load position and that the acquisi tion PC is displaying the Persistence page 2 Click the Tools button The Calibration Configuration menu ap pears 3 In the Calibration Configuration menu click Uniformity calibration The Uniformity Calibration page appears 4 Specify the energy settings for the ...

Page 85: ...te isotope and uni formly mixed on the surface of the colli mator on the detector 10 Verify that the count rate is less than 40 kc s Note When the CardioMD AC option is mounted on the system it is not possible to use this calibration position See Chapter 7 CardioMD AC Option of the CardioMD Op erator s Manual for further information 11 Click Start to start the uniformity calibra tion When the cali...

Page 86: ...r each set of collimators used for SPECT acquisition Source Specific isotope LEHR collimator 40 120 MBq or 1 3 mCi point source LEGP collimator 40 120 MBq or 1 3 mCi point source Total calibration time Approximately 20 minutes Calibration file created C Cardiocam calibrations CORcor CORcor coll X where X represents the assigned collimator number 0 LEGP 1 LEHR Note Before the COR acquisition is sta...

Page 87: ...f the settings are to be changed enter the new energy value for the appropriate iso tope For example keep the 20 window width but set Termination counts in first view to 25000 25 kc The default is 100 kc but 25 kc is sufficient and less time consuming 6 Use a Co57 point source or fill the vial with Tc 99m If the vial is used it must be filled with be tween 0 2 and 0 3 milliliters Use a syringe to ...

Page 88: ...point source holder 10 Click Start to start the COR acquisition 11 When prompted click OK to accept auto mated motions The system rotates 180 in 256 steps After the acquisition the system automatically stores the acquired COR corrections for the specific collimator under the matching file name Note If a correction table for the type of col limators already exists the system automati cally overwrit...

Page 89: ...r of Rotation Analysis Procedure To be performed After acquiring a COR correction Detector Extrinsic should be performed for each set of collimators used for SPECT acquisition Source Specific isotope LEHR collimator 40 MBq or 1mCi point source LEGP collimator 40 MBq or 1mCi point source Total calibration time Approximately 15 minutes See the procedure in Chapter 5 Maintenance of the CardioMD Opera...

Page 90: ...up That is when power is applied to the system the motion controllers read the absolute position of each axis and use it to index the incremental en coders The three absolute encoders require calibration after having been replaced or dismounted or fol lowing replacement of any of the vital components in the drive such as the gear The procedure below describes how to calibrate all three encoders si...

Page 91: ...op surface of the de tector rotate arm and the top edge of the vertical direction opening is exactly 790 mm 31 3 32 See the photo on the right Now proceed to perform the calibration 7 On the safety board press ZERO_ENA and ZERO_R simultaneously to calibrate the rotate absolute encoder 8 On the safety board press ZERO_ENA and ZERO_V simultaneously to calibrate the vertical absolute encoder 9 On the...

Page 92: ...software limits WARNING Always double check the position of switch 8 on both motion controllers after any service involving the controllers WARNING Always perform a COR check following calibration of any of the absolute encoders to check if a new COR calibration is required 4 4 3 Calibration of Y Ultimate End Stop No adjustment required 4 4 4 Calibration of Rotation Ultimate End Stop No adjustment...

Page 93: ...4 Loosen the 4 screws shown holding the X drive motor 5 Lift the motor to disengage the drive gear 6 Manually move the pillar as far towards the front of the system as it will go until the mechanical end stop is reached 7 Move the pillar towards the rear of the gantry approximately 3 4 mm 8 Use an Allen key to loosen the ultimate end stop code wheel III I II ...

Page 94: ...activated observe the green HORIZ ULT_OK LED indicator on the safety board the red ULT_STOP LED will still be lit 13 Reset the ULT_STOP relay by pressing the ULT_STOP RESET button on the safety board 14 Check that the red ULT_STOP LED is not lit 15 Reinstall the X drive motor and the covers 16 Release the E Stop 17 Reset both motion controllers by setting switch 10 in the ON position upwards on bo...

Page 95: ...tion Procedure Details 1 Move the detector to the patient load posi tion horizontal 489 1 mm vertical 371 mm angle 90 0 2 If the detector angle read out on the acqui sition PC is not 90 0º use the hand con troller to fine adjust until you obtain this reading Detector 1 must be vertical and detector 2 horizontal within 0 1 check with a level 3 If the detector vertical position read out on the acqui...

Page 96: ...e vertical position encoder is zeroed 790 mm from the top instead of 832 mm 4 5 3 Verifying Operation within Software Limits CardioMD system motions operate within two sets of limits In principle these function as illus trated in the diagram Figure 4 1 Figure 4 1 CardioMD motion limits This section tells you how to verify operation within software limits Section 4 5 4 on page 4 41 gives instructio...

Page 97: ...ding 9 Move the detector all the way forwards over the patient table Check min hori zontal reading 10 Rotate the detector clockwise and counter clockwise respectively as far as it will go Check rotational readings 11 Return the system to the patient load posi tion 4 5 4 Verifying Ultimate Limit Switches The ultimate switches must be verified adjusted after the absolute encoders have been calibrate...

Page 98: ... HyperTerminal connection Starting the CardioMD acquisition software Before testing X axis limits furthermore Removing the patient table pallet Before testing Y axis limits furthermore Removing the patient table pallet Rotating the detector assembly to approximately 110 Disabling Software Limits In order to verify ultimate switches software limits must first be disabled the diagram in Figure 4 1 o...

Page 99: ... controller to move the gantry outside the software limits and thus reach the ultimate limits This section explains the principle of testing one ultimate limit Caution Before starting to test ultimate limits of one of the motions make sure to have gone through the necessary preparations listed on page 4 42 such as removing the patient table and or rotating detectors Procedure Details 1 Use the han...

Page 100: ...verride switch back to the OFF position upwards Caution Be sure to deactivate the Ultimate Stop Override switch before pro ceeding to test the next ultimate limit If the Ultimate Stop Override switch is set OFF you risk hitting a mechanical end stop possibly damaging the system After Testing Ultimate Limit Switches Note After testing ultimate switches both motion controllers must be reset and the ...

Page 101: ... Zmin 92 Zmax 182 Note After testing ultimate switches both motion controllers must be reset and the CardioMD application software restarted in order to ensure correct display of detector rotation Procedure Details 1 Before verifying ultimate switches set SW8 upwards on both motion controllers It is not necessary to re boot after changing the state of SW8 WARNING In this mode all safety collision ...

Page 102: ...t or ensure that the detectors and rotate arm are above the level of the patient table To check an ultimate limit 4 Use the hand controller Collision Override button in combination with the relevant motion button to drive the axis in question into a power switch off 5 Note the read out of the halt position on the acquisition PC If automated motions are used during this procedure to move the system...

Page 103: ... the soft ware limits you can only operate the system if SW8 on both motion controllers is active up ward position Note After verifying ultimate limits it is im portant to reset both motion controllers and restart the CardioMD application software 5 Reset both motion controllers SW10 in position up 6 Then remove the reset on the master mo tion controller motion controller to the right SW10 in posi...

Page 104: ...1MAN0158 H11 04 2005 CSIP Level 1 Procedure Details button in the upper right corner of the window to close the CardioMD applica tion 9 Wait for at least 10 seconds 10 Start the CardioMD application by double clicking the CardioMD icon on the desk top ...

Page 105: ... Detector Top Cover Sensor and Rotate Gear Cover Sensor 5 20 5 5 1 3 Corrosion on Contact Prints 5 22 5 5 1 4 Checking Pressure on Contact Balls 5 22 5 5 1 5 Checking Collimator Lock Pressure 5 24 5 6 Diagnostic Software Utilities 5 25 5 6 1 Motion Controller Diagnostics 5 25 5 6 1 1 Tools Required 5 25 5 6 1 2 Configuring HyperTerminal for Terminal Access to Motion Controllers 5 25 5 6 1 3 Cardio...

Page 106: ...ice Manual 1MAN0158 H11 04 2005 CSIP Level 1 5 8 1 2 Creating and Setting Up a FTP Server 5 50 5 8 1 3 Setting Up Telnet 5 53 5 8 2 Windows XP 5 55 5 9 Remote Log On 5 57 5 9 1 FTP Logon 5 57 5 9 2 Telnet Logon 5 57 5 10 Detector Calibration Files 5 58 ...

Page 107: ... 5 2 External LED Indicators CardioMD offers a number of LED s that are visible from the outside These LED s are described in the following sections The system has three LED s indicating the status of the safety circuit On Series III systems these LED s are placed in a panel on the acquisition PC stand Figure 5 1 COLLISION MOTOR POWER and E STOP status LED s CardioMD Series III On Series I and II ...

Page 108: ...lit Try resetting both motion controllers or rebooting the system The rotate X or Y motion has exceeded the software controlled end stop and reached an ultimate limit If that is the case the red ULT_STOP LED on the safety board is lit and one or more of the green LED s labeled ULTIM LIM is off see Figure 5 5 on page 5 6 In this case proceed as follows 1 Set the ULT_STOP OVERRIDE switch on the safe...

Page 109: ...e problem persists proceed as follows Series III systems Remove the ECG gate power cable wait for 10 seconds reset fuse and reconnect power cable If this still does not solve the problem remove the acquisition PC power cable internal connection covers must be removed wait for 10 seconds reset fuse and reconnect power cable Series I and II systems Remove the acquisition PC power cable wait for 10 s...

Page 110: ... 1MAN0158 H11 04 2005 CSIP Level 1 5 3 1 LED s on the Safety Board Figure 5 5 LED s on the safety board RUNAWAY ULTIMATE STOP DISABLED ULTIMATE STOP ROT ULT_OK COLLIS OK COLLIS DISABLED HORIZ ULT_OK VERT ULT_OK REMOTE E STOP ON E STOP OK TABLE E STOP ON ...

Page 111: ... been triggered HORIZ ULT_OK This green LED is on during normal operation The LED is turned off when the ultimate stop switch on the horizontal X motion has been triggered motion limit exceeded or when VERT ULT_OK has been triggered VERT ULT_OK This green LED is on during normal operation The LED is turned off when the ultimate stop switch on the vertical Y motion has been triggered motion limit e...

Page 112: ...lower than specified setting or not enabled LVGOOD GREEN All low voltages in specified range LVLOW RED One or more low voltages lower than specified range Table 5 1 Significance of LED s on the detector power supply 5 3 3 LED s on the Detector EDC Boards An LED is located on the rear panel of the EDC board see Figure 5 7 on page 5 9 The LED of the EDC board configured as DET0 detector 1 should be ...

Page 113: ... are lit when the port signal is pulled low Furthermore 10 green LED s are provided to monitor the status on the detector drives i e the motion controllers control and encoder ports 5 3 4 1 Rotate Motion Controller Port Assignments Input Port Port Signal Polarity when active LED when system is ready IN00 Table mid position N A IN01 OFF IN02 OFF IN03 OFF IN04 OFF IN05 OFF IN06 OFF IN07 OFF IN08 Mot...

Page 114: ... use only OUT05 Not used OUT06 T8 LED Dimly lit during normal operation timer interrupt running OUT07 Clearance failure Lit if the detectors are too close to the table or the gantry base The system can only be operated using OVERRIDE on the hand controller OUT08 Active OK Flashes with a frequency of 0 5 Hz when the controller is running OUT09 Diagnostics OK If the power up self test is succesfully...

Page 115: ... Table 5 4 Rotate motion controller channel status 5 3 4 2 Linear Motion Controller Port Assignments The only signals connected to the input port of the linear motion controller are the hand controller inputs All buttons are low i e the LED is lit when the button is pressed The Stop button is not connected to the motion controller Input port Port Signal IN00 HS Motion Enable IN01 HS Mark IN02 HS X...

Page 116: ...normal operation and this LED flashes with a frequency of 1 Hz OUT11 Not used CHA POS Pos analog control voltage to Y amplifier Light is roughly proportional to the motor control voltage output when positive CHA NEG Neg analog control voltage to Y amplifier Light is roughly proportional to the motor control voltage output when negative CHB POS Pos analog control voltage to X amplifier Light is rou...

Page 117: ...H11 04 2005 CSIP Level 1 CardioMD Service Manual 5 13 Port Signal Explanation CHB_FAULT X amp fault Low LED on during normal use High LED off when motor power is not present Table 5 7 Linear motion controller channel status ...

Page 118: ...nals The electronic modules within CardioMD offer a number of test pins for diagnostics 5 4 1 Gantry 5 4 1 1 Test Terminals on the Safety Board Figure 5 8 Safety board test terminals TP16 TP15 TP14 TP13 TP12 TP24 TP21 TP11 TP9 TP10 TP8 TP23 TP17 TP20 TP19 TP18 TP2 TP3 TP4 TP5 TP1 TP7 TP22 TP6 ...

Page 119: ... of the hand controller Collision Override button the signal once again goes to 24 V DC TP10 Not to be used by Service TP11 Status of table position switch A transition from 0 to 4 V DC or from 4 to 0 V DC indicates that the table is passing its center position as used for patient load positioning TP12 0 V DC If 12 to 16 V DC is measured the master motion controller has issued a Runaway fault TP13...

Page 120: ...l measurements are referenced to GND which is represented by any of the mounting screws Vtune is a DC test point that reflects the tune value for the particular PMT Range 0 5 V digital tune value 0 1023 WP is a DC test point that reflects that the autotune loop on the particular PMT is operational At normal operation the voltage reading should be 2 4 V If the voltage reading is lower or negative t...

Page 121: ...illoscope test point for the Autotune LED sample signal serving PMT 1 2 3 7 8 9 13 14 15 19 20 and 21 SMPL 4 5 6 is an oscilloscope test point for the Autotune LED sample signal serving PMT 4 5 6 10 11 12 16 17 18 22 23 and 24 Figure 5 12 LED sample signal 5 4 2 3 X E Strip E OUT is an oscilloscope test point showing the Energy output signal to the EDC board The magnitude of scintillation signals ...

Page 122: ...he magnitude of scintillation signals from technetium or cobalt should be around 0 4 0 8 Vpp Base line should be 0 V 10 mV Figure 5 14 Typical HIDYN and LODYN signals THRESH is an oscilloscope test point showing the Threshold signal The magnitude of scintillation signals from technetium or cobalt should be around 0 15 0 30 Vpp Base line should be 0 V 10 mV Figure 5 15 Typical Threshold signal ...

Page 123: ...ator surface sensor detector II Detector edge sensor detector I Detector edge sensor detector II Detector end cover sensor detector I Detector end cover sensor detector II Detector top cover sensor Rotate gear cover sensor To locate a cause of a false collision it is practical to disable the sensors one by one in order to determine whether one of the sensors is causing the problems Note The collis...

Page 124: ...or the edge sensor See photo on the right 4 Disconnect one or both of the sensors as required 5 Place two jumpers on each connector as shown in photo This will establish a 20 kΩ substitute resistance for each of the disconnected sensors 5 5 1 2 Disabling Detector Top Cover Sensor and Rotate Gear Cover Sensor Procedure Details 1 Remove the detector top cover 2 Locate the two cover collision boards ...

Page 125: ... Level 1 CardioMD Service Manual 5 21 Procedure Details To disable one or both sensors 3 Remove the DB9 cable from the appropriate cover collision board 4 Unscrew the cover collision board and plug the DB9 cable directly into the EDC board ...

Page 126: ...acement of either board is straightforward When the collimator ID board has been replaced the new ID board must be programmed with collimator type information See instructions in Chapter 7 Software Update Procedures the section Collimator ID Programming 5 5 1 4 Checking Pressure on Contact Balls When electrical causes for false collisions have been ruled out by following instructions given in the ...

Page 127: ...ollimator locks as shown in the photo on the right This gap should be 1 5 2 0 mm 5 Check that all five ball contacts are engaging at the same point The contact balls must be evenly soldered and none of the boards must be bent 6 Push in the collimator all the way Check that both collimator locks are fully engaging no gap ...

Page 128: ... collimator locks must give a distinct click when engaging disengaging If this is not the case or if the locks are not applying sufficient pressure to ensure that the contact balls are firmly pressed together the tension of the locks must be adjusted 1 Adjust lock tension by turning the two adjustment screws on each lock See the photo on the right ...

Page 129: ...ed failures 5 6 1 1 Tools Required A special RS 232 cable part no 9CBL0818 When using a laptop acquisition PC CardioMD Series III An USB to RS 232 adapter part no 3ACQ1669 5 6 1 2 Configuring HyperTerminal for Terminal Access to Motion Controllers Procedure Details 1 Connect one end of the serial interface cable to the motion controller serial port labeled BZ2 RS232 This does not require that any ...

Page 130: ...al Note The screen pictures shown on this page are from a Windows XP installation However the Windows 2000 user interface is very similar to these HyperTerminal displays the connection Description window 5 In the Name field enter MC and select OK HyperTerminal displays the Connect To dialog When using a laptop acquisition PC you may need to check which COM port the USB to RS 232 adapter uses III ...

Page 131: ...ight hand pane click the next to the entry Ports Com LPT 9 Check the COM port number stated next to the item ATEN to USB Serial Bridge On a tower acquisition PC you must use COM1 10 Ensure that the correct COM port is selected 11 Click OK to continue The COM Properties dialog appears 12 Set the following parameters for the serial interface Baud rate 19200 Data bits 8 Parity None Stop bits 1 Flow c...

Page 132: ...beled BZ2 RS 232 These commands are useful for diagnosing system failures and intermittencies Boot prompt When the motion controller boots it issues the message CardioMD Motion Controller Hardware version 9MOT0918 Software version 7MOT0096 nnn Compile time Sep 19 2001 09 47 34 NodeID 36 This node should be controlling Rotate nnn represents the actual software version e g G07 The hardware version g...

Page 133: ...ictionary Index SubIndex WRSDO Write to object dictionary Index SubIndex Value RPDO Simulate receive PDO PDOnr Data TPDO Send transmit PDO PDOnr CSDO Client SDO R W Index Subindex Value CPSDO Copy SDO from server Index Subindex GETNODEID Print node ID STATUS Show status word MOVE MOV Move to absolute position 1 2 Position REL Move relative to actual position 1 2 Position SPEED VEL Set Get Velocity...

Page 134: ...re described later Caution By using some of these commands especially the ones not described in detail in this manual you can seriously jeopardize the operation of the motion controller with the possibility of imposing damage to persons and or the gantry Logging The logging facility provides you with more or less detailed information By default all logging is set off The command errlog without any...

Page 135: ...ler are provided such as motion start and stop faults encountered etc This setting is useful on both controllers It is the default setting for the linear motion controller HANDSET Displays the hand controller key actions The setting is only useful for the rotate motion controller TRAJECTORY When this mode is enabled the different states of the trajectory calculation is displayed The setting is onl...

Page 136: ...st way to verify whether the CANbus connection between the two controllers is OK If you get the reply Error on SDO request errval 0x55555555 there is no CANbus contact Do not use unless you receive further instructions GETNODEID Returns the switch setting for NodeID CANbus address Must be 35 for linear controller and 36 for rotate controller STATUS Rotate Returns status words for all axes plus the...

Page 137: ...NC_ERROR 0x0002 Same for the Y axis RA_Z_ENC_ERROR 0x0004 Same for the Z axis RA_LOST_SYNC_ ERROR 0x0020 Checksum error on 3 consecutive messages on the serial link used for communication between the two motion controllers Happens if one of the motion controllers stops responding RA_TIMEOUT 0x0040 The linear controller has not received synchronization messages from the rotate controller at the req...

Page 138: ... USB to RS 232 adapter part no 3ACQ1669 5 6 2 2 Configuring HyperTerminal for Terminal Access to EDC Module Procedure Details Note To communicate with the EDC module you need a NULL modem serial interface cable DB9 female to DB9 female 1 Connect one end of the serial interface cable to the EDC ECG port labeled A1 RS232 This requires that the ECG cable be removed With a laptop acquisition PC Cardio...

Page 139: ...he screen pictures shown on this page are from a Windows XP installation However the Windows 2000 user interface is very similar to these HyperTerminal displays the connection Description window 5 In the Name field enter EDC and select OK HyperTerminal displays the Connect To dialog When using a laptop acquisition PC you may need to check which COM port the USB to RS 232 adapter uses III ...

Page 140: ... Device Manager 8 In the right hand pane click the next to the entry Ports Com LPT 9 Check the COM port number stated next to the item ATEN to USB Serial Bridge On a tower acquisition PC you must use COM1 10 Ensure that the correct COM port is selected 11 Click OK to continue The COM Properties dialog appears 12 Set the following parameters for the serial interface Baud rate 57 600 Data bits 8 Par...

Page 141: ...only accessible via the EDC board s serial port labeled A1 RS232 These commands can be useful when diagnosing system failures and intermittencies Note The EDC interface only accepts numerical parameter s to commands Parameters can be entered either as decimal or hexadecimal values Parameters shown in brackets are optional Command List A help command that displays and provides a brief explanation o...

Page 142: ...e If no value is specified the current gain setting will be printed This is useful when attempting to manually change a specific PMT gain value or print the current loaded values Example PMT PMT gain 1 947 424 533 402 560 525 7 648 374 334 281 180 346 13 380 211 383 525 377 298 19 233 350 273 233 206 537 wp Print PMT work points This is useful to determine if PMT gains are under control All 24 WP ...

Page 143: ...to be loaded when acquiring an acquisition to determine if a failure is in the correction table or detector Example Event 1 Note Remember to execute this command after the tables have been loaded when accessing an acquisition screen Time Identifies the time from when the EDC board system was last reset Example TIME System time is 404658 seconds since reset ERRLOG Using the logging facility it is p...

Page 144: ...d then select Program ubCore FireViewer The FireViewer program is located in the directory c Program Files Unibrain ubCore When the FireViewer program has been started it immediately shows the status of the communication In CardioMD Series III systems the FireWire comprises four nodes The controlling node i e the acquisition PC shown as a white box The FireWire hub shown as a hatched box normal op...

Page 145: ...ight illustrate the possible locations of problems Between acquisition PC and detector 2 EDC board Between the two EDC modules 5 6 4 Acquisition PC Error Logs The log file information recorded on the CardioMD acquisition PC is a useful tool for diagnosing system failures and intermittencies Technical support personnel may request that copies of these files be provided in an effort to better diagno...

Page 146: ...ample of this is when the crank is used for emergency Y motion retraction 3 The two motion controllers located in the table console are unable to communicate with each other The most likely cause for the runaway condition is that the motion controllers are detecting different position information from the two position encoders cause 1 The most likely reasons for this are A defective absolute encod...

Page 147: ...ts the motor power lost bit In the above example the Y axis is first to show the discrepancy followed by the Z axis and then the X axis If all three axes are reporting a runaway condition the most likely cause is a defective safety board To correct this problem the safety board must be replaced If a single axis is failing the most likely cause is a defective absolute encoder or a loose absolute en...

Page 148: ...wn 1 On the acquisition PC ensure that the CardioMD application is displaying the Persistence page 2 Click the Close button in the upper right corner of the application window to close down the application Start the Windows Explorer 3 Right click the Windows Start button and select Explore from the pop up menu Create the directory to where the study files are to be exported 4 In Folders pane selec...

Page 149: ... In the Service Calibrations menu click Node configuration 13 In the Nodes Configuration dialog double click the to add a new node The Add a new node dialog appears 14 Select the FOLDER option and click Select 15 Check off import export capabilities from the node as shown Yes to Export and No to Import Note If you want to both import and export from the node check off Yes in both selections 16 To ...

Page 150: ...Persistence page click the Patient Database button 21 On the Patient Database page select the study or studies to be exported Instructions are provided in Chapter 4 Operating Instructions of the CardioMD Operator s Manual 22 Click Export 23 Click the FOLDER entry and click Select to export the selected study or studies to the folder 24 Click Done to exit the Patient Database page When done with th...

Page 151: ...from a Folder Study files can be imported into the CardioMD Patient Database from a directory on the acquisition PC s hard disk from a CD ROM or from a floppy disk In the following procedure it is assumed that the study files are placed in a directory on of these media Procedure Details 1 Ensure that the CardioMD application is displaying the Persistence page 2 Click the Tools button 3 When the Ca...

Page 152: ... to Import Note If you want to both import and export from the node check of Yes in both selections 9 To select the folder from where files will be imported click the button 10 Ín the Drive drop down select the drive where the folder containing the study files is located The contents of the drive appear in the large pane 11 Click on the folder s name and click Select The New Node dialog reappears ...

Page 153: ...nual Chapter 4 Operating Instructions See the sections Exporting a Patient and Exporting a Study 17 When the data transfer is complete click Done to return to Persistence page The study files have been imported into the patient database When done with the import operation it is important to delete the folder node 18 Proceed as explained in step 1 5 to display the Nodes Configuration dialog 19 Sele...

Page 154: ...n be a help in diagnosing fault conditions on the CardioMD system 5 8 1 Windows 2000 If the acquisition PC is running Windows 2000 you need to install FTP software as described in the procedure below 5 8 1 1 Tools Required Windows 2000 Installation CD 5 8 1 2 Creating and Setting Up a FTP Server Procedure Details 1 In the Windows Start menu select Settings Control Panel 2 In the Windows Control Pa...

Page 155: ...es IIS 5 Click Details 6 Check the entry File Transfer Protocol FTP Server 7 Click OK A progress indicator appears 8 When prompted insert the Windows 2000 installation CD in the CD ROM drive and click OK The system proceeds to install and configure the FTP server When the installation is complete 9 Click Finish to exit the wizard ...

Page 156: ...Administrative Tools 12 In the Administrative Tools window double click Internet Services Manager 13 In the Internet Information Services window click the next to the name of the computer to unfold the branch of the tree 14 Right click Default FTP Site and select Properties from the drop down menu 15 In the Default FTP Site Properties dialog select the Home Directory tab at the top of the window 1...

Page 157: ...1 3 Setting Up Telnet In this procedure you set up a Telnet server on the acquisition PC When this is accomplished a remote user can log into the acquisition PC via Telnet Procedure Details 1 In the Administrative Tools window double click Telnet Server Administration A command window appears 2 Enter 3 Enter to Display change registry settings 3 Enter 7 Enter to select NTLM 4 When prompted enter y...

Page 158: ...ails 5 Enter the new value 0 Enter This setting disables NTLM 6 When prompted enter y Enter to confirm 7 Enter 0 Enter to exit the menu 8 Enter 0 Enter to quit the application 9 In the Administrative Tools window double click Services 10 In the right hand pane of the Services window double click Telnet ...

Page 159: ...our acquisition PC is running Windows XP FTP and Telnet are already installed All you need to do is to configure the Telnet server Procedure Details 1 In the Windows Start menu select Run 2 In the Run dialog enter cmd and click OK A command window appears 3 At the prompt enter the command tnltadmn config sec ntlm passwd Enter 5 Click the Close button in the upper right corner of the window to clos...

Page 160: ... 7 In the Services window right click Telnet in the right hand pane 8 Select Properties from the drop down menu 9 In the Telnet Properties dialog select Automatic from the drop down list Startup type 10 Click Apply 11 Click Start 12 Click OK The Telnet server is now set up and running on the acquisition PC ...

Page 161: ...prompt enter the following command ftp IP address Enter 4 When prompted for a user name enter CardioMD Enter 5 When prompted for a password enter CardioMD Enter The ftp prompt appears indicating that the acquisition PC is ready to receive ftp commands 5 9 2 Telnet Logon Procedure Details 1 In the Windows Start menu select Run 2 In the Run dialog enter cmd and click OK A command window appears 3 At...

Page 162: ...operate the acquisition PC 5 10 Detector Calibration Files The directory C Cardiocam Calibrations stores five calibration files per detector The files are in ASCII format and can be reviewed in Windows Notepad The five files are dyncor det Ecal det Geocal det HVcal dat PMTcal det where is 1 for detector 1 and 2 for detector 2 Figure 5 16 on page 5 59 shows typical values in the files together with...

Page 163: ...lue for PMT 2 Tune value for PMT 3 Tune value for PMT 4 Tune value for PMT 24 Threshold High Dyncor Low Dyncor Basic size X direction Energy related size X direction Basic size Y direction Energy related size Y direction Basic offset X direction Basic offset Y direction Energy related offset X direction Energy related offset Y direction Coefficient 0 Coefficient 1 Coefficient 2 ...

Page 164: ...Detector Calibration Files 5 60 CardioMD Service Manual 1MAN0158 H11 04 2005 CSIP Level 1 ...

Page 165: ... 6 2 5 Replacing Cables in Conduits 6 3 6 2 6 Replacing a Motion Controller 6 4 6 2 7 Replacing the Power Supply 6 5 6 3 Detector Repairs 6 6 6 3 1 General 6 6 6 3 2 Tools 6 6 6 3 3 Removing and Remounting the Detector Cover 6 6 6 3 4 Replacing Detector Power Supply and EDC Board 6 7 6 3 5 Replacing PMT s 6 8 6 3 6 Replacing the Crystal 6 10 6 3 7 Replacing the Collimator ID Cable 6 12 6 3 8 Align...

Page 166: ...he following sections WARNING Some gantry components represent risks of serious injury if removed Make sure that heavy parts are adequately supported or in balance during repairs on these WARNING Disconnect power to the gantry before replacing any electrical parts Not disconnecting power entails a risk of serious injury from electrical shock and may lead to damage of the electronic parts Connect a...

Page 167: ...e Encoder The three main motions detector rotate detector vertical and detector horizontal each have an absolute encoder that can be replaced in the field The process of replacing an absolute encoder is straightforward However when an absolute encoder has been replaced the corresponding axis must be recalibrated To calibrate an axis follow the appropriate procedure provided in Chapter 4 Calibratio...

Page 168: ...ontroller out of its chassis 3 Carefully pull out the end where the Phillips screws came out by about 3 cm 4 Slide the other end out of the chassis two latches are holding this end down When a replacement motion controller is installed its DIP switches must be set according to its allocation See Table 6 1 Switch Master motion controller Slave motion controller 1 ON Up OFF Down 2 ON Up OFF Down 3 O...

Page 169: ...ing Installed Software Versions for detailed instructions 8 If they do not update motion controller software See Chapter 7 Software Update Procedures for instructions 6 2 7 Replacing the Power Supply Procedure Details To replace the AC mains power supply 1 Unplug all cables to the power supply 2 Unscrew the four bolts fixating the power supply to the mounting plate inside the table console Note Th...

Page 170: ...emoving internal covers 6 3 2 Tools In addition to the tools listed for gantry repairs a 5 5 mm and a 10 mm fork wrench are needed to disassembly the detectors Optical couplant grease is needed when a PMT is replaced 6 3 3 Removing and Remounting the Detector Cover Procedure Details 1 Rotate the detector to 45 2 Remove two slotted screws at the top and two M4 Allen screws at one end Note Lock wash...

Page 171: ...he detector selector switch to position DET1 or DET2 depending on the detector at which the module is mounted After mounting the new EDC module check whether it has the correct software 4 Power up the CardioMD system and the acquisition PC 5 Open the latest log file in the acquisition PC directory C cardiocam SystemLog 6 Check that both EDC modules have the same software version See Chapter 7 Soft...

Page 172: ...ed with new ones without problems See also Chapter 9 Spare Parts for details Procedure Details 1 Disassemble the detector as far as described above 2 Remove all six PMT strips and the power strip 3 Disconnect all cables and remove the cable bracket 4 Unscrew the 8 M6 screws to remove the strip mounting plate 5 Remove the rubber light seal tube along the edges Note When reassembling take care that ...

Page 173: ...l that no air bubbles are trapped in the couplant 12 Use the plastic spatula ruler to smear out part of the blob towards each of the corners of the PMT face plate Ensure that the layer is still thickest around the center 13 Rotate the PMT to position the connector consistently with the other PMT s Align the PMT and press down to seat the PMT on the face of the crystal Apply pressure to such an ext...

Page 174: ...ure Details 1 Disassemble the detector and remove all 24 PMT s Follow instructions provided in the previous sections 2 Unscrew the mu metal support plates mounted on the two short edges of the detector 3 Lift out the mu metal support plates 4 Disconnect the internal HV cable from the mu metal assembly 5 Loosen the two set screws in the support brackets in each side To remove the brackets 6 Unscrew...

Page 175: ...p exactly with the corresponding marks on the front of the crystal Note The print on the crystal cover may not be entirely centered If this is the case position the crystal so that the marks on the crystal front are off centered equally with the holes in the GeoCal Mask 13 Mount the two crystal support brackets making sure that no cables get pinched under the brackets Tighten the set screws in the...

Page 176: ...ctor contact board and from the EDC module 4 The cable s exit hole in the detector casting is sealed with black RTV Use a knife to remove the old seal and replace the cable 5 Connect the cable to the detector contact board and seal the exit hole once again with black RTV 6 Route the cable to the EDC module and re assemble the detector 6 3 8 Aligning Collision Sensors on the Detector Cover Procedur...

Page 177: ...the upper set screw on the back of each sensor support See the photo on the right 7 Remount the detector cover this time with only the two slotted pivot screws at top 8 Slide a 3 mm Allen key into each of the 4 mm screw holes all the way through the aligment tools and loosen the screw in the bottom of each sensor support 9 With the Allen key staying in the hole preferably a key in the hole on both...

Page 178: ...ations and connect the cables 15 Remount the detector cover using all its screws Make sure that the M4 Allen screws have their lock washers applied 16 Check the cover collision by rocking the cover in both directions around its pivot point A collision should be detected in both directions 17 Rotate the detector to 45 and check that collisions in both directions can be cleared when using the hand c...

Page 179: ... 9CSY0900 B02 or higher 7 7 7 2 4 Collimator ID Programming 7 12 7 2 4 1 Tools Required 7 12 7 2 4 2 Procedure 7 12 7 2 5 Upgrading Motion Controller Firmware 7 14 7 2 5 1 Tools Required 7 14 7 2 5 2 Procedure 7 14 7 3 Acquisition PC Software Updates 7 18 7 3 1 Upgrading CardioMD Acquisition Software 7 18 7 3 1 1 Tools Required 7 18 7 3 1 2 Procedure 7 18 7 3 2 Performing a Complete Installation o...

Page 180: ...he CardioMD application window 7 2 2 Determining which COM Port to Use When using a laptop acquisition PC with the CardioMD system Series III systems you use the PC s USB interface to communicate with the CardioMD system via RS 232 This is accomplished by using a USB to RS 232 adapter to connect the RS 232 cable to one of the PC s USB ports This section explains how to determine which COM port you...

Page 181: ...g to the revision 9CSY0900 A01 or 9CSY0900 B02 or higher follow the appro priate procedure below All versions of the EDC board can be updated using the current version of the EDC software Caution Both EDC modules must always have the same software version installed 7 2 3 1 Tools Required NULL modem serial interface cable DB9 female to DB9 female CardioMD software installation CD part number 9CSY09...

Page 182: ... Board you must start the Flash program Pro ceed as follows 1 In the Windows Explorer select the folder EDC CardioMD programming for Module rev 9CSY0900 A01 on the CD ROM 2 In this folder double click the icon flash exe to start the Flash program 3 Locate the Reset button and Detector se lect switch on the EDC board 4 While holding the Detector select switch towards the Reset button momentary swit...

Page 183: ... reporting errors enter the com mand QUIT to exit the Flash program 10 Reset the EDC board This time only press the EDC board s Reset button If you also need to upgrade the logic firmware of the EDC board proceed to the section Upgrading Logic Firmware on page 7 6 If not continue with the instructions below After the micro controller software has been upgraded the ECG connection must be re stored ...

Page 184: ... EDC CardioMD programming for Module rev 9CSY0900 A01 TTERMPRO on the CD ROM 2 In this folder double click the icon ttermpro exe to start the ttermpro pro gram 3 Press Enter to check if the terminal prompt is present If the prompt does not appear check the serial port setup Baudrate 57600 Data 8 Parity none Stop 1 Flow control hardware or none Transmit delay 0 and 1 communication 4 At the terminal...

Page 185: ...described on page 7 4 10 Repeat steps 1 to 8 of this procedure to upgrade the logic firmware of the EDC module on the other detector 11 When both EDC modules have been up dated remount the detector top cover fol lowing instructions provided in Chapter 6 Repair Procedures 7 2 3 3 Upgrading EDC Modules 9CSY0900 B02 or higher Before starting the installation check the release note on the CD ROM You f...

Page 186: ...ition PC s USB ports See section 7 2 2 page 7 2 for instructions on determining which COM port you are using If you are using a tower acquisition PC 5 Connect the opposite end of the cable to the acquisition PC s COM1 serial port 6 Insert the software installation CD ROM in the acquisition PC s CD ROM drive Upgrading Micro Controller Firmware Procedure Details To load micro controller firmware to ...

Page 187: ...ctor Select switch in posi tion PGRM toward the Reset button 9 While holding the Detector Select switch toward the Reset button momentary switch function press the Reset button Note Ensure that the Detector Select switch is returned to the correct position DET 0 for detector 1 and DET 1 for detector 2 10 Click OK to download the software to the EDC Module A progress bar should now appear Note If a...

Page 188: ...the other EDC board 16 Connect the serial interface cable to the other EDC board as described on page 7 8 17 Repeat steps 1 page 7 8 to 15 page 7 10 of this procedure to update the micro controller firmware of the EDC module on the other detector 18 When both EDC modules have been up dated remount the detector top cover fol lowing instructions provided in Chapter 6 Repair Procedures Upgrading Logi...

Page 189: ...p up appears counting the number of bytes transferred When the software is suc cessfully loaded the pop up closes automati cally At this point the EDC module no longer responds to commands in the ttermpro emula tor This is normal Now the ECG connection must be restored and the EDC module must be power cycled 7 Remove the serial interface cable from the connector A1 RS232 and reconnect the ECG cabl...

Page 190: ... programming check the release note on the CD ROM You find the release note in the directory Release notes The release note may provide information that is more recent than this manual Procedure Details 1 Remove the detector top cover to access the EDC modules See instructions in Chapter 6 Repair Procedures 2 Remove the ECG cable from the ECG port labeled A1 RS232 3 Connect one end of the serial i...

Page 191: ...port from the Setup menu Correct COM port selected Baudrate 57600 Data 8 Parity none Stop 1 Flow control hardware or none Transmit delay 0 and 1 communication 10 In the File menu select Send File 11 In the folder ID programming on the CD ROM select one of the files 7PRG0260 LEGP txt and 7PRG0261 LEHR txt Select the file corresponding to the type of collimator currently mounted on the detector 12 C...

Page 192: ...The release note may provide infor mation that is more recent than this manual Note If you are using a laptop acquisition PC make sure that you will be using either COM1 or COM2 to download firmware to the motion controller since the software used for downloading only supports these ports See section 7 2 2 on page 7 2 for instructions on determining the COM port number Procedure Details To access ...

Page 193: ...re using a tower acquisition PC 5 Connect the opposite end of the cable to the acquisition PC s COM1 serial port Note Downloading software to the motion controller does not require the use of a NULL modem cable 6 Disconnect the CANbus cable between the two motion controllers by unplugging the cable connected to CAN_IN on the slave motion controller controller to the left 7 Insert the software inst...

Page 194: ...o set the motion controller in program mode 16 Set SW10 back to DOWN position to remove the reset 17 Click OK to download the software to the motion controller A progress bar should now appear Note If an error message appears instead of the progress bar press OK and repeat from step 13 to try again Refer to the Readme txt file in the MC folder on the CD ROM for fur ther details 18 Wait until the p...

Page 195: ...all motions in case of faults Proceed as follows 25 Reset both motion controllers SW10 in position up 26 Then remove the reset on the master mo tion controller motion controller to the right SW10 in position down 27 Finally remove the reset on the slave mo tion controller motion controller to the left SW10 in position down As an alternative to resetting both motion con trollers you can power cycle...

Page 196: ...elease note may provide information that is more recent than this manual Procedure Details Before starting the acquisition software up grade close down the CardioMD application 1 If the CardioMD application is not dis playing the Persistence page click the Exit button to return to the Persistence page 2 On the Persistence page click the Close button in the upper right corner of the CardioMD applic...

Page 197: ...e As a precaution in case anything should go wrong ensure that the previous version of the software CD ROM is available in order to be able to restore the original acquisition software ver sion 7 3 2 2 Procedure Before starting the acquisition PC software installation check the release note on the CD ROM You find the release note in the directory Release notes The release note may provide infor ma...

Page 198: ...sting version of the CardioMD application software copy the C Cardiocam directory to a working directory on the C drive Proceed as follows Procedure Details 1 In the Windows Explorer s folder list locate the Cardiocam directory 2 Right click on the directory name and select Copy from the pop up menu 3 In the folder list select the root directory C 4 Right click in the file list and select Paste fr...

Page 199: ...stalling the FireWire driver does not solve the problem The reason for this is that there is a minor mismatch between Microsoft Windows 2000 and the FireWire driver used by the CardioMD acquisition software However this does not affect Fire Wire functionality To ascertain that the FireWire communication between the gantry and the ac quisition PC is working properly run the FireViewer program that ...

Page 200: ...d restore calibration tables and cus tomer specific protocols from the backup disks Instructions are provided in the Ap pendix of the CardioMD Operator s Man ual 7 Finally remove the software CD ROM and store it in a safe place along with the backup disks 8 Start the CardioMD acquisition software by double clicking the CardioMD icon on the acquisition PC s desktop 7 3 3 Configuring Antivirus Softw...

Page 201: ...dow appears 2 Select Schedule Updates from the File menu The window Schedule Virus Definition Up dates appears 3 De select the checkbox Enable scheduled automatic updates This stops the AntiVirus software from run ning the LiveUpdate function Alternatively the Schedule button lets you tailor the automatic updates setup to suit indi vidual needs at your installation Refer to the Symantec AntiVirus ...

Page 202: ...ion CD ROM and the release note 2 Open the Windows Explorer 3 In the directory C cardiocam SystemLog find the most recent log file 4 Double click the name of the log file to open it in the Windows Notepad program The contents of the log file will look similar to the file shown on the right 5 Check the EDC software against the EDC software version indicated on the label of the installation CD ROM L...

Page 203: ...1 Equipment Moved in Boxes on Pallet Jacks 8 14 8 2 2 2 Equipment Moved on Dolly Shipped with the System 8 14 8 2 3 Equipment Storage 8 15 8 2 4 Power Requirements 8 16 8 2 4 1 Quality of Power 8 16 8 2 4 2 Transient Voltage 8 16 8 2 4 3 Voltage Regulation 8 16 8 2 4 4 Brownouts 8 16 8 2 4 5 Source Configuration 8 16 8 2 4 6 Emergency Power 8 16 8 2 5 Environmental Specifications 8 17 8 2 6 Networ...

Page 204: ...upport 8 38 8 3 3 21 Electrical Connections between Detector X drive Y drive and Table Console 8 39 8 3 3 22 Assembling the Laptop PC Mounting Option 8 42 8 3 3 23 Mains Voltage Configuration 8 65 8 3 3 24 Tightening the Rear Anchor Bolts and Testing Motion 8 66 8 3 3 25 Removing Detector Insulation 8 67 8 3 3 26 Mounting the Patient Table and Adjusting the Table Support 8 67 8 3 3 27 Checking Mot...

Page 205: ... sodium iodide crystals and high speed electronics that require reasonably well controlled temperature humidity and power Complete camera systems can be installed in a single room or with the gantry and acquisition station in one room and the processing station in a separate room 8 1 3 Minimum Floor Space Allocation Minimum floor space layouts are shown for the CardioMD system including processing...

Page 206: ...de Monitor placed on customer s desktop 20 0 inch 51 cm 20 0 inch 51 cm 20 0 inch 51 cm 69 lbs 32 kg 8 Codonics Printer option placed on customer s desktop 17 0 inch 43 cm 21 0 inch 53 cm 12 0 inch 30 0 cm 55 lbs 25 kg 9 Uninteruptible power supply UPS 2 2 kVA from APC Inc 8 0 inch 20 cm 22 0 inch 56 cm 17 0 inch 43 cm 112 lbs 51 kg 10 Uninteruptible power supply UPS 3 1 kVA from Best Inc 20 0 inc...

Page 207: ...Installation 1MAN0158 H11 04 2005 CSIP Level 1 CardioMD Service Manual 8 5 Figure 8 2 System footprint with short table ...

Page 208: ... It is important that there is a minimum distance of 3 between the CardioMD camera and the wall This space is needed for the point source holder used to calibrate the system when the CardioMD AC option is installed Figure 8 3 Minimum room layout with long table and cart mounted acquisition PC ...

Page 209: ... important that there is a minimum distance of 3 between the CardioMD camera and the wall This space is needed for the point source holder used to calibrate the system when the CardioMD AC option is installed Figure 8 4 Minimum room layout with long table and wall mounted acquisition PC ...

Page 210: ... It is important that there is a minimum distance of 3 between the CardioMD camera and the wall This space is needed for the point source holder used to calibrate the system when the CardioMD AC option is installed Figure 8 5 Minimum room layout with short table and cart mounted acquisition PC ...

Page 211: ...important that there is a minimum distance of 3 between the CardioMD camera and the wall This space is needed for the point source holder used to calibrate the system when the CardioMD AC option is installed Figure 8 6 Minimum room layout with short table and wall mounted acquisition PC ...

Page 212: ... It is important that there is a minimum distance of 3 between the CardioMD camera and the wall This space is needed for the point source holder used to calibrate the system when the CardioMD AC option is installed Figure 8 7 Minimum room layout with short table and desk mounted acquisition PC ...

Page 213: ...edical supplies etc is needed 8 1 6 2 Floor The room floor must consist of a finished concrete floor covered with an industrial grade anti static tile No carpet may be used on the floor 8 1 6 3 Lighting Lighting fixtures vents etc shall be flush with finished ceiling Dimmers should be used to control light levels in control and exam rooms Locate dimmers conveniently for gantry and controls 8 1 6 4...

Page 214: ... the microprocessor and computer equipment and should not be located adjacent to the camera room 8 1 7 3 Gamma Events The camera detects gamma events from a radioactive source and measures their intensity Hospital physicists must consider this when a hot lab or patient waiting area is located adjacent to a camera room Consideration must also be given to new equipment layout with respect to current...

Page 215: ... 5 5 9 inch 50 207 15 cm Table support for short table option 66 lbs 30 kg 31 5 23 6 31 5 inch 80 60 80 cm Option Long table and mattress 44 lbs 20 kg 19 7 110 6 5 9 inch 50 281 15 cm Table support for long table option 66 lbs 30 kg 31 5 23 6 31 5 inch 80 60 80 cm Laptop cart mount option 110 lbs 50 kg 31 5 47 37 inch 80 120 93 cm Laptop wall mount option 110 lbs 50 kg 19 7 110 6 10 6 inch 50 281 ...

Page 216: ...red 80 inch 200 cm Table 8 4 Passage clearances for moving equiment in boxes on pallet jacks Figure 8 8 Minimum clearance for turns 8 2 2 2 Equipment Moved on Dolly Shipped with the System Door width with without jack beams mounted 36 inch 91 cm 30 inch 75 cm Corridor width 90 angle 42 inch 105 cm Door height 80 inch 200 cm Elevator width if required with without jack beams mounted 36 inch 91 cm 3...

Page 217: ...ng container Collimators are also mounted and shipped on the detectors providing additional thermal protection The thermal protection controls the temperature change rate of the crystals Caution You must never remove this thermal protection before the detectors have been in a controlled environment and the detectors have reached room temperature It is suggested that the detector temperature is all...

Page 218: ...8 2 4 4 Brownouts If there are consistent voltage losses exceeding a 30 drop in peak voltage for more than 5 cycles a battery uninterrupted power supply UPS is recommended Uninterruptible power supplies allow at least the case in progress to be completed and should be considered where there is concern for periodic power loss from any cause line drop out generator testing etc of the magnitude menti...

Page 219: ...s 8 2 6 1 Networking There are two general types of CardioMD networking installations 1 Single camera computer 2 Multiple camera computer Single Camera Computer In a single camera computer installation Philips Medical Systems will network together the CardioMD system the PegBlade computer and a printer The customer is responsible for providing one twin RJ 45 connection box near the CardioMD system...

Page 220: ...tuation the customer must install the twin RJ 45 connector boxes near the CardioMD system and near the PegUltra The customer must also run Cat 5 cables from the two connector boxes to a central connectivity point before ADAC can connect to other devices See Figure 8 11 Single camera computer network Multiple camera computer network Figure 8 11 Single and multiple camera computer networks ...

Page 221: ... the right hand side of the table console The length of this cable depends on the acquisition PC option Cart mount wall mount or desk mount Cart mount Wall mount Desk mount Figure 8 12 Acquisition PC and gantry cable lengths 8 2 7 CardioMD Floor Levelness The floor occupied by the CardioMD system must be in level within inch 12 5 mm Figure 8 13 System footprint with short table ...

Page 222: ...age 8 20 CardioMD Service Manual 1MAN0158 H11 04 2005 CSIP Level 1 Figure 8 14 System footprint with long table Figure 8 15 Floor levelness requirement 1 2 12 7 mm Allowable tolerance Floor grade levelness within occupied area Existing Floor ...

Page 223: ...stem calibration and performance checking 1 Gantry unload 2 Installation 3 System check out 8 3 1 Installation Overview Note Before starting an installation make sure to study the document CardioMD camera site planning ADAC no 9347 0112 Installation involves the following main steps 1 Open the boxes and remove packing materials Leave the detector insulation in place 2 Remove the wooden end bars on...

Page 224: ...one at the time Tighten the screws and then loosen them by half a turn Lower the rear end and remove the jack beam 15 Mount the last 2 M12 30 anchor screws and washers in the rear end of table base and tighten Tighten the 4 anchor screws in the mounting plates for the gantry 16 Remove 4 mounting screws in the gantry 2 in each end bar Using the special tool on the leveling screws and a spirit level...

Page 225: ... Tools 8 3 2 1 Tools Shipped with System 2 dolly wheel bars 2 jack beams 4 plastic protection feet 4 socket head cap screws M12 75 mm 1 rectangular plywood plate plate for trolley 24 24 inch 60 cm 60 cm 1 ratchet 1 leveling tool special screw driver for the leveling screws 2 M10 200 mm long bolts 1pcs 15 mm masonry drill 8 3 2 2 Tools not Shipped with System Pallet Jack Spirit level with tolerance...

Page 226: ...16 Minimum workspace and corridor width Procedure Details The gantry is shipped in a wooden crate 34 61 63 inch 86 155 160 cm 1 Remove the plywood sides and top of the crate 2 Remove the protection bag by carefully cutting around the edges Note Leave the detector insulation in place at this point Required work space for unpacking and unloading 100 x 92 inch 256 x 236 cm If corridors have a 90 corn...

Page 227: ...rd wooden crate 31 5 57 34 inch 80 145 87 cm 5 Remove the plywood sides and top 6 Remove the protection bag by carefully cutting around the edges The patient table option is shipped in two cardboard boxes The pallet and mattress are shipped in one box 19 7 110 6 5 9 inch 50 281 15 cm for the long table 19 7 81 5 5 9 inch 50 207 15 cm for the short table The table end support is shipped in a second...

Page 228: ...by carefully cutting around the edges Note Check the packing list and make sure that all parts are present 8 3 3 2 Removing End bars and Shipping Brackets Procedure Details In order to be able to mount the jack bars the extensions at both ends of the pallet must be removed 1 Use a Philips bit to remove all 4 steel angles and remove the 2 pieces of wood 2 Using a 16 mm wrench dismount the 2 small Z...

Page 229: ...Procedure Details 1 Locate the 2 jack beams the 2 wheel bars 4 plastic protective feet 4 screws M12 75 mm and a ratchet 2 Using 4 pcs M12 75 mm socket head cap screw and a 10 mm Allen wrench mount a jack beam in each end of the gantry The side with protective rubber against the painted surface of the end bar 3 Apply a plastic protective foot under each acme screw 4 Using a ratchet raise the gantry...

Page 230: ...unting plates 10 Lower the jack until the gantry is standing on the four wheels 11 If required remove the jack beams Note The Gantry on its Dolly with the jack beams mounted can go through 91 cm 3 ft door ways Without the jack beams the gantry can pass a doorway of 75 cm 2 5 ft 8 3 3 4 Determining the Actual Position for the System Note Use the template shipped with the system to determine the act...

Page 231: ...Installation 1MAN0158 H11 04 2005 CSIP Level 1 CardioMD Service Manual 8 29 position of the holes for anchors If rebars or tensioning cables in the floor obstruct drilling alternative holes are provided ...

Page 232: ...Installation 8 30 CardioMD Service Manual 1MAN0158 H11 04 2005 CSIP Level 1 Figure 8 17 Installation template ...

Page 233: ...e adhesive tape to fix the template to the floor 8 3 3 5 Drilling Holes and Setting Anchors Procedure Details 1 Drill 6 holes 2 55 mm deep for anchors through the template Use the 15 mm masonry drill You may use a hammer drill for a pilot hole 2 Remove the template and clean the holes Note If rebars or tensioning cables in the floor obstruct drilling use the alternative holes provided Procedure De...

Page 234: ...be at least 42 105 cm See Figure 8 18 The gantry on its dolly with the jack beams mounted can go through 91 cm 36 doorways Without the jack beams the gantry can pass a doorway of 75 cm 30 Figure 8 18 Passage clearance for gantry Procedure Details 1 Roll the gantry in position over the anchors holes 2 If the jack beams have been removed remount these now 3 Jack up and dismount the dolly wheels ...

Page 235: ...tallations require use of the optional CardioMD Seismic Kit Instructions for seismic installation are included with the kit 8 3 3 8 Positioning the Gantry Procedure Details 1 Lower the jacks until the gantry is about 3 4 20 mm above the mounting plates If needed push the gantry until the 4 screw heads below the gantry end bars align with the 2 holes in each mounting plate The screw heads will guid...

Page 236: ...t dirt from entering underneath the gantry 2 Cut the strip to fit between the mounting plates 8 3 3 10 Rebuilding the Trolley for Transporting the Table Base Procedure Details Use the two wheel bars and the rectangular plywood plate to build a trolley 1 Mount the wheel bars to the plate using 4 pcs M10 30 mm screws shipped with the plate Use an 8 mm Allen wrench to tighten the screws 2 Cut the str...

Page 237: ...Positioning the Table Base Procedure Details 1 Move the table base on the trolley and position it close to its final position Leave approximately 4 10 cm space between gantry and table base in order to be able to remount dismount the jack bars 2 If the jack bars have been removed re mount these now 3 Raise the jacks and remove the trolley 8 3 3 13 Mounting the Guide Screws Procedure Details 1 Lowe...

Page 238: ... Remove the long screws and replace them with M10 20 mounting screws one at the time 3 Using an 8 mm Allen wrench tighten the screws and loosen each screw again by approximately half a turn of the wrench 4 Lower the rear end of the table base and remove the jack beam 8 3 3 15 Mounting Anchors for Table Console Procedure Details 1 Using a 10 mm Allen key mount 2 M12 30 anchor screws with washers at...

Page 239: ... the table base 3 Level both end bars and check the side bar where the table base is mounted 4 Reinsert the 4 mounting screws and tighten them 8 3 3 17 Adjusting Center Leveling Screws Procedure Details 1 Remove the mounting screw in the middle of one of the sidebars and adjust the leveling screw until the plate is just supported on floor 2 Remount the mounting screw 3 Perform the same adjustment ...

Page 240: ...adjusting tool level the table base 3 Remount the mounting screws 8 3 3 19 Removing the 2 Shipping Locks Procedure Details 1 Tighten the mounting screws connecting the table base and gantry frame 2 Using an 6 mm Allen wrench remove the 2 shipping locks located in the gantry sidebars 8 3 3 20 Mounting the Patient Table Support Procedure Details 1 Mount the table end support onto the gantry base usi...

Page 241: ... in the three slotted holes at the bottom of the table console The thick conduit from the detector rotate gear goes into the right hand hole The conduit from the gantry base goes into the middle hole The conduit from the bottom of the Y pillar goes into the left hole 2 Tighten the nuts by hand 3 From the front side of the table console remove the fixing screws of the two rectangular ferrite filter...

Page 242: ...ector on the rotate motor amplifier the black unit to the right 7 Tighten the retaining screws 8 Plug the DB15 HD into the mating connector on the vertical motor amplifier the black unit in the middle 9 Tighten the retaining screws 10 Attach the rectangular ferrite filters to the standoffs where they came off using the fixing screws 11 Go to the back of the table console 12 Plug the two connectors...

Page 243: ...nector D12 on the safety board 18 Attach the BNC connector to the BNC adapter for the ECG gate on the rear connector panel Note You may have to remove the connector panel to access the BNC adapter Three yellow cables are equipped with DB9 connectors with code plates mounted Each code plate will only fit in one position over the three DB9 connectors on the safety board 19 Connect the three cables a...

Page 244: ...f rubber cable protector for routing of cables through traffic areas Before starting the installation remove the cable protector from the packaging and place it flat on the floor out of the way allowing curl to relax Cart mount Option Installing the cart comprises the following steps 1 Unpacking the cart 2 Connecting the cable from the cart to the gantry 3 Mounting the laptop power supply in the c...

Page 245: ...connector 5 Connect the FireWire cable to any of the ports on the FireWire hub 6 Attach the eye terminal of the yellow green ground wire to the ground screw on the power supply frame 7 Remove the rear connector panel for the ECG gate by unscrewing the four M4 x 8 screws holding the panel 8 Unscrew the two M3 screws to remove the small bracket for the Ethernet connector DB25 connector IEC connector...

Page 246: ...rain relief should be added to the gantry PC interface cable as follows Procedure Details 11 After making all connections take all excess cable length to the interior of the gantry 12 To prevent cable connections from being stressed attach two large Ty Wraps to the cable on the inside of the cabinet To mount the laptop power supply in the PC cart stand proceed as follows Procedure Details 1 Remove...

Page 247: ...aptop PC and hand controller proceed as follows Procedure Details 1 Connect the FireWire cable to the FireWire connector on the laptop PC 2 Connect the power cable to laptop PC s power input 3 Connect the DB9 connector to the laptop PC s monitor output This connection is only required to ground the laptop PC for EMI EMC reasons 4 Connect the Ethernet cable to the laptop PC s network connector 5 Co...

Page 248: ...e cables to be damaged and persons to trip over the cable Procedure Details The CardioMD system is supplied with 3 m 10 ft of rubber cable protectors used for covering cables running from the gantry to the wall power and network cables and the cable between gantry and acquisition PC Cable protectors should be applied where traffic across the cables is to be expected 7 Cut cable protectors to desir...

Page 249: ...d over the 180 arc This is of particular importance when installing in small rooms where the laptop may block entrances or passageways when swung In small rooms it is recommended always to have the laptop arm folded against the wall 2 Check that the cable from the wall mounting kit to the gantry is sufficiently long to be routed nicely in the wiremolds supplied as part of the wall mount option If ...

Page 250: ...ure Details If the screw will be placed in a stud 4 Use a 2 mm drill to drill the hole 5 Mount the plate with this first screw If working in drywall you must use the dedicated screws and anchors supplied with the kit see photo on the right 4 Drill a pilot hole and then use a 10 mm drill for the final hole 5 Remove the screw from the anchor and insert the anchor in the hole just drilled in the wall...

Page 251: ...ole just drilled Seat plug firmly into the wall by tapping with a hammer 6 Fasten the mounting plate with the first screw 7 Level the wall mount plate and mark the remaining 3 upper holes as well as the 4 lower mounting holes Note It is critical that the wall mounting plate is level Procedure Details 8 Remove the wall mounting plate to give access to drilling the 7 remaining holes 9 Mount anchors ...

Page 252: ...8 H11 04 2005 CSIP Level 1 Now proceed as follows to assemble the wall mount kit Procedure Details 1 Remove the M6 20 cap screw from the rear of the arm 2 Remove the cable grommet from the base of the pivot shaft 3 Remove the pivot shaft from the arm ...

Page 253: ...6 Assure that the cable is routed through the arm and escapes through the bottom of the arm 7 Route the cable through the split ring of the wall mounting plate assuring that the cable grommet is below the split ring 8 Place the arm between the two rings on the wall mounting plate 9 Place the remaining two large steel washers on top of the arm under the top ring of the wall mounting plate ...

Page 254: ...into alignment with the wall mounting plate rings 11 Insert the pivot shaft so that the slot in the pivot shaft allows the cable to escape the arm shaft mounting assembly 12 Replace the M6 20 cap screw at the rear of the arm 13 Remove the top cover from the arm 14 Replace the cable grommet at the bottom of the pivot shaft ...

Page 255: ...l up the cable clamp 16 Remove the knob indicated in the photo on the right When in place this knob serves to lock rotation of the top plate 17 Locate the laptop PC power supply 18 Lift up the top bracket from the wall mount arm 19 Thread the laptop power cable through the bracket next to the other cables Knob ...

Page 256: ...EC connector inside the arm 21 Place the power supply inside the arm 22 Mount the arm cover 23 On the top plate remove the 4 screws and the cable bracket 24 Mount the top plate using the two long screws at the rear and the two shorter ones for the front two holes Note Make sure to mount the top plate with the round air circulation holes to the left ...

Page 257: ...ardioMD Service Manual 8 55 25 Mount he cable bracket once again using the two M6 nuts 26 Use a Ty Wrap to secure the cables to the cable bracket 27 Fasten the ground wire to the top plate 28 Connect the DB25 connector to the box with the three LED s ...

Page 258: ... Proceed as follows Procedure Details 1 Route wiremolds nicely from the wall mount to the gantry Use the adhesive on the wiremolds to attach them to the wall The wiremolds provided with the system include angles and turns needed for most installations In case you need additional parts these can be obtained locally Note The adhesive on the wiremolds is only intended as an aid when installing The ad...

Page 259: ... other cables Due to safety and EMC EMI considerations the cable connecting the acquisition PC to the gantry must be routed in separate wiremolds Procedure Details 6 Use a part of the rubber protector supplied with the system to protect the cable from the wall to the gantry 3 m 10 ft of rubber cable protectors are provided to cover cables running from the gantry to the wall power and network cable...

Page 260: ...gantry 2 Fasten the plate to the gantry using the M4 x 8 screws 3 Connect the hand controller LED E stop cable to the DB25 connector on the internal connector panel 4 Connect the power cable to the IEC connector 5 Connect the FireWire cable to any of the ports on the FireWire hub 6 Attach the eye terminal of the yellow green ground wire to the ground screw on the power supply frame DB25 connector ...

Page 261: ...nector 9 Place the bracket on the Ethernet connector and mount the connector to the rear panel 10 Mount the panel again on the rear of the table console Note Strain relief should be added to the gantry PC interface cable as follows Procedure Details 11 After making all connections take all excess cable length to the interior of the gantry 12 To prevent cable connections from being stressed attach ...

Page 262: ...p PC s power input 3 Connect the DB9 connector to the laptop PC s monitor output This connection is only required to ground the laptop PC for EMI EMC reasons 4 Connect the Ethernet cable to the laptop PC s network connector 5 Connect the external mouse to a USB port on the laptop PC 6 Connect the hand controller to the DB25 connector on the rear side of the wall mount top plate next to the E Stop ...

Page 263: ...er cable can be threaded through the hole on the rear side of the desk mount allowing the power supply to be positioned behind the desk mount 3 Route the PC power cable to the front of the desk mount and connect it to the laptop PC s power input 4 Connect the FireWire cable to the FireWire connector on the laptop PC 5 Connect the DB9 connector to the laptop PC s monitor output This connection is o...

Page 264: ... adhesive on the wiremolds is only intended as an aid when installing The adhesive is not sufficiently strong to keep wiremolds in place for longer periods of time Procedure Details 2 With a 6 mm drill drill holes through the wiremold and into the wall Note Take care to avoid any studs 3 Insert wall plugs into the holes drilled 4 Use the screws provided with the system to secure wiremolds 5 Route ...

Page 265: ...ross cables must be expected 7 Cut cable protectors to desired lengths Open the membrane at the base of the protector to slide in the cable Connect the gantry PC interface cable to the gantry as follows Procedure Details 8 Push the cable coming from the acquisition PC through the entry hole in the gantry 9 Fasten the plate to the gantry using the M4 x 8 screws 10 Connect the hand controller LED E ...

Page 266: ... x 8 screws holding the panel 15 Unscrew the two M3 screws to remove the small bracket for the Ethernet connector 16 Place the bracket on the Ethernet connector and mount the connector to the rear panel 17 Mount the panel again on the rear of the table console Note Strain relief should be added to the gantry PC interface cable as follows Procedure Details 18 After making all connections take all e...

Page 267: ...elector compartment If configuring power for the final installation the remaining fuses should be discarded This is to ensure they are not mistakenly used as a replacement fuse as they will have the wrong value for the power setting 4 Remount the rectangular cover plate Note Nominal mains voltage Setting 90 107 V AC 108 132 V AC 180 208 V AC 209 228 V AC 229 264 V AC 100 V 120 V 200 V 220 V 240V 5...

Page 268: ...ontroller to move the detectors up and in towards the patient table leaving the x axis approximately 8 20 cm from the rear of the table 2 Tighten the 2 rear anchor screws using a 10 mm Allen key 3 Using the hand controller check that the system will move along all axes 4 Leave the detector assembly in the top position in order to be able to remove the detector insulation ...

Page 269: ... stabilize for a period of 24 hours with the thermal protection on the detector if the equipment is being relocated from one temperature to an extremely different temperature environment The accepted rate of change should be less than 15 F 8 C per hour Do not locally heat or cool the detector so as to produce gradients greater than 5 F 3 C across the detector face Failure to comply may result in d...

Page 270: ...ver proceed as follows Procedure Details 1 Locate the four stays for the gantry base cover 2 Mount the stays to the gantry frame Note Do not use excessive force when tightening the stays as they may break if subjected to too large a torque 8 3 3 29 Mounting Covers Procedure Details The cover of the tower must be removed before the base cover can be mounted 1 Dismount the two screws at the rear one...

Page 271: ...ays 7 Mount 2 screws with washers from the right hand side into the base frame 8 Re mount the cover on the gantry tower 9 Re mount the tower top cover 10 Mount the rails for the sliding cover onto the base using 4 pcs M6 screws and a 5 mm Allen wrench 11 Connect the sliding cover to the tower using a 2 mm Allen wrench 12 Mount the stay for the cable tray in the M12 hole to the left on the rear sid...

Page 272: ...edure Details 13 In the rear gantry base cover mount the two holders for the emergency crank 14 Mount the rear base cover onto the gantry base using 4 screws with washers from the top 15 Position the cable tray and fasten it with a M12 bottom head cap screw and an 8 mm Allen wrench ...

Page 273: ...he ECG gate is not shipped with the CardioMD system but is supplied separately by Philips Medical Systems Procedure Details 1 Unpack the ECG gate 2 Position the ECG gate and the dedicated gate support bracket supplied with the CardioMD system next to the table console as shown in the photo on the right Note The support bracket will prevent the gate from being accidentally pushed into the detector ...

Page 274: ...e 3 Remove the two screws from the plate covering the ECG gate power output connector 4 Remove the plate 5 Use the IEC power cable and the BNC cable supplied with the CardioMD system to connect the ECG gate to the system 6 Set the trigger polarity to negative The trigger polarity switch is located at the rear panel of the gate ECG trigger ECG gate power cable ...

Page 275: ...y has a cutout that will serve as an exit point for the two cables 3 m 10 ft of rubber cable protectors is provided to cover Power and network cables running from the gantry to the wall Cable between the gantry and acquisition PC Routing and protecting the acquisition PC gantry cable is described above see page 8 46 8 57 and 8 63 The power and network cables running from the gantry to the wall mus...

Page 276: ...r is required to separate the power line from the network cable 3 Slice one of the columns inside the rubber cable protector to place one of the two cables in the side compartment WARNING Trip hazard Failing to protect and secure the gantry PC interface cable may cause cables to be damaged and persons to trip over the cable Slice or cut this column within the rubber cable protector to isolate the ...

Page 277: ...PC If your acquisition PC is running Windows XP you automatically get administrator privileges For Windows 2000 proceed as follows Procedure Details If the CardioMD acquisition is running 1 Ensure that the acquisition PC is displaying the Persistence page Click the Close button in the upper right corner of the window to close the CardioMD application 2 Click the Windows Start button 3 Select Shut ...

Page 278: ...he Windows desktop right click on the icon My Network Places and select Properties from the pop up menu The Network Connections window appears In Windows 2000 this window looks a little different and its name is Network and Dial up Connections 2 Right click the item Local Area Connection and select Properties from the pop up menu The Local Area Connection Properties dialog appears 3 Select the ent...

Page 279: ...titution s network administrator 6 Click OK 7 In the Local Area Connection Properties dialog click OK again 8 Reboot the acquisition PC Further information about local area network setup is available in the Windows Help system Setting Up the Processing Station IP Address This section explains how to set up IP addresses for the processing station used with the CardioMD system This requires editing ...

Page 280: ...les contained in the folder appears 4 Select the Hosts file and click Open The contents of the Hosts file look similar to the window shown on the right 5 At the bottom of the file add an entry for the workstation acting as the database host starting with its IP address and ending with the hostname For example 192 168 10 143 Odyssey Note It is important that the IP address is valid and does not con...

Page 281: ...k the CardioMD icon on the acquisition PC s desktop to start the CardioMD application 2 On the Persistence page click the Tools button 3 When the Calibration Configuration menu appears click Service 4 If prompted enter the service password currently DDD 5 In the Service Calibrations menu click Node configuration 6 In the Nodes Configuration dialog double click the to add a new node The Add a new n...

Page 282: ...details are available in the CardioMD Operator s Manual Chapter 4 Operating Instructions 10 Click Save 11 In the Nodes configuration dialog click Exit The configuration is now complete 12 To make the changes take effect reboot the CardioMD acquisition PC DICOM Setup on the Processing Station Please refer to the installation and or configuration procedures in the documentation accompanying the proc...

Page 283: ...ication starts 2 In the Notepad window select File Open 3 Select the file c Program Files Philips Nuclear Medicine Jetstream Workspace dicom customMap ini 4 In this file find the lines Philips_CardioMD NameKey 0018 1030 ExamKey 0018 1030 5 Replace them with Philips_CardioMD NameKey 0008 103e ExamKey 0018 1030 8 3 4 3 Configuration of Regional Settings The acquisition PC must be set up to use the U...

Page 284: ...IP Level 1 Procedure Details 4 Select the appropriate language from the drop down list In Windows XP 5 Click Customize 6 Click the Date tab 7 In the Short date format drop down select the appropriate date format Likewise select the desired Long date format 8 Click OK ...

Page 285: ...the upper right corner of the application window to close down the application 3 In the Windows Start menu select Programs Accessories Notepad The Windows Notepad application starts 4 In the Notepad window select File Open The Open dialog box appears 5 In the Look in drop down select the folder C cardiocam 6 In the File of type drop down select All Files A listing of all the files contained in the...

Page 286: ...MD icon on the desktop to start the CardioMD application 12 Check that the correct institution name and ID appear during startup 8 3 4 5 Setting Up Units for Patient Height and Weight Procedure Details 1 On the acquisition PC ensure that the CardioMD application is displaying the Persistence page 2 Click the Close button in the upper right corner of the application window to close down the applica...

Page 287: ...ht 8 Find the entry EnglishUnits and edit it as follows EnglishUnits configures the patient database to accept lbs feet and inches EnglishUnits configures the patient database to use metric units Note Do not edit any other entry of this file 9 Select File Save to save the modified file 10 Select File Exit to close down the Notepad program 11 Double click the CardioMD icon on the desktop to start t...

Page 288: ...appears showing an overview of the printers defined on the system 4 Double click Add Printers 5 Follow instructions provided to create a new printer 6 Make sure to specify that the new printer will be used as the system s default printer Note The printer must be added as a network printer A local printer connected directly to the acquisition PC is not supported and is not a valid configuration 7 D...

Page 289: ...e state of the CardioMD system Procedure Details After the CardioMD has been powered up 1 Ensure that Collision Override has been pressed as part of normal power up procedure 2 Check that the Collision LED and the E Stop LED are both OFF 3 Check that the green Power OK LED is ON 4 Activate one of the system s collision sensors 5 Check that the yellow Collision LED is ON 6 Check that the green Powe...

Page 290: ...or Calibration Procedures for detector calibration are given in Chapter 4 Calibration of this Service Manual Perform the following calibration procedures HV calibration PMT update tune Uniformity calibration for Tc 99m Center of rotation calibration for all collimators used for tomography Run the following performance tests described in the Operator s Manual Chapter 5 Maintenance to verify perform...

Page 291: ...ers 9 6 9 1 8 Service Tools and Spares to Service Tools 9 7 9 2 Location of Spare Parts 9 8 9 2 1 Detector 9 8 9 2 2 Collimators 9 13 9 2 3 Gantry 9 14 9 2 3 1 Gantry Base 9 17 9 2 3 2 Gantry Tower 9 21 9 2 3 3 Table End Support 9 22 9 2 4 Acquisition PC 9 23 9 2 5 Accessories 9 27 9 2 6 Covers 9 28 9 2 7 Service Tools 9 30 9 2 7 1 Detector Service Kit 9 31 9 2 7 2 NEMA Kit 9 33 9 2 7 3 Miscellane...

Page 292: ... 5485 9CBL0718 A EXTERNAL HV CABLE I II III 2 2163 5488 9CBL0873 A TUNE CONTROL CABLE I II III 2 2163 5459 3CBL1542 A FIREWIRE CABLE I II III 1 2163 5463 9CBL0870 A CANBUS CABLE I II III 1 2163 5483 9CBL0661 A EDC POWER CABLE I II III 2 2163 5482 9CBL0872 A ANALOG SIGNAL CABLE I II III 2 2163 5489 9CBL0875 A EKG CABLE I II III 2 2163 5476 9TER0561 A CANBUS TERMINATOR FEMALE I II III 1 DDD4CSY1557B...

Page 293: ...II 1 2163 5417 9MOT0918 B TWO AXES MOTOR CONTROLLER I II III 2 2163 5415 9CTA0858 A TABLE DRIVE BOARD I II III 1 DDD9KIT1305B 9KIT1305 B ROLL Y MOTOR AMPLIFIER INST KIT I II III NA 2163 5457 9AMP0924 A X MOTOR AMPLIFIER I II III 1 DDD9SER1354A 9SER1354 A X DRIVE BEARING KIT I II III NA 2163 5478 2MOT1270 A ROLL Y HDD MOTOR I II III 2 2163 5453 9CSY0987 A X MOTOR dunker motor I II III 1 2163 5452 2...

Page 294: ...MM I II III 2 2163 5501 3FUS1509 A FUSE 10A 250V 6 3X32MM I II III 2 2163 5502 4CSY1370 A WORM WHEEL FOR ENCODER I II III 2 2163 5503 2BLT1274 A BELT SYNCROFLEX FOR ROTATE I II III 1 2163 5508 4CSY1415 A GEAR WHEEL FOR TABLE I II III 1 DDD4CSY1414A 4CSY1414 A TOOTHBAR FOR TABLE I II III 1 DDD4UNF1091A 4UNF1091 A WHEEL FOR TABLE SUPPORT I II III 1 DDD4UNF1092A 4UNF1092 A SHAFT FOR TABLE SUPPORT I I...

Page 295: ...C CART I II 1 2163 5514 6CBL1075 A PC MONITOR MAINS CABLE I II 2 9 1 5 Laptop Acquisition PC Philips part no DDD part no Description System series Qty per system DDD9ACQ1471A 9ACQ1471 A LAPTOP PC INCL POWER SUPPLY WINXP III 1 DDD9ACQ1475A 9ACQ1475 A LAPTOP POWER SUPPLY III 1 DDD9CBL1467A 9CBL1467 A 4 5 M LAPTOP GANTRY CABLE III Option DDD9CBL1442A 9CBL1442 A 10 M LAPTOP GANTRY CABLE III Option DDD...

Page 296: ... I II 1 DDD9CSY1465A 9CSY1465 A HAND CONTROLLER 3 5 m III Option DDD9CSY1395A 9CSY1395 A HAND CONTROLLER 6 m III Option DDD2TUB1933A 2TUB1933 A TEST TUBE 10 x 11 I II III 1 DDD2LID1934A 2LID1934 A LID TEST TUBE 2TUB1933 I II III 1 2163 5461 6CBL1080 A ETHERNET CABLE I II III 1 2163 5602 9DER0411 A POWER CABLE I II III 1 DDD3PLG1610A 3PLG1610 A NEMA PLUG L5 20R I II III 1 DDD4CSY1542A 4CSY1542 A CO...

Page 297: ... COVER FOR TABLE FRAME I II 1 DDD4CSY2080B 4CSY2080 B BACK COVER FOR TABLE FRAME III 1 2163 5533 4CSY1499 A COVER FOR TABLE FRAME I II 1 DDD4CSY2095A 4CSY2095 A COVER FOR TABLE FRAME III 1 DDD4CSY1279B 4CSY1279 B SHIELDING FOR COLLIMATOR I II 2 DDD4CSY1884A 4CSY1884 A SHIELDING FOR COLLIMATOR III 2 2163 5504 2SCR0337 A M4X8 SCREW FOR COVERS I II III 4 2163 5505 2SCR0088 A M4X12 SCREW FOR COVERS I ...

Page 298: ... 2163 5514 2SCR1231 A EXPANSION ANCHOR I II III 6 2163 5515 9CSY0861 A DOLLY ASSEMBLY I II III 1 DDD4UNC1290A 4UNC1290 A DOLLY TRAPEZ I II III 4 DDD2GUM0760A 2GUM0760 A RUBBER SEALING 15X20MM I II III 340 cm DDD2RUB1246A 2RUB1246 A CABLE PROTECTOR I II III 1 DDD3ACQ1669A 3ACQ1669 A USB RS232 CONVERTER FOR LAPTOP III NA 9 2 Location of Spare Parts 9 2 1 Detector Figure 9 1 Internal strip boards and...

Page 299: ... merely to solve problems encountered in production See Figure 9 2 Figure 9 2 The two different types of PMT Figure 9 3 Internal cables 2163 5481 Detector LV cable 2163 5488 Tune control cable 2163 5482 Analog signal cable 2163 5485 External HV cable 2163 5487 Internal HV cable Old type of PMT New type of PMT Protective sleeving Protective tape ...

Page 300: ...les Figure 9 5 Detector ID board 2163 5486 Collision board cable 2163 5492 Detector ID board 2163 5479 or DDD4CSY1299B or DDD4CSY1954A Crystal 2163 5433 EDC board s 2163 5489 EKG cable s 2163 5463 CANbus cable 2163 5483 EDC power cable s 2163 5476 CANbus terminator 2163 5459 FireWire cable 2163 5432 Detector PSU ...

Page 301: ...8 9CBL0868 9 C B L 0 8 7 1 9C B L0 87 1 9CBL0874 9CBL0880 9CBL0877 9CBL0876 TO GANTRY SEE NOTE ABOVE GND 9 C B L 0 8 9 2 9CBL0892 µ METAL CRYSTAL µ METAL CRYSTAL DETECTOR 1 COLLISION BOARD COVER COLLISION 9COL0899 9 C B L 0 9 2 1 GEARBOX COLLISION 9 C B L 0 9 2 1 3BNC1563 DETECTOR 2 COLLISION BOARD NOTE CABLE LENGTHS FROM CLAMP INSIDE DETECTOR 9CBL0892 GND 9CBL0874 POWER 9CBL0876 CANBUS 9CBL0877 E...

Page 302: ... 9 7 Detector and collimator collision pads CardioMD Series I and II Figure 9 8 Detector and collimator collision pads CardioMD Series III DDD4CSY1666A Detector collision pad DDD4CSY1756A Collimator collision pad DDD4CSY1557B Detector collision pad DDD4CSY1271B Collimator collision pad I II III ...

Page 303: ...et is the complete cabinet Series I and II shown in Figure 9 10 9CSY1281 is a complete LEHR collimator Series III including the 9CSY0888 Collimator ID board 9CSY1280 is a complete LEGP collimator Series III including the 9CSY0888 Collimator ID board 9CSY1377 Collimator Cabinet for Series III is very similar to Figure 9 10 Figure 9 9 Collimator with collimator ID board Figure 9 10 Collimator cabine...

Page 304: ... ease identifying of the location of the gantry FRU s this section is divided into separate subsections for the gantry base the table base electronics cabinet and the gantry tower Figure 9 11 on page 9 15 and Figure 9 12 on page 9 16 illustrate system cabling and identify all cables within the CardioMD ...

Page 305: ...18 9TER 0561 A2 A3 A4 A1 A5 A8 A7 A6 9CBL0868 9CBL 0659 9CBL0871 DETECTOR 1 A9 FIREWIRE SIGNAL TUNE TUNE SIGNAL HV LV VERT AMPL M ROT AMPL M TABLE CONTRL VERT LIMIT HORIZ LIMIT LINEAR CONTROLLER 55 V ROTATE CONTROLLER 55 V 55 V 180 V 55 V 55 V 24 V CAN BUS ABSOLUTE ENCODERS I F 24 V E STOP M OUTPUTS INPUTS OUTPUTS INPUTS CH A OUT CH B OUT CH A OUT CH B ENC CNTRL 24 V RESOL VER RESOL VER REMOTE E S...

Page 306: ...ENC CH A ENC CH B ENC CAN BUS 9CBL0661 9CBL0870 3CBL1542 9CBL0875 9CBL0875 9CBL0877 9CBL0880 180 V 55 V 9CBL0874 9CBL0874 9CBL0531 9CBL0531 9CBL0876 9CBL0895 9CBL0896 9CBL0675 9CBL0675 9CBL0884 9CBL0901 9FLT0936 9FLT0936 9FLT0936 9CSA0865 9CBL0882 9CBL0882 9CBL0882 9CBL0881 9CBL0881 9CBL0881 9CSY0771 9CBL0883 9CBL0883 9CBL0883 9CBL0887 9CBL0895 9CBL0896 9CBL0886 9CBL0885 9UNF0643 9PSU0934 9EDC0654...

Page 307: ...y Base Figure 9 13 X drive in gantry base Figure 9 14 Table drive rear of table console 2163 5453 X motor 2163 5494 Ultimate stop switch 2163 5502 Worm wheel for encoder 2163 5493 Absolute encoder 2163 5508 Gear wheel DDD4CSY1414A Tooth bar 2163 5415 Table drive board 2163 5452 Table Motor ...

Page 308: ...side CardioMD Series III 2163 5417 Motion controller 2163 5491 AMC control cable 2163 5416 Side panel 2163 5473 Dual input cable 2163 5466 Long EKG cable 2163 5467 Long FireWire cable 2163 5490 DC filter unit DDD9PAN1462A Internal connector panel 2163 5417 Motion controller 2163 5459 FireWire cable 2163 5473 Dual input cable 2163 5490 DC filter unit 2163 5491 AMC control cable I II III ...

Page 309: ...ure 9 18 Table base left front side 2163 5475 Encoder cable 2163 5477 CANbus terminator 2163 5470 Motion controller power cable DDD9KIT1305A Roll Y amplifier 2163 5457 X amplifier 2163 5462 Copley amplifier cable 2163 5472 CANbus 1 2 cable 2163 5465 Long CANbus cable DDD3HUB1732A FireWire hub 2163 5467 Long FireWire cable DDD9CBL1443A FireWire hub power cable III ...

Page 310: ...ains fuse when the power supply is set to 200 V 220 V or 240 V AC mains voltage 12 A 250 V 2163 5500 Primary mains fuse when the power supply is set to 100 V or 120 V AC mains voltage 10 A 250 V 2163 5501 Secondary fuses Table 9 1 CardioMD fuse ratings 2163 5420 Safety board 2163 5474 Dual output cable DDD9CBL0874B Detector power cable 2163 5469 Safety board power cable Primary fuses mains Seconda...

Page 311: ... 21 Y drive in top of gantry tower Figure 9 22 Roll drive on detector arm reverse side from detector 2163 5502 Worm wheel 2163 5493 Absolute encoder 2163 5478 HDD motor 2163 5503 Belt syncroflex 2163 5480 Resolver cable 2163 5484 HDD motor cable 2163 5478 HDD motor 2163 5507 Ball Screw for Vertical Drive ...

Page 312: ...A Nylon Wheel DDD2BUS1081A Bushing 10 mm P10 DDD2BUS1315A Bolt rearmed M8x12 DDD2BUS1314A Bushing PAW DDD2NUT0538A Brass M8 Nut DDD4UNF1091A Wheel for table support DDD4CSY2100A Short table support bracket DDD4CSY2081A Long table support bracket DDD4CSY1496A Support beam DDD4CSY1495A Support bar DDD4CSY1505A Bracket for table support DDD4CSY1508A Nylon Wheel DDD2BUS1081A Bushing 10 mm P10 DDD2BUS1...

Page 313: ...gure 9 25 Tower acquisition PC Series I and II Figure 9 26 Tower acquisition PC location of FireWire board Series I and II 2163 5454 Acq PC monitor 2163 5460 Acq PC keyboard 2163 3054A PC cart 2163 5455 Acq PC mouse 2163 5456 Acq PC 2163 5458 FireWire Board 2163 5514 PC Monitor Mains Cable I II I II ...

Page 314: ... Level 1 Figure 9 27 Laptop acquisition PC on laptop cart CardioMD Series III Figure 9 28 Laptop acquisition PC on DDD9CSY1448A laptop wall mount CardioMD Series III DDD9ACQ1471A Laptop acq PC DDD3ACQ1645B Laptop PC mouse DDD9CSY1447B Laptop cart DDD9BOX1456A PC table box III III ...

Page 315: ... IEC SOCKET IEEE1394 PLUG IEEE1394 PLUG RJ45 SOCKET RJ45 PLUG 15 cm 10 cm 10 cm 400 cm Braided Sleeving Self Adh PVC Tape Self Adh PVC Tape 550 cm REMOTE E STOP UNIT 3GLD1479 4CSY1515 2SWI1106 6 WAY SOCKET 4UNC1219 4CSY1538 2SCR1018 2 x 2SCR0088 2TIE0619 2TIE0116 Figure 9 30 2163 5601 Cable between gantry and tower acquisition PC CardioMD Series I and II I II III ...

Page 316: ...20 cm 85 cm 110 cm 3CON0649 WITHOUT PINS SOLDER Figure 9 31 DDD9CBL1467A Cable 4 5 m between gantry and laptop acquisition PC CardioMD Series III 6CBL2237 A IEC PLUG IEC SOCKET SMALL IEEE1394 PLUG LARGE IEEE1394 PLUG Braided Sleeving 6FLX1112 6TAP0045 PVC Tape 6TAP0045 PVC Tape PC END GANTRY END 3CBL1728 3FER1674 3FER1674 6CBL2238 RJ45 SOCKET RJ45 PLUG Minimum 75 cm 2TER0567 4mm Ø 50 cm DB25F DB25...

Page 317: ...t I II III 2163 5498 LID FOR VIAL 2163 5497 This lid is included in the QC kit as a separate part I II III 2163 3050A BAR PHANTOM Complete 4 field bar phantom option I II III 2163 5461 ETHERNET CABLE 3 m twisted pair Ethernet cable for connecting the CardioMD system to the hospital network I II III 2163 5602 POWER CABLE Cable to apply mains to the CardioMD system I II III DDD3PLG1610A NEMA PLUG L5...

Page 318: ... side cover 2163 5534 Back cover for tower Note Should be white 2163 5516 Spring clip 2163 5517 Screw cap M3x8 Both used for detector collision sensors 2163 5532 Slide cover for X drive 2163 5523 Cover for X drive 2163 5520 Back cover for table frame 2163 5519 Front cover for table frame 2163 5518 Base Cover 2163 5524 Cover for base 2163 5518 Gear cover collision strips 2163 5533 Cover for table f...

Page 319: ...Y1876A Detector top cover DDD4CSY2092A Detector side cover DDD4CSY2080B Back cover for table frame DDD4CSY2098A Cover for base DDD4CSY2083A Base cover DDD4CSY2079B Front cover for table frame DDD4CSY2082A Cover for X drive DDD4CSY1928A Slide cover for X drive DDD4CSY2179A Back cover for tower 2163 5516 Spring clip 2163 5517 Screw cap M3x8 Both used for detector collision sensors III ...

Page 320: ...gure 9 36 Location of covers CardioMD Series III 9 2 7 Service Tools Figure 9 37 2163 5600 Motion controller RS232 cable 2163 5518 Gear cover collision strips DDD4CSY2095A Cover for table frame DDD4CSY1996A Front cover for tower DDD4CSY1279B Shielding for collimator DDD4CSY2334A ECG bracket ...

Page 321: ... 2005 CSIP Level 1 CardioMD Service Manual 9 31 Figure 9 38 DDD3ACQ1669A USB RS232 converter for laptop 9 2 7 1 Detector Service Kit The 2163 5407 Detector service kit comprises all items shown Figure 9 39 2163 5512 Shipping case ...

Page 322: ...0158 H11 04 2005 CSIP Level 1 Figure 9 40 Source holders Figure 9 41 2163 5531 GeoCal mask 2163 5539 Source holder for tripod 2163 5513 Tripod kaiser 2163 5540 Point source holder 4 pcs 2163 5541 Teflon bottle 4 pcs 2163 5515 Lock snap 2163 5525 Phantom frame ...

Page 323: ...IP Level 1 CardioMD Service Manual 9 33 Figure 9 42 2163 5526 X line phantom Figure 9 43 2163 5529 Y line phantom 9 2 7 2 NEMA Kit The 2163 5408 NEMA kit comprises all items shown in this section Figure 9 44 2163 5511 NEMA shipping case ...

Page 324: ...Location of Spare Parts 9 34 CardioMD Service Manual 1MAN0158 H11 04 2005 CSIP Level 1 Figure 9 45 2163 5530 NEMA mask Figure 9 46 2163 5527 NEMA X line phantom Figure 9 47 2163 5528 NEMA Y line phantom ...

Page 325: ...d for installation of the CardioMD DDD4UNC1290A DOLLY TRAPEZ Trapez screw used to raise the system to mount and dismount the Dolly DDD4CSY1278B INSTALLATION TEMPLATE Installation floor template for drilling and positioning 2163 3051A SEISMIC INSTALLATION KIT Kit to be used for installations in California DDD2GUM0760A RUBBER SEALING Rubber sealing to be applied between gantry and floor during insta...

Page 326: ...ing of the collimator to fit it onto the detector The procedure describes the steps involved when replacing a collimator Procedure Details 1 Determine if the collimator is to be coded for detector 1 or detector 2 2 If the collimator is to be coded for detector 1 place the two M4x6 screws to the right of the collimator locks as shown in the photo on the right 3 To code the collimator for detector 2...

Page 327: ...ated in the diagram on the right 5 After replacing a collimator you must acquire A new center of rotation correction table New extrinsic uniformity calibration tables Refer to the Operator s Manual Chapter 5 Maintenance for procedures for performing center of rotation calibration and extrinsic uniformity calibration I or II label position Slanted part Handle Side towards patient ...

Page 328: ...Installation Procedures 9 38 CardioMD Service Manual 1MAN0158 H11 04 2005 CSIP Level 1 ...

Page 329: ...10 2 1 Test Requirements 10 4 10 2 2 Test Procedure 10 4 10 3 NEMA Uniformity 10 7 10 3 1 Test Requirements 10 7 10 3 2 Test Procedure 10 7 10 4 NEMA Spatial Resolution and Linearity 10 9 10 4 1 Test Requirements 10 9 10 4 2 Test Procedure 10 9 10 5 NEMA Multiple Window Spatial Registration MWSR 10 12 10 5 1 Test Requirements 10 12 10 5 2 Test Procedure 10 12 ...

Page 330: ...surements Note Make sure that the system is in the patient load position before accepting any automatic motions to bring the detectors into position for NEMA measurements Procedure Details 1 If the CardioMD system is equipped with the AC Option remove the transmission scanners before performing NEMA tests See Chapter 12 CardioMD AC Option for instructions 2 Make sure that the system is in patient ...

Page 331: ...MA Performance Measurement 1MAN0158 H11 04 2005 CSIP Level 1 CardioMD Service Manual 10 3 Procedure Details The NEMA menu appears This menu gives access to four tests which are described in the following ...

Page 332: ...nners must be removed before the NEMA Energy Resolution test can be performed See Chapter 12 CardioMD AC Option for instructions Procedure Details 1 In the NEMA menu select Energy resolu tion The Energy resolution page appears 2 In the Energy field enter 140 5 for Tc 99m The default setting is 140 5 keV 3 Check Detector 1 or Detector 2 to specify the detector to be measured 4 Click Continue 5 Clic...

Page 333: ...kcps 10 Click Start When the test is complete the result is shown in a pop up window 11 Note both the Fwhm and the Energy peak result Click OK to remove the pop up The energy resolution specification is 9 4 8 8 12 Remove the Tc 99m source and place a 200 500 µCi 7 20MBq Co 57 point source yielding 20 kcps or less in the holder 13 On the Energy resolution page enter 122 1 in the Energy field for Co...

Page 334: ...04 2005 CSIP Level 1 Procedure Details sult 18 Replace the NEMA Mask with the colli mator 19 Click Exit to return to the NEMA menu Note To measure the other detector place the CardioMD system in the patient load position be fore repeating the procedure outlined above ...

Page 335: ...MD system is equipped with the AC Option the transmission scanners must be removed before the NEMA Uniformity test can be performed See Chapter 12 CardioMD AC Option for instructions Procedure Details 1 In the NEMA menu select Uniformity The Uniformity page appears 2 In the Energy field enter 140 5 for Tc 99m 3 Check Detector 1 or Detector 2 to specify the detector to be measured 4 Click Continue ...

Page 336: ...n the holder Note Make sure that the position of the source is exactly in front of the center of the detector FOV It is very important that the entire detector FOV is uniformly exposed to the source Procedure Details 10 Make sure that the entire detector FOV is exposed to the source and that the count rate is 20 kcps 11 Click Start When the test is complete the result is shown in a pop up window 1...

Page 337: ...canners must be removed before the NEMA Spatial Resolution test can be performed See Chapter 12 CardioMD AC Option for instructions Procedure Details 1 In the NEMA menu select Spatial resolu tion and linearity The Spatial Resolution and Linearity page appears 2 In the Energy field enter 140 5 for Tc 99m 3 Check Detector 1 or Detector 2 to specify the detector to be measured 4 Click Continue 5 Clic...

Page 338: ...150 200 MBq Tc 99m point source yielding 20 kcps or less in the holder Note Make sure that the position of the source holder is aligned with the center of the detector FOV Procedure Details 9 Make sure that the entire detector FOV is exposed to the source and that the count rate is 20 kcps 10 Check that the phantom slits are seen as vertical lines 11 Click Start When the test is complete the pop u...

Page 339: ... the pop up Resolution specifications are UFOV FWHM 3 7 mm CFOV FWHM 3 7 mm UFOV FWTM 7 6 mm CFOV FWTM 7 6 mm Linearity specifications are UFOV absolute 0 5 mm CFOV absolute 0 5 mm UFOV differential 0 2 mm CFOV differential 0 2 mm 15 Replace the NEMA Y line phantom with the collimator 16 Click Exit to return to the NEMA menu Note To measure the other detector place the CardioMD system in the patie...

Page 340: ...e removed before the NEMA MWSR test can be performed See Chapter 12 CardioMD AC Option for instructions Procedure Details 1 In the NEMA menu select MWSR The MWSR page appears 2 Enter isotope energies as follows For Ba enter 81 in the Energy low field 155 in the Energy high field For Ga enter 92 in the Energy low field 185 in the Energy high field For Tl enter 72 in the Energy low field 167 in the ...

Page 341: ...hat all four sources are visible and that the count rate is 20 kcps 9 Click Start 10 After 400 kilocounts this pop up message appears Note Do not click OK at this point Move the four sources first 11 Move the four sources to the four inner holes 12 Click OK to acquire the next 400 kilo counts After the second 400 kilocounts this pop up message appears Note Do not click OK at this point Move the fo...

Page 342: ...ocounts the result pops up 16 Note the result The MWSR specification is 2 0 mm 17 Remove the GEOCAL mask and the re maining lead pig from the detector and mount the collimator 18 Click Exit to return to the NEMA menu Note To measure the other detector place the CardioMD system in the patient load position be fore repeating the procedure outlined above ...

Page 343: ...ce Schedule 11 2 11 3 Planned Maintenance Procedures 11 3 11 3 1 Inspection Check List from the Operator s Manual 11 3 11 3 2 Inspection of Image Quality 11 3 11 3 3 Check of Motion Limits 11 3 11 3 4 Lubrication 11 4 11 3 4 1 Tools Required 11 4 11 3 4 2 Horizontal Drive 11 4 11 3 4 3 Vertical Drive 11 4 11 3 5 Deleting Old Log Files 11 5 ...

Page 344: ...to carry out periodical checks of the safety systems This is already emphasized in the Operator s Manual but should also be a part of a periodic maintenance plan carried out by qualified service personnel 11 2 Planned Maintenance Schedule Frequency Tasks 1 month after installation Verify that the user is acquainted with the daily weekly checks described in the Operator s Manual Verify that the dai...

Page 345: ...attress for damage Daily E Stop Check both E Stop buttons for correct operation When an E Stop button is activated no gantry motions should be possible the yellow E Stop indicator should be on and the green motor power indicator should be off Daily 11 3 2 Inspection of Image Quality As uniformity correction is applied in normal use and in QC uniformity checks there is a risk that severe image impe...

Page 346: ...ds the patient table If it is possible to drive the detectors into the patient table refer to Chapter 4 Calibration for pro cedures to calibrate the absolute position encoders 11 3 4 Lubrication 11 3 4 1 Tools Required Grease gun with lithium based grease 11 3 4 2 Horizontal Drive Procedure Details 1 Remove the cover from the gantry base to access the horizontal drive 2 Apply lithium grease with t...

Page 347: ...o apply lithium grease through the two zerk fittings on the bearing shown in the photo on the right 11 3 5 Deleting Old Log Files The CardioMD stores information logging the operation of the system in log files in the directory C cardiocam SystemLog If the system log directory is not cleaned up from time to time the acquisition PC s harddisk will eventually be filled up with log files Therefore on...

Page 348: ...Planned Maintenance Procedures 11 6 CardioMD Service Manual 1MAN0158 H11 04 2005 CSIP Level 1 ...

Page 349: ...Dismounting Transmission Scanners 12 29 12 5 1 1 Removing Transmission Scanners from the Detectors 12 29 12 5 1 2 Detaching the Line Source Compartment from the Bracket 12 33 12 5 2 AC Option Bracket Repairs 12 34 12 5 2 1 Dismounting Detector Cable 12 34 12 5 2 2 Disassembling the Bracket 12 34 12 5 2 3 Replacing the Motor Power Board 12 36 12 5 2 4 Replacing Limit Switches 12 36 12 5 2 5 Replaci...

Page 350: ... 12 105 12 6 4 2 Installing AC Option Acquisition Software 12 105 12 6 4 3 Software Configuration of AC Option 12 107 12 6 5 Getting Ready to Use the CardioMD AC Option 12 109 12 6 5 1 Acquiring a Reference Scan 12 109 12 6 5 2 Acquiring a Tomography with AC 12 109 12 7 AC Option Spare Parts 12 109 12 7 1 Spare Parts Listing 12 109 12 7 1 1 AC Spare Parts in Gantry and Detector 12 109 12 7 1 2 AC ...

Page 351: ...CardioMD detector The two scanners are identical with the exception that they contain different software in the motion controller controlling the movement of the line source For this reason the two scanners are mechanically coded to prevent them being swapped by mistake Caution It is possible to swap the transmission scanners and this may occasionally be required when troubleshooting the system Ho...

Page 352: ... positions and for the detectors to rotate around the patient table When the detectors have rotated to a position above the patient table the compartments are automatically brought back to the IN position to allow for planar and non AC SPECT imaging procedures While preparing for AC SPECT studies the compartments translate to preparatory positions one transmission scanner IN the other OUT before t...

Page 353: ... 1MAN0158 H11 04 2005 CSIP Level 1 CardioMD Service Manual 12 5 Figure 12 2 Collision sensors on the CardioMD transmission scanner Collision sensors Collision strips Collision sensors Collision sensors Collision sensors ...

Page 354: ...er opens and the line source scans across the detector FOV The shutter is open during acquisition of AC SPECT and Gated SPECT studies and during acquisition of reference scans At all other times the shutter is closed On the end of the line source compartment there is a knob allowing the line source shutter to be closed manually The status of the shutter is indicated by the position of the knob and...

Page 355: ...ing a line source the line source housing s built in copper attenuator must be removed to enable extended use of the Gd 153 line sources Instructions are provided in section 12 5 3 9 page 12 75 Approximately one year after attenuator removal the Gd 153 sources will need to be replaced See section 12 5 3 8 page 12 68 ...

Page 356: ...C DC PSU BOX MOTION CONTROL SOURCE MOTION CONTROLLER CAN BUS LIMIT SWITCHES COLLISION SENSOR M BOX MOTOR SOLENOID DRIVER M SOURCE SERVO MOTOR LINE SOURCE COMPARTMENT AC BRACKET ENCLOSURE CARDIOMD DETECTOR CARDIOMD TABLE CONSOLE SOLENOID 48 V DC E stop DET ID Figure 12 5 AC option schematic block diagram 12 3 2 Overview of Modifications This section provides an overview of the electronic modules an...

Page 357: ...CardioMD AC Option 1MAN0158 H11 04 2005 CSIP Level 1 CardioMD Service Manual 12 9 Figure 12 6 Interconnections with AC option installed dark lines indicate AC option circuits ...

Page 358: ...ns Existing connector inside Table console Figure 12 7 Modifications to gantry cabling when installing the AC option power supply The continuous and safety interrupted outputs from the system power supply are now as shown in Table 12 1 and Table 12 2 below Connector Name Voltage Function OC1 115V AC ACQUISITION PC AND AC OPTION POWER SUPPLY C1 55V DC SPARE C2 55V DC DETECTOR 1 EDC BOARD AND DETECT...

Page 359: ...BL0718 9CBL0659 9CBL0659 9 C B L 0 6 6 1 9 C B L 0 6 6 1 9 C B L 0 8 6 8 9CBL0868 9 C B L 0 8 7 1 9CBL0871 9CBL0874 9CBL0880 9CBL0877 9CBL0876 TO GANTRY SEE NOTE ABOVE GND 9C BL 08 92 9CBL0892 DETECTOR 1 COLLISION BOARD COVER COLLISION 9ACI1312 9 C B L 0 9 2 1 GEARBOX COLLISION 9 C B L 0 9 2 1 DETECTOR 2 COLLISION BOARD END COLLISION 9 C B L 0 9 4 3 9CBL0942 9CBL0942 END COLLISION µ METAL and CRYS...

Page 360: ...uminum plate welded to form a rigid base for the support of the complete AC option assembly 12 3 3 1 AC Option Bracket Mechanics Locking Mechanism The locking mechanism consists of a steel plate and a handle The steel plate is screwed onto the AC option bracket and cutouts in the plate allow the bracket to be mounted onto the guide pins of the detector housing The handle locks the AC option in pla...

Page 361: ...g The box motion controller i e the device controlling the movement of the line source compartment Two DC DC power converters providing the necessary supply voltages for the AC Option Box Motion Controller Function The box motion controller is based on a small flash programmable micro processor and a motor driver The capabilities of the motion controller are as follows 1 Move line source compartme...

Page 362: ...mpartment moving towards scan position OUT 2x Line source compartment moving towards mid position 4x Line source compartment moving towards park position IN 8x Error Motion of line source compartment stopped due to an error switch error or motor power off caused by e g collision or activation of E Stop 0x Line source compartment stopped without error You can control the motions of the line source ...

Page 363: ...ion 1MAN0158 H11 04 2005 CSIP Level 1 CardioMD Service Manual 12 15 The PCB has a DB15 connector for the flexible cable to the line source compartment and another DB15 connector for the cable to the CardioMD detector ...

Page 364: ...s made of aluminum plate and consists of a bottom part in the form of an open box with two top covers Figure 12 12 Line source compartment outside view Figure 12 13 Line source compartment inside view Service cover Edge cover Toothbar for translation of line source compartment Slide bearings for line source motion Line source housing Acme screw ...

Page 365: ...gure 12 14 gives a more detailed inside view of the line source housing Figure 12 14 Components involved in line source motion The motion controller controls the servo motor driving the line source in its housing The torque from the servo motor is transferred via a belt to the Acme screw see Figure 12 13 which is mounted underneath the toothbar Note Carefully route the encoder cable to prevent int...

Page 366: ...gnaling to the motion controller The indicator arm is supplied with a spring shown in Figure 12 14 but not in Figure 12 15 which will pull it back in position when the line source moves away from the park position again Figure 12 15 The mechanism sensing the position of the line source Line Source Housing The line source housing contains the Gd 153 line source The line source housing is manufactur...

Page 367: ...sources installed shall only be performed by Philips Nuclear Medicine employees that have had radiation safety training classes and trained on proper handling of radioactive material Radiation from the line source is shut off activated by means of a shutter Furthermore the line source housing has an attenuator permitting reduction of radiation from a new line source Shutter Mechanism The shutter c...

Page 368: ...electrically it moves the actuator bracket which rests on a slide bearing The actuator bracket in its turn moves the shutter indicator manual knob out At the same time the locking plate is lifted and its built in groove activates the shutter lever on the line source housing see Figure 12 17 thereby causing the shutter to open The groove in the locking plate runs the entire length of the line sourc...

Page 369: ...rows older you will want to take advantage of its full radiation capacity The line source housing attenuator allows just that The attenuator consists of 4 copper strips that are mounted on top of each other in the line source housing When the line source is delivered from the manufacturer all four strips are in place covering the aperture of the line source housing When the line source is growing ...

Page 370: ...o 3 mm transportation screws into the line source housing and through dedicated holes in the shutter plate as illustrated in Figure 12 21 Figure 12 21 Locking the shutter for transportation Covers The AC option includes two aluminum covers both mounted on the line source compartment A small edge cover A larger service cover These are shown in Figure 12 12 page 12 16 12 3 4 2 Line Source Compartmen...

Page 371: ...ecting the ID of the CardioMD detector on which the AC unit is mounted The line source motion controller also receives incremental encoder pulses from the servo motor moving the line source After the CardioMD acquisition software is started the necessary configuration of the line source motion controller s CANbus interface takes place Therefore if power to the AC option is cut for example when the...

Page 372: ...e to a collision E Stop or power supply error Green Motion controller hardware ready for operation Table 12 3 Line source motion controller LED indication Manual Control of Line Source Motions It is possible to control the motions of the line source housing and of the shutter manually To do this a PC must be connected to one of the EDC boards which one is not important via its RS232 interface Moti...

Page 373: ...msg 532 0x6f 0 canmsg 532 0x80 0 canmsg 532 0x06 0 canmsg 532 0x0F 0 canmsg 532 0x0F 0 canmsg 1300 0 0xc0 3 0 0 0xc0 3 0 200 mm mid position canmsg 1044 0x55 0x55 8 0 0xaa 0xaa 2 0 canmsg 532 0x1f 0 canmsg 532 0x6f 0 canmsg 532 0x80 0 canmsg 532 0x06 0 canmsg 532 0x0F 0 canmsg 532 0x0F 0 canmsg 1300 0 0xc0 3 0 0 0xc0 3 0 1 400 mm position furthest from motion controller canmsg 1044 0xaa 0xaa 0x10 ...

Page 374: ...ckground These commands serve to reset the motion controller and need only be sent to the motion controller once Solenoid Driver The driver for the solenoid activating the shutter see Figure 12 18 page 12 20 is a switch mode type powered from the E Stop controlled 48 V supply For the first 0 5 second after the driver is activated it operates at 100 duty cycle After this it operates at 27 duty cycl...

Page 375: ...oint source holder shown in Figure 12 22 Figure 12 22 Point source holder to be used with AC option The gantry and source positions are shown in Figure 12 23 The point source holder is designed to be placed on the floor and will hold the point source at the correct angle Note For checks and calibration of detector 1 the point source holder is slid onto the base of the CardioMD gantry from the side...

Page 376: ...for using the AC option point source holder are provided in Chapter 7 CardioMD AC Option of the CardioMD Operator s Manual Gantry and source position for PMT update and intrinsic QC check of detector 2 1 2 X 10 Y 1190 Detector angle 31 Radiation source 1 2 X 10 Y 1190 Detector angle 59 Gantry and source position for PMT update and intrinsic QC check of detector 1 Radiation source ...

Page 377: ... transmission scanner from the detector proceed as outlined in the following section 12 5 1 Dismounting Transmission Scanners 12 5 1 1 Removing Transmission Scanners from the Detectors Positioning the Gantry Procedure Details 1 Ensure that the acquisition PC is displaying the Persistence page The fastest and safest way to position the gantry conveniently for accessing both transmission scanners is...

Page 378: ...click the Close button in the upper right corner of the Persistence page to close down the CardioMD application Reconfiguring the CardioMD Software The following steps describe how to modify the CardioMD system s software configuration for use without the AC option However these steps need only be performed if the camera is to be used without the AC option If you are just removing the transmission...

Page 379: ...system to function without the AC option 16 Select File Save to save the modified file 17 Click the Close button to close down the Notepad program Powering Down the Gantry Procedure Details Close down the acquisition PC and power off the CardioMD gantry 18 Follow the system shutdown procedure provided in Chapter 3 Getting Started of the CardioMD Operator s Manual Detaching the Transmission Scanner...

Page 380: ...canner weighs more than 40 lbs Procedure Details 22 Locate the collision circuit jumper part no 9PLG1345 and install it on the connector behind the port on the detector cover Note The collision circuit jumper is only needed if the CardioMD system is to be used without the AC option If the transmission scanners are just being removed for service purposes you do not need to install the collision cir...

Page 381: ...he site to move the transmission scanner to a secure shielded area determine if it has been damaged and assess possible radiation exposure 12 5 1 2 Detaching the Line Source Compartment from the Bracket To dismount the line source compartment from the bracket proceed as follows Procedure Details 1 Use a Torx T10 key to unscrew the four torx screws in each side 2 Carefully lift up the bracket and p...

Page 382: ...acket To further disassemble the bracket for repairs proceed as follows Procedure Details 1 Use a Torx T20 key to unscrew the two torx screws in bottom side of the bracket 2 On the rear of the bracket use a 4 mm Allen key to unscrew the 7 screws holding the steel mounting plate to the bracket Note Note the straight edge in the cutout next to the handle which is used to code the transmission scanne...

Page 383: ...ing of the transmission scanner for detector 1 or detector 2 The handle shown in the photo is coded for detector 2 The handle can be mounted onto the brass disc using the other hole to code the handle for detector 1 4 Turn the bracket and unscrew the cable to the line source compartment and the cable to the detector 5 Lift out the inner bracket assembly to access the bracket components ...

Page 384: ...t cables 2 To remove the motor power board unscrew the 7 screws from the rear of the inner bracket Use a 2 mm Allen key 12 5 2 4 Replacing Limit Switches Procedure Details 1 Unplug the switches from motor power board 2 Use a Torx T6 key to unscrew the limit switches from the motor and gear assembly The photos on the right show the limit switches on both sides of the inner bracket assembly ...

Page 385: ...ls The photo on the right shows the motor and gear assembly 9ACO1429 See also section 12 7 1 2 page 12 110 1 Follow the instructions given in the previous sections section 12 5 2 3 and 12 5 2 4 to remove the motor power board and the limit switches from the motor and gear assembly 2 Mount the motor power board and limit switches on the new motor and gear assembly ...

Page 386: ...hen the transmission scanner is dismounted and the line source compartment has been detached from the AC option bracket Transmission Scanner Mounted on Detector Procedure Details 1 Use the hand controller to position the detector assembly conveniently for access to the transmission scanner you are going to work with 2 If required use the crank supplied with the CardioMD system to position the line...

Page 387: ...5 CSIP Level 1 CardioMD Service Manual 12 39 Procedure Details 3 Use a T09 Torx key to remove the two screws holding the service cover Note Leave the two screws in the edge cover in place 4 Slide out the edge cover Edge cover Service cover ...

Page 388: ... Level 1 Procedure Details 5 Press down the service cover as shown in the photo on the right and carefully slide out the cover in the direction of the arrow Note Hold on to the cover to avoid dropping it 6 Carefully slide out the service cover while supporting it from below ...

Page 389: ...smission Scanner Dismounted Procedure Details The photo on the right shows the line source compartment detached from the AC option bracket 1 Use a T09 Torx key to remove the two screws holding the service cover Note Leave the two screws in the edge cover in place Service cover Edge cover ...

Page 390: ...dioMD Service Manual 1MAN0158 H11 04 2005 CSIP Level 1 Procedure Details 2 Slide out the edge cover 3 Press down the service cover as shown in the photo on the right and carefully slide out the cover in the direction of the arrow ...

Page 391: ...page 12 77 12 5 3 2 Dismounting Connecting Cable The 9CBL1344 cable connecting the bracket and the line source compartment can be replaced when the line source compartment has been dismounted from the bracket and the line source compartment covers have been removed Procedure Details Note The 9CBL1344 cable between the bracket and line source compartment is attached to the line source compartment b...

Page 392: ...the detector see section 12 5 1 1 page 12 29 2 Detach the line source compartment from the bracket see section 12 5 1 2 page 12 33 3 Remove line source compartment covers see page 12 41 4 Detach the connecting cable see section 12 5 3 2 page 12 43 When all of the above steps have been performed remove the collision detection shutter end cover 5 Use a T08 Torx key to remove the 3 screws indicated i...

Page 393: ...s 7 Remove the collision sensor in front of the source motion board in the motor side of the line source compartment This gives access to the screws holding the AC source motion board 8 If required carefully turn the Acme screw to translate the line source housing to give room for further disassembly ...

Page 394: ...Procedure Details 9 Disconnect all cables from the source motion board with the exception of the motion controller interface cable 10 Detach the spring from the line source position indicator arm 11 Disconnect the connector from the motion controller Motion controller interface cable ...

Page 395: ... Level 1 CardioMD Service Manual 12 47 Procedure Details 12 Remove the 4 Allen screws holding the source motion board Now dismount the indicator arm 13 Use a 7 mm fork wrench to loosen the jam nut and a 2 mm Allen key to unscrew the indicator arm ...

Page 396: ... Details 14 Use a 2 5 mm Allen key to remove the four screws holding the motion controller and AC source motion board assembly to the bottom of the line source compartment 15 Lift out the motion controller and AC source motion board assembly 16 Disconnect the motion controller interface cable ...

Page 397: ...interface cable 18 Place the motion controller and AC source motion board assembly in the line source compartment 19 Mount the four Allen screws holding the motion controller and AC source motion board assembly to the bottom of the line source compartment Remember to include the cable tie holding the collision cable Note The screw holding the cable tie is longer than the other screws and must be p...

Page 398: ... arrow in the photo 22 Use the 2 mm Allen key and the 7 mm fork wrench fasten the indicator arm and the jam nut 23 Attach the green connector to the motion controller 24 Mount the spring onto the end of the indicator arm 25 Connect all remaining cables to the source motion board 26 Assemble the collision sensor paying attention to insert the bracket correctly Note the orientation of the oblique ed...

Page 399: ...wn in the photo 29 Attach the spring and end stop to the collision detection shutter end cover 30 Mount the collision detection shutter end cover onto the line source compartment Remember to mount the nut on the inside of the line source compartment behind the spring and end stop Proceed to remount covers assemble the transmission scanner and install it on the detector 31 Install the cable connect...

Page 400: ...rding to whether the transmission scanner is for detector 1 or for detector 2 Thus the motion controllers cannot be swapped Note Motion controller 9EMC1411 must be installed in transmission scanner 1 and motion controller 9EMC1410 must be in transmission scanner 2 The procedure for replacing any of the two motion controllers is described below Procedure Details 1 Follow the procedure for replacing...

Page 401: ... screws are in place and locking the shutter before attempting to remove the source holder Failing to lock the shutter may cause you to be exposed to radiation from the source inside the holder Due to the Gd 153 source the CardioMD line source housings contain significantly higher levels of radiation than normally used in clinical imaging Potential for radiation exposure exists Use good radiation ...

Page 402: ...al 1MAN0158 H11 04 2005 CSIP Level 1 Procedure Details 3 Use a 2 mm Allen key to loosen the side rail from the line source compartment 4 Use 2 5 mm Allen key to loosen the AC source motion board from the bracket supporting the motor and ball screw ...

Page 403: ...troller connector Green to pin 4 PE Red to pin 5 M1 White to pin 6 M2 Black to pin 7 M3 6 Disconnect the spring from the motor and Acme screw bracket 7 Use a 2 5 mm Allen key to unscrew the rail on the underside of the line source compartment This will loosen the bracket holding the motor and ball screw 8 Carefully lift up the bracket and side panel assembly ...

Page 404: ...rce position indicator arm see Figure 12 14 on page 12 17 12 5 3 6 Replacing the Solenoid The procedure for replacing the solenoid is analogous to exchanging the AC servo motor You perform similar steps but working in the other side of the line source compartment Procedure Details Prepare for replacing the solenoid as follows 1 Dismount the transmission scanner from the detector see section 12 5 1...

Page 405: ...7 Procedure Details When all of the above steps have been performed remove the collision detection shutter end cover 5 Use a T08 Torx key to remove the 3 screws indicated in the photo on the right 6 Remove the cover 7 Disconnect the solenoid connector from the AC source motion board ...

Page 406: ...158 H11 04 2005 CSIP Level 1 Procedure Details 8 Use a 2 5 mm Allen key to remove the four screws holding the shutter indicator manual lever to the slide bearing Note Mind the spring holding the actuator bracket 9 Remove the shutter indicator manual lever ...

Page 407: ...AN0158 H11 04 2005 CSIP Level 1 CardioMD Service Manual 12 59 Procedure Details 10 Remove the actuator bracket and spring 11 Use a 2 mm Allen key to loosen the two screws holding the side rail to the line source compartment ...

Page 408: ...evel 1 Procedure Details 12 Remove the two Allen screws in the side of the source motion board towards the solenoid 13 Lift up and remove the side rail from the line source compartment Caution When removing the side rail take care not to damage the source motion board CAUTION ...

Page 409: ...t and bolt holding the anchor to the bracket 17 Replace the anchor Note Do not tighten the nut and bolt holding the anchor It is important that the anchor is held quite loosely to the bracket Note It is important that the anchor is replaced along with the solenoid 18 Mount the side rail onto the line source compartment Caution When mounting the side rail take care not to damage the source motion b...

Page 410: ...ant to fasten the side rail before mounting the Allen screws in the source motion board 21 Mount the actuator bracket inserting the anchor into the solenoid Note Make sure that the end of the bracket fits into the groove in the side of the line source compartment 22 Re insert the shutter indicator manual lever 23 Mount the four Allen screws holding the indicator and the actuator bracket to the sli...

Page 411: ... shutter indicator manual lever to be able to move smoothly 24 Check that the edge of the actuator bracket is perpendicular to the slide rail in the bottom of the line source compartment 25 Check that the shutter indicator manual lever moves unhindered through the opening in the line source compartment 26 Tighten the four Allen screws holding the shutter indicator manual lever ...

Page 412: ...r indicator manual lever When the shutter is in the closed position shutter indicator manual lever in the IN position the position must be as indicated on the photo 29 If required the position of shutter indicator manual lever can be adjusted by loosening the two Allen screws shown 30 Finally operate the manual lever a few times and check that it is still moving smoothly 31 Reconnect the solenoid ...

Page 413: ...e inside of the line source compartment behind the spring and end stop Proceed to remount covers assemble the transmission scanner and install it on the detector 35 Install the cable connecting the line source compartment to the bracket by reversing instructions provided in section 12 5 3 2 page 12 43 36 Install line source compartment covers see page 12 79 37 Attach the line source compartment to...

Page 414: ...e is located furthest away from the motor The shorter assembly is located at the motor end of the line source compartment The procedure for replacing both assemblies is the same Procedure Details 1 Use a T08 Torx key to unscrew the two collision sensors from the line source compartment 2 Locate the orange connector on top of the motion controller 3 Unplug the connection to the AC source motion boa...

Page 415: ...es from the collision sensors to be replaced The connector pinout is shown to the right 1 2 3 4 5 6 7 8 300 mm 4 5 0 m m 740 mm 7 4 0 m m 5 Mount the new set of collision sensors by reversing the steps 1 to 4 Note Sensors must be mounted square and flush so that they mate with the cover surface evenly across their surface ...

Page 416: ...e line source housing can be removed from inside the line source compartment you must dismount the transmission scanner from the detector detach the line source compartment from the AC option bracket and remove the covers of the line source compartment Proceed as follows Procedure Details 1 Remove the transmission scanner from the detector See section 12 5 1 1 page 12 29 for instructions 2 Detach ...

Page 417: ... two transportation screws to the center holes as shown in the photo on the right 6 Tighten the transportation screws so that they lock the shutter in the closed position WARNING Make sure that the transportation screws are in place and locking the shutter before attempting to remove the source holder Failing to lock the shutter may cause you to be exposed to radiation from the source inside the h...

Page 418: ...artment 8 Use a 2 5 mm Allen key to loosen and remove the 8 screws holding the line source housing to the two slide bearings 9 Push the slide bearings out from under the line source housing 10 Carefully turn the line source housing in the direction indicated on the photo and lift it out of the compartment Note To prevent damage to housing shutter components it is important to turn the line source ...

Page 419: ...e leak test proceed as follows Procedure Details 1 Obtain a cotton tipped swab and wipe the swab along the aperture of the line source housing number one Make sure that the shutter is closed to avoid any unnecessary radiation exposure The aperture of the line source housing is the area from which radiation is emitted 2 Place the cotton tipped swab in a well counter or equivalent device capable of ...

Page 420: ... top of two slide bearings running on the rails in the bottom of the compartment 2 Place the line source housing inside the compartment as shown 3 Carefully turn the line source housing in the direction indicated on the photo so that it ends up being perpendicular to the rails in the line source compartments Caution It is important to turn the line source housing in the indicated direction when in...

Page 421: ...astening the screws check that the line source housing is perpendicular to the rails e g by aligning one of its sides with screw heads in the two rails If required turn the motor shaft by hand to translate the line souce housing to a more convenient position inside the compartment The photo on the right shows the line source housing installed on the slide bearings and with all screws mounted 6 Fin...

Page 422: ... Source to the Vendor WARNING Gd 153 source management is the sole responsibility of the site Radioactive Materials License holder Philips Medical Systems employees are not authorized to participate in the legal safe return of radioactive sources and should not be involved in the packaging documentation and or shipment of radioactive sources The site Radioactive Materials License holder must retur...

Page 423: ...e housing from the line source compartment as described in the section Removing the Line Source Housing page 12 68 WARNING Make sure that the transportation screws are in place and locking the shutter before attempting to remove the source holder Failing to lock the shutter may cause you to be exposed to radiation from the source inside the holder Procedure Details The photos on the right show the...

Page 424: ...e line source housing Procedure Details 4 Remount the two screws to lock the attenuator in the open position The photos on the right show the attenuator in the open position 5 Reinstall the line source housing inside the line source compartment See instructions in the section Installing a New Line Source page 12 71 6 After reinstalling the line source housing grease the acme screw inside the line ...

Page 425: ... been detached from the AC option bracket Transmission Scanner Mounted on Detector Procedure Details 1 If required use the hand controller to position the detector assembly conveniently for access to the transmission scanner you are going to work with 2 If required use the crank supplied with the CardioMD system to position the line source compartment conveniently 3 Insert the service cover at the...

Page 426: ... CSIP Level 1 Procedure Details 4 Ease the cover past the collision sensors pressing down on each sensor one after the other 5 Slide the cover into place taking care to fit the two small bolts at the other end of the cover into the groove of the line source compartment ...

Page 427: ...mpartment one by one easing the cover into place 7 Remount the edge cover and fasten it using the two Torx screws previously removed from the service cover Transmission Scanner Dismounted Procedure Details 1 Insert the service cover at the end of the line source compartment The small bolts mounted at the corners of the cover must fit into the groove in the line source compartment ...

Page 428: ... CSIP Level 1 Procedure Details 2 Ease the cover past the collision sensors pressing down on each sensor one after the other 3 Slide the cover into place taking care to fit the two small bolts at the other end of the cover into the groove of the line source compartment ...

Page 429: ...uctions for mounting the transmission scanners on the detectors are provided in section 12 6 3 4 on page 12 103 12 5 3 12Aligning Transmission Scanners The AC option transmission scanners must be aligned When the AC option is installed for the first time Whenever a line source compartment has been detached from the AC option bracket Whenever a line source housing has been removed from the line sou...

Page 430: ...the collimator currently mounted on the CardioMD system The contents of the file look similar to the example shown to the right Note The entry Lsoffset 0 gives the line source offset value for the line source exposing detector 1 that is transmission scanner 2 Lsoffset 1 gives the line source offset for the line source exposing detector 2 that is transmission scanner 1 In the example the entry Lsof...

Page 431: ...compartment Note This procedure is most convenient for transmission scanner 2 When aligning transmission scanner 1 you need to wait for transmission scanner 2 to complete its entire reference scan before transmission scanner 1 moves to center position 7 Click Stop to stop the reference scan 8 Click Exit and then OK to interrupt the reference scan and close the Daily Reference Scan page 9 In the Ca...

Page 432: ...ck on the Pencil button to access energy setup 12 For Eset1 enter data for energy window 1 Ew1 Peak keV 100 0 Width 20 0 13 Leave Eset2 and Eset3 blank 14 Click Done The Isotope setting is not important 15 Click Start Now you need to open the line source shutter of the transmission scanner that you are aligning Proceed as follows ...

Page 433: ...n the Open position When the line source shutter is locked open the acquisition PC issues a pop up warning and emits a continuous audible warning signal This is normal WARNING When the line source shutter is open a collimated beam of radiation is emitted from the line source Make sure to never leave the system unattended while the transportation screws are locking the line source shutter in the op...

Page 434: ...de of the AC option bracket holding the line source compartment 19 While monitoring the count rate on the acquisition PC monitor gently rock the line source compartment back and forth until it is in the position yielding the maximum count rate Note If the count rate is fluctuating a lot it may help to expose the opposite detector to a Co 57 or Tc 99m point source ...

Page 435: ...screws from the line source housing and check that the line source shutter closes 22 Acquire a new reference scan See the CardioMD Operator s Manual Chapter 12 CardioMD AC Option for instructions 23 Install the line source compartment covers Instructions are provided in section 12 5 3 10 page 12 77 Note Acquiring a new reference scan after aligning one or both transmission scanners is mandatory ...

Page 436: ... mechanical attachment for the transmission scanners on the CardioMD detectors 9CSY1381 FOV mask 9CSY0906 CardioMD software installation CD 1MAN0153 CardioMD Operator s Manual and 1MAN0158 CardioMD Service Manual Note Line sources are not included with the CardioMD AC option but are delivered mounted in line source housings directly from the line source vendor Note The CardioMD AC Option requires ...

Page 437: ...holding the container to the pallet and open the box 2 Remove the envelope at the top containing the FOV mask and the Service Manual You now have access to the components shown in the photo on the right 3 Remove the components the styrofoam holding them and the cardboard below Power supply Detector guide pins and mounting screws Detector connector prints ...

Page 438: ...dioMD Service Manual 1MAN0158 H11 04 2005 CSIP Level 1 Procedure Details 4 Remove the envelope containing cables and the plastic bag with the Operator s Manual 5 Remove the styrofoam to the side of this transmission scanners ...

Page 439: ...re quite heavy Do not drop a transmission scanner Dropping a transmission scanner may cause personal injury or damage the equipment 12 6 2 Electrical Installation 12 6 2 1 Modifying Detector Cabling Procedure Details 1 Follow the procedure provided in Chapter 3 Getting Started of the CardioMD Operator s Manual to shut down the system 2 When the system is powered down disconnect the mains cable fro...

Page 440: ...r supply 6 Plug the detector power cable into the mating connector on the power interface board 7 Attach the AC Option s detector interface cable 9CBL1313 to the DB15 connector on the power interface board 8 Attach the AC Option s CANbus interface cable 9CBL1314 to the 6 way connector on the power interface board CANbus cable Detector interface cable Detector power cable ...

Page 441: ... cable 9CBL1314 to connector A3 on the EDC board of detector 1 11 On each detector mount one of the female DB15 connectors that are part of the AC Option s detector interface cable 9CBL1313 on the brackets provided Use the threaded stand offs provided Note The two female DB15 connectors that are part of the AC Option s detector interface cable carry identical signals Hence they are not detector sp...

Page 442: ... of the collision circuit jumper is required in order to allow the CardioMD system to move before the transmission scanners are installed 13 On both EDC boards remove the cover collision board 9COL0899 and replace it with the EDC AC IF board 9ACI1312 14 Reestablish the cable connections existing previously to the new board 15 Plug the 6 way plug from the AC Option s detector interface cable 9CBL13...

Page 443: ...4V EM ST 3 On the main PSU disconnect the white 3 way plug from PSU connector OC1 115VAC and unscrew the associated ground wire 4 Place the AC Option power supply 9POW1315 on the floor next to the main PSU 5 Now plug the two connectors that you just removed from the main PSU into the mating headers on the AC Option power supply 6 Attach the ground wire to the available post Note There are two of e...

Page 444: ...mount the 4 set screws provided 2SCR0867 in the table console frame in the four positions indicated in the photo on the right The top of set screws should be flush with the surface 8 From inside the table console frame use a 7 mm wrench to fit the stand offs provided 2STY0903 on each of the four set screws now protruding ...

Page 445: ...cap screws provided 2SCR0223 mount the AC Option power supply 9POW1315 inside the table console frame on the four stand offs just mounted 10 Locate the orange colored wire mounted 4 way connector plug inside the table console 11 Plug it into the orange colored wire mounted 4 way connector socket attached to the AC Option power supply ...

Page 446: ...he Main PSU 115VAC and attach the associated ground wire with the M4 screw 14 Unplug the cable connector C4 from the main PSU connector panel 15 Connect the 55 V split cable 9CBL1482 to the main PSU connector panel by inserting the plugs C2 and C4 into the connectors labeled C2 and C4 respectively 16 Connect the opposite end of the 55 V split cable labeled C4 to the cable connector C4 that was rem...

Page 447: ...ces from both ends of the detector top cover using an appropriate pair of pliers Caution Be careful when removing the knock out pieces Using excessive force may damage other parts of the cover 2 Dismount the two detector end covers 3 If necessary use a small hammer to remove the three pre cut knock out pieces in both covers 4 Take care not to damage the detector cover outside of the knock out piec...

Page 448: ...Installation 12 100 CardioMD Service Manual 1MAN0158 H11 04 2005 CSIP Level 1 Procedure Details 5 Once partly detached the knock out pieces can be removed by hand 6 Re mount detector the end covers ...

Page 449: ...o sockets in the bracket of the transmission scanner and carry the transmission scanner when it is mounted on the detector Procedure Details The photo on the right shows the detector end piece without the cover The CardioMD AC Option comprises 2 sets of 3 guide pins complete with Allen screws and lock washers to be mounted on the end piece of each detector The photo on the right shows the guide pi...

Page 450: ...mount the coded guide pin towards the top of the detector where the EDC board is located The photo on the right shows detector 1 with covers mounted Note One of the guide pins for each detector is coded and must be mounted at the top of the detector with its flat side facing away from the table console By doing this you ensure that the correct transmission scanner is placed on each detector Transm...

Page 451: ...section 12 5 3 10 page 12 77 5 Attaching the line source compartment to the AC option bracket Reverse instructions given in section 12 5 1 2 page 12 33 12 6 3 4 Mounting the Transmission Scanners Before starting to mount the transmission scanners the detector assembly must be positioned conveniently for accessing both detector ends Procedure Details Power up the gantry 1 Set the main switch at the...

Page 452: ...t show the guide pins on the detector and the mounting plate on one of the transmission scanners 6 Position transmission scanner 1 on detector 1 by engaging the three guide pins on the detector 1 end piece into the cutouts in the steel mounting plate on the trans mission scanner bracket 7 Push the handle into the locked position to mechanically lock the transmission scanner to the detector Note Th...

Page 453: ...cardiocam SystemLog Tools Required CardioMD installation Disk P N 9CSY0906 Procedure Refer to Chapter 7 Software Update Procedures the section Upgrading EDC Firmware for instructions 12 6 4 2 Installing AC Option Acquisition Software The CardioMD software is shipped on a CD ROM that includes two batch files used to update or perform a complete reinstallation of the acquisition software To install ...

Page 454: ...s case sensitive When the acquisition PC has finished booting 13 Insert the CardioMD software installation CD in the acquisition PC s CD ROM drive 14 Right click the Windows Start button and select Explore from the pop up menu This starts the Windows Explorer 15 In the Folders list select the CD ROM drive The contents of the CD ROM s root directory appear in the file list on the right 16 Run the f...

Page 455: ...hange the line to say ACoption 1 The entry ExportAll 0 indicates that when the acquisition PC is set up to automatically transfer study files to the processing station immediately after a study is completed only selected study files from AC SPECT and Gated SPECT studies are exported To set up the acquisition PC to export all AC study files automatically to the processing station 6 Change the Expor...

Page 456: ...Installation 12 108 CardioMD Service Manual 1MAN0158 H11 04 2005 CSIP Level 1 Procedure Details 9 Double click the CardioMD icon on the acquisition PC s desktop to restart the CardioMD application ...

Page 457: ...s between 50 kcnts and 70 kcnts using LEHR collimators and a new line source with the line source attenuator in the closed position see section 12 5 3 9 page 12 75 After approximately 1 year of using a line source the count rate should lie between 50 kcnts and 70 kcnts using a LEHR collimator and the line source attenuator in the open position 3 Check that no frames are missing and that all projec...

Page 458: ...D9EMC1411A 9EMC1411 A Motion controller for transmission scanner 1 1 DDD9EMC1410A 9EMC1410 A Motion controller for transmission scanner 2 1 DDD9MOT1359A 9MOT1359 A AC servo motor 2 DDD9SOL1370A 9SOL1370 A Solenoid 2 DDD9SMI1350A 9SMI1350 A AC source motion board 2 DDD9CBL1369A 9CBL1369 A MC interface cable 2 DDD9CBL1398A 9CBL1398 A Collision sensor assembly long short 2 DDD9LED1412A 9LED1412 A Yel...

Page 459: ...ry DDD9POW1315A AC option power supply and component parts Figure 12 25 AC spare parts in detector DDD9AES1317A 48 V E Stop board DDD3PSU1689A 120 W AC DC converter DDD9CBL1450A PSU to main PSU 115 V cable DDD9CBL1451A PSU to main PSU 24 V cable DDD9CBL1452A 48 V PSU cable set DDD9CBL1313A Detector I F cable DDD99ACP1316A Power I F board DDD9CBL1314A CANbus I F cable DDD9ACI1312A EDC AC I F board ...

Page 460: ...2 AC Spare Parts in Bracket Figure 12 26 AC spare parts in AC option bracket Figure 12 27 DDD9LIM1358A Set of limit switches DDD9CBL1357A AC box cable DDD9AMD1318A Motor power board DDD9CBL1344A AC module cable including sleeves and tube MID OUT switch MID IN switch OUT LIM switch IN LIM switch ...

Page 461: ...ssembly 12 7 2 3 Spare Parts in Line Source Compartment Figure 12 29 Spare parts in line source compartment DDD9SOL1370A Solenoid DDD9EMC1411A Motion controller scanner 1 DDD9EMC1410A Motion controller scanner 2 DDD9CBL1398A Collision sensor assembly short DDD9CBL1398A Collision sensor assembly long DDD9MOT1359A AC servo motor ...

Page 462: ...P Level 1 Figure 12 30 Spare parts in line source compartment cont Figure 12 31 DDD9COL1409A Collision strips DDD9SMI1350A AC source motion board DDD9LED1412A Yellow LED indicator DDD9CBL1369A Motion controller interface cable DDD9SOL1370A Solenoid DDD9COL1409A Collision strips ...

Page 463: ...CardioMD AC Option 1MAN0158 H11 04 2005 CSIP Level 1 CardioMD Service Manual 12 115 12 7 3 AC Option Accessories Figure 12 32 DDD9ACO1422A AC option source holder ...

Page 464: ...nce 12 8 1 Lubrication 12 8 1 1 Tools required Grease Klüber Microlube GL261 12 8 1 2 Acme Screw The acme screw in the line source compartment must be greased every 6 months Procedure Details 1 Use a brush to apply Microlube grease along the entire length of the Acme screw inside the line source compartment ...

Page 465: ......

Page 466: ...540 Alder Drive Milpitas California 95035 Telephone 408 321 9100 800 538 8531 Designed and developed by 3D Danish Diagnostic Development A S Dr Neergaards Vej 5F Danish Science Park DK 2970 Hoersholm Denmark Telephone 45 45 768888 Telefax 45 45 164659 3D part No 1MAN0158 H11 ...

Reviews: