background image

English

EN

 25

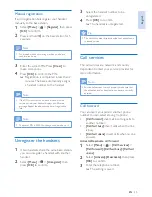
Select the handset number to be 

unregistered.

Press 

[OK]

 to confirm.


»

The handset is unregistered.

Tip


The handset number displays beside the handset name 

in standby mode.

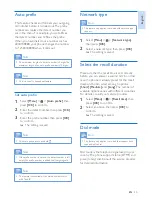
Call services

The call services are network and country 

dependent. Contact your service provider for 

more information. 

Note


For the call services to work properly, make sure that 

the activation and/or deactivation codes are correctly 

entered.

Call forward

You can divert your calls to another phone 

number. You can select among 3 options:

• 

[Call forward]

: divert all incoming calls to 

another number.

• 

[Call fwd busy]

: divert calls when the line 

is busy.

• 

[Call fwd unans]

: divert calls when no one 

answers.

Activate/Deactivate call forward

Select 

[Menu]

 >   > 

[Call Services]

 > 

[Call forward]

/

[Call fwd busy]

/

[Call fwd 

unans]

Select 

[Activate]

/

[Deactivate]

, then press 

[OK]

 to confirm.

Enter the telephone number.


»

The setting is saved .

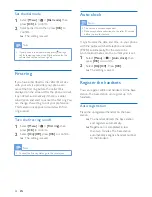
Manual registration

If auto registration fails, register your handset 

manually to the base station.

Select 

[Menu]

 >   > 

[Register]

, then press 

[OK]

 to confirm.

Press and hold   on the base station for 5 

seconds.

Note


For models with an answering machine, you hear a 

confirmation beep.

Enter the system PIN. Press 

[Clear]

 to 

make corrections.

Press 

[OK]

 to confirm the PIN.


»

Registration is completed in less than 2 

minutes. The base automatically assigns 

a handset number to the handset.

Note


If the PIN is incorrect or no base is found within a 

certain period, your handset displays a notification 

message. Repeat the above procedure if registration 

fails.

Note


The preset PIN is 0000. No change can be made on it.

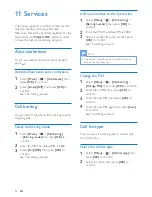
Unregister the handsets

If two handsets share the same base station, 

you can unregister a handset with another 

handset.

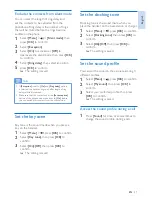
Select 

[Menu]

 >   > 

[Unregister]

, then 

press 

[OK]

 to confirm.

Summary of Contents for CD6950

Page 1: ...Register your product and get support at www philips com welcome CD6950 User manual Brugervejledning Brukerhåndbok Användarhandbok User manual Gebruiksaanwijzing Käyttöopas ...

Page 2: ......
Page 3: ...nd conference calls 14 Make a call to another handset 14 Transfer a call 14 Make a conference call 14 6 Text and numbers 16 Enter text and numbers 16 Switch between uppercase and lowercase 16 7 Phone settings 17 Set the date and time 17 ECO mode 17 Name the handset 17 Set the display language 17 8 Alarm clock 18 Set the alarm 18 Turn off the alarm 18 9 Display settings 19 Set the backlight of the ...

Page 4: ...Declaration of conformity 28 Use GAP standard compliance 28 Compliance with EMF 28 Disposal of your old product and batteries 28 14 Frequently asked questions 30 15 Appendix 31 Text and number input tables 31 16 Index 33 ...

Page 5: ...ays between 0 C to 40 C up to 90 relative humidity Store in a place where temperature is always between 20 C and 45 C up to 95 relative humidity Battery life may be shorter in low temperature conditions 1 Important safety instructions Power requirements This product requires an electrical supply of 100 240 volts AC In case of power failure the communication can be lost The voltage on the network i...

Page 6: ...ne cord then plug the line cord into the telephone socket 4XLFN VWDUW JXLGH 2 Your phone Congratulations on your purchase and welcome to Philips To fully benefit from the support that Philips offers register your product at www philips com welcome What is in the box Handset Charger Power adapter Warranty ...

Page 7: ...ter the options menu Select the function displayed on the handset screen directly above the key Overview of the phone a Earpiece b Loudspeaker c Battery door d Scroll up on the menu Increase the earpiece speaker volume Access the phonebook e Delete text or digits Cancel operation f Move the cursor to the left or right in editing mode g End the call Exit the menu operation h Press to enter a space ...

Page 8: ... icon is not shown when there is no voice message The silent mode is activated ECO The ECO mode is activated Main menu icons The following is an overview of the menu options that are available in your CD690 695 For detailed explanation of the menu options see the corresponding sections in this user manual Icon Descriptions Phone setup Set the date and time ECO mode handset name and display languag...

Page 9: ...that you have read the safety instructions in the Important safety instruction section before you connect and install your handset Connect the charger Warning Risk of product damage Make sure that the power supply voltage corresponds to the voltage printed on the back or underside of the phone Use only the supplied power adapter to charge the batteries Note If you subscribe to the digital subscrib...

Page 10: ... confirm The setting is saved Note The date and time format setting is country dependent Note Charge the batteries for 8 hours before first use If the handset becomes warm when the batteries are charging it is normal Warning Check the battery polarity when inserting in the battery compartment Incorrect polarity may damage the product Configure your phone country dependent 1 When using your phone f...

Page 11: ...cradle the standby screen displays the time as a screen saver Change the remote access PIN code Note The default answering machine remote access PIN code is 0000 and it is important to change it to ensure the security 1 Select Menu Remote access Change PIN then press OK to confirm 2 Enter the old PIN then press OK to confirm 3 Enter the new PIN code then press OK to confirm 4 Enter the new PIN cod...

Page 12: ...the better the connection is Make sure the handset is linked to the base station before you make or receive calls and carry out the functions and features If you hear warning tones when you are on the phone the handset is almost out of battery or the handset is out of range Charge the battery or move the handset close to the base station ...

Page 13: ...p the handset away from your ear to avoid ear damage Note The caller ID service is available if you have registered to the caller ID service with your service provider Tip When there is a missed call a notification message appears 4 Calls Note When the power fails the phone cannot access emergency services Tip Check the signal strength before you make a call or when you are in a call see Check the...

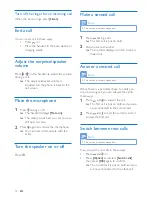
Page 14: ...can switch your calls in these ways Press and or Press Option and select Switch calls then press OK again to confirm The current call is put on hold and you are now connected to the other call Turn off the ringer for an incoming call When the phone rings press Silent End a call You can end a call in these ways Press or Place the handset to the base station or charging cradle Adjust the earpiece sp...

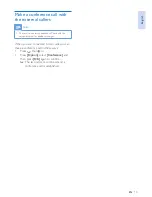
Page 15: ...ork dependent Check with the service provider for additional charges When you are connected to two calls you can make a conference call in these ways Press then or Press Option select Conference and then press OK again to confirm The two calls are combined and a conference call is established ...

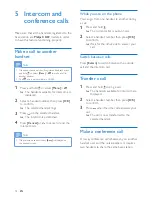
Page 16: ... between you another handset user and the outside callers It requires two handsets to share the same base station 5 Intercom and conference calls Make sure that all the handsets registered to the base station are Philips CD69 models in order to have this feature functioning properly Make a call to another handset Note If the base station only has 2 registered handsets press and hold or select Menu...

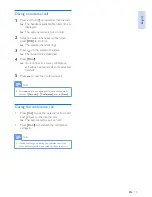
Page 17: ...ess Conf You are now in a 3 way conference call with an external call and a selected handset 5 Press to end the conference call Note Press to join an ongoing conference with another handset if Services Conference is set to Auto During the conference call Press Int to put the external call on hold and go back to the internal call The external call is put on hold Press Conf to establish the conferen...

Page 18: ... the selected character 2 Press Clear to delete the character Press to move the cursor left and right 3 Press to add a space Tip For further information on the text and number input see the chapter Appendix Switch between uppercase and lowercase By default the first letter of each word in a sentence is uppercase and the rest is lowercase Press to switch between the uppercase and lowercase letters ...

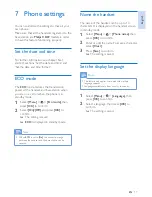
Page 19: ...is saved 7 Phone settings You can customize the settings to make it your own phone Make sure that all the handsets registered to the base station are Philips CD69 models in order to have this feature functioning properly Set the date and time For further information see chapter Get started sections Set the date and time and Set the date and time format ECO mode The ECO mode reduces the transmissio...

Page 20: ...u then press OK to confirm 2 Select On Off then press OK to confirm 3 Select Alarm time then press OK to confirm 4 Enter an alarm time then press OK to confirm 5 Select Repetition then press OK to confirm 6 Select an alarm occurrence then press OK to confirm 7 Select Alarm tone then press OK 8 Select a tone from options then press OK to confirm The alarm is set and is displayed on the screen Tip P...

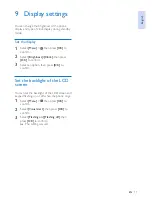
Page 21: ... Select Brightness Clock then press OK to confirm 3 Select an option then press OK to confirm Set the backlight of the LCD screen You can set the backlight of the LCD screen and keypad flashing on or off when the phone rings 1 Select Menu then press OK to confirm 2 Select Visual alert then press OK to confirm 3 Select Flashing on Flashing off then press OK to confirm The setting is saved ...

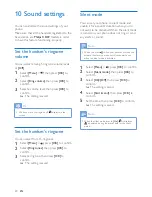
Page 22: ...hen the silent mode is set to On is displayed is displayed during the preset time for the silent mode 10 Sound settings You can customize the sound settings of your phone Make sure that all the handsets registered to the base station are Philips CD69 models in order to have this feature functioning properly Set the handset s ringtone volume You can select among 5 ringtone volume levels or Off 1 Se...

Page 23: ...g delay and set the contacts to be excluded from the phonebook Ring delay is the number of rings that will be muted before the rings become audible on the phone 1 Select Menu Silent mode then press OK to confirm 2 Select Exception 3 Select On to activate or Off to deactivate the silent mode then press OK to confirm 4 Select Ring delay then select an option 5 press OK to confirm The setting is save...

Page 24: ...lect the call list type 1 Select Menu Call list type then press OK to confirm 2 Select an option then press OK to confirm 11 Services The phone supports a number of features that help you handle and manage the calls Make sure that all the handsets registered to the base station are Philips CD69 models in order to have this feature functioning properly Auto conference To join an external call with ...

Page 25: ...upports tone DTMF and pulse rotary dial Consult the service provider for detailed information Auto prefix This feature checks and formats your outgoing call number before it is dialed out The prefix number can replace the detect number you set in the menu For example you set 604 as the detect number and 1250 as the prefix When you have dialed out a number such as 6043338888 your phone changes the ...

Page 26: ...tion automatically assigns a handset number to the handset Set the dial mode 1 Select Menu Dial mode then press OK to confirm 2 Select a dial mode then press OK to confirm The setting is saved Note If your phone is in pulse dial mode press during a call for temporary tone mode Digits entered for this call are then sent out as tone signals First ring If you have subscribed to the caller ID service ...

Page 27: ...d unans 2 Select Activate Deactivate then press OK to confirm 3 Enter the telephone number The setting is saved Manual registration If auto registration fails register your handset manually to the base station 1 Select Menu Register then press OK to confirm 2 Press and hold on the base station for 5 seconds Note For models with an answering machine you hear a confirmation beep 3 Enter the system P...

Page 28: ...et displays a confirmation request 2 Press OK to confirm All settings are reset Edit the activation deactivation code You can edit the prefix and suffix to the call forward codes 1 Select Menu Call Services Call forward Call fwd busy Call fwd unans then press OK to confirm 2 Select Change code then press OK 3 Then you can either Select Activation Prefix Suffix then press OK to confirm or Select De...

Page 29: ... and charger Philips SSW 2095EU 1 input 100 240Vac 50 60Hz 0 2A output 5V 600mA Philips S003PV0500060 input 100 240Vac 50 60Hz 0 2A output 5V 600mA Power consumption Power consumption at standby mode around 0 5 W CD690 0 55 W CD695 Note It only applies when the screen saver is turned off see Display settings on page 19 Weight and dimensions CD690 Handset 145 grams 167 4 x 49 24 x 27 08 mm H x W x ...

Page 30: ...otential negative consequences for the environment and human health 13 Notice Declaration of conformity Hereby Philips Consumer Lifestyle declares that the CD690 695 is in compliance with the essential requirements and other relevant provisions of Directive 1999 5 EC You can find the Declaration of Conformity on www p4c philips com This product has been designed tested and manufactured according t...

Page 31: ...roduct it means a financial contribution has been paid to the associated national recovery and recycling system Environmental information All unnecessary packaging has been omitted We have tried to make the packaging easy to separate into three materials cardboard box polystyrene foam buffer and polyethylene bags protective foam sheet Your system consists of materials which can be recycled and reu...

Page 32: ... is not activated Check with your service provider The caller s information is withheld or unavailable Note If the above solutions do not help disconnect the power supply from both the handset and base station Try again after 1 minute 14 Frequently asked questions No signal bar is displayed on the screen The handset is out of range Move it closer to the base station If the handset displays Unregis...

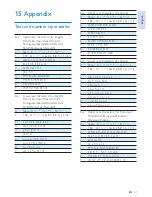
Page 33: ...Ě É Ę Δ Φ 4 G H I 4 Í Î Γ 5 J K L 5 Λ Ł Ĺ Ľ 6 M N O 6 Ñ Ň Ń Ó Ö Ő 7 P Q R S 7 Ř Ş Š Ś Π Θ Σ 8 T UV 8 Ţ Ť Ú Û Ü Ů Ű 9 W XY Z 9 Ý Ž Ź Ż ſ Ø Ω Ξ Ψ 15 Appendix Text and number input tables Key Upper case characters for English French German Italian Turkish Portuguese Spanish Dutch Danish Finnish Norwegian Swedish 0 Space 0 1 1 _ 2 A B C 2 À Â Æ Á Ã Ä Å Ç 3 D E F 3 È É Ê Ë Δ Φ 4 G H I 4 Ğ Í Ï İ Γ 5 J K...

Page 34: ...x y z 9 ý ž ƒ ø Ω Ξ Ψ Key Upper case characters for Serbian Bulgarian 0 Space 0 1 1 _ 2 А Б В Г Ђ Ć Č 2 A B CÆ Ä Å Ç 3 Д Е Ж З Ј Đ 3 D E F É Δ Φ 4 И Й К Л Љ 4 G H I Γ 5 М Н О П Њ 5 J K L Λ 6 Р С Т У Ћ 6 M N O Ñ Ö 7 Ф Х Ц Ч 7 P Q R S Π Θ Σ 8 Ш Щ Ъ Ы 8T UV Ü 9 Ь Э Ю Я Ž 9 W XY Z Ø Ω Ξ Ψ Key Lower case characters for Serbian Bulgarian 0 Space 0 1 1 _ 2 a b c 2 à æ ä å 3 d e f 3 è é Δ Φ 4 g h i 4 ì Γ ...

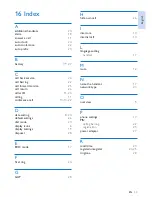
Page 35: ...l time 23 register unregister 24 25 ringtone 20 16 Index A additional handsets 24 alarm 18 answer a call 11 auto clock 24 auto conference 22 auto prefix 23 B battery 7 9 27 C call back service 26 call barring 22 call forward service 25 call return 26 caller ID 11 24 calling 11 conference call 13 14 22 D date setting 8 24 default settings 26 dial mode 23 display icons 6 display settings 19 disposal...

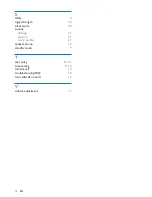
Page 36: ...rength 10 silent mode 20 sounds docking 21 keytone 21 sound profile 21 speaker phone 12 standby mode 9 T text entry 16 31 time setting 8 24 transfer call 14 troubleshooting FAQ 30 two calls call on hold 12 V volume adjustment 12 ...

Page 37: ...0168 Specifications are subject to change without notice 2012 Koninklijke Philips Electronics N V All rights reserved UM_CD6950_12_Book1_V1 0 WK12022 ...

Reviews: