background image

7

EN

Connect wires

Note


Make sure that all loose leads are insulated with 

electrical tape.


Consult a professional to connect wires as instructed 

below.

Check the car's wiring carefully and 

connect them to the the supplied ISO 

male connectors.


ISO male connectors

Connect to

1 Green strip,  

black-edged green 

strip

Rear left speaker

2 White strip,  

black-edged white 

strip

Front left speaker

3 Gray strip, black-edged 

gray strip

Front right speaker

4 Purple strip, black-

edged purple strip

Rear right speaker

e Red strip

Ignition key +12V 

DC when ON/

ACC

f

Blue strip

Motor/electric 

antenna relay 

control lead

g White-edged blue 

strip

Amplifier relay 

control lead

h Black strip

Ground

i

Yellow strip

To the +12V car 

battery which is 

energized at all 

times

Connect other wires if necessary.


Sockets or 

connectors on rear 

panel

External sockets or 

connectors

1 USB connector

A USB storage device 

or iPod/iPhone

2 Purple strip

OE remote control 

module

3 FM/MW radio 

antenna socket

FM/MW radio 

antenna

4 DAB radio receiver 

socket

DAB radio receiver

5

REAR R

Rear right speaker

6

REAR L

Rear left speaker

7 For ISO male 

connectors

ISO male connectors

g

b

a

f

e

d

c

Summary of Contents for CE153DR

Page 1: ...www philips com welcome User manual Always there to help you Register your product and get support at CE153DR Question Contact Philips ...

Page 2: ...am radio stations 16 Display DAB information 16 Set up for weak reception 17 Use the DRC Dynamic Range Control 17 Disable the DAB reception 17 Reset the DAB tuner 17 Remove invalid stations 17 Check the current version of DAB firmware 17 7 Play from a storage device 18 Control play 18 Switch tracks 19 8 Play from an iPod iPhone 19 Compatible iPod iPhone models 19 Connect your iPod iPhone 19 Contro...

Page 3: ...le level Improper fuses can cause damage or fire When you need to change the fuse consult a professional Use only the supplied mounting hardware for a safe and secure installation To avoid short circuits do not expose the device to rain or water The device shall not be exposed to dripping or splashing Do not place any sources of danger on the device e g liquid filled objects lighted candles Never ...

Page 4: ...C Mass Storage Class Maximum capacity 32 GB SD SDHC card Maximum capacity 32 GB Files File system FAT16 FAT32 Maximum number of folders 99 Maximum number of tracks files 999 Maximum level of directory 8 mp3 files Sampling frequencies 32 kHz 44 1 kHz 48 kHz Bitrates 8 320 kbps and variable bitrates wma files Versions V4 V7 V8 V9 L1 and L2 Sampling frequencies 44 1 kHz 48 kHz Bitrates 64 192 kbps an...

Page 5: ...ess to access the DAB menu Press to select a tuner band a b c d e t srq p o n m l k j i h f g u v c Return to the previous menu For iPod iPhone press repeatedly to select a control mode control play on the iPod iPhone or on this product During a call press and hold to transfer the phone call to mobile phone d LCD screen e Connect to a USB storage device Connect to a compatible iPod iPhone ...

Page 6: ...atedly to select a repeat mode k In FM MW radio mode press to select the preset radio station of No 2 In FM MW radio mode press and hold to store the current radio station at channel No 2 For wma and mp3 tracks on a storage device press to access the folder list l In FM MW radio mode press to select the preset radio station of No 1 In FM MW radio mode press and hold to store the current radio stat...

Page 7: ...ly If you have any question regarding installation kits consult your local retailer Note This system is designed for negative ground earth 12V DC operation only Always install this system in the car dashboard Other locations can be dangerous as the rear of the system heats up during use To avoid short circuit before you connect make sure that the ignition is off Make sure that you connect the yell...

Page 8: ...e strip Rear right speaker e Red strip Ignition key 12V DC when ON ACC f Blue strip Motor electric antenna relay control lead g White edged blue strip Amplifier relay control lead h Black strip Ground i Yellow strip To the 12V car battery which is energized at all times 2 Connect other wires if necessary Sockets or connectors on rear panel External sockets or connectors 1 USB connector A USB stora...

Page 9: ...c interference Do not install the DAB radio receiver over any sensors or vents Risk of short circuit malfunction or damage to this product Do not alter the cable of DAB radio receiver or dismantle the receiver box Risk of damage to the DAB radio receiver Never pull its cable when you remove it 1 Connect the DAB radio receiver to the main unit 2 Connect a DAB radio antenna to the DAB radio receiver...

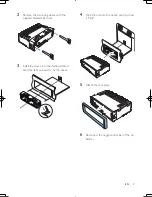
Page 10: ...d disassembly tools 3 Install the sleeve into the dashboard and bend the tabs outward to fix the sleeve 183 mm 53 5 mm 4 Slide the unit into the sleeve until you hear a click 5 Attach the trim plate 6 Reconnect the negative terminal of the car battery ...

Page 11: ... the front panel inwards until it is securely locked with a click Detach the front panel Note Before you insert an SD SDHC card or reset the system detach the front panel Before you detach the front panel make sure that the system is turned off 1 Press to release the front panel 2 Pull the front panel outwards to remove it ...

Page 12: ...1 Press and hold to access the system menu 2 Press repeatedly until CLOCK is displayed with time digits blinking 3 Rotate anti clockwise to set the hour 4 Rotate clockwise to set the minute Tip The system can automatically synchronize its clock with an RDS station that transmits time signals see Synchronize the system clock on page 15 Display the clock Press and hold DISP until CLOCK and the set c...

Page 13: ...ep sound of buttons BEEP OFF Mute the beep sound of buttons 3 Rotate to change the setting 5 Listen to FM MW radio stations Switch to FM MW radio mode 1 Press AS SOURCE repeatedly to switch the source to RADIO 2 Press repeatedly to select a band FM1 FM2 FM3 MW1 or MW2 Select a tuner region You can select a radio region that matches your location 1 Press and hold to access the system menu 2 Press r...

Page 14: ...store a maximum of six stations in each band Store radio stations automatically 1 Press or repeatedly to select a band 2 Press and hold AS SOURCE until STORE is displayed After the search is complete the first stored radio station is broadcast automatically To select a stored radio station press or Store radio stations manually 1 Press or repeatedly to select a tuner band 2 Tune to the radio stati...

Page 15: ...5 OTHER M Special music programs 16 WEATHER Weather 17 FINANCE Finance 18 CHILDREN Children s programs 19 SOCIAL Social Affairs 20 RELIGION Religion 21 PHONE IN Phone In 22 TRAVEL Travel 23 LEISURE Leisure 24 JAZZ Jazz Music 25 COUNTRY Country Music 26 NATION M National Music 27 OLDIES Oldies Music 28 FOLK M Folk Music 29 DOCUMENT Documentary 30 TEST AlarmTest 31 ALARM Alarm Use alternate frequenc...

Page 16: ...F is displayed 3 Rotate to select a setting CT ON Synchronize the system clock with the RDS station automatically CT OFF The automatic clock synchronization with RDS station is disabled Tip The accuracy of time depends on the RDS station that transmits time signals 6 Listen to DAB radio stations Note Make sure that the DAB radio receiver is securely connected For optimal reception securely connect...

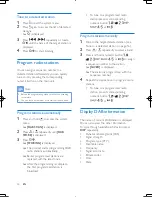
Page 17: ...ations automatically Earlier programmed stations are replaced with the latest ones After the programming is complete the first programmed station is broadcast To tune to a programmed radio station press its corresponding numeric button or Program stations manually 1 Tune to the target detected station see Tune to a detected station on page 16 2 Press repeatedly to select a band 3 Press and hold a ...

Page 18: ... compensation applied 3 Rotate to select an option Disable the DAB reception 1 Press and hold to access the system menu DAB SCAN is displayed 2 Press repeatedly until ANTENNA OFF or ANTENNA 12V is displayed 3 Rotate to select an option and then press to confirm ANTENNA OFF Disable the DAB reception ANTENNA 12V Enable the DAB reception Reset the DAB tuner 1 Press and hold to access the system menu ...

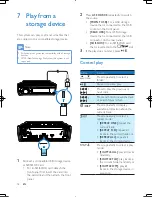
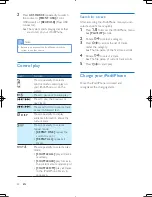
Page 19: ...device that is connected to the USB connector on the rear panel SD SDHC For an SD SDHC card that is inserted into the slot 3 If the play does not start press Control play Button Function Press repeatedly to select a folder Pause or resume play Press to play the previous or next track Press and hold to rewind a track or search forward fast DISP Press repeatedly to display available information abou...

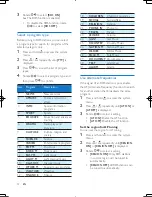
Page 20: ... folder The system starts playing the first track under the folder 8 Play from an iPod iPhone Note During play no audio signals are transferred through the headphone socket of your iPod iPhone Compatible iPod iPhone models This car audio system supports the following iPod and iPhone models iPhone 4S iPhone 4 iPhone 3GS and iPhone 3G iPod touch 2nd 3rd and 4th generations iPod classic iPod nano 3rd...

Page 21: ...current track Press repeatedly to select a repeat mode REPEAT ONE repeat the current track or REPEAT ALL repeat all tracks Press repeatedly to select a play mode SHUFFLE ALL play all tracks randomly SHUFFLE ALB play tracks in the current album randomly or SHUFFLE OFF play all tracks in the iPod iPhone library in sequence Search for a track After accessing the iPod iPhone menu you can select a spec...

Page 22: ...and then confirm the password entry If the pairing succeeds PAIRED is displayed on the LCD screen of this system 4 Enable or permit the connection with CE153 If the connection succeeds CONNECTED scrolls and is displayed on the LCD screen of this system If the connection fails FAILED is displayed on the LCD screen of this system Disconnect a device 1 Press and hold to access the system menu 2 Press...

Page 23: ...e control play on the connected device Make a call Note Keep the Bluetooth connection active between the system and your mobile phone Call a number On your mobile phone call a number CALLING is displayed Redial the last called number 1 Press REDIAL is displayed 2 Press to confirm CALLING is displayed Pick up an incoming call When the system receives an incoming call the phone number or PHONE IN is...

Page 24: ...y audio on the external player 11 Adjust sound The following operations are applicable to all supported media Button Function Rotate to increase or decrease the volume level Press to mute the speakers or release the speakers from mute status Press to enable or disable the MAX Sound feature Press and hold to enable or disable the Dynamic Bass Boost DBB effect Press repeatedly to select a sound equa...

Page 25: ...ware Note Power supply must not be interrupted during the upgrade When the firmware upgrade succeeds all settings are restored to the factory default status Register your product 1 Go to www philips com welcome 2 Click the link of Register my product the exact wording of this link name may vary in different languages 3 Log in with your account on the prompt Web page If you have no account for Club...

Page 26: ... the upgrade fails reboot this system and then perform the upgrade again 13 Product information Note Specifications are subject to change without prior notice General Power supply 12V DC 11V 16 V negative ground Fuse 15 A Suitable speaker impedance 4 8 Maximum power output 50 W x 4 channels Continuous power output 22 W x 4 RMS 4 10 T H D Pre Amp output voltage 2 0V Aux in level 500 mV Dimensions W...

Page 27: ...product is nearby and the model number and serial number are available General No power or no sound The power supply from car battery is cut off or the car battery runs out of energy Power the system with car battery Car engine is not on Turn the car engine on Cable is not correctly connected Check connections The fuse is burnt Replace the fuse Volume is too low Adjust volume If the above solution...

Page 28: ...ove the device closer to the system or remove any obstacle between the device and the system Cannot connect with the system The device does not support the profiles required for the system The Bluetooth function of the device is not enabled Refer to the user manual of the device to find out how to enable the function The system is not in the pairing mode The system is already connected with anothe...

Page 29: ... separate into three materials cardboard box polystyrene foam buffer and polyethylene bags protective foam sheet Your system consists of materials which can be recycled and reused if disassembled by a specialized company Please observe the local regulations regarding the disposal of packaging materials exhausted batteries and old equipment Trademark notice The Bluetooth word mark and logos are reg...

Page 30: ...ifications are subject to change without notice Trademarks are the property of Koninklijke Philips Electronics N V or their respective owners Philips reserves the right to change products at any time without being obliged to adjust earlier supplies accordingly ...

Page 31: ...Specifications are subject to change without notice 2013 Koninklijke Philips Electronics N V All rights reserved CE153DR_05_UM_V1 0 ...

Reviews: