background image


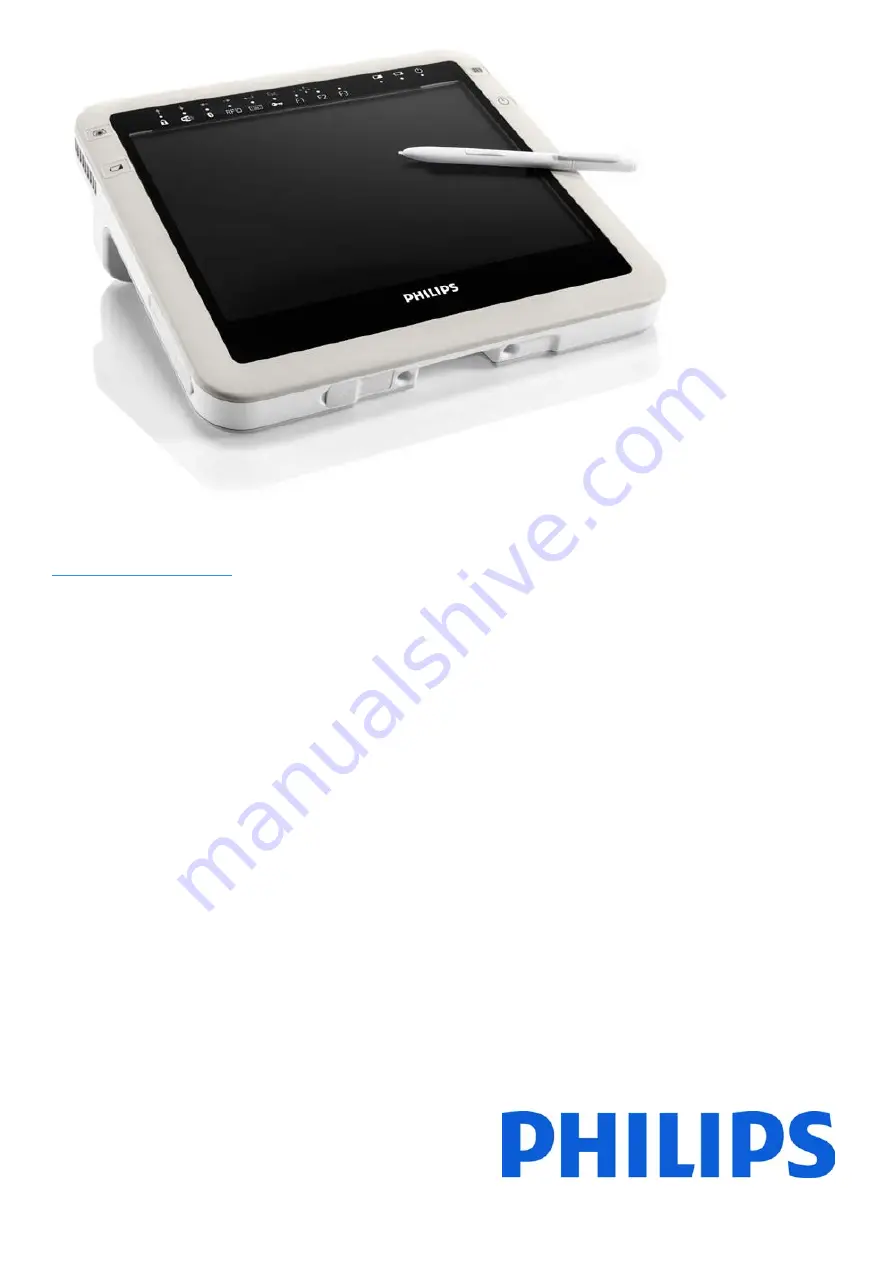
CliniScape 


MCA 104 series 

www.fimi.philips.com 

Cliniscape Mobile Clinical Assistant

Summary of Contents for CliniScape CMCA10

Page 1: ...CliniScape MCA 104 series www fimi philips com Cliniscape Mobile Clinical Assistant ...

Page 2: ...______________________________________________________________________ 20 3 1 2 Connect the AC adapter __________________________________________________________________________ 21 3 1 3 Removing the battery_____________________________________________________________________________ 23 3 1 4 Turning the system on ____________________________________________________________________________ 23 3 1 ...

Page 3: ...____________________________________________________________ 47 7 2 My Cliniscape Power on LED is ON but nothing happens _______________________________________ 47 7 3 My Cliniscape does not run smoothly________________________________________________________ 47 7 4 How do I turn off my Cliniscape ____________________________________________________________ 47 7 5 When I use the digitizer pen ____...

Page 4: ... function description 19 Table 4 LED status and battery conditions vs MCA status 24 Table 5 Digitizer pen operation 29 Table 6 Pre installed barcode symbologies 30 Table 7 Additional barcode supported symbologies 31 Table 8 Camera specifications 31 Table 9 Connector layout specifications 38 Table 10 Table of tested substances 45 ...

Page 5: ... language version 1 2 Safety and precautions 1 2 1 Intro Product safety information setup precautions and incorrect use of your CliniScape and its accessory are signalled by the word WARNING and by the Warning symbol 1 2 2 Read and follow these instructions when connecting and using your CliniScape WARNING Use of controls adjustments or procedures other than those specified in this documentation m...

Page 6: ...n most cases the afterimage will disappear gradually over a period of time after the power has been switched off Be aware that the afterimage symptom cannot be repaired and is not covered under warranty 1 2 3 Installation Locations Your CliniScape is a portable device and then its use is mostly on the go and hand carried But it will be laid down and or charge in specific locations In this situatio...

Page 7: ...ied that any changes or modifications made to this device that are not expressly approved by the manufacturer may void the user s authority to operate the equipment 1 3 2 Cables Connections to this device must be made with shielded signals cables with metallic RFI EMI connector hoods to maintain compliance with FCC Rules and Regulations 1 4 RF Exposure Statement This device complies with FCC RF ra...

Page 8: ...alert the user of the presence of important operating and maintenance servicing Instructions in this manual that can be a risk for this equipment Eco symbol This symbol indicates a feature a suggestion an opportunity for using your CliniScape with an environmentally sound behaviour Note symbol This icon indicates important information and tips that help you make better use of your CliniScape and t...

Page 9: ...601 Note This user s manual is available in electronic format only installed on the CliniScape and accessible by double pen tip on the relevant icon on the desktop We advice not to print the manual and consult it or search for specific items using the electronics tools provided by the various SW ...

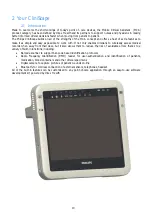
Page 10: ...enables clinicians to wirelessly access medical records when away from their desk but it also allows them to reduce the risk of avoidable errors thanks to a variety of built in functions including Barcode scanner to support bar code based identification protocols Radio Frequency Identification RFID reader for user authentication and identification of patients medication blood containers and other ...

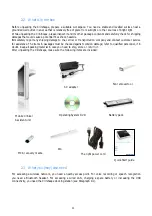
Page 11: ...at could cause a potential fires shock hazards Immediately report any shipping damage to the carrier or transportation company and contact customer service for assistance The items in packages must be checked against collision damage refer to qualified personnel if in doubt Keep all packing material in case you need to ship store or return it After unpacking the CliniScape make sure the following ...

Page 12: ...12 2 4 Overview 2 4 1 MCA Dimensions in mm 31 5 205 265 29 5 48 5 250 ...

Page 13: ...13 2 4 2 Battery dimensions in mm 2 4 3 Weight Your CliniScape has a total weight of 1 85 Kg with battery and stylus pen inserted 59 8 215 5 ...

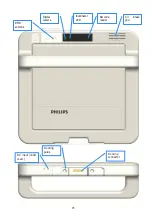
Page 14: ...tors and connectivity The below figures show the key features of your CliniScape Pen receptacle Removable fan Soft touch buttons and function LEDs Battery and power LEDs Camera and warm swap buttons Barcode and Power buttons ...

Page 15: ...15 Air intake grid Digital camera Illuminator LED Barcode reader RFID antenna Docking connector DC input under cover Docking guide ...

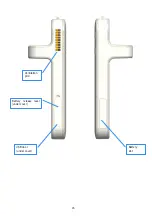
Page 16: ...16 Ventilation grid Battery slot USB door under cover Battery release lever under cover ...

Page 17: ... 3 Camera activation By pressing it activate de activate the camera See section 5 4 4 Battery swap activation By pressing it put the system in Suspend to RAM Stand by for allowing the swap of the main battery pack See section 5 17 1 Table 2 Touch button primary function description Symbol LED color Function Description 1 Amber Touchpad Lock By touching it for 3 seconds It locks or unlocks all the ...

Page 18: ...ion 1 button By touching it the system activate a custom action as set in Tablet and Pen setting section See paragraph 5 10 The green LED is turned ON for 5 seconds and then it turns OFF 8 Green Function 2 button By touching it the system activate a custom action as set in Tablet and Pen setting section See paragraph 5 10 The green LED is turned ON for 5 seconds and then it turns OFF 9 Green Funct...

Page 19: ...ey Up 2 Not relevant Navigation key Down 3 Not relevant Navigation key Left 4 Not relevant Navigation key Right 5 Not relevant Enter Enter 6 Not relevant Escape Escape 7 Not relevant Enter Exit navigation function Navigation Activation simultaneous press of the two touch buttons In Paragraph 5 you will find a more detailed explanation of the use of all the buttons ...

Page 20: ...04 F Remove the battery from its envelope and insert it in its compartment Press firmly till you hear a click that confirms that the battery has latched Warning To avoid personal injury handle the battery with care Do not open puncture short or expose it to fire or water Note Under normal conditions you can run the CliniScape on battery power for about three hours But the operation on battery can ...

Page 21: ...laced on the bottom of the CliniScape For additional information about the CliniScape AC adapter please consult paragraph 5 16 Note The remaining battery power can be checked in to different ways by right clicking on power status icon located in the notification area on the bottom right corner of your screen and click on Power Meter or leaving the pen over its symbol and waiting for the tooltip by...

Page 22: ...s wait until it cools to room temperature before recharging it Note When there is the AC adapter inserted the CliniScape is losing its IP21grade It is then recommended when using the CliniScape disconnected from the AC adapter to carefully close the rubber door The AC adapter must not be used in wet environments or when the CliniScape is cleaned with liquids ...

Page 23: ... battery swap function Note When opening the battery release door the CliniScape is losing its IP21 grade It is then recommended to carefully close the rubber door when the device is used in wet environments or it is cleaned with liquids 3 1 4 Turning the system on The CliniScape can be turned on by pressing the Power ON stand by button After one second the green LED turns ON For a complete indica...

Page 24: ...status and battery conditions vs MCA status BATTERY CONDITION MCA STATUS Battery Good Battery Empty Power ON Standby OFF Hibernate on battery OFF OFF OFF OFF Hibernate On AC adapter OFF OFF 20 Blinking ON ON OFF ON CHARGED on battery OR FULLY CHARGED on AC adapter Stand by OFF OFF 50 Blinking OFF Hibernate OFF ON OFF ON ON ON ON CHARGING Not Critical Stand by OFF ON 50 Blinking OFF Hibernate OFF O...

Page 25: ... second the dot 4 2 BIOS setup The Phoenix TrustedCore TM BIOS is set for optimal configuration of your CliniScape Nonetheless you or your system administrator can operate several choices according to the below Opening screen Phoenix TrustedCore setup utility Main Information Configuration Boot Exit Item Specific Help System time System date CPU type CPU speed System memory Extended memory F1 Help...

Page 26: ...nix TrustedCore setup utility Exit Submenu Security Configuration Item Specific Help TPM configuration Set supervisor Password Configure the Trusted Platform Module TPM options and view the security chip state Set user Password Password on boot F1 Help Select item Change values F9 Setup Defaults Esc Exit Select menu Enter Select Sub Menu F10 Save and exit Besides the Trusted Platform Module also a...

Page 27: ...ey are dealing about the tablet computing capabilities of Windows such as pen support touch screen support digital ink input and handwriting recognition To start the tutorials make one of the following selections In Windows XP Start All Programs Tablet PC Tablet PC Tutorials In Windows Vista Start All Programs Tablet PC Tablet PC Pen Training Start All Programs Tablet PC Pen Flicks Training ...

Page 28: ... digitizer panel allows the pen input and also the hand writing recognition The panel is protected by an anti glare and anti reflection acrylic screen with a minimum hardness of 5 so that the pen can be used without any surface scratching Screen brightness can be adjusted by using the Tablet and Pen Settings customization utility If you select it in the Windows Control panel under the Display tab ...

Page 29: ...le under the Control Panel Tablet and Pen Settings In the illustration above you can see that this feature is available under the Settings tab and can be started after selecting the used screen orientation Store the pen in the pen receptacle on the top of the unit when not in use To put the pen in the pen holder press it until it clicks into place To remove the pen press down on one end grab the o...

Page 30: ...place 5 3 Using the barcode reader optional Your CliniScape may have on board an ultra compact high performance 1D 2D barcode imager The optical engine is located on the back of the unit while its activation button is on the top tight corner of the front The barcode is not employing any laser technology so it can be safely used in any circumstance Its reading distance depends on the scanned symbol...

Page 31: ...that the brighter centre line is in its middle 5 If the scan is successful the data will appear in the application supporting the barcode functionality and you will hear a beep sound as confirmation 5 4 Using the digital camera The CliniScape has a built in camera that without any additional software support can be quickly initialized and activated by pressing the camera button located on the top ...

Page 32: ...ress of the button emits a sound initializes the camera turns on the LED illuminator and opens the capture window that can be used as viewfinder If the picture is not shot after a few seconds than the window is closed and you have to restart from 1 2 The following press is shooting the photo that is shown in the same preview pane and can be stored in your HDD or used by other apps A dialogue box w...

Page 33: ...e of sight scanning and can be scanned through many materials including plastics clothes carton boxes etc with the exception of metal An RFID tag can store much more data than a typical bar code and some RFID tags can both transmit and record data RFID can be used for asset tracking identification process control health care and pharmaceutical applications The RFID reader supports the following fo...

Page 34: ...1i Wireless support for Intel Active Management Technology Business Class Wireless Suite v2 High Density Networking Support for Cisco Compatible Extensions v4 Easy to use Intel PROSet v11 1 WLAN Software Besides the ProSet software control the Wi Fi can be enabled or disabled via the touch button located on the top of the screen Once disabled the lock the amber LED turns off then you have to touch...

Page 35: ...nflict with the Wi Fi channel in use determined by which access point is currently associated Once disabled the lock the amber LED turns off then you have to touch the Bluetooth button for enabling or disabling the Bluetooth functionality This control overrules any SW setting and it is not tracking with it 5 9 Using the tablet keyboard There are several ways to activate the tablet keyboard One rat...

Page 36: ... are available under the Pen and Tablet Settings control panel Launch it and select the Tablet Buttons tab In the Tablet Buttons pane tap the Buttons tab By selecting the change button you can associate to the Function keys commands applications actions etc See the Windows Help for more information Once disabled the lock the amber LED turns off then you have to touch one of the function keys for l...

Page 37: ... processing applications such as telephony voice dictation or speech recognition 5 12 USB door The CliniScape has a USB 2 0 standard Type A connection located at its left side under the same rubber element that covers the Battery release lever The USB can deliver power to the plugged device according to the USB specifications 0 5 Ampere max on a 5V supply line Note When there is a USB device inser...

Page 38: ... 13 USB D 5 GND 14 DC VCC 6 Interlock 15 DC VCC 7 LAN RD 16 DC VCC 8 LAN RD 17 DC VCC 9 LAN TD 18 DC VCC Note the docking connector is enabled only when the MCA is fully docked There are no voltages present on the connector when the CliniScape is undocked As the mating of the MCA and docking station connectors needs to be very accurate please be sure that the MCA is fully seated in its prescribed ...

Page 39: ...You must shut down the system before removing the fan As further precaution besides switching off and disconnecting the power adaptor you should remove the battery too and do not operate the fan cleaning on the powered docking station Replacing the fan is easy and immediate In the figure here aside you can notice that there is a small snap in the middle of the first slot of the grid With the tool ...

Page 40: ...are performed on the chip TPM provides the ability for a computing system to run applications more secured allows secured remote access performed electronic transactions and communication more safely These features are available but not activated in your CliniScape They are usually set up by your system administrators 5 15 2 Windows security The CliniScape has a shortcut touch key that replaces th...

Page 41: ...liniScape will be shipped with the right power cord in use in most countries Power cord sets for use in other countries must meet the requirements of that country or find the right power cable please consult the local Philips representatives When in use place the AC adapter in an open and ventilated area such as on a desktop or the floor do not use on wet surface Do not cover the AC adapter with i...

Page 42: ... an additional built in rechargeable battery that keeps the CliniScape powered in an active Power status during the battery replacement When the battery charge is below 7 a dialogue box appears advising a battery substitution If the user confirms that he or she wishes to change the battery he or she presses the button on the left of the unit and the MCA will automatically enter into the Stand by s...

Page 43: ...A or charger and stop using it If this is discovered when you first use the battery return it to your Philips reseller Do not transport the lithium ion batteries used in your MCA in checked baggage You may take up to two spare batteries in carryon luggage in addition to the one in your MCA Transporting batteries in checked baggage or transporting more than two spare batteries in carry on baggage v...

Page 44: ... MCA is not used can help increasing the battery life of typically 10 Remember that the display processor wireless cards and accessory drives all draw on the battery so adjust properties and disable unused accessories while running on battery power ...

Page 45: ...basis polluting agents physiological fluids The CliniScape has been tested against rubbing force long term exposure and contrast liquid tests with the following agents Table 10 Table of tested substances Liquids or fluids Isopropanol 100 CAS 67 630 Haemosol 1 in 1 litre water 00 238 1 Chlorine 250 ppm in 1 litre distilled water Chlorehexidine 0 5 in 70 Ethanol 00 125 Ethanol 70 70 CAS 64 17 5 Cide...

Page 46: ...e time of disposal will help to conserve natural resources and ensure that it is recycled in a manner that protects human health and the environment For more information about where you can drop off your waste equipment for recycling please contact your local city office or your supplier s office 6 2 3 For countries outside the European Union Disposal of electrical products in countries outside th...

Page 47: ...he bar at the bottom of the screen Choose the Wireless Information tab to show the current connection Access Point or try repositioning the antenna of the access point 7 4 How do I turn off my Cliniscape To end operation press the Power Stand by on the CliniScape right side Or tap the START Menu and then choose Shut Down to turn off the pad Note Pressing the Power button of the device for more the...

Page 48: ...I O Interfaces USB port 18 26 5 VDC Power Input Jack Docking connector Embedded Devices I Os IEEE 802 11 a g n WLAN Bluetooth 2 0 EDR Built in piezoelectric speakers Peripherals RFID reader 2Mpixel picture camera 2D Barcode imager optional Controls Digitizer with inductive pen Camera activation Button Barcode activation Button Battery release Button Power ON OFF Button Programmable Hotkeys x 3 1 W...

Page 49: ... non operating according to MIL810F Dust Water Protection IP21 Specials Removable Fan Cartridge 8 7 Optional Configurations Extended HDD Size up to 120 GB Extended SDRAM Size up to 2 GB 8 8 Environmental Specifications Temperature operating 0 C to 40 C Temperature transport and storage 20 C to 60 C Altitude operating 70 110 kPA Altitude transport and storage 70 110 kPA Humidity operating 10 to 90 ...

Page 50: ...50 9 Options 9 1 Docking station The Cliniscape has a companion docking station the MCD104 cod 991933050531 ...

Page 51: ...e purchased for replacing units that are considered too dirty or infected 9 4 Optional spare pens Additional digitizer pens can be purchased in 3 units packs MCS1043 P N 9919 171 00527 9 5 Optional spare AC adapter In case you want to have separate AC adapterS for the MCAs when on the go and the docking stations A separate AC adapter MCP104 can be purchased Its P N is 9919 208 85191 9 6 Optional V...

Page 52: ...unit The identification label detailed below is placed under a transparent window as the OS license sticker Here below the details of the rating label Model number Model number Code number 12NC Factory address Serial number Type number Identification label OS license sticker area Rating label ...

Page 53: ...Using 35 Boot about 25 Button about 14 BIOS enter 17 pen 29 tablet 36 C Calibration Pen BIOS 25 Pen OS 29 Care Customer 52 Cleaning Fan 39 about 45 Configuration BIOS 25 barcode 31 Function keys 36 option 49 Contacts 52 CTRL ALT DEL button 18 barcode 40 D Digitizer Pen operation 29 troubleshooting 47 Dimensions MCA 12 battery 13 Disabling buttons 17 Wi fi 34 Bluetooth 35 Display about 28 Power man...

Page 54: ...gement 20 44 LED signalling 24 adapter 41 troubleshooting 47 R Removing battery 23 fan 39 Replacing Pen tip 30 fan 39 S security CTRL ALT DEL 18 BIOS 26 about 40 settings Tablet and Pen 28 Wi Fi 33 function keys 36 power management 43 symbology Pre installed Barcode 30 Additional barcode 31 Sound 37 Specification Camera 31 Connector layout 38 MCA 48 Standard Medical 7 Applicable International 49 S...

Page 55: ...55 13 Your notes ...

Page 56: ... reserves the right to make changes in specifications and or to discontinue any product at any time without notice or obligation and will not be liable for any consequences resulting from the use of this publication Trademarks are the property of Koninklijke Philips Electronics N V or their respective owners Printed in Italy 4519 206 10431 February 2009 ...

Reviews: