background image

E

n

g

li

sh

TROUBLESHOOTING

47

Symptom

Cause

Remedy

Intermittent reception.

The picture is not sharp and on-
screen text is difficult to read.

You cannot find all the channels
you think should be available.

The picture on some channels
seems to have been stretched or
squashed.

Even if you use the number
buttons, you cannot access a
particular channel.

You set a timer but did not record
what you wanted.

The order of the channels has
changed.

You have forgotten your password.

You have forgotten your Premiere
PIN-Code.

Faulty connections.
Incorrect dish pointing.

TV SCART output format not set
to RGB.

TV SCART not connected to the
RGB capable SCART socket of
your TV  set.
Inappropriate TV  SCART.

The signal to your antenna may be
weak.

Your antenna may need adjusting.

The broadcast is probably in wide
screen and the receiver settings
may not be correct.

The parental lock has been
activated on this channel and a
message asks for your password.
Your subscription rights do not
include this channel.

The video was set incorrectly.

They have been re-arranged as
described in paragraph 

11

.2.2.

Check all connections and cable.
Adjust the dish pointing. Fasten the
antenna securely.

Change the setting of the TV
SCART item to RGB from the
System Setting menu.

Refer to your TV User Manual.

Use the SCART cable supplied
with your receiver.

Try retuning your receiver,
following the relevant steps in the
Quick installation chapter. If you
are still missing channels, your
antenna may need adjusting.
Call your installer.

Check the receiver “TV format”
option setting, following the
information in paragraph 

11

.5.

1

.

If you have a wide screen TV, you
may also need to check the
settings on your TV.

Enter your password to access the
channel or remove it as a locked
channel.
Select another channel.

Make sure that your video is set
for the same time as your Digital-
Receiver.

Refer to this chapter to change the
order again.

Set your password again from the
For Parents screen.To access this
screen, enter the following 4-digit
code:

1

9

11

.

For more information on the
password change, refer to
paragraph 

11

.4.

Call the Premiere Call Centre on:
0

1

80/55

1

00 00 for Germany

0

1

/ 49

1

66 200 for Austria

Note: For problems that are not related to Premiere programmes or the Premiere smart card, but rather due to your

receiver, call the Philips Call Centre on 0

1

80/500 75 3

1

* from Germany, or 0820 400 039* from Austria.

* open 7 days from 08.00 to 23.00 - 0.

1

2 Euros/min

DSR2011_052005  17/05/05  14:52  Page 47

Summary of Contents for DSR 2010

Page 1: ......

Page 2: ...ar in unique broadcast quality On PREMIERE DIREKT you can easily book the best current films exclusive sports events spe cial events and adult television for whatever time you want And that s not all theme channels for all your moods with documentaries children s program mes music channels and adult channels as well as the best programmes for fans of sci fi thrillers action and classic movies Subs...

Page 3: ...annels broadcast on the ASTRA 19 2 East satellite Connect your receiver the satellite antenna and TV set as shown below Do not connect your receiver to the mains now Switch on your TV set and select a channel Plug the receiver s power supply cord into the mains The welcome screen appears Wait for a few seconds for the First Installation screen to appear and then Select your favourite language Sele...

Page 4: ...Batteries marking symbol means used batteries must not be disposed of together with your household waste Please inquire about the local regulations regarding disposal of used batteries For information the Philips batteries supplied with your receiver remote do not contain hazardous substances such as Mercury Cadmium or Lead The Material recyclability symbol means the package cardboard or User manu...

Page 5: ...vent fire or shock hazard do not expose this equipment to rain or moisture The receiver should be placed on a firm surface and the ventilation openings must not be covered with items such as newspapers table clothes curtains etc Do not install the receiver near any heat sources such as radiators stoves or any other apparatus that produces heat Protect it from direct sunlight When installing the re...

Page 6: ... Channel search 17 5 2 2 Setting the correct time for summer or winter season 18 5 3 Search failure 18 6 Day today operation 19 6 1 Switching your receiver ON or to STAND BY 19 6 2 Switching from watching digital TV to listening to digital radio 19 6 3 Changing channels while watching digitalTV or listening to digital radio 20 6 3 1 Using number buttons 20 6 3 2 Using P P buttons 20 6 3 3 Using ch...

Page 7: ...1 3 Your Preferences 37 11 3 1 Display options 37 11 3 2 Language options 37 11 4 For Parents 37 11 5 Advanced settings 38 11 5 1 TV Settings 38 11 5 2 System Settings 39 11 5 3 Country Time Settings 39 11 5 4 Decoder Status 39 11 5 4 1 System Information 39 11 5 4 2 Software Upgrade 40 11 5 5 Default Settings 40 11 6 Channel Search 40 11 6 1 Antenna Configuration 41 11 6 2 LNB Configuration 41 11...

Page 8: ...rizontal or vertical position If you decide to use your receiver in the upright position follow the instructions below Unpack the stand place it on a horizontal surface with the click fit side on the left and lug side on the right Position the receiver as shown below rear panel on the left side and coaxial connectors on the bottom side Insert the stand lug in the slot located on the front of the r...

Page 9: ...tatus indicator table Blink at remote control command reception Status indicator table Note if you have put your receiver in Stand by and the red LED is blinking it indicates that an over the air upgrade of your receiver is taking place Do not interrupt this operation Wait until both LEDs lit up indicating successful download You can then continue as normal PRODUCT DESCRIPTION 9 Indicator Red LED ...

Page 10: ...s cord 6 Label showing the type and serial number of the receiver 7 VCR SCART 1 socket to connect your video recorder or DVD player recorder 8 L R Audio out Left Right analogue audio outputs to connect your receiver to your audio equipment Left Right analogue inputs Safety Extra Low Voltage Hazardous Voltage 1 SCART is also called Euroconnector or Peritel 2 If you consider using a video projector ...

Page 11: ...vered when taking up a Premiere subscription Insert the smartcard with the golden chip facing up Push the smartcard into the slot Approximately 1 cm of the card will be visible outside the slot New and updated information may be downloaded onto the smartcard from time to time The smartcard status can be checked from the Smartcard item of the Premiere menu ...

Page 12: ...ste Please inquire about the local regulations regarding disposal of used batteries For information the Philips batteries supplied with your receiver remote do not contain hazardous substances such as Mercury Cadmium or Lead Replace the cover Your remote is now ready to control your Digital Receiver Correct operation of the remote control is acknowledged at each key press by a dot blinking on the ...

Page 13: ...hannel lists V List Open current channel list Then toggle between favourite lists SUBTITLE Open option menu for subtitle selection I II Open option menu for sound track selection MENU Open Close menu CURSOR keys t y Move selection up down within menus and lists u i Select value for a setting OK Call up current channel list while watching digital TV or listening to the radio VOLUME Turn the volume ...

Page 14: ... Before starting Unplug all equipment TV set as well as VCR and or DVD if required from the mains Do not connect your Digital Receiver to the mains supply now Check your current wiring because you might keep existing connections of your current Audio Video setup Choose the relevant connection method for incorporating your Digital Receiver into your existing Audio Video setup Please see chapters 4 ...

Page 15: ... your TV using the SCART lead supplied with your Digital Receiver Connect the VCR SCART socket of your Digital Receiver to the EXT1 OUTPUT SCART socket of your VCR using a SCART lead Plug all your equipment excluding your Digital Receiver into the mains Note 1 This connection also applies to DVD recorders fitted with one or two SCART sockets 2 With this connection set up you can Watch digital TV w...

Page 16: ...your audio equipment using a single CINCH cable not supplied Consult the user manual of your audio equipment to locate the proper digital audio input Note with this connection set up you can only control the volume up down and mute using your audio equipment remote control refer to the user manual of your audio equipment 4 3 Connecting to a video projector to watch Digital TV Connect the TV SCART ...

Page 17: ...inting of your antenna so as to maximize the level of the signal quality and strength bargraph indicators then fasten your antenna according to the antenna user manual instructions Press OK to start searching for channels broadcast on the ASTRA 19 2 East satellite The Installation screen appears Proceed to paragraph 5 2 To install ASTRA 19 2 East and other satellites Press EXIT to access the Anten...

Page 18: ...Offset menu option to the appropriate value For summer season it should be set to GMT 2 For winter season it should be set to GMT 1 5 3 Search failure In case of channel search failure a message is displayed Press EXIT to go back to either the First Installation or Antenna Configuration screen Before starting a new scanning The following checks are recommended to recover adequate signal quality an...

Page 19: ... receiver as any electronic equipment consumes power In order to reduce power consumption please switch your receiver to either Stand by or Low Power whenever you are not using it For maximum energy saving we recommend you switch off the receiver by unplugging it from the mains if you are not using it for a long time 6 2 Switching from watching digital TV to listening to digital radio To switch yo...

Page 20: ...Press List repeatedly to display the list containing the channel you want to select if need be Scroll to the channel you want to select using the t or y button Scroll from one page to another using the or remote control button Press OK to confirm your choice You can preview the selected channel on the right hand side of the screen or listen to the selected radio channel Press OK again to close the...

Page 21: ...volume Press to increase the volume Press to mute the sound and press again to de mute Note change of volume is signalled using a bargraph while audio mute is signalled with an icon at the top of the screen 6 6 Changing the current programme options The OPT button is used to directly access the current programme display format audio language and subtitles language options Note access to this scree...

Page 22: ...FO to display extended information for the highlighted programme When information is made up of several pages press or to scroll up or down Press INFO again to return to the event view with video resize Press the y or t button to move the highlight to the previous or next programme respectively Press the uor i button to view the previous or next day programme list respectively Press the PROG or PR...

Page 23: ...et a timer on is locked you will be prompted to enter your password To edit a timer from the EPG Move the focus to the desired programme and press the OK button to access the Timer edition screen 6 8 3 Deleting an active timer A timer is active recording is signalled by the front panel LEDs lit respectively in red and orange To delete the active timer If your receiver is in standby press the front...

Page 24: ...watching digital TV or listening to digital radio Press the TV STB button to switch to analogue TV Press TV STB again to revert to digital TV or radio 6 10 Viewing Teletext Your receiver is not equipped with a teletext decoder To consult Teletext pages your TV set must be fitted with a Teletext decoder and be connected to the TV SCART socket of your receiver using a SCART cable Refer to the user m...

Page 25: ... open the Options screen Scroll to the option you want to set using the y or t button Set the setting of your choice using the u or i button Press OK to confirm and exit the Options screen 7 2 PREMIERE DIREKT PREMIERE DIREKT presents various programmes at various times that you can order individually All the information about the programmes on offer prices and the process of ordering is available ...

Page 26: ...ction Authorities For a locked programme to be broadcast a 4 digit PIN code has to be entererd You receive your PIN code together with your Premiere smart card Please note that this code is different from you password also called system password The Premiere PIN code is used to access programmes to which a maturity rating is assigned Such programmes are systematically locked so as to prevent unsui...

Page 27: ...ay options Language options Mode Channel list Channel Date Start time End Time Timer type Repeat Select list Mode Channel list Modify Add Delete or Move Channel Source Satellite Mode Channel Pool Sort Banner duration Banner transparency Channel number input latency time Timer warning duration On screen language Audio language Subtitle ON OFF Subtitle language Add delete rename or re order favourit...

Page 28: ...er Configuration TV screen format Display format TV VCR SCART output Dolby digital VCR Control TV Audio VCR Audio Default Volume Channel lists Time Offset System information Software upgrade LNB LNB control DiSEqC ON OFF Scan LNB 1 2 3 4 active inactive Channel Access Channel Type Channel Lists LNB Type Local Frequency1 Local Frequency2 Pointing to satellite Frequency Range Method ...

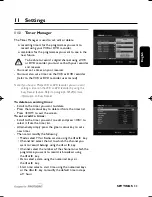
Page 29: ...ENU button to close the menu and return to watching TV 8 2 2 Changing settings Once you highlighted an adjustable item or sub item you can then access the values and make changes using the uor i button to select an option and numerical buttons to enter numerical values Note when Parental control is activated you need to enter your password to open certain menu items 8 2 3 Cancelling storing change...

Page 30: ...etely updated some pieces of information may not be available for instance you might get incomplete results when performing a search Please also note that EPG information has to be fully reloaded in case of power failure Low Power mode or network or content modification The Premiere Service Menu includes the following items o PIN Code Change o Smartcard o System o Software Upgrade o Scan o Display...

Page 31: ...screen 10 4 2 Check for new software availability Press the red colour key from the System screen described above to launch a search for new software After a few seconds the Software Upgrade screen indicates whether new software is available To proceed with the receiver software upgrade refer to paragraph 11 5 4 2 10 5 Scan This screen is used to view the date and results of the last scan performe...

Page 32: ... does not support RGB AV Control for proper operation it is recommended to keep this setting to ON Press EXIT to exit the screen 10 7 Dolby Digital out of the digital audio output This screen is used to enable disable Dolby Digital sound When Dolby Digital is disabled you can still get stereo sound in digital format PCM 10 8 Channel List This screen is used to indicate the country in which you ope...

Page 33: ...or more information on Easy Record To delete an existing timer Scroll to the timer you want to delete Press the red colour key to delete it from the timer list Press EXIT to exit the screen To set or edit a timer Scroll to the timer you want to edit and press OK to select it from the timer list Alternatively simply press the green colour key to set a new timer Then set or modify the following Mode...

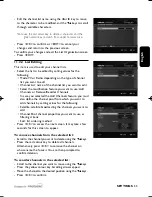
Page 34: ... List Editing o Channel Pool 11 2 1 List Organization This item is used to add new TV Radio channel lists delete existing TV Radio channel lists or reorder the existing lists Select TV or Radio channel lists using the TV RADIO button To add or delete channel lists Press the green colour key to add a new list At this stage the new channel list is empty Or scroll to the list you want to delete using...

Page 35: ...e Add Channels or Remove Reorder Channels In case you selected the Add Channels feature you must also define the channel pool from which you want to add channels by setting values for the following Satellite satellite broadcasting the channels you want to add Channel Pool channel properties you want to use as filtering criteria Sort list ordering method Press OK to access the next screen It may ta...

Page 36: ...subset of the channel pool you want to consult Select values for the following Satellite satellite broadcasting the channels you want to manage Mode TV or Radio depending on the type of channels you want to manage Channel Pool channel properties to be used as filtering criteria Sort list ordering method Press OK to access the next screen It may take a few seconds for this screen to appear To deact...

Page 37: ...ning Duration select a banner display duration from 15 seconds to 5 minutes using the uor i key Press OK confirm 11 3 2 Language options This screen is used to set language options according to your preferences Select values for the following On Screen Language select a language for on screen display Audio Language select your audio language Subtitles select On If audio not available Hard of heari...

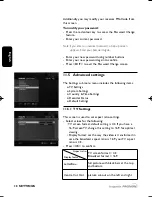
Page 38: ... menu includes the following items o TV Settings o System Settings o Country Time Settings o Decoder Status o Default Settings 11 5 1 TV Settings This screen is used to set aspect ratio settings Select values for the following TV screen format default setting is 4 3 If you have a 16 9 screen TV change this setting to 16 9 for optimal viewing Display format set the way the video is transformed in c...

Page 39: ...e indicate the volume level to be set as default at turn on Press OK to confirm 11 5 3 Country Time Settings This screen is used to set the country where you operate your receiver and the local time offset with respect to actual local time retrieved from the network Note it is also used to change to Summer Time Select the country where you operate the receiver using the uor i key Select the approp...

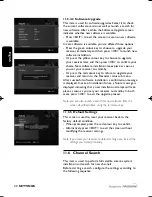
Page 40: ... return to the Decoder status sub menu After successful software installation a confirmation message is displayed In case of installation failure a failure message is displayed indicating that a new installation attempt will take place as soon as you set your receiver to stand by In both cases press OK to exit the upgrade process Note you can also launch a search for new software from the screen d...

Page 41: ...ing to the selected LNB and the satellite it is pointing at Select the desired satellite default setting is ASTRA 19 2 East To select another satellite press the blue colour key Select the frequency range to be scanned press the blue colour key and then select either FULL to scan the whole frequency range or CUSTOM to scan for a particular frequency range In the latter case enter the range low and...

Page 42: ... maximize the level of the signal quality and strength bargraph indicators then fasten your antenna s according to the antenna user manual instructions Note to enable the audible signal quality indicator press the yellow colour key Press OK to start searching for channels The Installation screen appears During the scanning process the following information is reported on screen o the number of TV ...

Page 43: ...eceiver If the setting has been changed the remote will no longer operate the receiver You must then change the setting of your receiver Note if the batteries are removed while a button is being pressed the default setting 39 is restored To change the setting of your receiver Disconnect your receiver from the mains Reconnect your receiver to the mains while pressing the PROG button on the front pa...

Page 44: ...d DVD recorders support one of the two Easy Record options i e Prepare Record or Record Link Check that your TV and VCR or DVD are both fitted with two SCART sockets Incorporate your receiver in your existing installation as described below Connect the cable from the satellite dish to the SAT IN socket of your Digital Receiver Connect the TV SCART socket of your Digital Receiver to the EXT1 SCART ...

Page 45: ...l Receiver and VCR or DVD settings Depending on your VCR or DVD brand and type you have to set the VCR recording control option to Prepare Record or Record Link Refer to the VCR or DVD User manual or try the two options to find out which is most suitable Set your VCR or DVD to Prepare Record or Record Link to allow control by your Digital Receiver 12 3 3 Recording with the VCR control feature Your...

Page 46: ...and your receiver is locked on the channel you are recording Poor reception signal No power fed to LNB Check that the power cord is correctly connected Disconnect this cord and reconnect it to ensure it is in place Check that the power is available at the wall socket Press the Stand by button Adjust the dish pointing Check the signal level from theAntenna Setup menu Check the connections at the LN...

Page 47: ...able Adjust the dish pointing Fasten the antenna securely Change the setting of the TV SCART item to RGB from the System Setting menu Refer to your TV User Manual Use the SCART cable supplied with your receiver Try retuning your receiver following the relevant steps in the Quick installation chapter If you are still missing channels your antenna may need adjusting Call your installer Check the rec...

Page 48: ...z C band De scrambling Embedded Type DVB compliant Smartcard reader 1 for CA CA system Premiere integrated conditional access Note subscription is required to watch Premiere programmes Connections TV SCART Output CVBS Controlled audio L R RGB Slow blanking Fast blanking VCR SCART Input CVBS Slow blanking Audio L R RGB Fast blanking Output CVBS Audio L R Slow blanking during timer if Prepare Record...

Page 49: ...English RUNNING HEADS 49 ...

Reviews: