background image

1

English

EN

Contents

1  Safety and Notice

 2

Safety 2

Notice 3

2  Your Micro System

 5

Introduction 5

What’s in the box 

5

Overview of the main unit 

6

Overview of the remote control 

7

3  Get started

 9

Connect the FM/DAB antenna 

9

Connect power 

9

Prepare the remote control 

9

Set clock 

10

Store radio stations automatically 

10

Turn on 

11

Demonstrate the unit’s features 

11

4 Play

 12

Play a disc 

12

Play from USB 

13

Play from a Bluetooth device 

13

5  Play iPod/iPhone

 15

Compatible iPod/iPhone 

15

Load the iPod/iPhone 

15

Listen to the iPod/iPhone 

16

Charge the iPod/iPhone 

16

Remove the iPod/iPhone 

16

6  Listen to radio

 17

Store DAB radio stations automatically  17

Basic operations 

17

Use the menu 

18

7  Adjust sound

 19

Adjust volume 

19

Select a preset sound effect 

19

Mute sound 

19

8  Other features

 20

Set the sleep timer 

20

Set the alarm timer 

20

Play from an external audio device 

21

Adjust display brightness 

21

9  Product information

 22

Specifications 

22

USB playability information 

23

Supported MP3 disc formats 

23

RDS program types 

23

Maintenance 24

10 Troubleshooting

 25

Contents

Summary of Contents for DTB3185

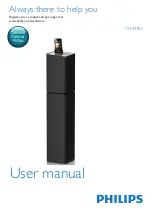
Page 1: ...www philips com welcome User manual Always there to help you Register your product and get support at DTB3185 Question Contact Philips ...

Page 2: ......

Page 3: ... device 13 5 Play iPod iPhone 15 Compatible iPod iPhone 15 Load the iPod iPhone 15 Listen to the iPod iPhone 16 Charge the iPod iPhone 16 Remove the iPod iPhone 16 6 Listen to radio 17 Store DAB radio stations automatically 17 Basic operations 17 Use the menu 18 7 Adjust sound 19 Adjust volume 19 Select a preset sound effect 19 Mute sound 19 8 Other features 20 Set the sleep timer 20 Set the alarm...

Page 4: ...convenience receptacles and the point where they exit from the apparatus j Only use attachments accessories specified by the manufacturer k Use only with the cart stand tripod bracket or table specified by the manufacturer or sold with the apparatus When a cart is used use caution when moving the cart apparatus combination to avoid injury from tip over l Unplug this apparatus during lightning stor...

Page 5: ...tteries covered by the European Directive 2006 66 EC which cannot be disposed with normal household waste Please inform yourself about the local rules on separate collection of batteries because correct disposal helps to prevent negative consequences for the environmental and human health Compliance Hereby WOOX Innovations declares that this product is in compliance with the essential requirements...

Page 6: ...ed by the developer to meet Apple performance standards Apple is not responsible for the operation of this device or its compliance with safety and regulatory standards Please note that the use of this accessory with iPod or iPhone may affect wireless performance iPod and iPhone are trademarks of Apple Inc registered in the U S and other countries The Bluetooth word mark and logos are registered t...

Page 7: ... www philips com welcome Introduction With this unit you can enjoy audio from discs USB devices iPod iPhone Bluetooth devices and other external devices listen to radio stations The unit supports the following media formats What s in the box Check and identify the contents of your package Main unit Remote control with an AAA battery Power cord DAB antenna Printed materials ...

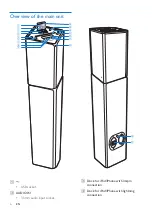
Page 8: ... Overview of the main unit a USB socket b AUDIO IN 3 5mm audio input socket b a c d e f g h i j q r k l m n o p c Dock for iPod iPhone with 30 pin connection d Dock for iPod iPhone with lightning connection ...

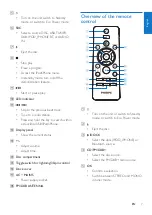
Page 9: ... the key to search within a track disc USB iPod iPhone l Display panel Show the current status m Adjust volume Adjust time n Disc compartment o Toggle switch for lightning 30 pin control p Dock cover q AC MAINS Power supply socket r FM DAB ANTENNA Overview of the remote control a Turn on the unit or switch to Standby mode or switch to Eco Power mode b Eject the disc c DOCK Select the dock IPOD_IPH...

Page 10: ...et clock in standby mode Display the current time in any source mode l SLEEP TIMER Set the sleep timer Set the alarm timer m REPEAT SHUFFLE Select the repeat play mode Select the random play mode n PROG Program tracks in disc USB source Program radio stations o RDS DISPLAY Select RDS broadcast information Synchronize clock with RDS station Select display information during play Adjust display brig...

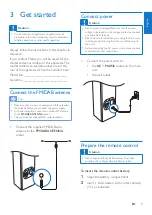
Page 11: ...connect an outdoor FM antenna to the FM DAB ANTENNA socket The unit does not support MW radio reception Connect the supplied FM DAB wire antenna to the FM DAB ANTENNA socket Connect power Caution Risk of product damage Make sure that the power voltage corresponds to the voltage printed on the back or underside of the unit Risk of electric shock When you unplug the AC power cord always pull the plu...

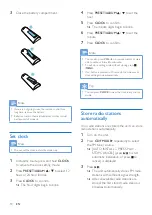
Page 12: ... to confirm Note You can also press VOL on remote control or main unit to set hour format hour minute To exit clock setting mode without storing press MENU If no button is pressed in 90 seconds the system exits clock setting mode automatically Tip You can press CLOCK to view the clock in any source mode Store radio stations automatically If no radio stations are stored the unit can store radio sta...

Page 13: ... after 15 minutes in standby mode Switch between standby mode and Eco Power mode In standby Eco Power mode press and hold to switch the unit to Eco Power standby mode Demonstrate the unit s features In standby mode press MENU until WELCOME TO PHILIPS welcome to Philips scrolls from the right to the left on the display and then DEMO ON demo on is displayed briefly This system s features are display...

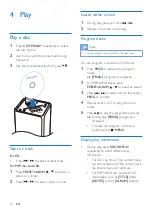
Page 14: ...You can program a maximum of 20 tracks 1 Press PROG to activate the program mode PROG program is displayed 2 For MP3 WMA tracks press PRESET ALBUM to select an album 3 Press to select a track then press PROG to confirm 4 Repeat steps 2 to 3 to program more tracks 5 Press to play the programmed tracks During play PROG program is displayed To erase the program in the stop position press MENU Display...

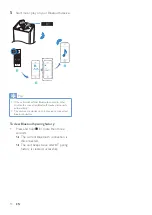
Page 15: ...an audio file press Play from a Bluetooth device You can listen to a Bluetooth device through the unit Note Before you connect a Bluetooth device to the unit familiarize yourself with the Bluetooth capabilities of the device Keep the unit away from other electronic devices that may cause interference The effective operation range between the unit and the paired device is approximately 10 meters 30...

Page 16: ...etooth device disconnects automatically The unit can memorize up to 8 previously connected Bluetooth devices To clear Bluetooth pairing history Press and hold for more than three seconds The current Bluetooth connection is disconnected The unit beeps twice after BT paring history is cleared successfully PHILIPS DTB3185 0000 PIN BT ...

Page 17: ...nano 7th generation iPod touch 5th generation Also made for 30 pin connection iPhone 4S iPhone 4 iPhone 3GS iPhone 3G iPhone iPod nano 2nd 3rd 4th 5th 6th generation iPod classic iPod touch 1st 2nd 3rd 4th generation Load the iPod iPhone 1 Lift up the dock cover 2 Slide the switch to the right and hold it 3 Swivel the dock connectors to the front or back to select the lightning or 30 pin connector...

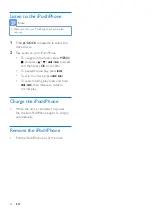
Page 18: ...o navigate in the menu press MENU and press to select and then press OK to confirm To pause resume play press To skip to a track press To search during play press and hold then release to resume normal play Charge the iPod iPhone When the unit is connected to power the docked iPod iPhone begins to charge automatically Remove the iPod iPhone Pull the iPod iPhone out of the dock ...

Page 19: ...perations Follow the instructions below for more functions Tune to the next FM radio station with sufficient signal strength at the lower higher frequency Press and hold to start the auto search Tune to the FM radio station at a specific frequency Press repeatedly until the frequency digitals are displayed Program FM radio stations automatically Press and hold PROG to start auto programming Progra...

Page 20: ...tereo or MONO mono SYSTEM system RESET reset Reset all settings to the factory default status SWVER software version Display the current version of the firmware DAB mode STATION station Access the list of the previously stored DAB radio stations Press to select a station and then on the main unit or OK on the remote control to start listening FULL SN full scan Scan and store DAB radio stations wit...

Page 21: ...press and hold SOUND WOOFER to activate volume adjustment of subwoofer 2 Press VOL to increase decrease the subwoofer volume within 5 seconds Select a preset sound effect During play press SOUND WOOFER repeatedly to select BALANCED balanced WARM warm BRIGHT bright POWERFUL powerful CLEAR clear Mute sound During play press MUTE to mute unmute sound ...

Page 22: ...o select the source is displayed 4 Press a source key to select a source DISC USB TUNER DAB IPOD_IPHONE or PLAYLIST 5 Press SLEEP TIMER to confirm The hour digits begin to blink 6 Press PRESET ALBUM to set the hour 7 Press SLEEP TIMER to confirm The minute digits begin to blink 8 Press PRESET ALBUM to set the minute 9 Press SLEEP TIMER to confirm The VOL volume begins to blink 10 Press PRESET ALBU...

Page 23: ...es the alarm source to the iPod iPhone library Play from an external audio device You can play from an external audio device such as MP3 player through this unit 1 Connect a 3 5mm audio cable not supplied to the AUDIO IN socket on the unit the headphone socket on the audio device 2 Press USB AUDIO IN repeatedly to select the 3 5mm audio input source 3 Play the external audio device Adjust display ...

Page 24: ...uner FM Tuning Range 87 5 108 MHz Tuning grid 50 KHz Sensitivity Mono 26dB S N Ratio Stereo 46dB S N Ratio 22 dBf 43 dBf Search Selectivity 28 dBf Total Harmonic Distortion 2 Signal to Noise Ratio 55 dB DAB Tuner Tuning Range 174 240 MHz Band III Sensitivity 90 dBf Bluetooth Standard Bluetooth StandardVersion 2 1 EDR Frequency band 2 402 2 480 GHz ISM Band Range 10m free space Speakers Speaker Imp...

Page 25: ...ximum album number 99 Supported sampling frequencies 32 kHz 44 1 kHz 48 kHz Supported Bit rates 32 320 kbps variable bit rates RDS program types NOTYPE No RDS programme type NEWS News services AFFAIRS Politics and current affairs INFO Special information programs SPORT Sports EDUCATE Education and advanced training DRAMA Radio plays and literature CULTURE Culture religion and society SCIENCE Scien...

Page 26: ...h a cleaning cloth Wipe the disc from the centre out Do not use solvents such as benzene thinner commercially available cleaners or antistatic spray intended for analogue records Clean the disc lens After prolonged use dirt or dust may accumulate at the disc lens To ensure good play quality clean the disc lens with Philips CD lens cleaner or any commercially available cleaner Follow the instructio...

Page 27: ... distance between the remote control and the unit Insert the batteries with its polarities signs aligned as indicated Replace the batteries Aim the remote control directly at the sensor on the front of the unit No disc detected Insert a disc Check if the disc is inserted upside down Wait until the moisture condensation at the lens has cleared Replace or clean the disc Use a finalized CD or correct...

Page 28: ...oth enabled device Disconnect that device and then try again The paired mobile device connects and disconnects constantly The Bluetooth reception is poor Move the device closer to this unit or remove any obstacle between them Some mobile phones may connect and disconnect constantly when you make or end calls This does not indicate any malfunction of this unit For some devices the Bluetooth connect...

Page 29: ......

Page 30: ... Innovations Limited or one of its affiliates further referred to in this document as WOOX Innovations and is the manufacturer of the product WOOX Innovations is the warrantor in relation to the product with which this booklet was packaged Philips and the Philips Shield Emblem are registered trademarks of Koninklijke Philips N V DTB3185_10_UM_V2 0 ...

Reviews: