background image

4

I

NTRODUCTION

En

glis

h

Introduction 

Thank you for purchasing this product which has been 

designed and manufactured to give you many years of 

trouble-free service. 

About This User Guide 

This user guide contains all the information you need to 

know about how to setup and watch available 'Freeview' 

channels using your set top box. 

What is Freeview? 

It is the new, free digital service currently providing up to 

30 free digital TV channels, over 20 digital radio stations 

plus a whole new world of interactive services. It's broad-

cast from transmitters and received via a rooftop aerial. 
It works like traditional TV, but because the signals are 

Digital you need a set top box to convert them. This 

means more channels can be transmitted with extra fea-

tures such as interactivity and widescreen pictures. 

Safety is Important 

To ensure your safety and the safety of others, please 

ensure you read the Safety Instructions before you oper-

ate this product. 

Note: Keep this information in a safe place for future refer-

ence. 

Safety Considerations 

Position the cables so that they cannot be walked on or 

pinched by items placed on or against them. 

- Do not use the set top box in humid or damp condi-

tions. 

- Do not allow the set top box to get wet. 
- Do not expose the set top box to dripping or splashing. 
- Do not place water filled objects such as vases on top of 

the set top box. 

- Do not place naked flame sources, such as candles, on 

top of the set top box. 

Cleaning 

- ALWAYS unplug the set top box before you clean it. 
- Do not use liquid or aerosol cleaners. 
- Clean the set top box with a soft, damp (not wet) cloth. 

Ventilation 

- The slots and openings on the set top box are for venti-

lation. Do not cover or block them as it may cause 

overheating. 

- NEVER let children push anything into the holes or slots 

on the case. 

Servicing 

- There are no user serviceable parts in this set top box. 
- When servicing, refer to qualified service personnel. 
- Consult your dealer if you are ever in doubt about the 

installation, operation or safety of this set top box. 

Electrical Information 

Warning: 

Read these electrical safety instructions carefully 

before connecting the adapter to the mains supply. 

- This digital set top box is supplied with a mains adapter. 
- This mains adapter is designed to operate on 230V AC 

50Hz supply only. Connecting it to any other power 

sources may damage the set top box. 

- The mains adapter is designed for indoor use only. 
- The mains adapter is a sealed unit. There are no user 

serviceable parts inside and it does not require any elec-

trical adjustments. 

- Do not attempt to open the mains adapter. 
- If the mains adapter is not suitable for your socket, or 

becomes damaged, it must be replaced and disposed of 

in a safe and environmentally protective way. Always 

refer to qualified personnel. 

- Periodically inspect the mains adapter for damage. Do 

not use if faults or damage are found. Refer to qualified 

personnel.

This symbol indicates that the adaptor is a Class 

II appliance and does not require an earth con-

nection. 
This symbol indicates that the adapter is for 

indoor use only. 
This symbol indicates that the adapter conforms 

to CE regulations. 

Summary of Contents for DTR 100

Page 1: ...User Guide DTR 100 Digital Set Top Box ...

Page 2: ...a Television and DVD 8 Connecting to a TV and a Stereo System 9 Switching on for the first time 10 Using the Set Top Box 11 Channel List 11 To Watch a channel 11 To Delete a Channel 11 To Edit a channel name 11 To Lock a channel 12 To Add a channel to your Favourites list 12 Changing Channels 12 Channel browse buttons 12 Number buttons 0 9 12 Channel list 12 Configuration 13 Receiver Upgrade 13 Pa...

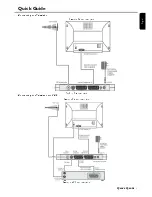
Page 3: ...UICK QUIDE 3 E n g l i s h Quick Guide Connecting to a Television Connecting to a Television and VCR Example TV set rear panel Set Top Box rear panel Example TV set rear panel Example VCR set rear panel ...

Page 4: ...YS unplug the set top box before you clean it Do not use liquid or aerosol cleaners Clean the set top box with a soft damp not wet cloth Ventilation The slots and openings on the set top box are for venti lation Do not cover or block them as it may cause overheating NEVER let children push anything into the holes or slots on the case Servicing There are no user serviceable parts in this set top bo...

Page 5: ...upplied with your receiver remote do not contain hazardous substances such as Mer cury Cadmium or Lead The Material recyclability symbol means the package cardboard or user manual paper is recy clable The Green dot affixed on cardboard means PHILIPS pays a financial duty to the Avoidance and Recovery of Packaging Waste organization This receiver contains a large number of materials that can be rec...

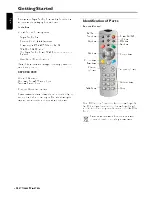
Page 6: ...y 8 30 am to 6 pm Saturday 9 am to 6 pm Cost per Minute national rate Please make sure that you have the model number of your set top box before contacting us The label showing the type and serial number is underneath your receiver Identification of Parts Remote Control Note RCU is a code 5 destination 21 and not exchangeable by a Philips universal remote control It is exchangeable with a so calle...

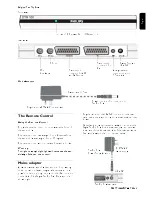
Page 7: ...o the 12V connector on the back of the Digital Set Top Box The adaptor is shown right Plug the cable into the 12V DC connector on the rear panel Insert the adaptor body into a suitable mains outlet socket Note that the only recommended way to disconnect the Digital Set Top Box from the mains supply is to remove the adaptor from the mains socket If the mains socket is fitted with a switch this coul...

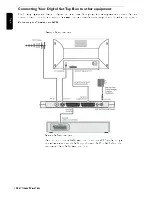
Page 8: ...are unsure on how to connect to your set top box always consult your manufacturer s user guide supplied with your equipment Connecting to a Television and DVD Example TV set rear panel Example DVD set rear panel If you decide to connect a DVD player or recorder to the VCR Scart of your digital receiver we advise to set the DVD output format to CVBS or PAL Refer to the user manual of your DVD playe...

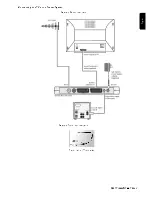
Page 9: ...GETTING STARTED 9 E n g l i s h Connecting to a TV and a Stereo System Example TV set rear panel Example Stereo set rear panel Stereo cable 3 5mm jack ...

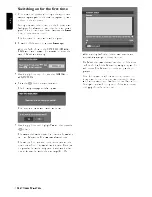
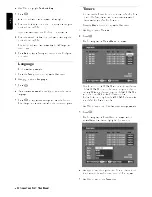
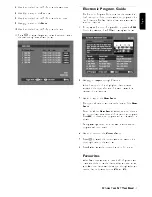
Page 10: ...placed by the window shown below 5 Use the buttons to highlight Yes and then press the button The system then starts to search all channels for available radio and TV stations This may take a few minutes The stations found are listed in the centre panel and the total number found displayed above this panel There is a progress bar below the listing panel that shows the chan nels so far searched wit...

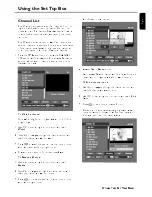
Page 11: ...ptions until you reach Watch 2 Use to navigate through the channel list until you reach the channel you want to watch 3 Press to watch the selected channel in the picture window located at the top right corner 4 To watch the channel on full screen press Exit To Delete a Channel 1 Use to step along the options until you reach Delete 2 Use to navigate through the channel list until you reach the cha...

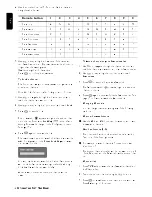
Page 12: ...ed To Add a channel to your Favourites list 1 Use to navigate through the channel list until you reach the channel you want to add to your favourites list 2 Use to step along the options until you reach Favourites 3 Press to set this channel as a favourite The favourites symbol appears alongside the selected channel in the list 4 Press again to remove from the favourites list See page 15 on how to...

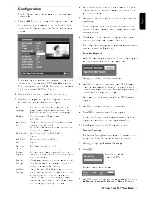
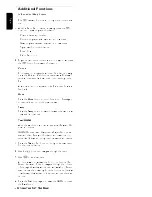
Page 13: ...anged accordingly If you want to check immediately for an STB firmware upgrade 3 Use to move to the second item shown 4 Press to start the search for an upgrade You will be informed that the system is searching for an upgrade and whether or not an upgrade was found 5 Press Exit to return to the Configuration menu Parental Settings The Parental Setting feature allows you to password pro tect groups...

Page 14: ...rily for the current program Timers You can use the Timer function to turn your Set Top Box on and off in Stand by and also to automatically switch channels when your Set Top Box is on Press the Menu button to display the Main menu 1 Use to select Timers 2 Press The following typical Timer Menu is displayed Note To record on a VCR DVDR you must also set the timer of the VCR DVDR to record the desi...

Page 15: ...nnels A brief description of the highlighted channel name appears in the upper left panel of the window with its name and broadcast time 3 Use to step to the Next Event The upper left panel now contains the details of the Next Event Reminder When Next Event has been selected there is an opportunity to set a reminder for a particular program Press OK on the selected program and a clock symbol is sh...

Page 16: ...Mute Press the Mute button to turn of the sound Press again to restore the sound to the previous level Swap Press the Swap button to switch between the two previ ously selected channels Text MHEG With the text button you can access certain Text and Mul timedia contents MHEG Multimedia and Hypermedia Expert Group is a standard that offers you information about various con tents like life style shop...

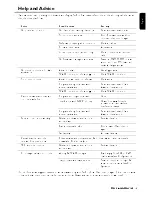
Page 17: ... not fully plugged in Check SCART connector Sound but no picture Aerial poorly adjusted or defective Check aerial Program is being broadcast with altered parameters Do an automatic search see Advanced Installation SCART connector not fully plugged in Check SCART connector Cannot receive station that you could receive before Program is no longer broadcast None Interference with DECT phones Move pho...

Page 18: ...mbol duration Fast PLL tuning speed step size 62 5 kHz 166 67 kHz Input Output 2x SCART VCR TV out TV SCART video out CVBS Y C RGB VCR SCART video out CVBS Y C switching signal 0 6 12V Audio out left right Audio out 3 5mm stereo jack RF input connector IEC60169 2 female termination 75 Ohm Return Loss min 6 dB 75 Ohm RF Re Modulator connector IEC60169 2 male adjustable Re Modulator channel 21 69 ou...

Page 19: ...urchased The guarantee is subject to the following provi sions The product must be correctly assembled and operated in accordance with the instructions contained in this user guide The guarantee does not cover accidental damage mis use or consumable items The guarantee will be rendered invalid if the set top box is resold or has been damaged by inexpert repair The manufacturer disclaims any liabil...

Page 20: ......

Reviews: