background image

5

EN

• 

Stop the play of music.

• 

Access the playlist of a docked iPod/

iPhone.

• 

Connect a compatible USB storage 

device for music play.

• 

Connect a compatible USB device for 

charging.

Disc compartment

• 

Press to eject the disc from the disc 

compartment.

 / 

• 

Skip to the previous or next track.

• 

Press and hold to search within a track.

• 

Tune to a radio station.

VOL+/VOL-

• 

Increase or decrease the volume level.

Dock for iPod/iPhone/iPad

• 

Connect to a compatible iPod/iPhone/

iPad.

IR sensor

• 

Receive infrared signals from the 

remote control.

Indicator

• 

It lights red when the product is in the 

eco power standby mode.

LCD screen

Micro USB socket 

•  This socket is for firmware upgrade 

only.

DC IN

• 

Connect to the AC power adaptor.

• 

Connect to a headphone with 3.5-mm 

connector.

AUDIO IN

• 

Connect to the audio output socket 

(usually the headphone socket) of an 

external device.

FM ANT

• 

Connect to the FM antenna.

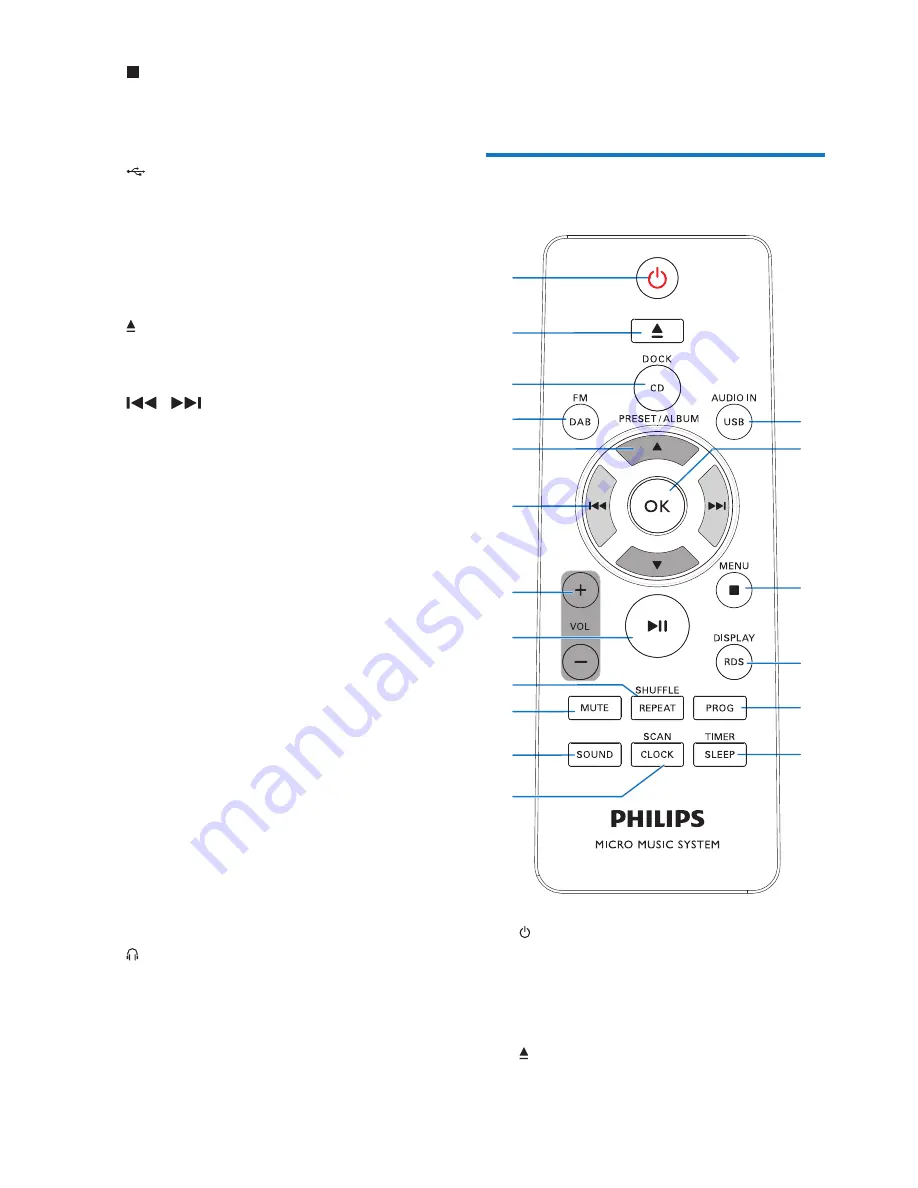
Overview of the remote 

control


• 

Turn on the product.

• 

Switch the product to eco power 

standby mode or normal standby 

mode.

• 

Eject the disc.

a

b

c

d
e

f

h

g

i
j

k

l

r
q

p

o

n

m

Summary of Contents for DualDock DCB2270

Page 1: ...www philips com welcome User manual Always there to help you Register your product and get support at DCB2270 Question Contact Philips ...

Page 2: ......

Page 3: ...dio 13 Tune to an FM radio station 13 Program radio stations automatically 14 Program radio stations manually 14 Tune to a preset radio station 14 Display RDS information 14 Adjust FM settings 14 8 Listen to DAB radio stations 15 Use for the first time 15 Program radio stations 15 Display DAB information 16 Use DAB menus 16 9 Adjust sound 17 Select a preset sound effect 17 Adjust volume level 17 M...

Page 4: ...ave the product checked before use Never place the product and accessories near naked flames or other heat sources including direct sunlight Never insert objects into the ventilation slots or other openings on the product Where the mains plug or an appliance coupler is used as the disconnect device the disconnect device shall remain readily operable Disconnect the product from the power outlet bef...

Page 5: ...s for a normal person even for exposure less than a minute The higher decibel ranges are offered for those that may have already experienced some hearing loss Sound can be deceiving Over time your hearing comfort level adapts to higher volumes of sound So after prolonged listening what sounds normal can actually be loud and harmful to your hearing To guard against this set your volume to a safe le...

Page 6: ...M and DAB radio stations What s in the box Check and identify the contents of the package Micro music system Remote control with one AAA battery AC power adaptor with 3 plug converters Wall mounting kit 2 dowels and 2 screws FM antenna Safety sheet Short user manual Wall mounting instructions Overview of the main unit a Turn on the product Switch the product to eco power standby mode or normal sta...

Page 7: ...o a compatible iPod iPhone iPad k IR sensor Receive infrared signals from the remote control l Indicator It lights red when the product is in the eco power standby mode m LCD screen n Micro USB socket This socket is for firmware upgrade only o DC IN Connect to the AC power adaptor p Connect to a headphone with 3 5 mm connector q AUDIO IN Connect to the audio output socket usually the headphone soc...

Page 8: ...t sound effect l SCAN CLOCK In normal standby mode press and hold to start setting the clock In working mode press to display the clock In FM or DAB mode press and hold to start scanning for FM stations m TIMER SLEEP Set the alarm timer Set the sleep timer n PROG Program radio stations Program tracks that are stored on a disc or USB storage device o DISPLAY RDS In working mode press to toggle thro...

Page 9: ...ted on the back of the main unit Risk of electric shock Before you plug the AC power adaptor make sure that the adaptor plug converter is fixed securely When you unplug the AC power adaptor always pull the plug never the cord Before you connect the AC power adaptor make sure that you have completed all the other connections 1 Select an adaptor plug converter and fix it to the adaptor 2 Connect the...

Page 10: ...last selected source Switch modes Automatically switch the modes After this product stays inactive for 15 minutes it automatically switches to the normal standby mode The clock is displayed If the clock is not set blinks After this product stays in the normal standby mode for 15 minutes it automatically switches to the eco power standby mode scrolls and then the LCD screen lights off The LED indic...

Page 11: ...atically synchronizes its clock with the RDS station Not synchronize the clock automatically The set clock is displayed Tip This product will synchronize its clock with the current DAB station or the connected iPod iPhone iPad Select a source On the product press SOURCE repeatedly to select a source the playlist on the connected iPhone iPod iPad the audio input through the AUDIO IN socket the disc...

Page 12: ...hat are copied onto a compatible USB storage device Flash drive Memory card reader HDD hard disc drive This product can detect only a portable HDD with USB power peak current no more than 500 mA Note WOOX Innovations does not guarantee compatibility with all USB storage devices FAT16 and FAT 32 file systems are supported and NTFS NewTechnology File System not 1 Connect the USB storage device to th...

Page 13: ...hen no track is played press PROG The current track number blinks on the display panel 2 Press to select a track number 3 Press PROG to confirm 4 Repeat steps 2 and 3 to program more tracks 5 Press to play the programmed tracks To erase the program press twice 6 Use the dock You can enjoy audio from iPod iPhone iPad through this product Note There is no audio output from the headphone socket of th...

Page 14: ...ess DOCK or SOURCE to switch the source to 2 Eject the dock 3 Turn the dock tray to select a connector that matches your iPod iPhone iPad 4 Connect your iPod iPhone iPad to the dock Once the iPod iPhone iPad is recognized the charging starts ...

Page 15: ...iPad Do not twist or shake your iPod iPhone iPad during unloading 1 Pull the iPod iPhone iPad out of the dock 2 Press inside to hide the dock 7 Listen to FM radio Tune to an FM radio station Note Make sure that you have connected and fully extended the FM antenna 1 Press FM or SOURCE repeatedly to switch the source to 2 Press and hold until the frequency starts to change The product automatically ...

Page 16: ...reset sequence number and the frequency of this radio station are displayed 4 Repeat steps 1 3 to program more stations Tune to a preset radio station Press to select the sequence number of the preset radio station Display RDS information RDS Radio Data System is a service that allows FM stations to transfer additional information If you tune to an RDS station an RDS icon is displayed 1 Tune to an...

Page 17: ...seconds when listening to a DAB station Tip You can re scan to update the list of stored stations see Use DAB menus Re scan for stations You can tune to a station manually see Use DAB menus Tune to a station manually Tune to a stored station 1 Switch the source to The last listened station is broadcast 2 Press to select a station and then press OK to start listening Note If is displayed before the...

Page 18: ...e you can tune to a specific channel frequency manually In addition to antenna orientation for better radio reception the optimal reception can also be obtained with this feature 1 Press OK to access the station list 2 Press to select a station from 5A to 13F 3 Press OK to confirm the option Remove invalid stations This option lists active stations and removes any stations that are in the list but...

Page 19: ...d on a USB storage device as alarm source Note Make sure that you have set the clock correctly If the selected alarm source is unavailable this product switches to FM mode automatically 1 In normal standby mode press and hold SLEEP TIMER The alarm time is displayed with the hour digits blinking TIMER is displayed 2 Press VOL or repeatedly to set the hour and then press SLEEP TIMER to confirm The m...

Page 20: ...0 45 30 or 15 minutes When the sleep timer is activated is displayed To deactivate the sleep timer press SLEEP TIMER repeatedly until is displayed Listen to an external device You can also listen to an external audio device for example MP3 player through this product 1 Press AUDIO IN or SOURCE to switch the source to 2 Connect an audio input cable with 3 5 mm plug on both ends between the AUDIO IN...

Page 21: ...re and reset the product to factory default status Check the current software version Press OK to display the version of current software Reset the product 1 Press OK to display the options 2 Press to select an option Return to the previous menu Reset the product to factory default status 3 Press OK to confirm the option Upgrade the software 1 Go to www philips com support 2 Search for support inf...

Page 22: ...mation AC power adaptor Model AS360 120 AD300 Philips Input 100 240V 50 60 Hz 1 2 A Output 12V 3 0 A Safety standard EN60065 Operation power consumption 20 W Eco standby power consumption 0 5 W USB Direct Version 1 1 2 0 Max loading of USB output 5V 500 mA Dimensions Main unit W x H x D 420 x 226 x 97 mm Weight With packing Main unit 3 6 kg 2 3 kg Amplifier Maximum output power 2 X 10 W Frequency ...

Page 23: ...Memory cards requires an additional card reader to work with this unit Supported formats USB or memory file formats FAT16 FAT32 sector size 512 bytes MP3 bit rate data rate 32 320 kbps and variable bit rate Directory nesting up to a maximum of 8 levels Number of albums folders maximum 999 Number of tracks titles maximum 999 ID3 tag v2 0 or later File name in Unicode UTF8 maximum length 128 bytes U...

Page 24: ...s product To keep the warranty valid never try to repair the product yourself If you encounter problems when using this device check the following points before requesting service If the problem remains unsolved go to the Philips Web page www philips com support When you contact the Consumer Care make sure that the product is nearby and the model number and serial number are available Problem Solu...

Page 25: ...cleared Replace or clean the disc Make sure that the recordable disc is finalized and the format supported USB storage device is not supported Make sure that the USB storage device is compatible with the product Try another one Cannot play some files on the USB storage device Make sure that the file format is supported Make sure that the file quantity does not exceed the maximum Radio reception is...

Page 26: ...se act according to your local rules and do not dispose of your old products with your normal household waste Correct disposal of your old product helps to prevent potential negative consequences for the environment and human health Your product contains batteries covered by the European Directive 2006 66 EC which cannot be disposed with normal household waste Please inform yourself about the loca...

Page 27: ... of this accessory with iPod iPhone or iPad may affect wireless performance iPod and iPhone are trademarks of Apple Inc registered in the U S and other countries iPad is a trademark of Apple Inc Copyright 2013 WOOX Innovations Limited All rights reserved Philips and the Philips Shield Emblem are registered trademarks of Koninklijke Philips N V and are used by WOOX Innovations Limited under license...

Page 28: ...26 ...

Page 29: ......

Page 30: ... Innovations Limited or one of its affiliates further referred to in this document as WOOX Innovations and is the manufacturer of the product WOOX Innovations is the warrantor in relation to the product with which this booklet was packaged Philips and the Philips Shield Emblem are registered trademarks of Koninklijke Philips N V DCB2270_10_UM_V1 0 ...

Reviews: