background image

7

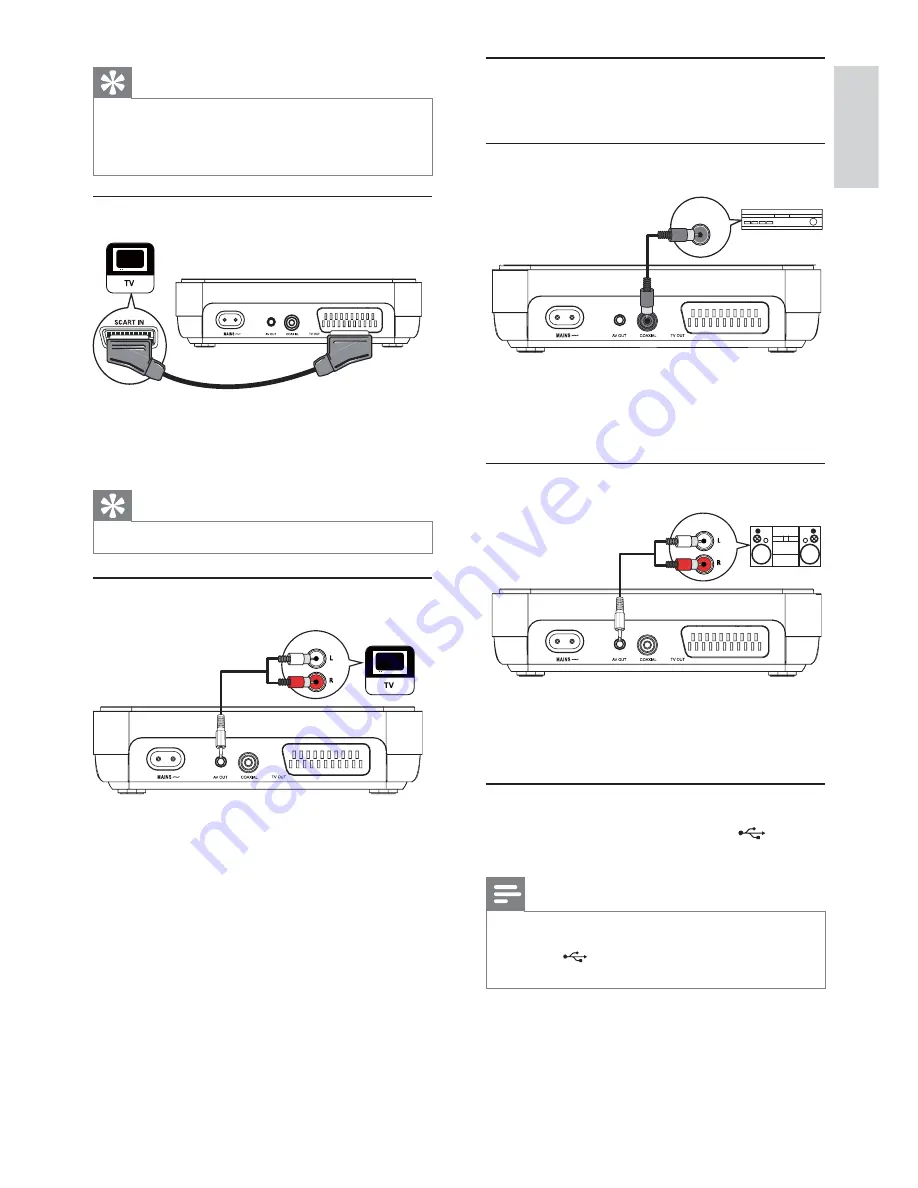
Route audio to other devices

Route the audio from this product to other devices 
to enhance audio play.

Connect to digital amplifi er/receiver

DIGITAL IN

1


Connect a coaxial cable (not supplied) to: 

the  

COAXIAL

 jack on this product.

the COAXIAL/DIGITAL input jack on 

the device.

Connect analogue stereo system

AUDIO IN

1


Connect the supplied AV cables to: 

the  

AV OUT

 jack (3.5mm) on this 

product.
the audio input jacks on the device.

Connect USB device

1


Connect a USB fl ash drive to the  

 jack on 

this product.

Note

This product can only play/view MP3, WMA, DivX or 

JPEG fi les that are stored on a USB fl ash drive.
Press the  

 button to access the content and play 

the fi les.

Tip

The video input jack on the TV may be labeled as A/V 

IN, VIDEO IN, COMPOSITE or BASEBAND. 
This type of connection provides standard picture 

quality.

Option 2: Connect to scart jack

1


Connect a scart cable (not supplied) to: 

the  

TV OUT

 jack on this product.

the scart input jack on the TV.

Tip

This type of connection provides good picture quality.

Connect audio cables

AUDIO IN

Connect the audio from this product to the TV to 
allow sound output through the TV.

1


Connect the supplied AV cables to: 

the  

AV OUT

 jack (3.5mm) on this 

product.
the audio input jacks on the TV.

English

EN

Summary of Contents for DVP2320

Page 1: ...r your product and get support at www philips com welcome EN User manual 3 DE Benutzerhandbuch 19 ES Manual del usuario 37 FR Mode d emploi 55 IT Manuale utente 73 NL Gebruiksaanwijzing 89 PT Manual do utilizador 107 ...

Page 2: ...n Philips Consumer Lifestyles Philips Glaslaan 25616 JB Eindhoven The Netherlands LASER CAUTION USE OF CONTROLS OR ADJUSTMENTS OR PERFORMANCE OF PROCEDURES OTHER THAN THOSE SPECIFIED HEREIN MAY RESULT IN HAZARDOUS RADIATION EXPOSURE CAUTION VISIBLE AND INVISIBLE LASER RADIATION WHEN OPEN AND INTERLOCK DEFEATED DO NOT STARE INTO BEAM LOCATION INSIDE NEAR THE DECK MECHANISM ...

Page 3: ...Safety and important notice 4 Trademark notice 4 2 Your product 5 Feature highlights 5 Product overview 5 3 Connect 6 Connect video cables 6 Connect audio cables 7 Route audio to other devices 7 Connect USB device 7 Connect power 8 4 Get started 8 Prepare the remote control 8 Find the correct viewing channel 8 Select menu display language 8 5 Play 8 Play a disc 8 Play video 9 Play music 10 Play ph...

Page 4: ...roduct Never place the product remote control or batteries near naked flames or other heat sources including direct sunlight Only use this product indoors Keep this product away from water moisture and liquid filled objects Never place this product on other electrical equipment Keep away from this product during lightning storms Where the mains plug or an appliance coupler is used as the disconnect ...

Page 5: ...es You can play discs with the following region codes DVD region code Countries Europe Product overview Main unit a PUSH TO OPEN Open the disc compartment b Turn on this product or switch to standby mode c IR sensor Point the remote control at the IR sensor d jack Connect a USB flash drive e Stop play f Start pause or resume disc play Remote control a Turn on this product or switch to standby mode ...

Page 6: ...V Option 2 Connect to scart jack for a standard TV Note You must connect this product directly to a TV Connect to AV OUT jack VIDEO IN 1 Connect the supplied AV cables to the AV OUT jack 3 5mm on this product the video input jack on the TV d Navigate through the menus Search fast forward or fast backward Search slow forward or slow backward e BACK Return to the previous display menu f Start pause ...

Page 7: ...t can only play view MP3 WMA DivX or JPEG files that are stored on a USB flash drive Press the button to access the content and play the files Tip The video input jack on the TV may be labeled as A V IN VIDEO IN COMPOSITE or BASEBAND This type of connection provides standard picture quality Option 2 Connect to scart jack 1 Connect a scart cable not supplied to the TV OUT jack on this product the scar...

Page 8: ...saver press DISC MENU After you pause or stop a disc and no button is pressed within 15 minutes this product automatically switches to standby Connect power Caution Risk of product damage Ensure that the power supply voltage corresponds to the voltage printed on the back of the unit Before connecting the AC power cord ensure you have completed all other connections Note The type plate is located o...

Page 9: ... OK Display play time 1 During play press INFO The disc status menu is displayed 2 Select Time Disp then press The display options vary from disc type 3 Select an option then press OK Play video Note Some operations may not work with some discs See the information accompanying the disc for details Control video play 1 Play a title 2 Use the remote control to control the play Button Action Start pa...

Page 10: ...ed correctly on the screen because these characters are not supported Folders files that exceed the supported limit of this product cannot be displayed or played View DVD play from different angles 1 During play press INFO The disc status menu is displayed 2 Select Angle then press 3 Press the Numeric buttons to change the angle Play changes to the selected angle Note Applicable only to discs conta...

Page 11: ...B that contains the JPEG photos For USB press Slideshow begins for Kodak disc or a contents menu for JPEG disc is displayed 2 Select a photo folder then press OK to start slideshow To preview the photos in thumbnail press INFO To select a photo press the Navigation buttons To enlarge the selected photo and start slideshow press OK To return to the menu press BACK Note It may require longer time to...

Page 12: ...und output through two speakers Digital Audio Setup Select a digital setting based on the digital amplifier receiver that is connected through the digital jack coaxial digital 6 Adjust settings Note If the setup option is grayed out it means the setting cannot be changed at the current state General setup 1 Press SETUP General Setup menu is displayed 2 Press 3 Select an option then press OK 4 Selec...

Page 13: ... the LPCM Linear Pulse Code Modulation output sampling rate 48kHz For discs recorded at sampling rate of 48 kHz 96kHz For discs recorded at sampling rate of 96 kHz Note LPCM Output setting is only available if the Digital Output is set to PCM Only The higher the sampling rate the better the sound quality Volume Set the default volume level when you play a disc 1 Press OK 2 Press to set the volume ...

Page 14: ...ord again at Confirm PWD field 4 Press OK to exit the menu Note If you forget the password enter 136900 before you set a new password DivX Subtitle Select a character set that supports the DivX subtitle Picture Setting Select a predefined set of picture color settings or customize the personal setting Standard Original color setting Bright Vibrant color setting Soft Warm color setting Personal Custom...

Page 15: ...d for discs Clean discs Wipe the disc with a micro fibre cleaning cloth from the centre to the edge in a straight line movement Standard English Irish Danish Estonian Finnish French German Italian Portuguese Luxembourgish Norwegian Bokmål and Nynorsk Spanish Swedish Turkish Central Europe Polish Czech Slovak Albanian Hungarian Slovene Croatian Serbian Latin script Romanian Cyrillic Belarusian Bulga...

Page 16: ... 790 nm CD Output Power 7 0 mW DVD 10 0 mW VCD CD Beam divergence 60 degrees Specifications Note Specification and design are subject to change without notice Accessories supplied Remote control and batteries Power cord User manual Play media DVD Video Video CD SVCD Audio CD CD R CD RW DVD R RW DVD R RW DivX CD Picture CD MP3 CD WMA CD USB flash drive USB Compatibility Hi Speed USB 2 0 Class support ...

Page 17: ...The USB flash drive format is not compatible with the digital receiver The drive is formatted with a file system which is not supported by this unit e g NTFS 8 Troubleshooting Warning Risk of electric shock Never remove the casing of the product To keep the warranty valid never try to repair the product yourself If you have problems using this product check the following points before you request se...

Page 18: ...wider perspective on a standard 4 3 screen D DivX Video On Demand This DivX Certified device must be registered in order to play DivX Video on Demand VOD content To generate the registration code locate the DivX VOD section in your device setup menu Go to vod divx com with this code to complete the registration process and learn more about DivX video J JPEG A very common digital still picture forma...

Page 19: ...85 Lao 7679 Latina 7665 Latvian 7686 Letzeburgesch 7666 Limburgan Limburger 7673 Lingala 7678 Lithuanian 7684 Luxembourgish 7666 Macedonian 7775 Malagasy 7771 Magyar 7285 Malayalam 7776 Maltese 7784 Manx 7186 Maori 7773 Marathi 7782 Marshallese 7772 Moldavian 7779 Mongolian 7778 Nauru 7865 Navaho Navajo 7886 Ndebele North 7868 Ndebele South 7882 Ndonga 7871 Nederlands 7876 Nepali 7869 Norsk 7879 N...

Page 20: ... 2009 Koninklijke Philips Electronics N V All rights reserved DVP2320_12_UM_V3 0_935 ...

Reviews: