background image

14

      Play video

 Note

 Some operations may not work with some discs. See 


the information accompanying the disc for details.

     Control video play

    1

  Play a title.

    2

  Use the remote control to control the play.

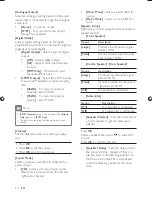
  Button

  Action


 Start, pause or resume disc play.


 Stop disc play.

      , 

 Skip to a previous/next title or 
chapter.

    ,  

 Search fast-backward or fast-
forward. Press repeatedly to 
change the search speed.

    ,  

 Search slow-forward or slow-
backward. Press repeatedly to 
change the search speed.
  For VCD/SVCD,  slow-backward 
search is not available.


AUDIO/
CREATE 
MP3

 Select an audio language or 
channel available on a disc.


SUBTITLE

 Select a subtitle language available 
on a disc.
 Select or turn off repeat mode.
  Repeat play for a speci c section.


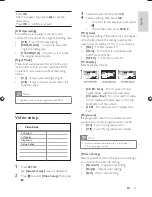
 ZOOM

 Fit the picture format to the TV 
screen.
  Press repeatedly until the image is 
scaled to  t to the TV screen.


 ZOOM

 Toggle between screen aspect 
ratio and different zoom factor.
  To pan through the zoomed 
image, press the  

Navigation 

buttons

 .


 INFO

 Access the play options and 
display the current disc status.

       5 Play

    Play a disc

 Caution

 Do not place any objects other than discs into the disc 


compartment.
  Do not touch the disc optical lens inside the disc 


compartment.

    1

 Press 


  to open the disc compartment.

    2

  Insert a disc with its label facing up.

    3

 Press 


  to close the disc compartment and 

start disc play.

    To view disc play, turn on the TV to 

• 

the correct viewing channel for this 
product.
    To stop disc play, press 

• 

 .

 Note

 Check the types of discs supported (see 


“Speci cations” > “Play media”).
  If the password entry menu is displayed, enter the 


password before you can play the locked or restricted 
disc (see “Adjust settings” > “Preferences” >  

[Parental 

Control]

 ).

  If you pause or stop a disc, the screen saver appears 


after 5 minutes of inactivity. To deactivate the screen 
saver, press  

DISC MENU

 .

  After you pause or stop a disc and no button is pressed 


within 15 minutes, this product automatically switches 
to standby. 

EN

(1LQGG6HF

(1LQGG6HF

Summary of Contents for DVP3326

Page 1: ...Register your product and get support at www philips com welcome EN User manual DVP3326 ...

Page 2: ...evices 10 Connect USB device 11 Connect power 11 4 Get started 12 Prepare the remote control 12 Find the correct viewing channel 12 Select menu display language 12 Turn on progressive scan 12 5 Play 14 Play a disc 14 Play video 14 Play music 16 Play photo 16 Play from USB device 17 6 Advanced features 18 Create MP3 les 18 7 Adjust settings 19 General setup 19 Audio setup 19 Video setup 21 Preferen...

Page 3: ...ches around the product for ventilation Ensure curtains or other objects never cover the ventilation slots on the product Never place the product remote control or batteries near naked ames or other heat sources including direct sunlight Only use this product indoors Keep this product away from water moisture and liquid lled objects Never place this product on other electrical equipment Keep away ...

Page 4: ...or home and other limited viewing uses only unless otherwise authorised by Macrovision Corporation Reverse engineering or disassembly is prohibited Trademark notice Manufactured under license from Dolby Laboratories Dolby and the double D symbol are trademarks of Dolby Laboratories Windows Media and the Windows logo are trademarks or registered trademarks of Microsoft Corporation in the United Sta...

Page 5: ...t that Philips offers register your product at www philips com welcome Feature highlights Screen Fit View the movie in full screen display on anyTV Progressive scan video Push the limits of standard resolution and provide a more lm like DVD video display on aTV screen USB link Plug a USB ash drive to the USB jack to enjoy the MP3 WMA JPEG les Create MP3 les Convert audio tracks from an audio CD in...

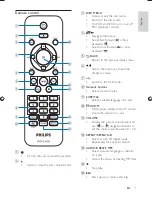
Page 6: ...Select a subtitle language on a disc j ZOOM Fit the piture display to theTV screen Zoom the picture in or out k VOLUME Display the current volume level and use or navigation buttons to set the volume level between 0 20 l REPEAT REPEAT A B Select or turn off repeat mode Repeat play for a speci c section m AUDIO CREATE MP3 Select an audio language or channel on a disc Access the menu of creating MP3...

Page 7: ...p INFO For discs access the play options or display the current disc status For slideshows display a thumbnail view of photo les q OK Con rm an entry or selection r SETUP Access or exit the setup menu EN ...

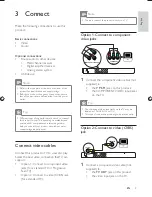
Page 8: ...deo Audio Optional connections Route audio to other devices Multi channel receiver Digital ampli er receiver Analog stereo system USB device Note Refer to the type plate at the back or bottom of the product for identi cation and supply ratings Before you make or change any connections ensure that all the devices are disconnected from the power outlet Tip Different types of connectors may be used t...

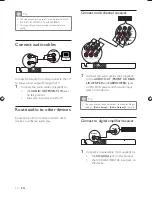
Page 9: ...OAXIAL DIGITAL input jack on the device FRONT R REAR R SUBWOOFER FRONT L REAR L CENTER MULTICHANNEL AUDIO IN DIGITAL IN COAXIAL DIGITAL OUT Tip The video input jack on theTV may be labeled as A V IN VIDEO IN COMPOSITE or BASEBAND This type of connection provides standard picture quality Connect audio cables Connect the audio from this product to theTV to allow sound output through theTV 1 Connect ...

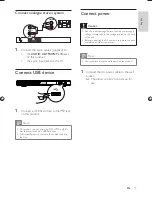
Page 10: ...Connect the AC power cable to the wall socket The player is ready to be set up for use Connect analogue stereo system 1 Connect the audio cables supplied to the AUDIO OUTFRONT L R jacks on this product the audio input jacks on theTV Connect USB device 1 Connect a USB ash drive to the jack on this product Note This product can only play view MP3 WMA or JPEG les that are stored on a USB ash drive Pr...

Page 11: ... Setup English Video Setup Picture Setting TV Display TV System Progressive On Off 4 Get started Prepare the remote control 1 Open the battery compartment 2 Insert two R03 or AAA batteries with correct polarity as indicated 3 Close the battery compartment Caution Remove batteries if they are exhausted or if the remote control is not to be used for a long time Do not mix batteries old and new or ca...

Page 12: ...ait for 15 seconds for the auto recovery If no picture is displayed turn off the progressive scan mode as follows 1 Press to open the disc compartment 2 Press the Numeric button 1 6 Press SETUP to exit the menu 7 You can now turn on the progressive scan mode on theTV see theTV user manual Note During play when the progressive scan mode is on for both this product and theTV distorted picture may di...

Page 13: ...spect ratio and different zoom factor To pan through the zoomed image press the Navigation buttons INFO Access the play options and display the current disc status 5 Play Play a disc Caution Do not place any objects other than discs into the disc compartment Do not touch the disc optical lens inside the disc compartment 1 Press to open the disc compartment 2 Insert a disc with its label facing up ...

Page 14: ...o set the end point Repeat play starts Access DVD menu 1 Press DISC MENU to access the disc root menu 2 Select a play option then press OK In some menus press the Numeric buttons to input your selection AccessVCD menu The PBC playback control feature is available forVCD SVCD which can display the contents menu for you to select a play option The PBC is on by default in the factory Note See Adjust ...

Page 15: ...ot support MP3PRO audio format For any special character that is present in the MP3 track name ID3 or album name it might not be displayed correctly on the screen because these characters are not supported Folders les that exceed the supported limit of this product cannot be displayed or played Play photo Play photo as slideshow You can play JPEG photos les with jpeg or jpg extensions 3 To cancel ...

Page 16: ...begins for Kodak disc or a contents menu for JPEG disc is displayed 2 Select a photo folder then press OK to start slideshow To preview the photos in thumbnail press INFO To select a photo press the Navigation buttons To enlarge the selected photo and start slideshow press OK To return to the menu press BACK Note It may require longer time to display the disc content on theTV due to the large numb...

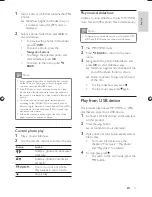
Page 17: ...MP3 audio les The created MP3 audio les are saved in the USB device 1 Insert an audio CD 2 Connect a USB ash drive to the jack on this product 3 During disc play press AUDIO CREATE MP3 The MP3 creation menu is displayed 4 Select Yes in the menu then press OK 5 Select a conversion option in the OPTIONS panel then press OK repeatedly to select an item Option Description Speed Select a copying speed ...

Page 18: ...ess OK To return to the previous menu press To exit the menu press SETUP Sound Mode Digital Audio Analogue Output Volume Audio Setup Night Mode Speaker Setup CD Upsampling 7 Adjust settings Note If the setup option is grayed out it means the setting cannot be changed at the current state General setup 1 Press SETUP General Setup menu is displayed 2 Press 3 Select an option then press OK 4 Select a...

Page 19: ...n at the same time Analogue Output Select an analogue setting based on the audio device that is connected through the analogue audio jack Stereo For stereo output LT RT For surround sound output through two speakers Digital Audio Select a digital setting based on the digital ampli er receiver that is connected through the digital jack coaxial digital Digital Output Select a type of digital output ...

Page 20: ... description see Get started Turn on progressive scan Picture Setting Select a prede ned set of picture color settings or customize the personal setting Standard Original color setting Bright Vibrant color setting Soft Warm color setting Press OK Select a speaker then press to set the delay time Press OK to con rm and exit CD Upsampling For better sound quality in stereo mode convert the music CD ...

Page 21: ... on such discs PBC Turn on or off the content menu ofVCDs SVCDs with PBC playback control feature On Display the index menu when you load a disc for play Off Skip the menu and start play from the rst title MP3 JPEG Nav Select to display the folders or display all the les View Files Display all the les View Folders Display the folders of MP3 WMA les Password Set or change the password for locked di...

Page 22: ...orget the password enter 136900 before you set a new password Version Info Display the software version of this product Tip This information is required when you want to nd out if a newest software version is available at the Philips website that you may download and install on this product Default Reset all the settings of this product to factory default except for Disc Lock Parental Control and ...

Page 23: ...tware if available at the Philips website Caution Power supply must not be interrupted during software upgrade 1 Press SETUP 2 Select Preferences Version Info then press OK 3 Write down the le name then press SETUP to exit the menu 4 Visit www philips com support to check for the latest software version using the le name for this product 5 Refer to the upgrade instructions on the website for more ...

Page 24: ...lti channel sound Connections Y Pb Pr output Cinch 3x Video output Cinch yellow Audio output L R Cinch white red Digital output 1 coaxial IEC60958 for CDDA LPCM IEC61937 for MPEG 1 2 Dolby Digital 9 Specifications Note Speci cation and design are subject to change without notice Accessories supplied Remote control and batteries Play media DVD Video Video CD SVCD Audio CD CD R CD RW DVD R RW DVD R ...

Page 25: ... 1 3 kg Power Power supply rating 110V 240V 50 60 Hz Power consumption 10 W Power consumption in standby mode 1 W Laser speci cation Type Semiconductor laser InGaAIP DVD AIGaAs CD Wave length 655 nm DVD 790 nm CD Output Power 10 mW DVD 5 mW VCD CD Beam divergence 60 degrees EN ...

Page 26: ... ash drive cannot be read The USB ash drive format is not compatible with the digital receiver The drive is formatted with a le system which is not supported by this unit e g NTFS 10 Troubleshooting Warning Risk of electric shock Never remove the casing of the product To keep the warranty valid never try to repair the product yourself If you have problems using this product check the following poi...

Page 27: ...16 9 The letter box allows you to enjoy a picture with a wider perspective on a standard 4 3 screen J JPEG A very common digital still picture format A still picture data compression system proposed by the Joint Photographic Expert Group which features small decrease in image quality in spite of its high compression ratio Files are recognized by their le extension jpg or jpeg M MP3 A le format wit...

Page 28: ...sh 7585 Lao 7679 Latina 7665 Latvian 7686 Letzeburgesch 7666 Limburgan Limburger 7673 Lingala 7678 Lithuanian 7684 Luxembourgish 7666 Macedonian 7775 Malagasy 7771 Magyar 7285 Malayalam 7776 Maltese 7784 Manx 7186 Maori 7773 Marathi 7782 Marshallese 7772 Moldavian 7779 Mongolian 7778 Nauru 7865 Navaho Navajo 7886 Ndebele North 7868 Ndebele South 7882 Ndonga 7871 Nederlands 7876 Nepali 7869 Norsk 7...

Page 29: ...30 EN Visit us on web at www philips com support or Call us on Tel No 1860 180 1111 BSNL MTNL 011 6600 1111 GSM WLL standard call rates apply Electronics ...

Page 30: ... 2008 Koninklijke Philips Electronics N V All rights reserved Document order number DVP3326_94_UM_V1 1 ...

Reviews: