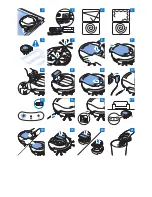
- The suction power of the robot picks up loose dirt and transports it through the suction
opening into the dust container (Fig. 3).
Cleaning patterns
The robot uses a systematic cleaning strategy that consists of three cleaning patterns.
1 Straight pattern
2 Spiral pattern
3 Wall-following pattern
The robot uses these patterns in the following order:
1 A straight pattern, followed by a spiral pattern (Fig. 4)
2 A wall-following pattern, followed by a spiral pattern (Fig. 5)
When the robot has completed this sequence of patterns, it starts moving in straight lines again.
The robot continues to use this sequence of patterns to clean the room until the rechargeable
battery is empty, or until it is switched off manually.
How your robot avoids stairs
The robot is fitted with three drop-off sensors in the bottom.
- These drop-off sensors are used to detect and avoid height differences. In some cases, depending on
specific circumstances in your home, the drop-off sensors may not detect a staircase or other height
difference in time. Therefore avoid using the robot in these situations or monitor it carefully (Fig. 6).
Before first use
Mounting the side brushes
1
Unpack the side brushes.
2
Push the side brushes onto the shafts on the bottom of the robot (Fig. 7).
Note: Make sure you attach the side brushes properly. Press them onto the shaft until you hear them
lock into position with a click.
Inserting the rechargeable battery
You have to insert the rechargeable battery before use.
1
Put the robot on a flat and stable surface in front of you with the bumper towards you.
2
Press the two ribbed areas on the dust container compartment cover firmly to unlock it (Fig. 8).
3
Slide the cover off the robot (Fig. 9).
4
Push the plug of the rechargeable battery onto the connector in the rechargeable battery cavity.
Note: The plug only fits on the connector in one way: with the tab on the side of the hook on the
connector (Fig. 10).
5
Place the rechargeable battery in the rechargeable battery cavity (Fig. 11).
6
Slide the dust container compartment cover back onto the robot until it locks into position (Fig. 12).
Note: Make sure the two cover latches slide into the appropriate holes in the housing of the robot.
The robot does not work and the dust compartment indicator flashes when the cover latches have not
been inserted properly (see chapter ‘Using your robot’, section ‘Indicator signals and their meaning’).
Preparing for use
Charge the battery for at least 4 hours each time to ensure the rechargeable battery performs best
and has a long life. A fully charged battery gives you a cleaning time of approximately 50 minutes on
hard floors.
English
9
Summary of Contents for EasyStar FC8800
Page 1: ...FC8802 FC8800 User manual ...
Page 2: ......
Page 3: ...1 ...
Page 4: ...2 3 4 5 6 7 8 9 10 11 12 13 14 15 16 17 18 19 20 21 ...
Page 125: ......
Page 126: ...22 23 24 25 26 27 28 29 30 31 32 33 34 35 36 37 ...
Page 127: ......
Page 128: ...4222 003 3611 3 ...


