background image

5

English

EN

HDMI 1

Lights up when you select HDMI IN 1 as 

the input source.

HDMI 2

Lights up when you select HDMI IN 2 as 

the input source.

OPTICAL/COAX

•  Lights up when you switch to optical 

or coaxial input source. 

•  Blinks when an unsupported audio 

format is detected.

AUX

Lights up when you switch to AUX input 

source.

AUDIO-IN

Lights up when you switch to AUDIO-IN 

source (3.5mm jack).

Bluetooth

•  Lights up when you switch to 

Bluetooth mode and Bluetooth devices 

are paired. 

•  Blinks when you switch to Bluetooth 

mode and Bluetooth devices are not 

paired.

V. SURR indicator

•  Lights up when surround mode is 

selected. 

•  Off when stereo mode is selected.

•  Blinks once when night mode/auto 

volume is enabled.

•  Blinks twice when Dolby Digital audio 

is input.

•  Blinks twice when night mode/auto 

volume is disabled.

•  Blinks three times when DTS audio is 

input.

 (Standby-On/Standby indicator)

When the SoundBar is in standby, the 

standby indicator turns red.

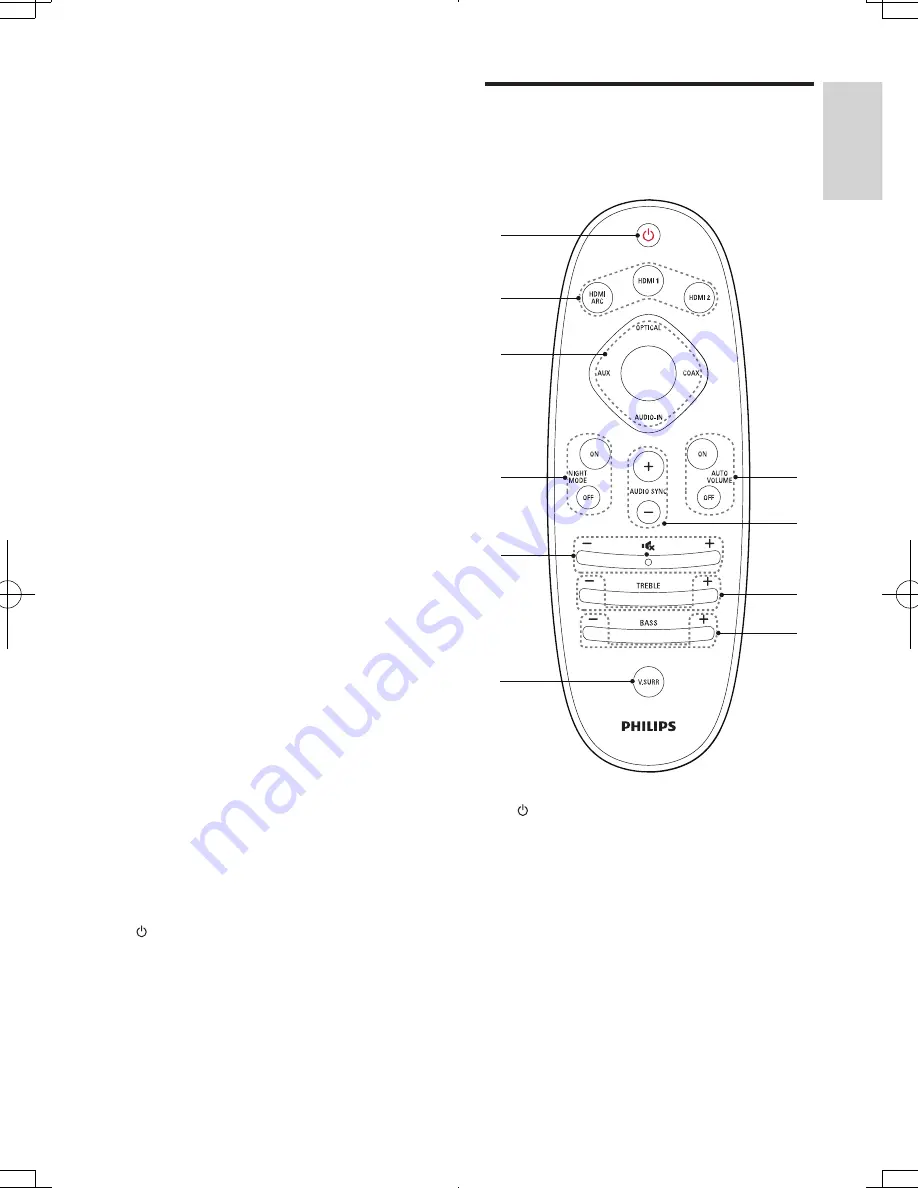
Remote control

This section includes an overview of the 

remote control.


 (Standby-On) 

•  Switch the SoundBar on or to standby.

•  When EasyLink is enabled, press 

and hold for at least three seconds 

to switch all connected HDMI CEC 

compliant devices to standby.

HDMI selection

HDMI ARC

: Switch your source to HDMI 

ARC connection.

HDMI 1

: Switch your source to the HDMI 

IN 1 connection.

Bluetooth

a

j

i

h

g

f

d

c

e

b

HTL7180_F7_UM_V1.1.indb   5

2013/5/14   14:49:59

Summary of Contents for Fidelio HTL7180

Page 1: ...DA 01 800 839 1989 Solo Para Mexico Mexico city 5887 9736 FR Pour obtenir de l aide supplementaire communiquez avec le centre de service a la clientele de votre pays Pour obtenir de l aide aux Etats Unis au Canada a Puerto Rico ou aux lles Vierges americaines communiquez avec le centre de service a la clientele Philips au 1 866 310 0744 Pour obtenir l aide au Mexique entrez en contact avec le cent...

Page 2: ...Connect and set up 8 Charge speakers 8 Pair up with speakers subwoofer 8 Place speakers 9 Connect toTV 9 Connect digital devices through HDMI 10 Connect audio fromTV and other devices 10 4 Use your SoundBar 11 Adjust the volume 11 Choose your sound 11 MP3 player 12 Play music via Bluetooth 13 Auto standby 13 Apply factory settings 13 5 Wall mount your SoundBar 14 Wall mount 14 6 Product specificat...

Page 3: ...se only with the cart stand tripod bracket or table specified by the manufacturer or sold with the apparatus When a cart is used use caution when moving the cart apparatus combination to avoid injury from tip over Unplug this apparatus during lightning storm or when unused for long periods of time Refer all servicing to qualified service personnel Servicing is required when the apparatus has been ...

Page 4: ...g apparatus can cause serious injury or even death This apparatus should not be placed in a built in installation such as a bookcase or rack unless proper ventilation is provided Make sure to leave a space of 7 8 inches 20cm or more around this apparatus Class II equipment symbol This symbol indicates that the unit has a double insulation system This bolt of lightning indicates uninsulated materia...

Page 5: ... Follow the instructions on the website to select your language and then enter your product model number Alternatively you can contact Philips Consumer Care in your country Before you contact Philips note down the model number and serial number of your product You can find this information on the back or bottom of your product 2 Your SoundBar Congratulations on your purchase and welcome to Philips...

Page 6: ...ndicator Lights up when surround mode is selected Off when stereo mode is selected Blinks once when night mode auto volume is enabled Blinks twice when Dolby Digital audio is input Blinks twice when night mode auto volume is disabled Blinks three times when DTS audio is input j Standby On Standby indicator When the SoundBar is in standby the standby indicator turns red Remote control This section ...

Page 7: ...eaker orTV speaker g BASS Increase or decrease bass h TREBLE Increase or decrease treble i AUDIO SYNC Increase or decrease audio delay j AUTOVOLUME ON OFF Turn auto volume on or off Connectors This section includes an overview of the connectors available on your SoundBar Rear connectors a AC MAINS Connect to the power supply b TO TV HDMI OUT ARC Connect to the HDMI ARC input on the TV c HDMI IN 2 ...

Page 8: ...peaker is being charged docked into the main unit the indicator lights up amber When the speaker goes to standby the indicator blinks amber b Connection key Press with a pin to enter the pairing mode for the speaker c POWER ON Press to turn on the wireless speaker if it automatically goes to standby POWER ON a b c Wireless subwoofer The SoundBar comes with a wireless subwoofer a CONNECT Press to t...

Page 9: ... hours to fully charge the speakers If the charging lasts more than 4 hours during standby of the main unit the speakers automatically switch to standby Pair up with speakers subwoofer The wireless speakers and subwoofer automatically pair up with the SoundBar for wireless connection when you turn on the SoundBar the speakers and the subwoofer If no audio from the wireless speakers and subwoofer c...

Page 10: ...te Surround sound depends on factors such as room shape and size type of wall and ceiling windows and reflective surfaces and speaker acoustics Experiment with the speaker positions to find the optimum setting for you Follow these general guidelines for speakers placement 1 Seating position This is the center of your listening area 2 Place the SoundBar in front of the seating position 3 REAR L rea...

Page 11: ...HDMI Connect a digital device such as a set top box DVD Blu ray player or games console to your SoundBar through a single HDMI connection When you connect the devices in this way and play a file or game the TV video is automatically displayed on your TV and audio is automatically played on your SoundBar 1 Using a High Speed HDMI cable connect the HDMI OUT connector on your digital device to the HD...

Page 12: ...ice DVD 4 Use your SoundBar This section helps you use the SoundBar to play audio from connected devices Before you start Make the necessary connections described in the quick start guide and the user manual Switch the SoundBar to the correct source for other devices Adjust the volume 1 Press Volume to increase or decrease a volume level To mute sound press Mute To restore the sound press Mute aga...

Page 13: ...enes and decreasing the volume for loud scenes 1 Press AUTOVOLUME ON OFF to turn auto volume on or off When auto volume is turned on the V SURR indicator blinks once 4 4 When auto volume is turned off the V SURR indicator blinks twice Synchronize picture and sound If the audio and video are not synchronized delay the audio to match the video 1 Press AUDIO SYNC to synchronize the audio with the vid...

Page 14: ...m the SoundBar The Bluetooth indicator lights up If the connection fails the Bluetooth indicator blinks continually 4 Select and play audio files or music on your Bluetooth device During play if a call is coming music play is paused Play resumes when the call ends If music streaming is interrupted place the Bluetooth device closer to the Soundbar 5 To exit Bluetooth select other source When your s...

Page 15: ...t bracket make sure that you use screws of a suitable length and diameter For information about how to wall your SoundBar see the wall mount guide 25mm 3 3 5mm 6 Product specifications Note Specifications and design are subject to change without notice Amplifier FTC total output power 66W Front Left Right 16W 1 THD 8ohm 150 Hz 20 kHz Surround Left Right 20W 1 THD 8ohm 150 Hz 20 kHz Subwoofer 30W 1...

Page 16: ... the casing of the product To keep the warranty valid never try to repair the product yourself If you have problems using this product check the following points before you request service If you still have a problem get support at www philips com support Main unit The buttons on the SoundBar do not work Disconnect the SoundBar from the power supply for a few minutes then reconnect Sound No sound ...

Page 17: ...tically to save power This does not indicate any malfunction of the SoundBar 8 Notice This section contains the legal and trademark notices Notice of compliance This set complies with the FCC rules Part 15 and with 21 CFR 1040 10 Operation is subject to the following two conditions a This device may not cause harmful interference and b This device must accept any interference received including in...

Page 18: ...s made to this equipment not expressly approved by Philips may void the FCC authorization to operate this equipment Model number PHILIPS HTL7180 F7 Trade Name Philips Responsible Party P F USA Inc PO Box 2248 Alpharetta GA 30023 2248 1 866 310 0744 Canada This device complies with Industry Canada licence exempt RSS standard s Operation is subject to the followingTwo conditions 1 this device may no...

Page 19: ...P F USA Inc PO Box 2248 Alpharetta GA 30023 2248 Specifications are subject to change without notice 2013 Koninklijke Philips Electronics N V All rights reserved HTL7180_F7_UM_V1 1 ...

Reviews: