IMPOR
T
ANT!
–M
ak
e sure the m
ute setting on y
our
PC contr
ol panel is deactivated to ensur
e
y
ou g
et the sound fr
om y
our audio
system!
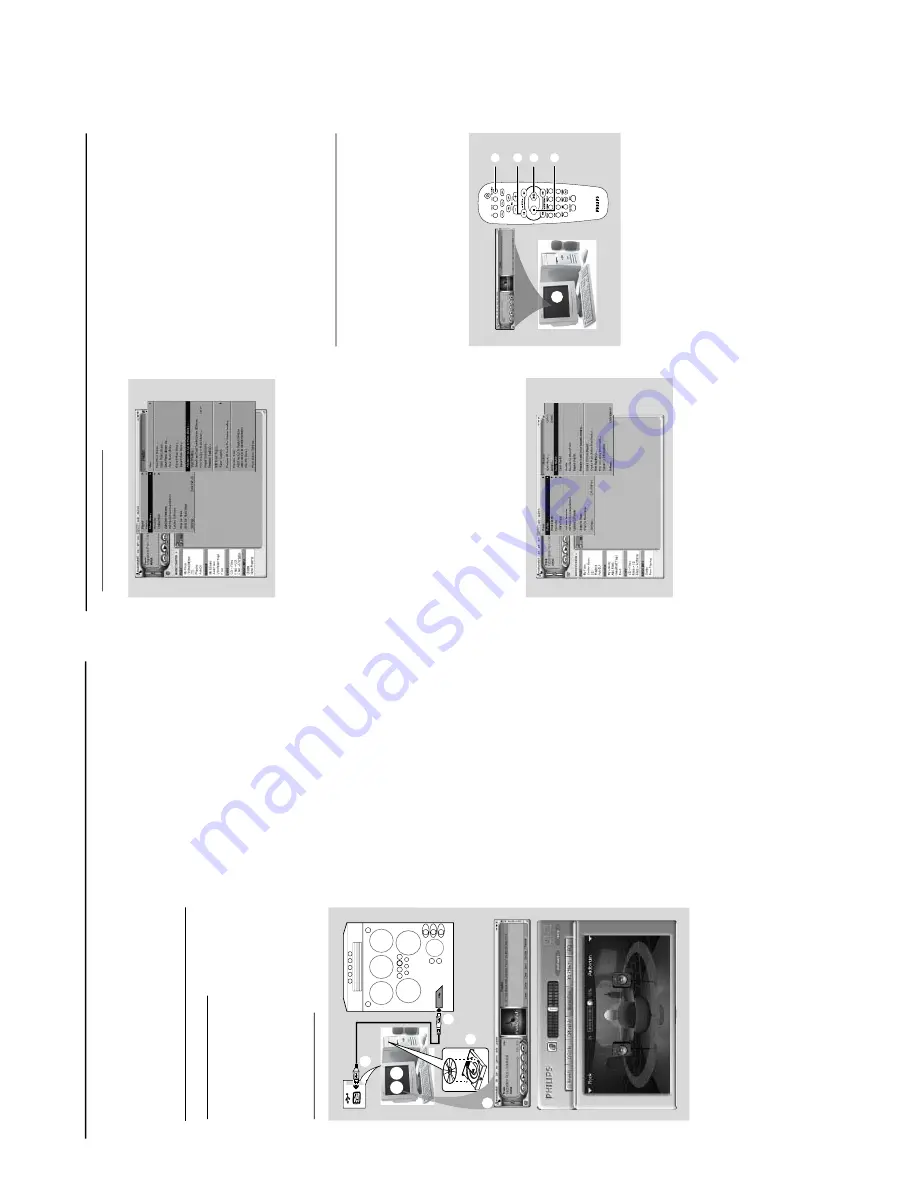
Quick setup guide
PC system r
equirement
–W
indo
ws 98SE/
ME/2000/XP
–
Intel P
entium MMX200 or higher
–
CD-ROM dr
iv
e
–U
SB por
t
–
Free hard disk space:
80 MB f
or the
software
Softwar
e installation
2
4
3
2
1
6
5
1
Tu
rn
on y
our PC and inser
t the installer disc into
your PC’
s CD-ROM dr
iv
e
.
2
The installation guide will appear automatically
. I
f
it does not,
go to the CD-R
OM dr
iv
e in
Windo
ws Explorer and doub
le click the
Setup
.e
x
e
.
3
Select y
our desired language from the list.
4
Select
install Softwar
e
.
5
Connect the USB cab
le to the PC and
Audio
System and press the USB PC Link button on
the
Audio set or the remote control
.
6
Follow the instr
uctions as prompted on the
screen to cor
rectl
y install the USB PC Link
Dr
iv
er
,
Philips Sound
Ag
ent 2
and
MusicMatch
Juk
ebo
x software
.
Notes:
–M
inim
um OS r
equirement f
or Philips Sound
Ag
ent 2:
Windo
ws 2000 or XP
.
–D
ur
ing installation,
your pr
evious MusicMatc
h
Juk
ebo
x softw
ar
e on your PC will be replaced.
Declarations
Windo
ws
and
P
entium
are tr
ademar
ks of
Microsoft Cor
por
ation and Intel Cor
por
ation.
All other tr
ademar
ks belong to their respecti
ve
ow
ner
s.
USB PC Link sample tr
ack,
m
usic by Chemistr
y
(www
.chemistr
yteam.com)
USB PC Link
Using MusicMatch softwar
e
To
cr
eate a m
usic librar
y
Add music f
iles to
My Music Librar
y
Add f
iles to
My Librar
y
b
y dr
agging and
dropping audio tr
acks from an
ywhere in
Windows,
into the
My Librar
y
windo
w
.
You can also click
Add Files
in the
Music
Center
to add tr
acks.
1
Click the
Add Files
b
utton on the
Music
Librar
y
windo
w
.
2
Bro
wse y
our computer to the folder where
audio f
iles are stored.
Check the bo
x
Also Ad
d
T
racks
from Subfolder
s to add all tr
acks in the
cur
rent f
older
, and all subfolder
s.
3
Click the
Select All
button to select all the f
iles
in the cur
rent,
and all subfolder
s.
4
Click
Ad
d
.
Files will be added to
My Librar
y
.
To
cr
eate a
“Pla
ylist”
1
Dr
ag and drop f
iles,
or folder
s with music f
iles,
from anywhere on y
our computer or
My
Librar
y
into the
Pla
ylist
windo
w
. Y
our f
iles will
begin to play
. Or
, y
ou ma
y click the
Open
button on the
Pla
ylist
windo
w to bro
wse for
and add music to the
Pla
ylist
.
2
Click the
Sa
v
e
button on the
Pla
ylist
,o
r
go to
the menu
Options
>
Pla
ylist
>
Sa
v
e Pla
ylist
.
3
You will be prompted to name the
Pla
ylist
. I
n
the Name f
ield type the name y
ou'd like to gi
ve
this
Pla
ylist
.
4
Click the
Sa
v
e
button.
No
w y
ou can pla
y all the
sa
ved pl
aylists with the audio system
by
pressing
S
or
T
buttons.
Details oper
ation,
please
ref
er to Connecting to
USB PC Link
.
Note:
–
It is not possible to cr
eate a playlist fr
om the
system’
s 5 CD c
hang
er
. If you encounter any
pr
oblem using USB PC Link,
please ref
er to the
FA
Q (Fr
equently
Ask
ed Questions) stor
ed in your
USB PC Link installer disc or visi
t
“www
.audio.philips
.com”
f
or the latest update on
FA
Q
.
Connecting to USB PC Link
USB PC Link allo
ws y
ou to playback y
our m
usic
collection from the PC via the po
w
erful amplif
ier
and speaker
s of this system.
IMPOR
T
ANT!
Mak
e sur
e the MUSICMA
TCH
softwar
e
has been installed.
Refer to the CD-
RO
M
slee
v
e f
or USB PC Link installation.
1
2
3
4
5
1
Tu
rn
on y
our computer and launch the
“
MUSICMA
TCH JUKEBO
X
”.
The v
olume lev
el of PC should not be put
into m
ute
.
2
Press
USB PC LINK
.
If the audio streaming is detected,
“
CONNECTING
”
is displa
yed and the USB
indicator will be flashing.
If “
NO CONNECTION
”i
s displa
yed,
check the
connection betw
een y
our PC and micro system
.
USB PC Link
1-10
Summary of Contents for FW-M589
Page 16: ...Service position A Service position B Service position C 2 4 2 4 DISMANTLING INSTRUCTIONS ...
Page 62: ...9 2 9 2 AF12 BOARD COMPONENT LAYOUT ...
Page 63: ...9 3 9 3 AF12 BOARD CHIP LAYOUT MAPPING AF12 BOARD COMPONENT LAYOUT MAPPING ...
Page 64: ...9 4 9 4 AF12 BOARD CHIP LAYOUT ...
Page 76: ...10 8 Location of switches ...
Page 84: ...10 16 10 16 Exploded view 5DTC mechanic for orientation only ...


