2-10
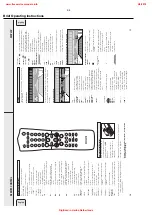
Brief Operating Instructions
INTERNAL RECORDING
18
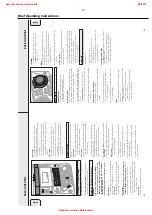
High speed recording of an entire disc, a track, a
program or a track edit
1
Make sure the CDR(W) is absolutely free of scratches and
dust particles.
2
Press either CD 1, CD 2 or CD 3 to select the disc from
which you wish to record.
3
Press REC TYPE on the unit to enter into the recording menu.
4
Rotate
í
JOG CONTROL
ë
to select one of the
following high speed recording modes:
If a disc from the CD changer is selected:
y
CD Fast?
: for high speed recording of an entire disc
•
Continue with step 5.
y
Track Fast?
: for high speed recording of a track
•
Press YES to confirm.
•
Rotate
í
JOG CONTROL
ë
to select the track.
y
Rec Tr
and the track number is displayed.
•
Continue with step 6.
If CD changer program mode is available:
y
Prog Fast?
: for high speed recording of the selected
disc or of the program
If CD changer track edit mode is available:
y
A-B Fast?
: for high speed recording of the A–B track
5
Press YES to confirm your selection.
y
Both decks will be selected in the display
, the arrow
starts blinking. The remaining recording time of the
CDR(W), the total recording time of the CDR(W) and
either
Record CD1
(or
2
,
3
)
?
,
Record Prog?
or
Record A-B?
is displayed.
Note: When the CDR(W) already contains a recording,
ALC
will also become active and
ALC
will be shown.
6
Press YES to start high speed recording.
y
The arrow lights,
RECORDING
IN
PROGRESS
is shown, high
speed recording starts and the actual recording time
remaining starts to count down.
•
To stop recording, press
Ç
STOP on the unit.
Normal recording and listening of an entire disc, a
track, a program or a track edit
1
Make sure the CDR(W) is absolutely free of scratches and
dust particles.
2
Follow steps 2 and 3 of “High speed recording”.
3
Rotate
í
JOG CONTROL
ë
to select one of the
following normal record options:
If CD changer is selected:
y
CD Listen?
: for listening to the entire disc during
normal recording
y
TrackListen?
: for listening to the track during
normal recording
•
Press YES to confirm.
•
Rotate
í
JOG CONTROL
ë
to select the desired
track.
y
Rec Tr
and the track number is displayed.
•
Continue with step 6 of “High speed recording”.
If CD changer program mode is available:
y
Prog Listen?
: for listening to the program during
normal recording
If CD changer track edit mode is available:
y
A-B Listen?
: for listening to the A–B track during
normal recording
4
Follow steps 5 and 6 of “High speed recording”.
•
To stop recording, press
Ç
STOP on the unit.
DO NOT FORGET TO
FINALIZE!
Finalizing a CDR(W) disc is a simple procedure, necessary to:
– play a recorded CDR on a standard CD
player or
–
play a recorded CDRW on a CDRW compatible CD player
and CD
recorder
.
Normal recording and listening
High speed recording
English
DISPLA
Y
CDR
iR
S
EN
S
O
R
TU
N
ER
D
IG
IT
A
L
/ A
N
A
LO
G
AUX
CD TEXT
CLOCK
/TI
M
O
PE
N
/C
LO
S
E
M
IC
M
IC
L
E
V
E
L
C
D
-
T
E
X
T
E
D
IT
IN
G
ST
A
N
DB
Y
ON
CD
1
CD
2
CD
3
R
E
C
T
Y
P
E
E
D
IT
C
O
M
P
IL
E
C
D
FI
N
A
LI
Z
E
E
R
A
S
E
C
D
C
D
R
E
C
O
R
D
FW
-
R8
C
D
R
E
C
O
R
D
A
B
LE
M
IN
I
H
IF
I
S
Y
S
T
E
M
C
D
R
E
C
O
R
D
E
R
INTERNAL RECORDING
19
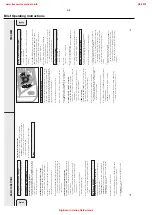
Manual recording from the FM tuner
1
Make sure the CDR(W) is absolutely free of scratches and
dust particles.
2
Press TUNER repeatedly to select the FM tuner
. Then select
the desired radio station (see “T
uning to radio stations”).
3
Press REC TYPE on the unit to enter the recording menu.
y
FM Tuner?
is displayed.
4
Press YES to confirm.
y
Wait
and
Record?
are displayed.
5
Press YES to start recording.
y
The arrow lights,
RECORDING
IN
PROGRESS
is shown,
manual recording starts and the actual recording time
remaining starts to count down.
6
Press
Ç
STOP to stop recording.
Manual microphone recording
1
Make sure the CDR(W) is absolutely free of scratches and
dust particles.
2
Set MIC LEVEL to the minimum level to prevent acoustic
feedback (e.g. a loud howling sound) before you connect
the microphone.
3
Connect a microphone to MIC.
4
Press CD 1, CD 2 or CD 3 to select the disc with which you
wish to mix the microphone.
5
Press REC TYPE on the unit to enter the recording menu.
6
Rotate
í
JOG CONTROL
ë
to select the manual recording
mode for the microphone:
y
CD Mix Mic
is displayed.
7
Press YES to confirm.
y
Wait
and
Record?
are displayed.
8
Press YES to start recording.
9
Rotate
í
JOG CONTROL
ë
to select the desired track.
y
The disc tray number
, the current track number and
playing time of the track are displayed.
10
Press
É
PLA
Y/P
AUSE to start playback.
y
The selected source is mixed with the microphone.
11
Press
Ç
STOP to stop recording.
•
To perform microphone recording only
, see “Manual
recording” in chapter “External recording”.
DO NOT FORGET TO
FINALIZE!
Finalizing a CDR(W) disc is a simple procedure, necessary to:
– play a recorded CDR on a standard CD
player or
–
play a recorded CDRW on a CDRW compatible CD player
and CD
recorder
.
Manual recording
English
D
ISPLA
Y
CDR
iR
S
EN
S
O
R
TU
N
ER
D
IG
IT
A
L
/ A
N
A
LO
G
AUX
CD TEXT
CLOCK
/TI
M
O
PE
N
/C
LO
S
E
M
IC
M
IC
L
E
V
E
L
C
D
-
T
E
X
T
E
D
IT
IN
G
ST
A
N
DB
Y
ON
CD
1
CD
2
CD
3
R
E
C
T
Y
P
E
E
D
IT
C
O
M
P
IL
E
C
D
FI
N
A
LI
Z
E
E
R
A
S
E
C
D
C
D
R
E
C
O
R
D
FW
-
R8
C
D
R
E
C
O
R
D
A
B
LE
M
IN
I
H
IF
I
S
Y
S
T
E
M
C
D
R
E
C
O
R
D
E
R
www.freeservicemanuals.info
2/4/2018
Digitized in Heiloo Netherlands


