2-14
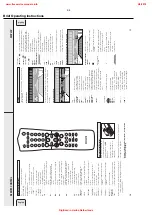
Brief Operating Instructions
TUNER
26
1
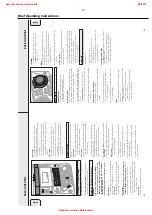
Press TUNER to select the tuner
.
y
Tuner
is scrolled.
2
Press TUNER again to select the desired waveband.
y
The selected waveband is displayed.
3
Keep
à
SEARCH
or
á
SEARCH
(
à
or
á
on the remote
control) pressed for more than a half second.
y
The selected waveband and
Searching
are displayed.
The radio tunes to a station with sufficient signal strength.
4
Repeat searching until you find the desired station.
•
To tune to a weak station, briefly press
à
SEARCH
or
á
SEARCH
(
à
or
á
on the remote control) as often as
necessary for optimum reception.
It is possible to store up to 40 radio stations. Stations can be
selected and programmed automatically or you can do that
yourself. Programming will overwrite your former presets
starting from the last active preset station. After programming
the last stored preset station will be tuned.
Automatic programming
If no preset is tuned, automatic programming starts at preset
number one.
1
Follow steps 1 and 2 of “T
uning to radio stations”.
2
Keep PROG (PROGRAM on the remote control) pressed for
more than 2 seconds.
y
Autoprogram
is displayed,
PROG
and the current
preset number in the music calendar start blinking.
y
All available radio stations for the selected waveband are
stored automatically
.
PROG
goes off, the preset number
,
the waveband and the frequency of the last preset station
are displayed briefly
.
•
To store radio stations for another waveband, repeat steps
1–2. Make sure to select the next available preset number
first before proceeding, otherwise already programmed
radio stations may be erased.
•
To exit the automatic programming, press PROG (PROGRAM
on the remote control).
Note: S
tr
ong stations will always automatically be programmed
first, followed by the weak stations.
Manual programming
1
Follow steps 1 and 2 of “T
uning to radio stations”.
2
Keep PROG (PROGRAM on the remote control) pressed for
less than 2 seconds.
y
PROG
and the current preset number in the music
calendar start flashing.
3
Press
à
SEARCH
or
á
SEARCH
(
à
or
á
on the remote
control) to tune to the desired radio station.
•
To allocate the radio station to another preset number
,
rotate
í
JOG CONTROL
ë
(press
í
or
ë
on the
remote control).
4
Press YES to confirm the setting.
y
PROG
goes off, the preset number
, the waveband and
the frequency of the preset station are displayed.
•
To exit manual programming, press PROG (PROGRAM on
the remote control).
•
Use
í
JOG CONTROL
ë
(
í
or
ë
on the remote control)
until the preset number of the desired station is displayed.
Tuning to preset stations
Storing radio stations
Tuning to radio stations
English
DISPLA
Y
CDR
iR
S
EN
S
O
R
TU
N
ER
D
IG
IT
A
L
/ A
N
A
LO
G
AUX
CD TEXT
CLOCK
/TI
M
O
PE
N
/C
LO
S
E
M
IC
M
IC
L
E
V
E
L
C
D
-
T
E
X
T
E
D
IT
IN
G
ST
A
N
DB
Y
ON
CD
1
CD
2
CD
3
R
E
C
T
Y
P
E
E
D
IT
C
O
M
P
IL
E
C
D
FI
N
A
LI
Z
E
E
R
A
S
E
C
D
C
D
R
E
C
O
R
D
FW
-
R8
C
D
R
E
C
O
R
D
A
B
LE
M
IN
I
H
IF
I
S
Y
S
T
E
M
C
D
R
E
C
O
R
D
E
R
CLOCK/TIMER
27
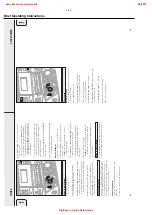
Manual clock setting
1
Press
y
ST
ANDBY ON as often as necessary o
n
th
e
un
it
t
o
switch the unit to standby
.
2
Press CLOCK/TIMER o
n
the unit.
3
Rotate
í
JOG CONTROL
ë
to select the clock.
y
Clock
is displayed and
X
starts blinking.
4
Press YES
to confirm the selection.
y
The day of the week digit blinks.
5
Rotate
í
JOG CONTROL
ë
to set the day
.
6
Use
à
SEARCH
or
á
SEARCH
on the unit
to move from
day of the week to hour
.
7
Rotate
í
JOG CONTROL
ë
to set the hour
.
8
Repeat steps 6 and 7 to set the minutes.
9
Press YES
to confirm the settings.
Clock setting
English
DISPLA
Y
CDR
iR
S
EN
S
O
R
TU
N
ER
D
IG
IT
A
L
/ A
N
A
LO
G
AUX
CD TEXT
CLOCK
/
TIMER
O
PE
N
/C
LO
S
E
M
IC
M
IC
L
E
V
E
L
C
D
-
T
E
X
T
E
D
IT
IN
G
ST
A
N
DB
Y
ON
CD
1
CD
2
CD
3
R
E
C
T
Y
P
E
E
D
IT
C
O
M
P
IL
E
C
D
FI
N
A
LI
Z
E
E
R
A
S
E
C
D
C
D
R
E
C
O
R
D
FW
-
R8
C
D
R
E
C
O
R
D
A
B
LE
M
IN
I
H
IF
I
S
Y
S
T
E
M
C
D
R
E
C
O
R
D
E
R
www.freeservicemanuals.info
2/4/2018
Digitized in Heiloo Netherlands

