background image

3139 116 20021

14

English

CD - VCD

Programming Tracks

Programming tracks of a loaded disc is
possible when playback is stopped. The
display will indicate the total tracks stored
in the program. Up to 99 tracks can be
stored in the memory in any order. When
99 tracks are stored and you attempt to
store another track, the display will show

PROGRAM FULL

”.

Note:
– Program cannot be used for VCDs when

PBC is switched on. Switch off PBC
before storing tracks from such a VCD.

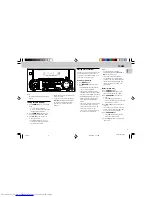
1

Load the desired discs in the disc trays.

2

Press the 

VCD

 (CD 1•2•3) button to

select the disc tray.

Programming can only be done on the
selected disc.

3

Press 

PROGRAM

 to start programming.

The


PROG

 flag starts flashing.

It will cancel any previously
programmed tracks and selected
repeat mode.

4

Press

í

 or 

ë


(or 

digit 0-9 

on the

remote control) to select the desired
track.

5

Press 

PROGRAM

 to store the track.

• Repeat steps 

4

 to 

5

 to store other

tracks.

6

Press 

Ç

 once to end programming.

The total number of tracks
programmed and total playing time
appear on the display.

Notes:
– If the total playing time is more than

99

:

59

” then “

--

:

--

” appears on the

display instead of the total playing time.

– During programming,  if no button is

pressed within 20 seconds, the system
will exit program mode automatically.

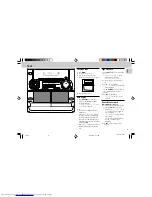
Reviewing the program

Reviewing of program is possible only
when playback is stopped.

1

Press 

í

 or 

ë

repeatedly to review

the programmed tracks.

2

Press 

Ç

 to exit review mode.

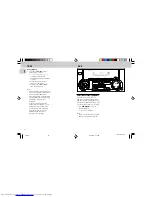
Playing the program

1

Press 

PLAY


ÉÅ

 to start program

playback.

"

PLAY PROGRAM

" will be

displayed.

The track number and elapsed
playing time of the current track will
appear on the display.

The 

PROG 

flags appear on the

display.

2

Press 

Ç

 to stop program playback.

Note:
– If you press any other CD DIRECT PLAY

buttons, the system will play the
selected disc or track and the stored
program will be cleared.

Erasing the program 

(when

playback is stopped)
• Press 

Ç

.

PROGRAM CLEARED

” will be

displayed.

Note:
– The program will be erased when the

system is disconnected from the power
supply, the system is switched to
standby mode, when you change source
or when you change the program disc.

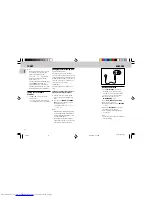
VIDEO CD

Adjusting the TV System

Before viewing the Video CD, ensure that
the set is switched to corresponding PAL or
NTSC system of your TV set 

(exception

Multi-system TV).

• Press and hold  

PAL/NTSC

 for more

than 

2 seconds

 to switch between PAL

or NTSC TV system.

After TV system is selected, the set
will automatically switch to the last
TV system setting everytime the VCD
source is selected.

OSD - On Screen Display

If you insert one or more VCDs/CDs, your
TV screen will serve as an additional
display for messages (e.g. PLAY, STOP), and
information stored on the VCD/CD.

• Press 

OSD

 on the remote control

repeatedly to switch ON or OFF.

When OSD is switched ON; you can see
the following display on the TV screen.

Untitled-1

31/05/2001, 11:35 AM

14

Summary of Contents for FW-V28

Page 1: ...3139 116 19201 Toll Free Help Line Ligne d assistance en service libre Linea de ayuda telefónica sin cargo 800 531 0039 Mini Hi Fi System FW V28 Untitled 1 31 05 2001 11 34 AM 1 ...

Page 2: ...rfect discs with the minimum disturbance to normal playing By effectively eliminating virtually all errors arising under normal playing conditions Super Error Correction ensures that the picture quality as seen by the user is independent of disc play The video encoding and processing during mastering of the disc and the MPEG 1 decoding and video encoding in the signal processing stages are now the...

Page 3: ...3 English 3139 116 xxxxx CLASS 1 LASER PRODUCT English 4 Untitled 1 31 05 2001 11 35 AM 3 ...

Page 4: ...3139 116 20021 4 English Untitled 1 31 05 2001 11 35 AM 4 ...

Page 5: ...r cord and plug it in again after a few seconds To disconnect the system from the power supply completely remove the AC power plug from the wall socket Accessories Supplied Remote control Batteries two AA size for remote control AM loop antenna FM wire antenna AC power cord One Video cinch cable Safety Information Before operating the system check that the operating voltage indicated on the typepl...

Page 6: ...r Connections AM ANTENNA A B C D VOLTAGE SELECTOR 110V 127V 220V 240V AUX IN R L E AUDIO OUT L R AC MAINS FM AERIAL 75Ω VOLTAGE SELECTOR 110V 127V 220V 240V VOLTAGE SELECTOR 220V 240V 110V 127V F W VIDEO OUT G Untitled 1 31 05 2001 11 35 AM 6 ...

Page 7: ...connect speakers with impedance lower than the speakers supplied Please refer to SPECIFICATION section of this manual PREPARATION D Connecting other equipment to your system You can connect the audio left and right OUT terminals of a TV VCR Laser Disc player DVD player or CD Recorder to the AUX IN terminals at the rear of the system E Video Out Connection Connect the VIDEO OUT terminal at the rear...

Page 8: ... Z Z R O CK TEC H N O DSC DISC 2 DISC 1 RECORD DUBBING A REPLAY VOLUME MICROPHONE LEVEL PAL NTSC 3 VCD ROTARY CHANGER SYSTEM 3 VCD ROTARY CHANGER SYSTEM CD SYNCHRO RECORDING CD SYNCHRO RECORDING VCD 3C H A N G E R 2 1 0 3 4 9 8 6 7 5 DBB DSC RESUME VOCAL Å É 1 3 2 4 6 5 7 9 8 VOLUME á à IS ë í Ç 0 2 TAPE 1 2 CD 1 2 3 VCD AUX TUNER MUTE OSD A B ZOOM KEY CONTROL SLOW PBC RETURN DIGEST ECHO Ö fl 4 º ª...

Page 9: ...nal source e g TV VCR Laser Disc player DVD player or CD Recorder MODE SELECTION SEARCH TUNING à á for VCD only to move the zoom picture to the left or right for VCD CD to search backward forward for TUNER to tune to a lower or higher radio frequency for TAPE to rewind or fast forward on tape for CLOCK to set the hour on the system only STOP CLEAR Ç for VCD CD to stop disc playback or to clear a p...

Page 10: ...emote control First select the source you wish to control by pressing one of the source select keys on the remote control e g VCD TUNER etc Then select the desired function É í ë etc CONTROLS OPERATING THE SYSTEM Important Before you operate the system complete the preparation procedures Demonstration mode The system has a demonstration mode that shows the various features offered by the system Wh...

Page 11: ...SE or DISC CHANGE button Switching the system to standby mode Press STANDBY ON or B on the remote control The system will switch to standby mode Selecting the Source Press the respective source selection button VCD TUNER TAPE or AUX The display indicates the selected source Note For an external source make sure you have connected the audio left and right OUT terminals of the external equipment TV ...

Page 12: ...E on the remote control to switch off the sound MUTE and the MUTE flag will be displayed Press MUTE again on the remote control or increase the VOLUME to switch on the sound Warning 1 This system is designed for conventional Discs Do not use any accessories such as disc stabilizer rings or disc treatment sheets etc which may damage the disc mechanism 2 Do not load more than one disc into each tray...

Page 13: ...ou press any button PLEASE WAIT will be displayed Disc Change You can change the outer two discs while the third inner disc is stopped or is playing 1 Press DISC CHANGE The disc carousel tray slides out 2 Replace the discs in the left and right disc trays If you press DISC CHANGE again during playback the disc will stop playing The disc carousel tray will rotate until the inner tray is rotated out...

Page 14: ... playback is stopped 1 Press í or ë repeatedly to review the programmed tracks 2 Press Ç to exit review mode Playing the program 1 Press PLAY É Å to start program playback PLAY PROGRAM will be displayed The track number and elapsed playing time of the current track will appear on the display The PROG flags appear on the display 2 Press Ç to stop program playback Note If you press any other CD DIRE...

Page 15: ... on the TV screen 2 PressÉ Å again to resume playback at normal speed Note Audio is muted in Slow mode Resume This feature is also applicable to audio CD 1 Press Ç to stop playback 2 Press RESUME on the remote control to start playback again from where you have stopped RESUME appears on the display Note Resume information is lost if you select another disc or the set is disconnected from the mains...

Page 16: ... playback the desired parts Press í or ë to digest the next track 2 Press digit 4 on the remote control to select EXIT DIGEST MENU Digest mode will be exited Vocal This feature allows you to fade out the original vocal from a karaoke VCD This feature is used together with Echo mode You can also use it to select the different audio modes STEREO same effect as the original recorded disc STEREO VOCAL...

Page 17: ... 2 Press PROGRAM for more than one second The PROG flag starts flashing and AUTO will be displayed The system will search for every available station in the FM waveband first then search the MW waveband All available stations will be stored automatically The frequency and preset number will be displayed briefly The system will stop searching when all the available radio stations are stored or when...

Page 18: ...kHz or vice versa Changing of tuning grid will erase all previously stored preset stations 1 Disconnect the system from the AC power supply pull out the AC power cord 2 Press and hold TUNER and TUNING á while reconnecting the system to the AC power supply Display will show GRID 10 or GRID 9 Notes GRID 9 indicates that the tuning grid is in step of 9 kHz in MW band GRID 10 indicates that the tuning...

Page 19: ... of playback for the selected side Then it will start playing again It will replay up to a maximum of 20 times until you press Ç When ONCE is selected the tape will play the selected side once and then stop Tape Playback 1 Press TAPE TAPE 1 2 to select TAPE mode TAPE 1 or TAPE 2 will be displayed and followed by T1 222 or T2 222 2 Load the tape into the selected tape deck 3 Press É to start playba...

Page 20: ...MICROPHONE LEVEL PAL NTSC CLOCK TIMER RETURN PBC TAPE AUX During playback Press and hold à or á until the desired passage is located T1 or T2 with 11 or 22 scrolling left or right will be displayed depending on which button is pressed During searching the sound is reduced to a low volume When you release à or á the tape continues playing Notes During rewinding or fast forwarding of a tape it is al...

Page 21: ...shoulder of the tape side that you want to protect If CHECK TAPE is displayed the protection tab has been broken Put a piece of clear adhesive tape over the opening Do not cover the Cr02 tape detection hole when covering the tab opening Recording the mixed sound One Touch Recording During microphone mixing you can record the mixed sound on a tape in tape deck 2 except dubbing mode For One Touch Re...

Page 22: ... recording The REC flag starts flashing Disc will start playback automatically 4 Press Ç to stop recording View Clock You can view the clock if it is set if the system is in Standby mode or when any sound source is selected VCD TUNER etc The clock will be displayed for about seven seconds Press CLOCK TIMER briefly 10 38 PM or 22 38 the current time in either 12 or 24 hour mode will be displayed de...

Page 23: ...isc or tape is loaded in the disc tray or tape deck 2 3 Press à or á on the system to set the hour for the timer to start 4 Press í or ë on the system to set the minute for the timer to start 5 Press CLOCK TIMER to store the start time The timer is now set The TIMER flag remains on the display At the preset time the timer will be activated The selected source will be played Notes During timer sett...

Page 24: ...2 kHz MW wave range 10 kHz 530 1700 kHz Tuning grid 9 10 kHz Number of presets 40 Antenna FM 75 Ω wire AM Loop antenna TAPE DECK Frequency range Chrome tape type II 80 12500 Hz 8 dB Normal tape type I 80 12500 Hz 8 dB Signal to noise ratio Chrome tape type II 52 dBA Normal tape type I 48 dBA Wow and flutter 0 4 DIN SPEAKERS System 2 way double port bass reflex Impedance 6 Ω Woofer 1 x 5 25 Tweeter...

Page 25: ...t the antenna Connect an external antenna for better reception The TV or VCR is too close to the stereo system Separate the stereo system from the TV or VCR Cannot tune to station Wrong tuning grid Switch to the correct tuning grid Maintenance Cleaning the Cabinet Use a soft cloth slightly moistened with a mild detergent solution Do not use a solution containing alcohol spirits ammonia or abrasive...

Page 26: ...g tape Tape deck door cannot open Power failure or AC power plug disconnect from the wall outlet during tape playback Reconnect the AC power plug and switch on the system again Lack of bass sound or apparently imprecise physical location of musical instruments Speakers are connected wrongly Check the speaker connection for proper phasing colored black wires to colored black terminals Remote contro...

Reviews: