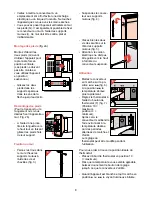
Mounting the stands
(fig. 2a)
Mount the two stands
(G) before using the
heater standing upright
for the first time.
(Do not mount the
stands if you wish to
use the heater hanging
on the wall.)
- Slide the two stands
into the special
holders in the
direction of the
arrows until “Click” is
heard.
Removing the stands
(For transport, storage
or wall-mounting.
Fig. 2b)
- Pull the lip a little
upwards using a pair
of pliers while sliding
the stand out of the
holder.
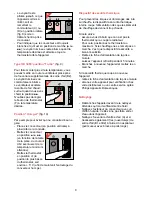
Wall-mounting
- Drill the holes and fix
the brackets to the
wall using screws and
rawlplugs (fig. 3).
- Slide the appliance
correctly onto the
brackets (fig. 4).
- Secure with the two
screws on the sides
of the brackets
(fig. 5).
• Please note: do not
lead the mains cord
upward at the back
side of the wall-
mounted heater.
Operation
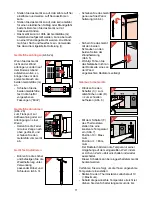
- Switch on by selecting
• or •• (fig. 6). Position
•• results in quicker
heating.
- Then set the
thermostat by means
of thermostat dial (F)
(fig. 7).
(Position 10 =
maximum,
position
y
y
=
minimum.)
Subsequently, the
heater will keep keep
the surrounding air at
the set temperature by
switching on and off at
intervals.
You may adjust the
thermostat during use.
To find the ideal thermostat setting for you:
- First set the dial to position 10 (= maximum).
- As soon as the temperature is comfortable, turn
down the thermostat knob slowly until the
heater goes off.
- When the appliance is connected to mains
power and switched on by selecting • or •• the
pilot light will come on.
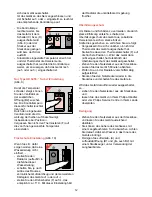
- The light will stay on
until the appliance is
switched off by setting
switch (C) or (D) back
into the original
position (fig. 8) or by
disconnecting from the
mains.
- To indicate that the
heater is still
connected and in
“switched-on” position (• or ••), the pilot light will
remain alight when the set temperature is
reached and the thermostat switches the
appliance off.
Type HD 3455: “Turbo”
position
(fig. 9)
To make the
temperature rise more
rapidly, you may switch
on the fan at the extra air
outlet opening (B2). The
pilot light in the switch
will come on.
6
7
3
4
HOT
S Y S T E M
1 5 0 0
DO NOT C
OVER NO
N COPRIR
E OVNEN
MÅ IKKE
TILDEKKE
S
NE PAS
COUVRIR
FÅR ICK
E ÖVERTÄ
CKAS
EI SAA PE
ITÄÄ NÃ
O COBRIR
NO CUB
RIR
NICHT BED
ECKEN N
IET BEDEK
KEN
1
2
2b
5
2a
5
9
8
Summary of Contents for HD 3454
Page 40: ...4222 000 91675 ...


