background image

6

EN

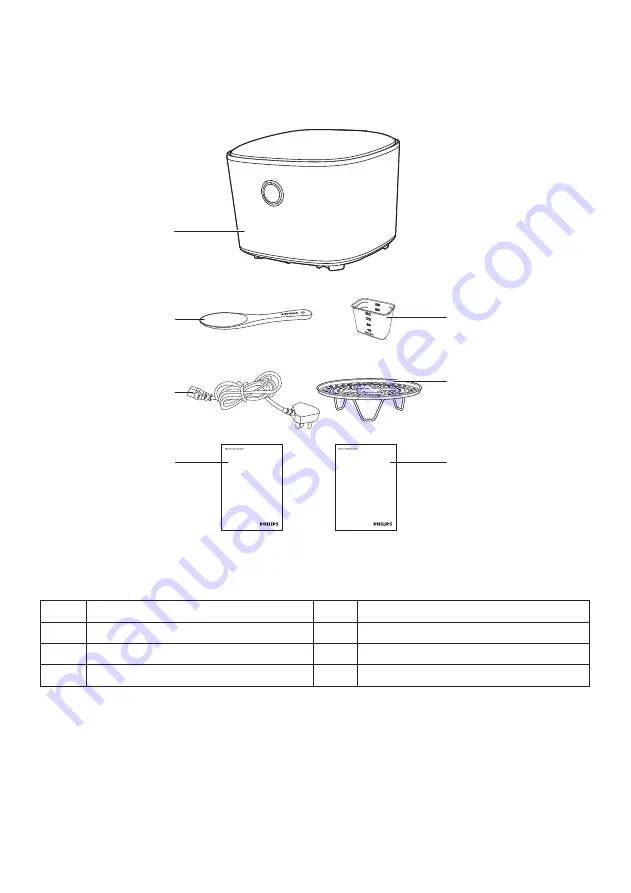
3  What’s in the box

a

Main unit

e

User manual

b

Rice Scoop

f

Steam rack

c

Power cord

g

Measuring cup

d

Warranty card

http://www.philips.com/welcome

用户手册

http://www.philips.com/welcome

保修卡

a

b

c

d

f

g

e

Summary of Contents for HD4566

Page 1: ...HD4566 User Manual Always there to help you Register your product and get support from Question Contact Philips www philips com welcome ...

Page 2: ...rice cooking 农家 饭 Country flavored rice cooking 粗粮 饭 Cooking grain 八宝饭 Eight treasure rice pudding 少量煮 Small portion rice cooking 菜饭 Cooking rice with food 13 煮粥 Cooking congee 杂粮粥 Cooking congee with grains 稀饭 Cooking gruel 煲汤 Making soup 慢炖 Slow cooking 14 煲仔饭 Claypot rice cooking 15 煮面 Cooking noodles 16 热饭 Reheating 17 Set the cooking time 18 Preset time for delayed cooking 18 Set up My Favori...

Page 3: ...3 EN 1 Your rice cooker Congratulations on your purchase and welcome to Philips To fully benefit from the support that Philips offers register your product at www Philips com welcome ...

Page 4: ...lips or similarly qualified persons in order to avoid a hazard The appliance is not intended to be operated by means of an external timer or a separate remote control system Check if the voltage indicated on the appliance corresponds to the local power voltage before you connect it Only connect the appliance to a grounded power outlet Always make sure that the plug is inserted firmly into the powe...

Page 5: ...netic substance on the lid Do not use the appliance near a magnetic substance Always let the appliance cool down before you clean or move it Always clean the appliance after use Do not clean the appliance in a dishwasher Always unplug the appliance if not used for a longer period If the appliance is used improperly or for professional or semiprofessional purposes or if it is not used according to ...

Page 6: ...6 EN 3 What s in the box a Main unit e User manual b Rice Scoop f Steam rack c Power cord g Measuring cup d Warranty card http www philips com welcome 用户手册 http www philips com welcome 保修卡 a b c d f g e ...

Page 7: ...ew Product overview a Control panel f On Off switch b Top lid g Power socket c Detachable inner lid h Main unit d Inner pot i Water level indications e Lid release button j Detachable steam valve b a d c e f g h j i ...

Page 8: ...cooking c Warm off g Menu Child lock d My favorite h Slider bar for menu selection Note 升温吸水 heat up and absorb water 淀粉溶出 dissolution of starch 淀粉糊化 gelatinization of starch 吸水扩张 absorb water and expand 加速膨胀 accerate the expand speed 浸润保水 reserve water are the six stages for rice cooking a b c d h g f e ...

Page 9: ...s to avoid liquid in the inner pot being ejected from the steam vent Before first use 1 Take out all the accessories from the inner pot and remove all packaging materials of it 2 Clean the parts of the appliance thoroughly before using it for the first time see chapter Cleaning and Maintenance Note Make sure all parts are completely dry before you start using the appliance There is an on off switc...

Page 10: ...香糯 45 mins N A Chewy 劲道 35 mins Fluffy 松软 40 mins 糙米 Sticky 香糯 80 mins N A Chewy 劲道 60 mins Fluffy 松软 70 mins 1 Measure some rice with the provided measuring cup 2 Rinse rice and put the washed rice in the inner pot 3 Add water to the level indicated on the scale inside the inner pot that corresponds to the number of cups of rice used Then smooth the rice surface For instance if you cook 4 cups of...

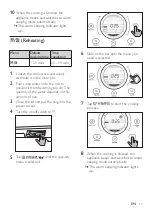
Page 11: ... and brown rice follow the water level indication of the northeast rice 4 Wipe off water outside of the inner pot and put it into the appliance Note Make sure that the outside of the inner pot is dry and clean and that there is no foreign residue on the inside of the appliance 5 Close the lid and put the plug into the power socket 6 Turn the on off switch to I 7 Tap and you can start with the defa...

Page 12: ...When the cooking is finished the appliance beeps and switches to warm keeping mode automatically The warm keeping indicator lights up Tip After the cooking is finished stir the rice and loosen it immediately to release excessive moisture for fluffy rice Note Depending on the cooking conditions rice on the bottom may become slightly browned ...

Page 13: ...evel indicated on the scale inside the inner pot that corresponds to the number of cups of rice used Then smooth the rice surface 3 Wipe off water outside of the inner pot and put it into the appliance 4 Close the lid and put the plug into the power socket 5 Turn the on off switch to I 6 Tap until the specialty menu is selected 7 Slide on the bar until the menu you need is selected 8 Tap to start ...

Page 14: ...hrs 杂粮粥 90 mins 1 4 hrs 稀饭 90 mins 1 4 hrs 煲汤 2 hrs 1 4 hrs 慢炖 4 hrs 3 6 hrs 1 Put the ingredients in the inner pot 2 Wipe off water outside of the inner pot and put it into the appliance 3 Close the lid and put the plug into the power socket 4 Turn the on off switch to I 5 Tap until the specialty menu is selected 6 Slide on the bar until the menu you need is selected 7 Tap to start the cooking pr...

Page 15: ...ooking process 5 When the rice is ready the appliance beeps 6 Add the ingredients for the claypot rice by placing them on top of the rice Coat the inner pot with some cooking oil Close the lid to resume the cooking process 7 When the cooking is finished the appliance beeps and switches to warm keeping mode automatically The warm keeping indicator lights up Note Depending on the cooking conditions ...

Page 16: ...need is selected 7 Tap to start the cooking process 8 The timer starts counting down when the water is brought up to boil 9 Open the lid and put noodles into the inner pot Note To avoid overflow or to keep the noodles from sticking together constantly stir the noodles during cooking Do not exceed the maximum water level indication when cooking noodles After the noodles are put in the inner pot kee...

Page 17: ...r pot 2 Pour some water onto the rice to prevent it from becoming too dry The quantity of the water depends on the amount of rice 3 Close the lid and put the plug into the power socket 4 Turn the on off switch to I 5 Tap until the specialty menu is selected 6 Slide on the bar until the menu you need is selected 7 Tap to start the cooking process 8 When the cooking is finished the appliance beeps a...

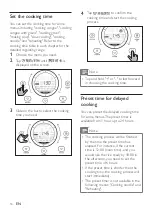
Page 18: ...he cooking process Note Tap and hold or to fast forward in choosing the cooking time Preset time for delayed cooking You can preset the delayed cooking time for some menus The preset timer is available from 1 hour up to 24 hours Note The cooking process will be finished by the time the preset time has elapsed For instance if the current time is 12 00 noon time and you would like the rice ready by ...

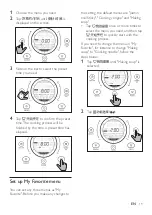
Page 19: ...p My Favorite menu You can set any three menus as My Favorite Before you make any changes to the setting the default menus are Jasmin rice Sticky Cooking congee and Making soup Tap once or more times to select the menu you need and then tap to quickly start with the cooking process If you need to change the menu in My Favorite for instance to change Making soup to Cooking noodle follow the steps b...

Page 20: ...menu Follow the same logic to change the other menus in My Favorite Set up child lock To protect your child from using the appliance or to avoid unexpected operations during cooking you can set up the child lock function 1 Tap for 3 seconds to activate child lock 3秒 The child lock icon appears on the display screen Apart from all the other selections are disabled To unlockthe appliance press and h...

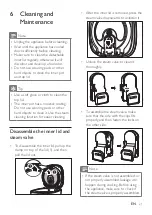
Page 21: ...her hard objects to clean it Use the steam cleaning function for easier cleaning Disassemble the inner lid and steam valve To disassemble the inner lid pull up the clamp on top of the lid 1 and then pull the lid out After the inner lid is removed press the steam valve downwards to unfasten it Unlock the steam valve to clean it thoroughly To assemble the steam valve make sure that the side with the...

Page 22: ...r Wipe with a cloth damped with soap water Only use soft and dry cloth to wipe the control panel Make sure to remove all the food residues on the top lid Accessories and inner pot Rice scoop steam rack and inner pot Soak in hot water and clean with sponge Note Do not place spoons bowls or any other object in the inner pot that may damage the nonstick coating Clean the inner pot immediately if seas...

Page 23: ...ou can help to preserve the environment 8 Guarantee and service If you need service or information or if you have a problem visit the Philips website at www philips com tw or contact the Philips Customer Care Center in your country You can find its phone number in the worldwide guarantee leaflet If there is no Customer Care Center in your country go to your local Philips dealer ...

Page 24: ...24 EN 9 Specifications Model Number HD4566 Rated power output 1500W Rated capacity 4 0L ...

Page 25: ... Using the ultra quick rice cooking menu setting may result in harder rice This is normal Check if the inner pot is deformed There is not enough water Add water according to the scale on the inside of the inner pot Make sure that there is no foreign residue on the inside of the appliance and the outside of the inner pot before switching the appliance on The rice is scorched Check if there are food...

Page 26: ... result I tap but there is no response Check if the power supply is working Check if the power cord power plug and power socket are well connected Check if the on off switch at the lower right side is at the I position Make sure to follow the instructions in the user manual If you cannot resolve the problem do not disassemble the appliance Take the appliance to your Philips dealer or a service cen...

Page 27: ...lips Boil dry protection E14 displays on the screen Check if there is no water or very little water in the inner pot Check if the inner pot is overheated During the cooking process if the appliance boils dry the boil dry protection will be activated This is normal Switch off the appliance when the error code displays unplug the appliance and take out the inner pot When the inner pot and appliance ...

Page 28: ... 2014 Koninklijke Philips N V HD4566_UM_EN_for_China_v1 0 ...

Reviews: