background image

HD6596/50/G /51/G

4-18

Disassembly- and Reassembly advice

Make sure the appliances cordset is disconnected from the mains!

To open the appliance, remove all detachable parts:  Water container, driptray and cover, pod holder and collector.

1. 

To reach the brew chamber.

1.1. 

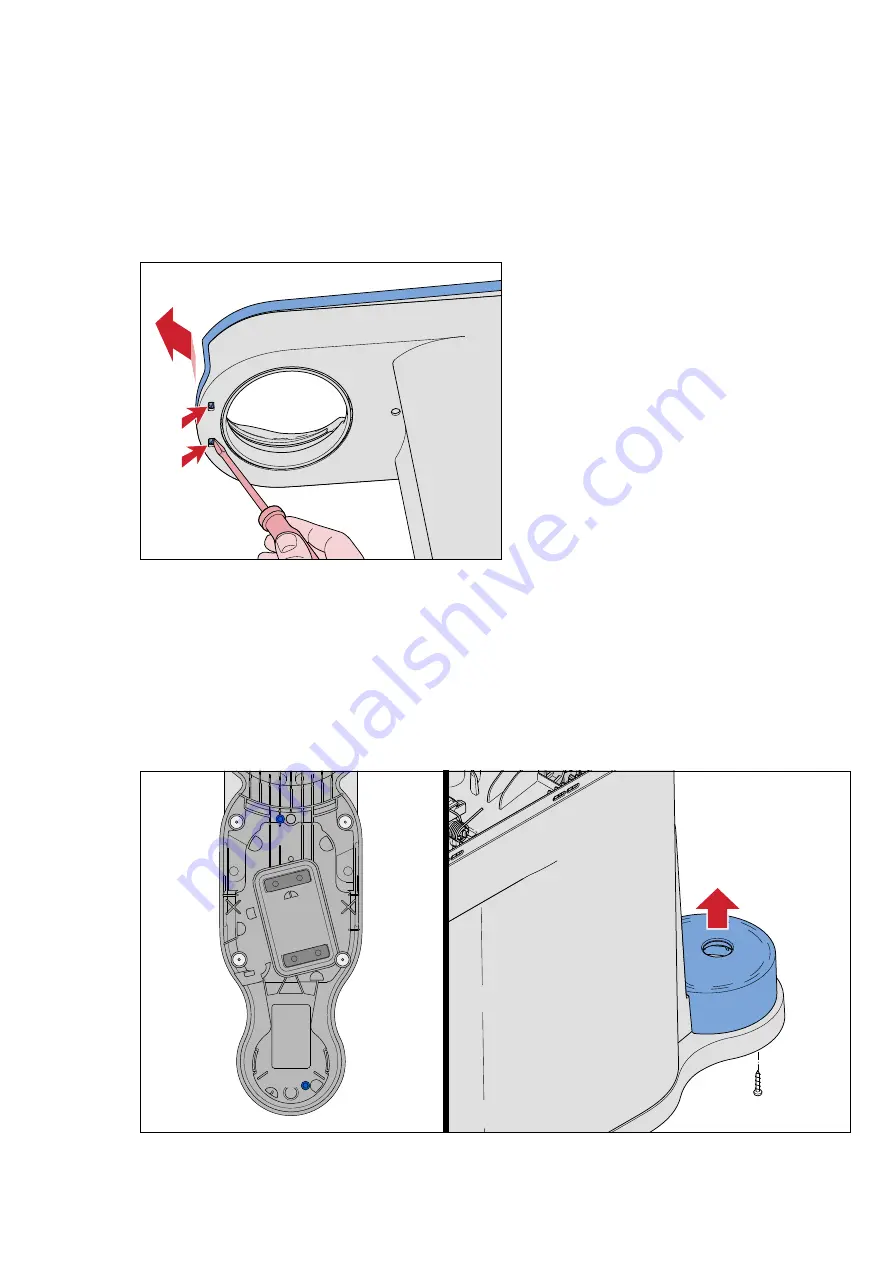
Open the top cover.

To open the top cover the brew chamber needs to be unlocked.  Start at the back side of the top cover, using a 

plastic tool, and trace along the parting line of the top cover, undoing all the snaps.  There are two small snaps on 

the front lower side of the brew chamber, undo them with a small fl athead screwdriver (No. 0)

The top cover needs to be tilted forward to be removed.  The fl at cable 

W

 from the main PCBA to the UI PCBA is still 

attached to the User Interface panel, and can easily be unplugged.

The brew chamber can now be removed by unscrewing the two screws (

C

, T15), and undoing the hose connection 

(

g

) from the one way valve.


2. 

To reach internal components like Boiler or Pump.

2.1. 

Remove the screw (

A

, T15) from the bottom side of the appliance.

2.2. 

Remove the screw (

B

, T15) from the bottom side of the appliance to remove the back plate and undo the hose 

connection (

g

) from the one way valve (if not done so already).

The socked tube (

a

) is still connected to the water container socket, and can easily be pulled off .

B

B

A

Summary of Contents for HD6596/50/G

Page 1: ... º Packaging 466 x 242 x 322 mm º Product 150 x 400 x 270 mm Weight º Incl packaging 2 4 kg º Product 1 75 kg Functions º Crema improvement º Strength select only for HD6592 HD6596 Materials º Podholder Stainless steel º Podholder handle PP º Top collector Podholder spouts POM º Housing Driptray cover Back plate ABS º Driptray cover Stainless steel only for HD6596 º Water container SAN º Water con...

Page 2: ...122 ml 74 C 76 C French Spanish version 100 ml 69 C 73 C Jug temperature specification C Directly after brew Keep warm 30 minutes after brew Measured in full Jug 7 cups 78 C 74 C Water specification in mL without coffee pod 1 cup ml with 1 cup pod holder 2 cup ml with 1 cup pod holder General version normal cup 122 ml 133 10 266 10 French Spanish version normal cup 100 ml 109 20 218 20 All countri...

Page 3: ...l information User interface layout x 2 x 1 x 2 x 1 Electical diagram P NTC Fuse Fuse TCO Water level sensor N E L Boiler Pump UI PCBA Main PCBA t Functional diagram Boiler Pump 1 way valve Brew head g h e d f c b a Water Container ...

Page 4: ...r undo them with a small flathead screwdriver No 0 The top cover needs to be tilted forward to be removed The flat cable W from the main PCBA to the UI PCBA is still attached to the User Interface panel and can easily be unplugged The brew chamber can now be removed by unscrewing the two screws C T15 and undoing the hose connection g from the one way valve 2 To reach internal components like Boile...

Page 5: ... the electrical connections and hoses and reinstall in the reverse order Make sure before placing the housing part back that the Hall sensor WLI cable is routed correctly Therefore when re assembling make sure the routing of the WLI cable is according the picture see red arrows for the attention points how to dress the cable Arrow C make sure the white NTC cable is pushed inside by the WLI sensor ...

Page 6: ...inegar or Hydrochloric acid These descaling agents may damage your SENSEO coffee machine For detailed instructions please refer to the Directions For Use chapter CALC Note HD659x the descaling routine has changed to 2x descale cycles and 2x flushing cycles Intensity select The new PCBA 03 2018 onwards has an extra feature onboard Intensity select which need to be enabled for the following type num...

Page 7: ...ing cause e g User programmable volume leakage incorrect voltage setting etc for the deviation in volume from the factory default Every time a PCBA is replaced for whatever reason the 1 cup 2 cup setting both need to be separately adjusted calibrated There is no country selection option therefore adjust both 1 cup 2 cup recipes within the right volumes following the table page 2 If the Intensity s...

Page 8: ...isabled HD7892 HD6591 1 cup LED is on 2 cup LED is off Intensity select enabled HD6592 HD6596 1 cup LED is off 2 cup LED is on 7 Check press the desired button following the above table for the desired state 8 Press and release the 1 cup and 2 cup button at the same time to store the value the 1 cup and 2 cup LEDs blink rapidly 3 times 9 If the Intensity selection is disabled 1 cup LED has being s...

Page 9: ...he 1 cup button d Heater turns off 1 cup LED remain on 3 Test step 3 2 cup button 2 cup LED and pump a Press the 2 cup button and hold it b 2 cup LED and pump turn on Other LEDs and the heater are off c Release the 2 cup button d Pump turns off 2 cup LED remain on 4 Test step 4 Test temperature sensor and descale LED a Press the 1 cup button and hold it b The descale LED turns on Other LEDs and th...

Page 10: ... 100 70806 Jug lid Deep black 9 4222 247 75141 Coffee spoon 10 4222 259 65932 Water container assy incl Lid 1010 Water container lid 1020 Valve seal 1030 Valve spring 1040 Valve rod 1050 Float spring 1060 Float assy 1070 Water container Transparent 11 4222 259 60072 Check valve assy 12 4222 259 69631 Housing Beluga 13 4222 247 59473 Sensor housing 14 4222 259 69661 Top cover assy SS printed Deep b...

Page 11: ... Switch OPR IS 220 240 V 20 4222 247 08101 L bend 21 4222 240 02041 Hose clamp D 9 1 mm 22 4222 259 61291 Pressure hose assy 23 4222 247 75502 Base plate Fusion black 24 4222 247 72551 Suspension bracket 25 4222 244 50693 Tie wrap Boiler 26 4222 259 37244 Pump ULKA HF 230 V 50 Hz 27 4222 247 43690 Boiler pin cover 28 Hose valve assy 29 4222 247 75271 TCO cover OPR 30 4222 259 65481 Boiler assy OPR...

Page 12: ...HD6596 50 G 51 G 12 18 110 120 3 4 5 210 220 1 2 Exploded view ...

Page 13: ...HD6596 50 G 51 G 13 18 8 9 6 7 610 620 Exploded view ...

Page 14: ...HD6596 50 G 51 G 14 18 1060 1050 1030 1020 1070 1040 10 1010 Exploded view ...

Page 15: ...HD6596 50 G 51 G 15 18 a B A g C C W g f V 13 11 1460 1420 1430 1440 1450 1410 14 1530 1510 1520 15 12 Exploded view ...

Page 16: ...HD6596 50 G 51 G 16 18 h g 1790 1770 1750 1760 2x 1780 1720 1710 17120 17130 17140 1730 1740 16 17100 17 17110 Exploded view ...

Page 17: ...HD6596 50 G 51 G 17 18 R S T Restrictor U U W V Y X 19 20 21 22 23 D Z D 18 26 c b a Z Y X 31 34 33 2x 32 4x 24 25 d e f R T S 29 27 28 30 3040 3020 Exploded view ...

Page 18: ...HD6596 50 G 51 G 18 18 Version history 18 02 Version 1 1 HD6596 50 G HD6596 51 G initial release ...

Reviews: