The Language Support Tool
4
-
68
Removal and Replacement
z
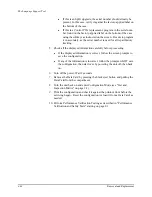
If this is an SpO
2
upgrade, the serial number should already be
present. In this case, verify it against the factory-applied label on
the bottom of the case.
z
If this is a Control PCA replacement, program in the serial num-
ber found on the factory-applied label on the bottom of the case
using the softkeys as instructed on the screen. Be sure to program
it in accurately, as the serial number is used for all repair history
tracking.
5. Check all the displayed information carefully before proceeding.
z
If the displayed information is correct, follow the screen prompts to
save the configuration.
z
If any of the information is incorrect, follow the prompts to NOT save
the configuration, then start over by powering the unit off, then back
on.
6. Turn off the power. Wait 2 seconds.
7. Remove the Data Card by pressing the black eject button and pulling the
Data Card from the compartment.
8. Turn the unit back on and enter Configuration Mode (see "Test and
Inspection Matrix" on page 2-3).
9. Print the configuration and check it against the printout from before the
servicing began. Reset the configuration (or load it from a Data Card) as
needed.
10. Perform Performance Verification Testing as described in "Performance
Summary of Contents for Heartstart XLT
Page 1: ...H E A R T S TA R T X LT S e r v i c e M a n u a l M 3 5 0 0 B M 5 5 0 0 B ...
Page 2: ......
Page 3: ...Service Manual M3500B HeartStart XLT M5500B Heartstart 4000 Defibrillator Monitor ...
Page 6: ......
Page 16: ......
Page 20: ......
Page 52: ......
Page 216: ......
Page 223: ......
Page 224: ...M3500 90900 Printed in USA February 2003 Second Edition M3500 90900 2 ...


