Press the middle selection wheel (SET) to confirm.
The minute indication starts to flash (Fig. 15).
Turn the middle selection wheel (SET) to select the minutes.
5
Press the middle selection wheel (SET) to confirm or wait for a few seconds.
The appliance leaves the menu and the display shows the clock time.
The alarm time is now set.
switching off the alarm
To switch off the alarm function, push up the control lever to the top position.
setting the alarm sound
See section ‘Menu functions of middle selection wheel (SET)’ above.
You can choose one of the following sounds:
Radio (Fig. 16)
Birds (Fig. 17)
Beep (Fig. 18)
African jungle (Fig. 19)
Wind chimes (Fig. 20)
snoozing
1
Push down the control lever to the bottom position when the alarm goes off. (Fig. 1)
The lamp continues to be on at the selected intensity level, but the alarm sound stops. After
9 minutes, the wake-up sound is automatically played again.
Note: The 9-minute snooze time is fixed. This time cannot be adjusted.
Note: If you push down the control lever with too much force, it may jump back to off position.
alarm demonstration
During the alarm demonstration the appliance performs an accelerated wake-up procedure. This
means that you see a rapid increase of the light intensity to the selected level and you hear the
selected sound increase rapidly to the selected level.
1
Push the control lever down to the bottom position for a few seconds until TEST appears on
the display (Fig. ).
Push the control lever down again to stop the demonstration.
Note: The appliance continues to run the alarm demonstration until you push down the control lever
again. The test automatically stops after 9 hours.
cleaning and maintenance
Never use scouring pads, abrasive cleaning agents or aggressive liquids such as petrol or acetone
to clean the appliance.
Regularly remove dust from the outside of the appliance with a dry cloth.
1
Unplug the appliance before you clean it.
Clean the outside of the appliance with a dry cloth.
Do not let water run into the appliance or spill water onto the appliance (Fig. ).
,
,
-
-
-
-
-
,
EnglisH
10
Summary of Contents for HF3476/01
Page 1: ...HF3476 HF3475 ...
Page 2: ... ...
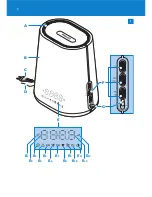
Page 3: ... A E E1 E3 E5 E7 E9 E11 E13 E2 E4 E6 E8 E10 E12 F G B C D 1 ...
Page 4: ... ...
Page 104: ...104 ...
Page 105: ...105 ...
Page 106: ...106 2 3 For indoor use only 4 5 6 7 8 9 10 11 12 13 14 15 16 17 18 19 20 21 ...
Page 107: ...107 22 23 ...
Page 108: ...4222 002 7080 1 ...


