background image

 4 

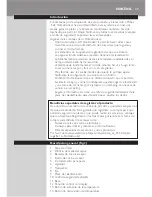
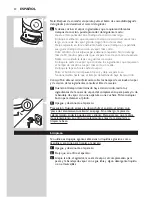
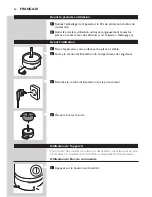
 Repase la base y la placa de calentamiento con un paño húmedo. 

Peligro: Nunca sumerja la base en agua ni la enjuague bajo el grifo. 

Tampoco la limpie en el lavavajillas. 

Precaución: Mantenga siempre la placa de calentamiento seca, ya que la 

humedad y el vapor conducen a la formación de óxido. 

 5 

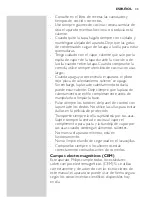
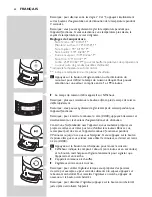
 Retire el anillo de seguridad de vez en cuando para limpiar a fondo. 

Limpie el anillo de seguridad con un paño húmedo. 

Nunca retire el anillo de seguridad mientras la placa de calentamiento 

esté caliente. 
Precaución: Nunca limpie el anillo de seguridad en el lavavajillas. 

 6 

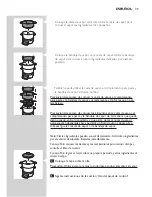
 Seque todas las piezas del aparato con un paño. 

Nota: Si hay depósitos de cal en la placa de calentamiento, elimínelos con 

vinagre de vino (4 % de ácido acético). A continuación limpie los restos de 

vinagre con un paño suave humedecido con agua limpia.

almacenamiento

 1 

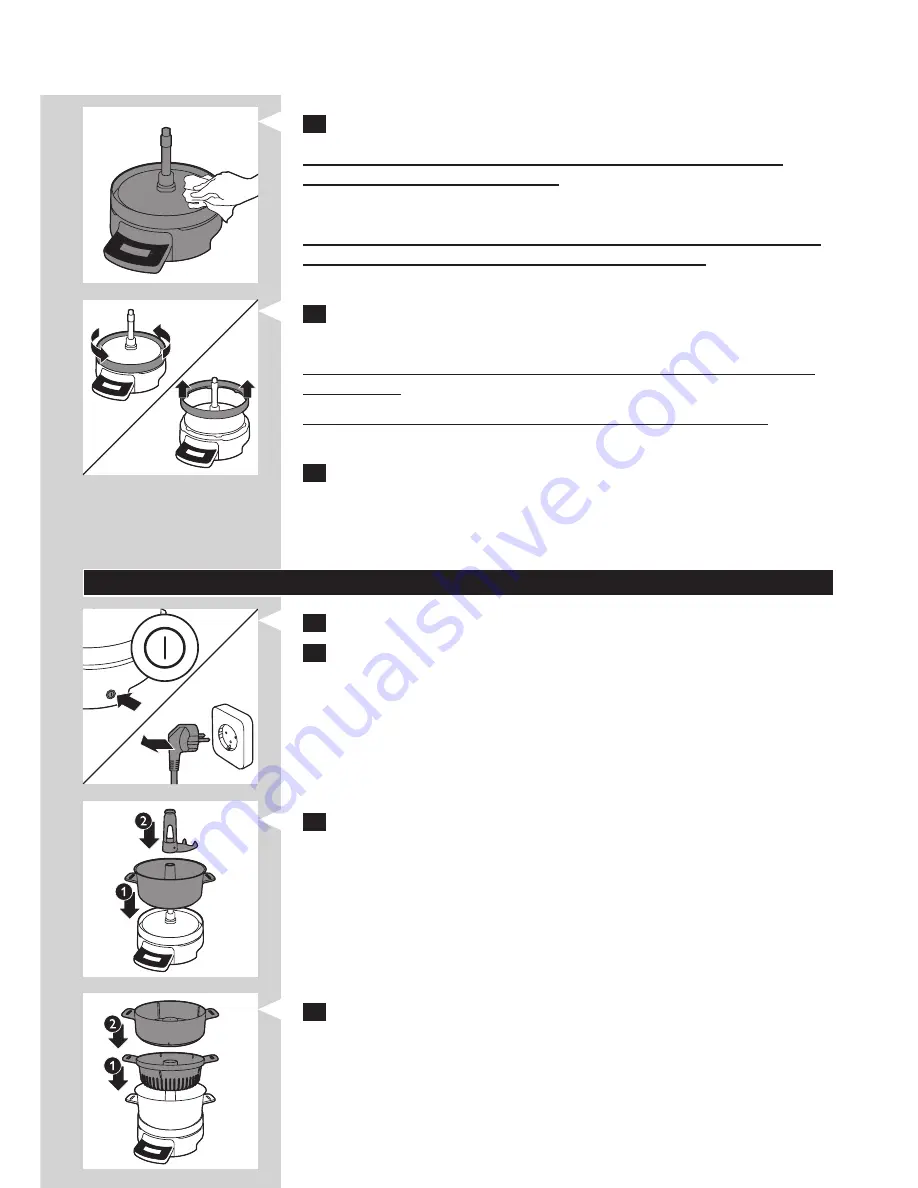
 Apague y desconecte el aparato.

 2 

 Deje que se enfríe el aparato.

 3 

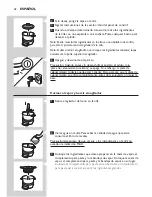
 Coloque la olla en la base (1) y coloque el agitador en el cono (2).

 4 

 Coloque el complemento para pasta en la olla (1) y ponga la cesta de 

vapor sobre él (2).

Español

51

Summary of Contents for HomeCooker HR1040

Page 1: ...Always there to help you Register your product and get support at www philips com welcome HR1040 ...

Page 2: ......

Page 3: ...1 ...

Page 4: ......

Page 5: ...HR1040 English 6 Deutsch 22 Español 39 Français 55 Italiano 71 Nederlands 87 ...

Page 6: ...ith you and cook anywhere you have electricity and a wall socket e g at a campsite in a summer house or on your patio Safe The HomeCooker has a safety ring around the heating plate to prevent finger burning Special benefits of product registration You have bought a culinary tool for life and we want to ensure that you remain satisfied We would like you to register your purchase so that we can stay...

Page 7: ...rated by means of an external timer or separate remote control system Do not use the appliance if the plug the mains cord or other parts are damaged If the mains cord is damaged you must have it replaced by Philips a service centre authorised by Philips or similarly qualified persons in order to avoid a hazard The appliance can be used by children aged 8 or above and by persons with reduced physic...

Page 8: ... Keep long hair jewelry loose clothing etc away from the stirrer The temperature of accessible surfaces is high when the appliance is operating Overheated oil and fat may catch fire Caution This appliance is intended for normal household use only It is not intended for use in environments such as staff kitchens of shops offices farms or other work environments Nor is it intended to be used by clie...

Page 9: ... first Do not exceed the MAX indication on the pot 3 litres Always make sure that the steaming slots in the steaming baskets and steaming tray are free from fat food remnants and dirt Only use a moist cloth to clean the base Never let the appliance operate when the pot is empty Always use the lid when you want to steam food Consult the recipe book for the correct quantities and cooking times Alway...

Page 10: ...ndled properly and according to the instructions in this user manual the appliance is safe to use based on scientific evidence available today Overheat protection The HomeCooker is equipped with overheat protection If the appliance overheats it switches off automatically Unplug the appliance and let it cool down to ambient temperature Then put the mains plug back into the wall socket and press the...

Page 11: ... it goes into standby mode to save energy In this mode the start pause button flashes every 10 seconds If you want to switch the appliance back on press the start pause button Note If the appliance is still hot but is cooling down it goes into standby mode to save energy The heating plate hot light lights up as long as the plate is hot If you want to switch the appliance back on press the start pa...

Page 12: ...ture on the display stops flashing The appliance maintains the set temperature while you can do something else Note Due to the different ambient temperature it might happen that the temperature display starts flashing again Note If you press the temperature increase and decrease buttons briefly at the same time the temperature is reset to zero Note If you press the temperature increase and decreas...

Page 13: ... have become more familiar with the appliance and when you want to prepare your own recipes you can also use it without setting the timer In that case the time starts counting up from zero and the appliance continues to operate for 99 minutes or until you switch it off yourself If you press the pause button while cooking without setting the timer the timer is reset to 00 00 4 Press the start pause...

Page 14: ... the stirrer in the pot before you add the ingredients 2 Put the ingredients you want to prepare in the pot If necessary add water e g to cook potatoes Caution Make sure the ingredients in the pot do not exceed the MAX indication Note Certain ingredients may cause discolouration If you spill ingredients on the outside of the appliance wipe away the spills immediately Tip For cooking times and temp...

Page 15: ... ingredients you want to prepare in the steaming basket the pasta insert and or the steaming tray Put the steaming basket the pasta insert and the steaming tray in place Put the pasta insert in the pot Use the pasta insert to steam large ingredients Put the steaming basket on the pot Use the steaming basket to steam smaller ingredients Put the steaming tray in the steaming basket Use the steaming ...

Page 16: ... After you have switched on the appliance press the stirrer on off button to deactivate the stirrer motor 6 If you want to steam ingredients that require different steaming times you can do this in the following way Set the timer to the longest steaming time Put the food that requires the longest steaming time in the large steaming basket according recipe book Let the appliance operate until the t...

Page 17: ...nd some washing up liquid or in the dishwasher 4 Wipe the base and the heating plate with a moist cloth Danger Never immerse the base in water nor rinse it under the tap Do not clean it in the dishwasher either Caution Always keep the heating plate dry as dampness and steam lead to rust formation 5 Remove the safety ring from time to time for extra thorough cleaning Wipe the safety ring with a moi...

Page 18: ...Put the pasta insert in the pot 1 and put the steaming basket on the pasta insert 2 5 Put the steaming tray in the steaming basket 1 and put the lid on the steaming basket 2 6 Push the mains cord into the cord storage compartment 7 Store the appliance on a dry flat and stable surface preferably on the working top in your kitchen English 18 ...

Page 19: ...faulty materials and poor workmanship will be repaired or the product will be replaced at Philips expense provided that convincing proof of purchase is provided Replacement products and repaired parts are guaranteed for the remaining time of the guarantee or a period of six months whichever is longer The guarantee does not apply to any defect that results from an accident misuse improper maintenan...

Page 20: ...tray you can easily prepare ingredients with different steaming times see chapter Using the appliance section Steaming and boiling without stirrer You put too much food in the steaming baskets and on the steaming tray Make sure you put the food in the steaming baskets and on the steaming tray in such a way that there is some space between the pieces and that some of the steaming slots stay clear t...

Page 21: ...easant smell or even smoke when they get warm during the first uses This phenomenon stops after you have used the appliance a few times The stirrer blocks You put too many ingredients in the pot Remove the ingredients and give the stirrer a light push Do not overload the pot During roasting a piece of meat got stuck on the bottom of the pot Give the stirrer a slight push The message Err appears on...

Page 22: ...mitnehmen und verwenden können wo Strom und eine Steckdose verfügbar sind z B am Campingplatz im Ferienhaus oder auf derTerrasse Sicher Der HomeCooker weist einen Sicherheitsring um die Heizplatte auf derVerbrennungen am Finger verhindert BesondereVorteile der Produktregistrierung Sie haben sich für ein kulinarisches Werkzeug fürs Leben entschieden Wir möchten dass Sie auch weiterhin zufrieden ble...

Page 23: ...ob die Spannungsangabe auf dem Gerät mit der örtlichen Netzspannung übereinstimmt Schließen Sie das Gerät nur an eine geerdete Steckdose an Bedienen Sie das Gerät nicht über einen externen Timer oder ein separates Fernbedienungssystem Dieses Gerät ist nicht dafür geeignet über einen externenTimer oder ein separates Fernbedienungssystem gesteuert zu werden Benutzen Sie das Gerät nicht wenn der Netz...

Page 24: ...en Halten Sie hinter dem Gerät und an beiden Seiten mindestens 10 cm Platz frei um eine optimale Funktion des Geräts zu gewährleisten Stellen Sie keine Gegenstände in die Nähe des Geräts wenn dieses in Betrieb ist Wickeln Sie das Netzkabel stets vollständig ab bevor Sie das Gerät einstecken Betreiben Sie das Gerät nicht ohneTopf auf dem Aufheizsockel Das Gerät wird sehr heiß und behält noch lange ...

Page 25: ...es Zubehör benutzen erlischt die Garantie Verwenden Sie denTopf nur zusammen mit dem Original Aufheizsockel Verwenden Sie denTopf nicht auf einem Induktionskochfeld Herd oder anderen Kochgerät Verwenden Sie den Dampfkorb den Nudeleinsatz und die Dampfschale nur zusammen mit dem Original Aufheizsockel und Topf Verwenden Sie zur Abdeckung desTopfes Dampfkorbs oder Nudeleinsatzes ausschließlich den m...

Page 26: ...cht Während des Kochens kann heißer Dampf aus dem Dampfventil im Deckel oder beim Öffnen des Deckels aus demTopf entweichen Verwenden Sie zum Prüfen der Zutaten immer Utensilien mit langen Griffen Wenn Sie das Gerät ausschalten bzw ausstecken erlischt die rote Anzeigeleuchte Heizplatte heiß Die Heizplatte kann jedoch noch heiß sein Lassen Sie die Heizplatte immer vollständig abkühlen bevor Sie den...

Page 27: ...ecker aus der Steckdose und lassen Sie das Gerät auf Zimmertemperatur abkühlen Stecken Sie anschließend den Stecker wieder in die Steckdose und schalten Sie das Gerät mit dem Ein Ausschalter erneut ein Vor dem ersten Gebrauch 1 Entfernen Sie sämtlicheVerpackungsmaterialien vom Gerät sowie die Schutzfolie vom Bedienfeld 2 Reinigen Sie vor dem ersten Gebrauch des Geräts gründlich alle Teile die mit ...

Page 28: ...tet die Start Pausetaste alle 10 Sekunden auf Wenn Sie das Gerät wieder einschalten möchten drücken Sie die Start Pausetaste Hinweis Wenn das Gerät noch heiß ist aber gerade abkühlt wechselt das Gerät in den Standby Modus um Energie zu sparen Die Anzeige Heizplatte heiß leuchtet solange die Platte heiß ist Wenn Sie das Gerät wieder einschalten möchten drücken Sie die Start Pausetaste Hinweis Wenn ...

Page 29: ...zierung derTemperatur kurz gleichzeitig drücken wird dieTemperatur auf Null zurückgesetzt Hinweis Wenn Sie dieTasten zur Erhöhung und Reduzierung derTemperatur drei Sekunden lang gleichzeitig drücken können Sie zwischen C und F wechseln Hinweis Sie können dieTemperatur auch während des Betriebs anpassen Wenn Sie eine höhereTemperatur einstellen beginnt dieTemperaturanzeige erneut zu blinken Temper...

Page 30: ...n zu garen oder etwas zu dämpfen drücken Sie den Ein Ausschalter des Rührarms Um den Rührarm wieder zu aktivieren drücken Sie den Ein Ausschalter des Rührarms erneut Hinweis Um den Rührarm zu deaktivieren drücken Sie den Ein Ausschalter des Rührarms direkt nach dem Einschalten des Geräts 5 Wenn Sie den Garvorgang unterbrechen möchten drücken Sie die Start Pausetaste Die Start Pausetaste leuchtet u...

Page 31: ... Befolgen Sie die Anweisungen im Abschnitt Das Bedienfeld verwenden 5 Wenn die eingestellte Zeit verstrichen ist nehmen Sie die Zutaten mit einem Pfannenwender oder einem Löffel aus dem Topf Drücken Sie eine beliebige Taste um das Tonsignal zu beenden Hinweis Sie können die Zutaten imTopf mit einem Handmixer vermengen Dafür müssen Sie zunächst jedoch den Rührarm vomTopf nehmen Hinweis Wenn Sie den...

Page 32: ...fkorb eignet sich zum Dämpfen kleinerer Zutaten Setzen Sie die Dampfschale in den Dampfkorb Die Dampfschale eignet sich zum Dämpfen empfindlicher Zutaten z B Fisch Sie können den Dampfkorb den Nudeleinsatz und die Dampfschale auch gleichzeitig verwenden Achtung Vergewissern Sie sich dass Sie den Dampfkorb den Nudeleinsatz und die Dampfschale ordnungsgemäß einsetzen und sie nicht wackeln Achtung Ve...

Page 33: ...uf dem Display der kürzeren Garzeit entspricht Drücken Sie die Start Pausetaste um das Gerät anzuhalten Unterbrechen Sie den Betrieb nicht länger als 10 Minuten da das Gerät sonst in den Standby Modus wechselt Nehmen Sie den Deckel mit Ofenhandschuhen vorsichtig ab Setzen Sie den Dampfkorb der die Zutaten mit der kürzeren Garzeit enthält auf denTopf Setzen Sie den Deckel auf den Dampfkorb Drücken ...

Page 34: ...uch nicht im Geschirrspüler Achtung Halten Sie die Heizplatte immer trocken da sich durch Feuchtigkeit und Dampf Rost bilden kann 5 Nehmen Sie zur besonders gründlichen Reinigung den Sicherheitsring von Zeit zu Zeit ab Wischen Sie den Sicherheitsring mit einem feuchten Tuch ab Nehmen Sie den Sicherheitsring niemals ab wenn die Heizplatte heiß ist Achtung Reinigen Sie den Sicherheitsring niemals im...

Page 35: ...rfläche auf vorzugsweise auf der Arbeitsplatte in Ihrer Küche Zubehör bestellen Um Zubehör für dieses Gerät zu kaufen besuchen Sie unseren Online Shop unter www shop philips com service Wenn der Online Shop in Ihrem Land nicht verfügbar ist wenden Sie sich an Ihren Philips Händler oder ein Philips Service Center Sollten Sie Schwierigkeiten bei der Beschaffung von Zubehör für Ihr Gerät haben wenden...

Page 36: ...nd reparierteTeile sind über die restliche Garantiezeit abgedeckt mindestens jedoch sechs Monate Die Garantie gilt nicht für Fehler die auf Unfall falsche Benutzung unerlaubte Reparatur oder auf normale Abnutzung zurückzuführen sind Durch die Garantiebedingungen werden Ihre gesetzlichen Ansprüche nicht ausgeschlossen eingeschränkt oder geändert Wenn Ihr Produkt einen Defekt aufweist wenden Sie sic...

Page 37: ...t gegart Einige Speisestücke im Topf den Dampfkörben oder der Dampfschale sind größer als andere und müssen länger gedämpft bzw gegart werden als kleinere Stücke Stellen Sie eine längere Dämpf Garzeit ein Wenn Sie beide Dampfkörbe und die Dampfschale verwenden können Sie Zutaten mit unterschiedlichen Garzeiten ganz einfach zubereiten siehe Kapitel Das Gerät verwenden Abschnitt Dämpfen und Kochen o...

Page 38: ...h einen unangenehmen Geruch abgibt oder etwas Rauch erzeugt Der Grund dafür ist dass bei neuen Elektromotoren ein Sicherheitslack auf den Motorwicklungen aufgetragen ist der diesen unangenehmen Geruch oder sogar Rauch abgibt wenn sich der Motor bei den ersten Einsätzen des Geräts erwärmt Wenn Sie das Gerät jedoch einige Male verwendet haben tritt dies nicht mehr auf Der Rührarm ist blockiert Sie h...

Page 39: ...cto que le permite llevárselo consigo y cocinar dondequiera que disponga de electricidad y una toma de corriente por ejemplo en un camping en una casa de verano o en el patio Seguro el HomeCooker tiene un anillo de seguridad alrededor de la placa de calentamiento para impedir que se queme los dedos Beneficios especiales de registrar el producto Ha adquirido un accesorio de cocina de por vida y que...

Page 40: ...ajo el grifo Advertencia Antes de enchufar el aparato compruebe si el voltaje indicado en el mismo se corresponde con el voltaje de red local Conecte el aparato sólo a un enchufe con toma de tierra No utilice el aparato por medio de un reloj externo ni un sistema de control remoto separado Este aparato no está diseñado para funcionar con un temporizador externo o un sistema de control remoto adici...

Page 41: ...ente el cable de alimentación antes de enchufar el aparato a la toma de corriente Nunca permita que el aparato funcione sin la olla en la base El aparato se calienta mucho y permanece caliente durante mucho tiempo después de cocinar Cuando el piloto rojo placa de calentamiento caliente se ilumine en el panel de control la placa de calentamiento está caliente y no debe tocarse Nunca retire el anill...

Page 42: ...se y la olla originales Cubra la olla la cesta de vapor o el complemento para pasta únicamente con la tapa suministrada Nunca utilice toallas ni nada semejante para este fin Coloque siempre el aparato sobre una superficie seca plana y estable No coloque el aparato debajo o cerca de objetos a los que pudiera perjudicarles el vapor como paredes o armarios No utilice el aparato para freír alimentos N...

Page 43: ...e Deje siempre que la placa de calentamiento se enfríe completamente antes de manipularla o limpiar la base Pulse siempre los botones del panel de control con la punta de los dedos No utilice las uñas para evitar daños en la película de protección Transporte siempre la olla sujetándola por sus asas Sujete siempre la cesta de cocina al vapor el complemento para pasta y la bandeja de vapor por sus a...

Page 44: ...volver a encender el aparato Antes de utilizarlo por primera vez 1 Retire todos los materiales de embalaje del aparato y la película de protección del panel de control 2 Antes de usar el aparato por primera vez limpie bien las piezas que van a entrar en contacto con los alimentos consulte el capítulo Limpieza Preparación para su uso 1 Coloque el aparato sobre una superficie seca plana y estable 2 ...

Page 45: ...e entra en modo de espera para ahorrar energía El piloto de placa de calentamiento caliente se ilumina siempre que la placa esté caliente Si desea volver a encender el aparato pulse el botón de inicio pausa Nota Si apaga el aparato o lo desenchufa el piloto de placa de calentamiento caliente se apaga Sin embargo la placa de calentamiento todavía puede estar caliente 2 Pulse el botón de aumento o d...

Page 46: ...ntes indica la temperatura en el fondo de la olla indica la temperatura en la placa de calentamiento 3 Pulse los botones de aumento o disminución de tiempo para determinar el tiempo de cocción deseado Puede programar un tiempo de cocción de 1 a 99 minutos El tiempo programado se muestra en la pantalla Nota Cuanto más tiempo mantenga el botón pulsado más rápidamente avanza o retrocede el tiempo Not...

Page 47: ...contar desde 0 cuando pulse el botón de inicio pausa Nota Si no reanuda el proceso de cocinado en un plazo de 10 minutos el aparato entra en modo de espera En este modo el botón de inicio pausa destella cada 10 segundos 7 Cuando el tiempo determinado transcurre el aparato pita y el botón de inicio pausa se ilumina continuamente Pulse cualquier botón para detener el pitido Fundir mantener el calor ...

Page 48: ...alentamiento caliente se apaga Sin embargo la placa de calentamiento todavía puede estar caliente Deje siempre que la placa de calentamiento se enfríe completamente antes de manipularla o limpiar la base Cocinar al vapor y hervir sin agitador 1 Retire el agitador del cono en la olla 2 Vierta agua en la olla Para saber la cantidad de agua necesaria consulte el libro de recetas Precaución Asegúrese ...

Page 49: ...apor el complemento para pasta y la bandeja de vapor de tal manera que quede algún espacio entre los pedazos y que parte de las ranuras de vapor permanezcan despejadas para permitir un flujo de vapor óptimo No sobrecargue las cestas de vapor ni la bandeja de vapor Nota Ciertos ingredientes pueden causar decoloración Si derrama ingredientes por el exterior del aparato límpielos inmediatamente Conse...

Page 50: ... otra vez y deje al aparato en funcionamiento hasta que el tiempo determinado haya transcurrido Consejo Para obtener más información sobre los tiempos de cocinado al vapor y de cocción de los ingredientes consulte el libro de recetas 7 Cuando el tiempo determinado haya transcurrido retire los ingredientes de la cesta de vapor del complemento para pasta y o de la bandeja de vapor con una espátula o...

Page 51: ... anillo de seguridad mientras la placa de calentamiento esté caliente Precaución Nunca limpie el anillo de seguridad en el lavavajillas 6 Seque todas las piezas del aparato con un paño Nota Si hay depósitos de cal en la placa de calentamiento elimínelos con vinagre de vino 4 de ácido acético A continuación limpie los restos de vinagre con un paño suave humedecido con agua limpia Almacenamiento 1 A...

Page 52: ... puerros y cebollas así como ciertas clases de queso y carne y expulsa los ingredientes procesados directamente a la olla del HomeCooker Puede pedir suTorre de corte en la tienda en línea en www shop philips com service buscando HR1055 HR1056 o en www philips com homecooker Garantía y servicio Philips garantiza sus productos por un periodo de dos años a partir de la fecha de compra Philips se hará...

Page 53: ... Pulse el botón de inicio pausa para iniciar el proceso de cocinado El aparato estaba en modo de espera pero pensó que estaba apagado y pulsó el botón de encendido apagado en un intento de encenderlo pero en realidad lo apagó Pulse el botón de encendido apagado una vez más para encender el aparato El cable de alimentación está dañado Si el cable de alimentación está dañado debe ser sustituido por ...

Page 54: ...to o disminución de temperatura durante la cocción hasta que en la pantalla aparezca la temperatura deseada El aparato produce un poco de humo La placa de calentamiento y o la olla no están completamente limpias Asegúrese de limpiar la placa de calentamiento y la olla correctamente después de cada uso Puede que el aparato emita algo de humo cuando lo utilice por primera vez Es normal que un produc...

Page 55: ...ctricité et une prise secteur au camping dans une location de vacances ou dans votre jardin par exemple Sécurité la plaque chauffante du HomeCooker est entourée d un anneau de sécurité pour vous empêcher de vous brûler les doigts Avantages procurés par l enregistrement de votre produit Vous venez de faire l acquisition d un outil culinaire pour la vie et nous tenons à nous assurer que vous en sere...

Page 56: ...hez l appareil uniquement sur une prise secteur mise à la terre Ne branchez pas l appareil à un minuteur externe ou à un système de contrôle séparé Cet appareil n est pas destiné à être utilisé avec un minuteur externe ou un système de contrôle séparé N utilisez pas l appareil si la fiche le cordon d alimentation ou d autres pièces sont endommagées Si le cordon d alimentation est endommagé il doit...

Page 57: ...tilisation Le voyant rouge Plaque chauffante chaude du bloc de commande s allume pour indiquer que la plaque chauffante est chaude et qu elle ne doit pas être touchée Ne retirez jamais l anneau de sécurité lorsque la plaque chauffante est allumée ou chaude Tenez les cheveux longs les bijoux les vêtements amples etc éloignés de l agitateur La température des surfaces accessibles est élevée lorsque ...

Page 58: ...s l appareil sur une surface sèche stable et plane Ne placez jamais l appareil à proximité ou en dessous d objets qui pourraient être endommagés par la vapeur murs placards etc N utilisez pas l appareil pour une cuisson en grande friture Ne mettez pas l appareil ou ses composants au four à micro ondes Vous pouvez mixer des aliments dans le bol avec un mixeur plongeant à condition de retirer l agit...

Page 59: ...on Soulevez toujours le bol par les poignées Soulevez toujours le panier vapeur l insert cuit pâtes et le plateau vapeur par les poignées lorsqu ils contiennent des aliments chauds Ne déplacez pas l appareil en cours d utilisation Ne mettez jamais l anneau de sécurité au lave vaisselle Vérifiez toujours que les aliments sont cuits avant de les manger Champs électromagnétiques CEM Cet appareil Phil...

Page 60: ...n 1 Posez l appareil sur une surface sèche plane et stable 2 Sortez le cordon d alimentation du compartiment de rangement 3 Branchez le cordon d alimentation sur la prise secteur 4 Placez le bol sur le socle Utilisation de l appareil Pour obtenir des conseils de cuisson et des recettes reportez vous au livre de recettes et consultez notre site Web www philips com homecooker Utilisation du bloc de ...

Page 61: ...aude 2 Appuyez une ou plusieurs fois sur le bouton d augmentation ou de diminution de la température pour sélectionner la température adéquate La température sélectionnée apparaît sur l afficheur Elle clignote pour indiquer que l appareil modifie la température Le voyant rouge Plaque chauffante chaude de l afficheur s allume pour indiquer que la plaque chauffante est chaude et qu elle ne doit pas ...

Page 62: ...vous pouvez également régler le temps de cuisson pendant que l appareil fonctionne Remarque pour remettre le minuteur à zéro 00 00 appuyez brièvement et simultanément sur les boutons d augmentation et de diminution Conseil une fois familiarisé avec l appareil si vous souhaitez préparer vos propres recettes vous n êtes pas tenu d utiliser le minuteur Dans ce cas le compteur part de zéro et l appare...

Page 63: ...e mijoter faire bouillir et faire frire au moyen de l agitateur 1 Placez l agitateur sur le cône du bol Remarque pour faciliter l assemblage placez toujours l agitateur dans le bol avant d y introduire des aliments 2 Mettez les ingrédients que vous voulez préparer dans le bol Si nécessaire ajoutez de l eau par exemple pour faire cuire des pommes de terre Attention ne remplissez pas le bol au delà ...

Page 64: ...eur du cône du bol 2 Versez de l eau dans le bol Pour connaître la quantité d eau reportez vous au livre de recettes Attention ne remplissez pas le bol au delà de la mention MAX 3 Mettez les aliments que vous voulez préparer dans le panier vapeur l insert cuit pâtes et ou le plateau vapeur Positionnez le panier vapeur l insert cuit pâtes et le plateau vapeur Placez l insert cuit pâtes dans le bol ...

Page 65: ...tes Conseil pour obtenir le meilleur goût ne préparez pas du poisson en même temps que d autres aliments 4 Placez le couvercle sur le bol Attention utilisez toujours le couvercle pour faire cuire des aliments à la vapeur 5 Suivez les instructions de la section Utilisation du bloc de commande Remarque après avoir allumé l appareil appuyez sur le bouton marche arrêt de l agitateur pour désactiver le...

Page 66: ...détergents agressifs tels que l essence ou l acétone pour nettoyer l appareil 1 Arrêtez puis débranchez l appareil 2 Laissez refroidir l appareil 3 Lavez le bol l agitateur le panier vapeur l insert cuit pâtes et le plateau vapeur à l eau chaude savonneuse ou au lave vaisselle 4 Essuyez le socle et la plaque chauffante avec un chiffon humide Danger ne plongez jamais le socle dans de l eau et ne le...

Page 67: ...l insert cuit pâtes dans le bol 1 et le panier vapeur sur l insert cuit pâtes 2 5 Placez le plateau vapeur dans le panier vapeur 1 et le couvercle sur le panier vapeur 2 6 Rangez le cordon d alimentation dans son compartiment 7 Rangez l appareil sur une surface sèche plane et stable de préférence sur le plan de travail de votre cuisine Français 67 ...

Page 68: ...date d achat En cas de défaillance de l appareil signalée au cours de la période de garantie avec preuve d achat à l appui Philips s engage à réparer ou à remplacer le produit à ses frais La période de garantie restante ou une période de six mois selon la plus longue des deux s applique aux produits de remplacement et aux pièces réparées La garantie ne s applique pas aux défauts résultant d un acc...

Page 69: ...pais que d autres et ou nécessitent un temps de cuisson plus long que les autres Sélectionnez un temps de cuisson plus long Lorsque vous utilisez simultanément les paniers vapeur et le plateau vapeur vous pouvez facilement préparer des aliments dont les temps de cuisson sont différents voir chapitre Utilisation de l appareil section Cuire à la vapeur et faire bouillir sans l agitateur Vous avez tr...

Page 70: ...ut se dégager de l appareil Il est normal qu un produit neuf génère une odeur désagréable ou émette de la fumée lors de sa première utilisation car les enroulements des moteurs électriques neufs sont enduits d un vernis de sécurité Ce phénomène cesse au bout de quelques utilisations L agitateur se bloque Vous avez trop rempli le bol Videz le bol et appuyez légèrement sur l agitateur Ne surchargez ...

Page 71: ...ompatto che consente di portarlo con voi e utilizzarlo dovunque ci sia elettricità e una presa di corrente a muro ad esempio in un campeggio in una casa per le vacanze o sul vostro patio Sicuro l HomeCooker è munito di un anello di sicurezza intorno alla piastra riscaldante che impedisce di scottarsi le dita Vantaggi speciali derivanti dalla registrazione del prodotto Avete acquistato uno strument...

Page 72: ...icate che la tensione riportata sulla spina corrisponda alla tensione disponibile Collegate l apparecchio esclusivamente a una presa di messa a terra Non utilizzate l apparecchio per mezzo di un timer esterno o di un sistema di controllo remoto separato Questo apparecchio non è stato progettato per essere utilizzato in abbinamento a un timer esterno o un sistema di controllo remoto separato Non us...

Page 73: ...de Lasciate almeno 10 cm di spazio libero sui lati e sul retro dell apparecchio Non posizionate oggetti vicino all apparecchio quando è in funzione Srotolate sempre completamente il cavo di alimentazione prima di collegare l apparecchio alla presa a muro Non lasciate mai l apparecchio in funzione senza la pentola sulla base L apparecchio diventa incandescente e rimane caldo per molto tempo dopo la...

Page 74: ...nello a induzione un piano cottura o altro dispositivo di cottura Usate il cestello per la cottura a vapore l inserto per la pasta e il vassoio per la cottura a vapore solo in combinazione con la base e la pentola originali Coprite la pentola il cestello per la cottura a vapore o l inserto per la pasta solo con il coperchio fornito A tale scopo non usate mai un asciugamano o simili Appoggiate semp...

Page 75: ... si spegne La piastra riscaldante potrebbe tuttavia essere ancora calda Lasciate sempre raffreddare completamente la piastra riscaldante prima di maneggiare o pulire la base Premete sempre i pulsanti sul pannello di controllo con la punta delle dita Non usate le unghie per evitare di danneggiare la protezione Tenete sempre la pentola dai manici Tenete sempre il cestello per la cottura a vapore l i...

Page 76: ...accendere l apparecchio Primo utilizzo 1 Rimuovete tutti i materiali di imballaggio dall apparecchio e la pellicola protettiva dal pannello di controllo 2 Al primo utilizzo dell apparecchio lavate con cura tutte le parti che verranno a contatto con il cibo vedere il capitolo Pulizia Predisposizione dell apparecchio 1 Appoggiate l apparecchio su una superficie asciutta piatta e stabile 2 Togliete i...

Page 77: ...ma si sta raffreddando entra in modalità standby per risparmiare energia La spia Piastra riscaldante calda resta illuminata finché la piastra è calda Per ripristinare l apparecchio premete il pulsante di avvio pausa Nota Se spegnete l apparecchio o disinserite la spina la spia Piastra riscaldante calda si spegne La piastra riscaldante potrebbe tuttavia essere ancora calda 2 Premete il pulsante di ...

Page 78: ...limenti indica la temperatura sul fondo della pentola indica la temperatura sulla piastra riscaldante 3 Premete i pulsanti di aumento o diminuzione del timer per impostare il tempo di cottura richiesto Potete impostare un tempo da 1 a 99 minuti Il tempo impostato viene mostrato sul display Nota Più a lungo tenete premuto il pulsante più velocemente il tempo aumenta o diminuisce Nota Potete regolar...

Page 79: ...sante di avvio pausa Nota Se non riprendete il processo di cottura entro 10 minuti l apparecchio va in modalità standby In questa modalità il pulsante di avvio pausa lampeggia ogni 10 secondi 7 Quando il tempo impostato è trascorso l apparecchio emette un segnale acustico e il pulsante di avvio pausa si illumina in modo permanente Premete qualunque pulsante per interrompere la riproduzione del seg...

Page 80: ...a rossa piastra riscaldante calda si spegne La piastra riscaldante potrebbe tuttavia essere ancora calda Lasciate sempre raffreddare completamente la piastra riscaldante prima di maneggiare o pulire la base Cottura a vapore e bollitura senza l accessorio per mescolare 1 Rimuovete l accessorio per mescolare dal cono nella pentola 2 Versate l acqua nella pentola Per la quantità di acqua vedete il ri...

Page 81: ...te e che siano stabili Attenzione Assicuratevi di disporre il cibo nel cestello per la cottura a vapore nell inserto per la pasta e nel vassoio per la cottura a vapore in maniera tale da lasciare un po di spazio tra i pezzi e che alcune delle fessure per vapore siano libere per consentire al vapore di fluire in modo ottimale Non sovraccaricate i cestelli e il vassoio per la cottura a vapore Nota C...

Page 82: ...e di nuovo il pulsante di avvio pausa e lasciate l apparecchio in funzione per il tempo impostato Consiglio Per ulteriori informazioni su tempi e temperature per la cottura a vapore e la bollitura dei cibi consultate il ricettario 7 Quando il tempo impostato è trascorso rimuovete gli alimenti dal cestello per la cottura a vapore dall inserto per la pasta e o dal vassoio per la cottura a vapore con...

Page 83: ...astra riscaldante è calda Attenzione Non pulite mai l anello di sicurezza in lavastoviglie 6 Asciugate tutte le parti dell apparecchio con uno strofinaccio Nota Se ci sono depositi di calcare sulla piastra riscaldante rimuoveteli con aceto bianco 4 di acido acetico Asciugate quindi i residui di aceto con un panno morbido inumidito con acqua fresca Conservazione 1 Spegnete l apparecchio e scollegat...

Page 84: ... come cetrioli carote patate porri e cipolle così come alcuni tipi di formaggio e carne e consente di versare gli ingredienti direttamente nella pentola dell HomeCooker Potete ordinare l accessorio per tagliare nell Online Shop all indirizzo www shop philips com service cercando il codice HR1055 HR1056 o all indirizzo www philips com homecooker Garanzia e assistenza Philips garantisce i propri pro...

Page 85: ...o di cottura a vapore L apparecchio era in modalità standby ma avete pensato che fosse spento e avete premuto il pulsante on off nel tentativo di accenderlo ma in effetti l avete spento Premete di nuovo il pulsante on off per accendere l apparecchio Il cavo di alimentazione è danneggiato Nel caso in cui il cavo di alimentazione fosse danneggiato dovrà essere sostituito presso i centri autorizzati ...

Page 86: ...ella temperatura durante la cottura finché il display mostra la temperatura desiderata L apparecchio emette fumo La piastra riscaldante e o la pentola non sono completamente pulite Assicuratevi di pulire la piastra riscaldante e la pentola correttamente dopo ogni uso La prima volta che l apparecchio viene utilizzato potrebbe produrre del fumo È normale per un nuovo prodotto produrre un odore sgrad...

Page 87: ... overal kunt koken waar elektriciteit en een stopcontact beschikbaar zijn Gebruik het apparaat bijvoorbeeld op de camping in uw vakantiewoning of op uw terras Veilig de HomeCooker heeft een veiligheidsring rond de verwarmingsplaat zodat u uw vingers niet brandt Speciale voordelen van productregistratie U hebt een keukenhulpmiddel aangeschaft dat levenslang meegaat en wij willen ervoor zorgen dat u...

Page 88: ...t u het apparaat aansluit Sluit het apparaat uitsluitend aan op een geaard stopcontact Bedien het apparaat niet met behulp van een externe timer of een ander systeem voor bediening op afstand Dit apparaat is niet bedoeld om bediend te worden met een externe timer of een afzonderlijk afstandsbedieningssysteem Gebruik het apparaat niet indien de stekker het snoer of andere onderdelen beschadigd zijn...

Page 89: ... in het stopcontact steekt Schakel het apparaat alleen in als de pan op de voet is geplaatst Het apparaat wordt zeer heet en blijft ook na het koken nog lang warm Wanneer het rode verwarmingsplaat heet indicatielampje op het bedieningspaneel brandt is de verwarmingsplaat heet Raak de plaat dan niet aan Verwijder de veiligheidsring niet wanneer de verwarmingsplaat is ingeschakeld of heet is Houd la...

Page 90: ...d uitsluitend met het bijgeleverde deksel Gebruik geen handdoek of een vergelijkbaar middel om de pan de stoommand of de pastamand af te dekken Plaats het apparaat altijd op een droge vlakke en stabiele ondergrond Plaats het apparaat niet in de buurt van of onder voorwerpen die door stoom kunnen worden beschadigd zoals muren en kastjes Gebruik het apparaat niet om gerechten te frituren Plaats het ...

Page 91: ... kan echter nog steeds heet zijn Laat de verwarmingsplaat volledig afkoelen voordat u de voet aanraakt of schoonmaakt Druk met uw vingertoppen en niet met uw nagels op de knoppen op het bedieningspaneel anders kan de beschermfolie beschadigd raken Draag de pan altijd aan de handgrepen Houd de stoommand de pastamand en het stoomplateau altijd vast aan de handgrepen wanneer ze warm voedsel bevatten ...

Page 92: ...n uitknop om het apparaat weer in te schakelen Voor het eerste gebruik 1 Verwijder alle verpakkingsmaterialen van het apparaat en de beschermfolie van het bedieningspaneel 2 Maak alle onderdelen die in aanraking komen met voedsel grondig schoon voordat u het apparaat voor het eerst gebruikt zie hoofdstuk Schoonmaken Klaarmaken voor gebruik 1 Plaats het apparaat op een droge vlakke en stabiele onde...

Page 93: ...ergie te besparen Het verwarmingsplaat heet lampje brandt zolang de plaat heet is Druk op de start pauzeknop als u het apparaat weer wilt inschakelen Opmerking Als u het apparaat uitschakelt of als u de stekker van het apparaat uit het stopcontact haalt dooft het verwarmingsplaat heet lampje De verwarmingsplaat kan echter nog steeds heet zijn 2 Druk een of meerdere keren op de knoppen voor het ver...

Page 94: ...250 C 482 F om ingrediënten snel te verwarmen of grote hoeveelheden ingrediënten te bakken geeft de temperatuur op de bodem van de pan aan geeft de temperatuur van de verwarmingsplaat aan 3 Druk op de knoppen voor het verlengen en verkorten van de tijd om de gewenste kooktijd in te stellen U kunt een tijd instellen van 1 tot 99 minuten De ingestelde tijd verschijnt op het display Opmerking Hoe lan...

Page 95: ...egint weer te lopen en de start pauzeknop begint weer te knipperen Opmerking Als u geen kooktijd hebt ingesteld begint het display weer te tellen vanaf nul wanneer u op de start pauzeknop drukt Opmerking Als u het koken niet binnen 10 minuten hervat gaat het apparaat in stand bymodus In deze modus knippert de start pauzeknop iedere 10 seconden 7 Wanneer de ingestelde tijd is verstreken piept het a...

Page 96: ...het apparaat uitschakelt en of u de stekker uit het stopcontact haalt dooft het rode verwarmingsplaat heet indicatielampje De verwarmingsplaat kan echter nog steeds heet zijn Laat de verwarmingsplaat volledig afkoelen voordat u de voet aanraakt of schoonmaakt Stomen en koken zonder het roerhulpstuk 1 Neem het roerhulpstuk van de as in de pan 2 Giet water in de pan Zie het receptenboek voor de juis...

Page 97: ... de pastamand of op het stoomplateau dat er wat ruimte tussen de ingrediënten is en dat een deel van de stoomopeningen vrij blijft zodat de stoom optimaal kan circuleren Plaats niet te veel ingrediënten in de manden en op het plateau Opmerking Bepaalde ingrediënten kunnen verkleuring veroorzaken Als u ingrediënten op de buitenkant van het apparaat morst veeg het apparaat dan onmiddellijk schoon Ti...

Page 98: ...het apparaat werken tot de ingestelde tijd is verstreken Tip Zie het receptenboek voor meer informatie over de stoom en kooktijden van ingrediënten 7 Wacht tot de ingestelde tijd is verstreken en haal de ingrediënten met een spatel of lepel uit de stoommand uit de pastamand en of van het stoomplateau Druk op een knop om het piepen te stoppen 8 Schakel het apparaat uit en haal de stekker uit het st...

Page 99: ... veiligheidsring niet wanneer de verwarmingsplaat heet is Let op Maak de veiligheidsring niet schoon in de vaatwasmachine 6 Droog alle onderdelen van het apparaat met een theedoek Opmerking Verwijder eventueel ontstane kalkaanslag op de verwarmingsplaat met blanke azijn 4 azijnzuur Veeg de kalkresten daarna weg met een zachte doek die is bevochtigd met schoon water Opbergen 1 Schakel het apparaat ...

Page 100: ... en vlees De verwerkte ingrediënten vallen direct in de pan van de HomeCooker Bestel de snijtoren in de Online Shop door op www shop philips com service te zoeken naar HR1055 HR1056 of kijk op www philips com homecooker Garantie en service Philips biedt garantie op zijn producten tot twee jaar na de aankoopdatum Materiaal en constructiefouten zullen worden gerepareerd of het product wordt vervange...

Page 101: ...bt niet op de start pauzeknop gedrukt Druk op de start pauzeknop om het koken of stomen te starten Het apparaat stond in de stand bymodus maar u dacht dat het apparaat was uitgeschakeld U hebt op de aan uitknop gedrukt om te proberen het apparaat in te schakelen maar hebt het apparaat daarmee uitgeschakeld Druk nog een keer op de aan uitknop om het apparaat in te schakelen Het netsnoer is beschadi...

Page 102: ...et display verschijnt Er komt wat rook uit het apparaat De verwarmingsplaat en of pan zijn niet volledig schoon Maak de verwarmingsplaat en de pan na elk gebruik grondig schoon Er kan wat rook uit het apparaat komen wanneer u het voor de eerste keer gebruikt Het is normaal dat een nieuw product een onaangename geur of een beetje rook produceert bij het eerste gebruik Op de tandwielen van nieuwe el...

Page 103: ......

Page 104: ......

Page 105: ......

Page 106: ...4203 064 5823 1 ...

Reviews: