Remove the batteries if you are not going to use the appliance for a
month or more.
do not leave empty batteries in the appliance.
1
Make sure that your hands and the appliance are dry when you
insert the batteries.
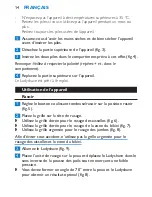
Pull the upper part of the appliance off the lower part (Fig. 3).
3
Insert the two batteries into the battery compartment (Fig. 4).
Note: Make sure the + and - marks on the batteries match those in the
battery compartment.
4
Reattach the lower part of the appliance to the upper part.
The ladyshave is now ready for use.
Using the appliance
shaving
1
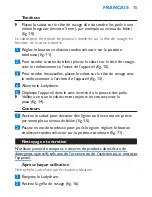
Set the Trim/Shave slide to the ‘Shave’ position (Fig. 5).
Put the desired shaving foil on the shaving head.
Use the golden shaving foil to shave the underarms (Fig. 6).
Use the golden shaving foil to shave the bikini zone (Fig. 7).
Use the silver shaving foil to shave the legs (Fig. 8).
Do not use the silver shaving foil to shave the underarms and the bikini
line to prevent injuries.
3
Switch on the ladyshave (Fig. 9).
4
Place the shaving unit gently on the skin and move the ladyshave
slowly against the direction of hair growth while pressing it lightly.
The angle between the skin and the ladyshave should be 70° to get
the best results (Fig. 8).
Trimming
Put the comb attachment onto the shaving head to trim the hairs
to an even length (about 5mm), e.g. in the bikini zone (Fig. 10).
-
-
,
,
,
,
,
EnglisH
6
Summary of Contents for HP6317/00
Page 1: ...HP6317 01 ...
Page 2: ... 1 ...
Page 3: ...HP6317 01 English 4 Français 12 한국어 20 ภาษาไทย 28 繁體中文 34 简体中文 40 52 58 ...
Page 47: ...47 ...
Page 48: ...48 ...
Page 49: ...49 ...
Page 50: ...50 ...
Page 51: ...51 ...
Page 52: ...52 ...
Page 53: ...53 ...
Page 54: ...54 ...
Page 55: ...55 ...
Page 56: ...56 ...
Page 57: ...57 ...
Page 58: ...58 ...
Page 59: ...59 ...
Page 60: ...60 ...
Page 61: ...61 ...
Page 62: ...62 2 3 4 5 6 7 8 9 10 11 12 13 14 15 16 17 18 19 20 21 ...
Page 63: ...63 ...


