background image

Select a cloth with high absorptive capacity.
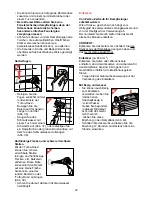
- Set the steam control to position “Minimum” or

“Normal” (fig. 20).

- As soon as steam comes out, let the nozzle

with the steaming cloth glide across the surface
you wish to clean (fig. 21). Do not scrub! 
The results will be better if you do not crush
down the hairs of the brush.

- Treat vulnerable surfaces lightly and with a

double cloth fixed to the nozzle. 
Set the steam control to minimum steam output
for this application.

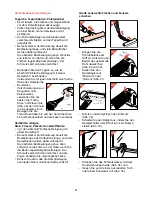
Thorough cleaning 
To clean seriously contaminated surfaces and
remove stubborn spots:

- First place the brush nozzle without steaming

cloth on to the surface you wish to clean, so
that the steam and the
brush have maximum
effect on the dirt 
(fig 22).

- Set the steam control

to position “Normal” or
“Maximum” (fig. 23).

- Lightly brush up the

soluted dirt (fig. 24).
Do not scrub!

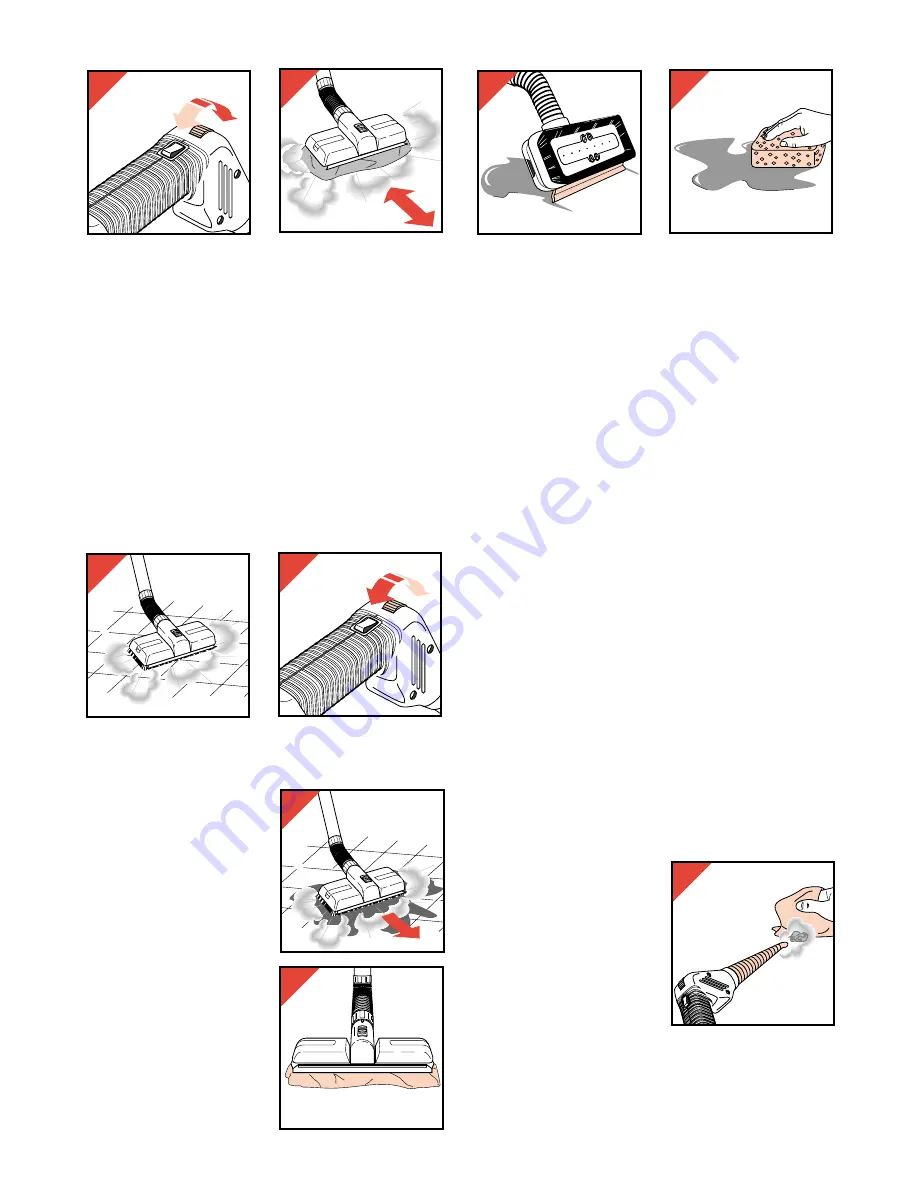
Removing soluted dirt
To remove soluted dirt
you can:
- fix a steaming cloth to

the brush nozzle 
(fig. 25) (refer to
section “Normal
cleaning with a
steaming cloth”);

- collect the dirty water with the rubber strip of

the large nozzle (fig. 26);

- use a separate cloth or sponge (fig. 27).

After use

- Switch the appliance off by pressing the On/Off

switch 

I

.

- Remove the mains plug from the wall socket.
To prevent corrosion inside the steam

cleaner: make sure that the filling cap is
screwed tightly when storing the appliance.

Various applications

Carpets, rugs, upholstery
• It is advisable to vacuum clean before steam

cleaning.

• First try out the effect of steam cleaning on a

section which does not catch the eye.

• Steam cleaning will make stains disappear

from your carpets and will freshen them up.

• If a carpet is seriously stained, the first steam

cleaning treatment will take some extra time
(and steaming cloths).
However, if you steam clean the carpet
regularly this will prevent the dirt from setting
so that cleaning will be quicker and easier.

- Treat the carpet as described in section

“Normal cleaning with a steaming cloth”.
Make sure that you
always use a clean
section of the steaming
cloth.

- For small stains

(chewing gum, candle-
grease, etc.) it is
advisable to use the
“Turbo” nozzle and a
cloth (fig. 28). 
The steam will blow the
dirt into the cloth.
Keep the “Turbo” nozzle moving to prevent
overheating of the fibres.

7

25

27

26

24

;;

;;

21

NOR.

MAX.

23

22

NOR.MIN.

20

;;

;;

;;

28

Summary of Contents for HR 6640

Page 1: ......

Page 2: ...Français Page 10 Pour le mode d emploi dépliez la page 3 Deutsch Seite 17 Schlagen Sie beim Lesen der Gebrauchsanweisung Seite 3 auf Nederlands Pagina 24 Sla bij het lezen van de gebruiksaanwijzing pagina 3 op Ελληνικά Σελίδα 31 Ανοίξτε την σελίδα 3 για τις οδηγίες χρήσεως 2 ...

Page 3: ...6961 P R Q U L W Note Items V and R are not included with all versions N B Les pièces V et R ne sont pas livrées standard avec tous les modèles Hinweis V und R sind nicht bei jeder Ausführung mitgeliefert N B Accessoires Ven R worden niet bij elke uitvoering meegeleverd Σηµείωση τα αντικείµενα V R δεν περιλαµβάνονται σε λα τα µοντέλα ...

Page 4: ...r to wall sockets electrical connectors or appliances Thermostatic taps can be damaged by hot steam Do not use the appliance for cleaning this type of taps Prevent the steam jet from coming into contact with materials which are not resistant to moisture and heat such as wall paper unless you wish to remove it silk synthetic fibres leather suede velvet When in doubt try out on a section which does ...

Page 5: ...of the hose into the opening of the appliance fig 7 Then rotate the ring into the opposite direction fig 8 Check if the hose is well connected Connecting nozzle and tubes Rotate the ring in the direction of the arrow fig 9 Insert the narrowed section of one tube into the wider section of the other tube fig 10 Then rotate the ring into the opposite direction fig 11 If you wish you can connect nozzl...

Page 6: ...lect the most suitable steam output for various applications Maximum steam output for cleaning from some distance hard to reach places using the Turbo nozzle sticking dirt and stubborn spots Maximum or normal steam output for normal cleaning with steaming cloth floors and washable surfaces Normal or minimum steam output for cleaning with steaming cloth rugs and carpets Minimum output for ceramics ...

Page 7: ...the large nozzle fig 26 use a separate cloth or sponge fig 27 After use Switch the appliance off by pressing the On Off switch I Remove the mains plug from the wall socket To prevent corrosion inside the steam cleaner make sure that the filling cap is screwed tightly when storing the appliance Various applications Carpets rugs upholstery It is advisable to vacuum clean before steam cleaning First ...

Page 8: ...or a sponge fig 35 You can also use the large brush nozzle for steam cleaning and use a separate squeegee and or a cloth to remove the dirty water When it is extremely cold do not steam clean your window panes esp single pane as the sudden heating might cause the glass to break Ceramics wash basin tub and other bathroom fixtures can also be cleaned as described for glass Ensure that there are no s...

Page 9: ...e sold and at druggist stores Follow the instructions on the packaging of the descaling agent Mixture of water half a litre and white vinegar half a glassful Instead of a descaling agent you can also use a mixture of half a litre of water and half a glassful of white vinegar Especially in this case ensure that the appliance is not hot Pour the mixture of water with vinegar into the steam tank fig ...

Page 10: ...mmager les robinets à thermostat N utilisez jamais votre appareil pour nettoyer ce type de robinets Evitez d utiliser le jet de vapeur au contact de matériaux sensibles à l humidité et ou à la chaleur comme le papier peint sauf si vous désirez le décoller la soie les fibres synthéti ques le cuir le daim et le velours En cas de doute faites un essai sur une partie cachée Branchez l appareil sur une...

Page 11: ...chon de remplissage fig 5 N utilisez pas d outils pour visser et dévisser le bouchon de remplissage Raccordement du tuyau Tournez la bague dans le sens de la flèche fig 6 Enfoncez l extrémité du tuyau dans l ouverture de l appareil fig 7 Tournez ensuite la bague dans l autre sens fig 8 Assurez vous que le tuyau est bien fixé Raccordement de l embout et des tubes Tournez la bague dans le sens de la...

Page 12: ... réglage de vapeur situé sur la poignée vous pouvez sélectionner la force de vapeur la mieux adaptée aux diverses applications Production de vapeur maximum pour le nettoyage à distance endroits difficilement accessibles avec l embout Turbo pour la saleté incrustée et les taches rebelles Production de vapeur maximum ou normale pour le nettoyage normal avec lavette à vapeur de sols et de surfaces la...

Page 13: ...ut brosse sans lavette à vapeur sur la surface à nettoyer de sorte que la vapeur et la brosse puissent agir au maximum sur la saleté fig 22 Mettez le bouton de réglage de vapeur en position Normal ou Maximum fig 23 Brossez légèrement la saleté dissoute fig 24 Ne frottez pas Enlever la saleté dissoute Pour enlever la saleté dissoute vous pouvez fixer une lavette à vapeur sur l embout brosse fig 25 ...

Page 14: ... des fibres Sols durs carrelages dalles parquet matières synthétiques Voir Nettoyage normal avec lavette à vapeur Si le carrelage est très sale le premier traitement à la vapeur demandera davantage de temps et de lavettes à vapeur Si cependant vous nettoyez régulièrement le sol à la vapeur vous éviterez que la saleté s incruste et les joints conserveront leur teinte originale N oubliez pas que la ...

Page 15: ... De temps à autre le réservoir de vapeur doit être détartré La fréquence de cette opération dépend de la dureté de l eau de votre réseau et de la fréquence d utilisation de l appareil En général nous recommandons de détartrer l appareil au moins tous les six mois Utilisez de préférence un produit de détartrage spécialement conçu pour les appareils domestiques comme les machines espresso fers vapeu...

Page 16: ...n guise de clef fig 41 et 42 Rincez le réservoir jusqu à ce que l eau qui s en écoule soit claire Accessoires remplacement ou option Des accessoires sont disponibles pour augmenter les possibilités de votre nett oyeur vapeur ou pour un remplacement Regardez s il vous plaît page 37 Adressez vous à votre Distributeur et indiquez lui le type concerné et ou le code sevice 16 41 42 ...

Page 17: ... diese Art von Wasserhähnen nicht mit diesem Gerät Achten Sie darauf daß der Dampfstrahl nicht auf Gegenstände gerichtet wird die Feuchtigkeit und Hitze nicht vertragen z B Seide Synthetics Leder Wildleder Samt und Tapeten es sei denn Sie wollten die Tapeten von den Wänden lösen Prüfen Sie nötigenfalls das Material an einer Stelle die nicht ins Auge fällt Wenn Sie den Verschluß der Einfüllöffnung ...

Page 18: ...pftankfüllung Schrauben Sie den Verschluß fest zu Abb 5 Verwenden Sie keine Werkzeuge um den Verschluß auf oder zuzudrehen Den Dampfschlauch anschließen Drehen Sie den Ring in Pfeilrichtung los Abb 6 Stecken Sie das Ende des Dampfschlauchs in den Anschluß I am Gerät Abb 7 Drehen Sie den Ring in Pfeilrichtung fest Abb 8 Prüfen Sie den Sitz des Schlauches Rohre und Düsen anschließen Drehen Sie den R...

Page 19: ... die Dampfzufuhr bei verschiedenen Arbeiten auf das erforderliche Maß einstellen Maximale Dampfzufuhr Reinigung schwer zugänglicher Stellen und von hartnäckigem Schmutz mit Hilfe der Turbo Düse Maximale oder normale Dampfzufuhr Reinigung normal verschmutzter wasserunempfindlicher Flächen auch mit Hilfe eines Dampftuchs Normale oder minimale Dampfzufuhr Reinigung von Teppichen und Teppichboden auch...

Page 20: ...Bürstendüse ohne Dampftuch auf die zu bearbeitende Stelle so daß Dampf und Bürste gründlich auf den Schmutz einwirken können Abb 22 Stellen Sie den Dampfregler auf Normal oder auf Maximum Abb 23 Bürsten Sie den gelösten Schmutz auf ohne zu schrubben Abb 24 Gelösten Schmutz entfernen Den gelösten Schmutz entfernen Sie indem Sie ein Dampftuch an der großen Bürstendüse anbringen Abb 25 vgl den Abschn...

Page 21: ...dabei hin und her damit die Hitze sich nicht konzentriert und die Fasern versengt Hartböden reinigen Stein Fliesen Parkett Kunststoffböden Vgl den Abschnitt Einfache Reinigung mit einem Dampftuch Bei sehr starker Verschmutzung dauert die Bearbeitung eines Hartbodens lange und viele Dampftücher werden dabei verbraucht Die nächsten Bearbeitungen gehen dann schneller und leichter von der Hand wenn Si...

Page 22: ...en Diese Düse konzentriert den Dampf auf eine kleine Fläche Sie können eine der runden Bürsten an der Turbo Düse anbringen Abb 39 Achten Sie darauf daß kein Schmutzwasser herabtropft Entkalken Von Zeit zu Zeit muß Ihr Dampfreiniger entkalkt werden Wie oft das zu geschehen hat hängt vom Härtegrad des verwendeten Leitungswassers und von der Häufigkeit der Verwendung ab Bei normalem Gebrauch sollten ...

Page 23: ...löffnung als Öffner Abb 41 und 42 Spülen Sie den Dampftank gründlich aus bis nur noch reines Wasser austritt Ersatz und Zusatzteile Für Ihren Dampfreiniger sind verschiedene Ersatz bzw Zusatzteile erhältlich Vgl hierzu Seite 37 Wenden Sie sich an Ihren Philips Händler und geben Sie dabei die entsprechende Typen bezeichnung und oder die Service Nummer an 23 41 42 ...

Page 24: ...te stoom Reinig deze dus niet met behulp van dit apparaat Vermijd dat de stoomstraal in aanraking komt met materialen die niet bestand zijn tegen vocht en of warmte zoals papieren behang tenzij u het wilt verwijderen zijde kunstvezels leer suède fluweel Probeer bij twijfel een gedeelte uit dat niet in het oog valt Sluit het apparaat aan op een geaard stopcontact Als u de vuldop opendraait terwijl ...

Page 25: ...vuldop stevig vast fig 5 Gebruik geen gereedschap bij het los en vastdraaien van de vuldop Slang aansluiten Draai de ring in de richting van de pijl fig 6 Steek het uiteinde van de slang in de opening van het apparaat fig 7 Draai vervolgens de ring terug fig 8 Controleer even of de slang goed vast zit Mondstuk en buizen aansluiten Draai de ring in de richting van de pijl fig 9 Schuif de beide buis...

Page 26: ...oomregelaar Remote Steam Control Met behulp van de stoomregelaar op het handvat kunt u de meest geschikte stoomkracht kiezen voor de diverse toepassingen Maximum stoomafgifte voor reiniging op afstand moeilijk bereikbare plaatsen met Turbo mondstuk voor vastzittend vuil en hardnekkige vlekken Maximum of normale stoomafgifte voor het normaal schoonmaken met stoomlap van vloeren en afwasbare oppervl...

Page 27: ...e verwijderen Borstelmondstuk eerst zonder stoomlap op het te reinigen oppervlak plaatsen zodat de stoom en de borstel zo goed mogelijk op het vuil kunnen inwerken fig 22 Zet de stoomregelaar in stand Normaal of Maximum fig 23 Borstel het opgeloste vuil luchtig op fig 24 Niet schrobben Opgelost vuil verwijderen Om het opgeloste vuil te verwijderen kunt u een stoomlap op het borstelmondstuk bevesti...

Page 28: ...eweging om over verhitting van de vezels te voorkomen Harde vloeren tegels plavuizen parket kunststof Zie Normaal schoonmaken met stoomlap Bij een zeer vervuilde tegelvloer zal de eerste behandeling met stoom wat extra tijd èn extra stoomlappen vergen Als u de vloer echter regelmatig met stoom schoonmaakt voorkomt u dat het vuil zich vastzet en behouden de voegen hun oorspronkelijke tint Houd er r...

Page 29: ...estigen fig 39 Houd rekening met het druipen van vies water Ontkalken Van tijd tot tijd moet de stoomtank ontkalkt worden Hoe vaak dat moet gebeuren hangt af van de hardheid van het leidingwater en van de vraag hoe vaak u het apparaat gebruikt In het algemeen adviseren wij het apparaat tenminste elk half jaar te ontkalken Gebruik bij voorkeur een speciaal ontkalkingsmiddel voor huishoudelijke appa...

Page 30: ...tel fig 41 en 42 Spoel de stoomtank met vers water door totdat het uitstromende water helder is Accessoires nabestellen of bijbestellen Voor het uitbreiden van de mogelijkheden met uw stoomreiniger of voor vervanging zijn accessoires verkrijgbaar Zie hiervoor pag 37 Wend u tot uw leverancier en vermeld het betreffende typenummer en of servicenummer 30 41 42 ...

Page 31: ...ευές Οι θερµοστατικοί διακ πτες µπορεί να καταστραφούν απ τον ατµ Μην χρησιµοποιείτε τη συσκευή για να καθαριζετε τέτοιου τύπου διακ πτες Aποφεύγετε την επαφή του σωλήνα µε υλικά που δεν είναι ανθεκτικά σε υγρασία ή θερµ τητα πως ταπετσαρία τοίχου εκτ ς και αν θέλετε να τα αποµακρίνετε µετάξι συνθετικές ίνες δέρµα σουέτ βελούδο Aν έχετε αµφιβολία δοκιµάστε σε ένα σηµείο που δεν είναι άµεσα ορατ Aν...

Page 32: ... το καπάκι πλήρωσης εικ 5 Mην χρησιµοποιείτε κανένα εργαλείο για να βιδώσετε ή να ξεβιδώσετε το καπάκι Συνδέοντας το σωλήνα ατµού Περιστρέψτε την άκρη του σωλήνα κατα την φορά του βέλους εικ 6 Tοποθετήστε το άκρο του σωλήνα στην υποδοχή της συσκευής εικ 7 Mετά περιστρέψτε τον δακτύλιο κατά την αντίθετη φορά εικ 8 Eλέγξτε αν ο σωλήνας είναι καλά τοποθετηµένος Πώς θα συνδέσετε τα ρύγχη και τους σωλή...

Page 33: ... διάρκεια λειτουργίας της συσκευής θα ανάβει αυτ µατα το στοιχείο θέρµανσης κατά διαστήµατα θα ανάβει το πορτοκαλί ενδεικτικ λαµπάκι αν και ατµ ς θα είναι ακ µα διαθέσιµος Mπορείτε να συνεχίσετε το καθάρισµα µε ατµ Tηλεχειριζ µενος έλεγχος ατµού Mε τον έλεγχο ατµού πανω στην χειρολαβή µπορείτε να διαλέξετε την καταλληλ τερη έξοδο ατµού για τις διάφορες λειτουργίες Mέγιστη έξοδος ατµού Για καθάρισµ...

Page 34: ...λ πανί στο ρύγχος Γι αυτήν την εφαρµογή βάλτε τον έλεγχο ατµού στην ελάχιστη έξοδο ατµού Bαθύ καθάρισµα Για να καθαρίσετε καλά βρώµικες επιφάνειες και επίµονους λεκέδες Πρώτα χρησιµοποιήστε το ρύχγος µε την βούρτσα χωρίς πανί στην επιφάνεια που θέλετε να καθαρίσετε κατά τρ πον ώστε ο ατµ ς και η βούρτσα να έχουν το καλύτερο δυνατ αποτέλεσµα εικ 22 Bάλτε τον έλεγχο ατµού στην θέση Kανονικ ή Mέγιστο...

Page 35: ...κρούς λεκέδες τσίχλες κερί κλπ σας συνιστούµε να χρησιµοποιήτε το ρύγχος turbo και πανί εικ 28 O ατµ ς θα οδηγήσει τον λεκέ στο πανί Mετακινείτε συνέχεια το ρύγχος turbo για να εµποδίσετε υπερθέρµανση των ινών Σκληρά πατώµατα πέτρα πλακάκια παρκέ συνθετικά Bλέπε τµήµα Kανονικ ς καθαρισµ ς µε πανί και ατµ Aν το πάτωµα απ πλακάκια είναι πολύ βρώµικο το πρώτο καθάρισµα µπορεί να πάρει περισσ τερο χρ ...

Page 36: ... ατµ σε ένα σηµείο Mπορείτε να στερεώσετε µία απ τις στρογγυλές βούρτσες στο ρύγχος turbo εικ 39 Πάρτε προφυλάξεις σε σχέση µε το βρώµικο νερ που στάζει Aφαίρεση αλάτων Aπ καιρ σε καιρ η δεξαµενή νερού χρειάζετε αφαίρεση αλάτων Tο π σο συχνά χρειάζεται να γίνεται αυτή η διαδικασία εξαρτάται απ την σκληρ τητα του νερού και απ την συχν τητα της χρήσης Γενικά συνιστάται να γίνεται η αφαίρεση των αλάτ...

Page 37: ... HR 6962 Triangular nozzle Brosse triangulaire Dreiecksdüse Driehoekig mondstuk Τριγονικ ρύγχος 4822 479 60134 HR 6963 Set of 3 steam cloths Sachet de chiffons en coton 3 pièces Satz von 3 Dampf tüchern Set 3 stuks stoom lapjes Σετ 3 πετσετών 4822 395 91038 HR 6964 Accessory and type number Accessoire et type Zubehör und Typen Nummer Accessoire en typenummer Εξαρτήµατα και τύπος Description Descri...

Page 38: ...38 ...

Page 39: ...39 ...

Page 40: ...49 Dealer stamp Cachet du commerçant Händlerstempel Handelarenstempel Aterförsäljarens stämpel Timbro del rivenditore Sello comercial Carimbo do revendedor Date of purchase Date de la vente Verkaufsdatum Datum van verkoop Inköpsdatum Data di acquisto Fecha de compra Data de compra ...

Reviews: