background image

5

How to use

- Check if the lid is correctly placed.
• For your safety: the appliance can only

operate when the lid has been correctly
mounted on to the base unit.

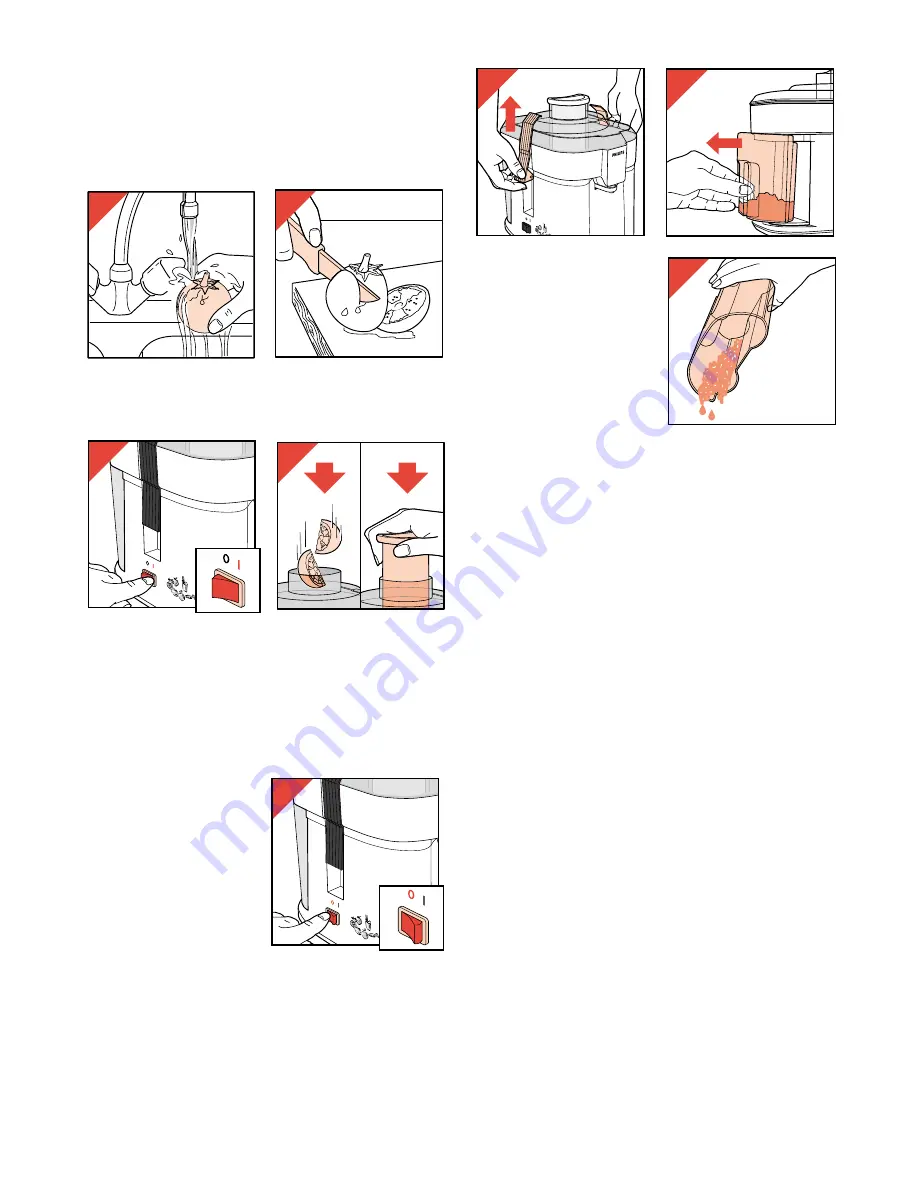
Wash the fruits and/or vegetable(s) (fig. 6) and

cut them in pieces (fig. 7) to fit into the feeding
tube.

- Switch the appliance on by pressing the on/off

switch (fig. 8).

- Put the pieces into the feeding tube and press

them gently downwards with the pusher (fig. 9).

• Do not press down with force. This would

give worse results and could even block the
rotating sieve.

• Never put any objects or your fingers in the

feeding tube.

- After the juice has

stopped flowing:
switch the appliance
off (fig. 10) and wait
for the sieve to come
to a complete
standstill before
removing the juice jug
or cup. 

- Preferably, drink the juice immediately after it

has been extracted. 
Exposure to the open air for any length of time
will result in the juice losing its nutritional value
and its taste. 
However, if you wish to keep the juice, put it
into the refrigerator in a well-closed container
for a maximum of 24 hours.

- When the pulp

container is full:
switch off (fig. 10) and
wait for the sieve to
come to a complete
standstill, 
release the two latches
to disassemble the lid
(fig. 11),
remove the pulp
container (fig. 12),
empty the pulp container (fig. 13). 
Reassemble the juice extractor and continue
the process.

Culinary hints

• With tomato juice you can prepare a delicious

Bloody Mary. 

• Pulp of e.g. carrots, beetroots, cabbage,

spinach can be used as a basis for soup,
sauce, jam, ice-cream and dessert. 
Cook the pulp with some spices. Liquidize the
cooked pulp using a food processor or a (bar)
blender.
Use tomato pulp to make a tomato paste.

• Try these combinations of juices: apple with

carrot, orange with grape, pineapple with
grapefruit, beetroot with carrot, carrot with
melon, apple with orange.

Cleaning

• Switch off and remove the mains plug from the

wall socket before cleaning.

• Disassemble the appliance for washing-up as

indicated in figs. 11-13.

• The base unit may be wiped with a damp cloth,

some detergent may be required. 

• Do not use scourers, scouring pads, abrasives,

steel wool, acetone, alcohol etc.

• Wash the parts which have been in contact with

food in warm soapy water immediately after
use.

• Do not clean parts in a dishwasher.
• Use a soft brush for cleaning the sieve. 

6

7

8

9

10

11

12

13

Summary of Contents for HR2825

Page 1: ...HR 2825 26 ...

Page 2: ...rlands Pagina 11 Sla bij het lezen van de gebruiksaanwijzing pagina 3 op Italiano Pagina 14 Prima di usare l apparecchio aprite le pagina 3 e leggete attentamente le istruzioni per l uso Español Página 17 Desplegar las página 3 al leer las instrucciones de manejo Português Página 20 Durante a leitura do modo de emprêgo desdobre e verifique as pág 3 Ελληνικά Σελίδα 23 Ανοίξτε την σελίδα 3 για τις ο...

Page 3: ...3 1 A C D E G B 500 450 400 350 300 250 200 150 50 F 100 H I ...

Page 4: ...ner fig 2 Position the sieve fig 3 Place the lid so that it fits on all sides fig 4a Lock the lid with the latches Click fig 4b Check if the lid is positioned correctly Position your juice jar or cup fig 5 Insert the mains plug into the wall socket Ingredients Always use fresh fruits and vegetables because they produce more juice Especially advisable are pineapple beetroot apple cucumber carrot sp...

Page 5: ...he pulp container is full switch off fig 10 and wait for the sieve to come to a complete standstill release the two latches to disassemble the lid fig 11 remove the pulp container fig 12 empty the pulp container fig 13 Reassemble the juice extractor and continue the process Culinary hints With tomato juice you can prepare a delicious Bloody Mary Pulp of e g carrots beetroots cabbage spinach can be...

Page 6: ...s avant d appuyer sur le bouton d ouverture du couvercle Assemblage Positionnez le réservoir à pulpe fig 2 Positionnez le tamis fig 3 Mettez en place le couvercle fig 4a poussez les 2 crochets vers le bas pour verrouiller clic fig 4b Mettez en place le récipient à jus ou un verre fig 5 Vérifiez que le bouton marche arrêt est bien sur la position Arrêt Branchez l appareil Ingrédients Utilisez toujo...

Page 7: ...and le réservoir à pulpe est plein arrêtez l appareil fig 10 attendez que la pulpe ait fini de s écouler liberez les crochets de verrouillage pour retirer le couvercle fig 11 retirez le réservoir à pulpe ou le verre fig 12 videz le fig 13 Assemblez l appareil de nouveau Conseils de préparation Vous pouvez préparer un délicieux Bloody Mary avec du jus de tomates La pulpe de carottes betteraves chou...

Page 8: ...ie den Deckel entriegeln und öffnen Zusammensetzen des Entsafters Setzen Sie den Tresterbehälter ein Abb 2 Setzen Sie das Raspelsieb ein Abb 3 Setzen Sie den Deckel auf das Gerät Abb 4a Befestigen Sie den Deckel mit dem Schnappveschluß Klick Abb 4b Prüfen Sie ob der Deckel richtig sitzt und fest geschlossen ist Stellen Sie die Saftkanne oder einen anderen passenden Behälter unter den Auslauf Abb 5...

Page 9: ...er Luft ausgesetzt ist verliert er an Geschmack und an Nährwert Wenn Sie den Saft jedoch aufbewahren wollen so gießen Sie ihn in ein fest verschließbares Gefäß So können Sie ihn bis zu 24 Stunden im Kühlschrank aufbewahren Wenn Sie noch einen im Gerät verbliebenen Rest auffangen wollen so stellen Sie die Saftkanne in das Gerät zurück und schalten das Gerät nochmals ein Ist der Tresterbehälter voll...

Page 10: ...ischen auf das Sie bei Bedarf etwas Spülmittel aufgetragen haben Verwenden Sie keine scheuernden oder ätzenden Substanzen und keine Lösungsmittel wie Alkohol und Azeton Waschen Sie alle Teile die mit Nahrungsmitteln in Berührung gekommen sind nach Gebrauch mit warmem Wasser ab dem Sie etwas Spülmittel zugesetzt haben Spülen Sie keine Teile dieses Geräts im Geschirrspüler Reinigen Sie das Raspelsie...

Page 11: ...dekselklemmen losmaakt en het deksel opent In elkaar zetten Zet de opvangbak voor pulp op zijn plaats fig 2 Zet de zeef op zijn plaats fig 3 Zet het deksel zo op zijn plaats dat het aan alle zijden past fig 4a Bevestig het deksel met de klemmen Klik fig 4b Controleer of het deksel goed op zijn plaats zit Zet uw sapkan of beker op zijn plaats fig 5 Steek de stekker in het stopcontact Ingrediënten G...

Page 12: ...sap zijn voedingswaarde en smaak Als u het sap echter wilt bewaren doe het dan in een goed afgesloten kan of pot en zet deze voor max 24 uur in de koelkast Indien u het laatste sap nog in de sapkan wilt opvangen kunt u de kan in het apparaat terugzetten en het apparaat inschakelen Wanneer de opvangbak voor pulp vol is schakel het apparaat uit fig 10 en wacht tot de zeef geheel tot stilstand is gek...

Page 13: ... schoonmaken met een vochtige doek desgewenst met wat vloeibaar schoonmaakmiddel Gebruik geen krassende of schurende schoon maakmiddelen pannesponsen schuurdoekjes of sponsen staalwol aceton alcohol e d Maak de delen die met het voedsel in aanraking zijn gekomen meteen na gebruik schoon in warm sop en spoel ze af met heet water Doe geen onderdelen in de afwasmachine Gebruik een zachte borstel om d...

Page 14: ...o pestello Aspettate che il setaccio sia completamente fermo prima di sganciare e aprire il coperchio Come montare l apparecchio Posizionate il contenitore della polpa fig 2 Inserite il setaccio fig 3 Mettete il coperchio e bloccatelo premendo verso il basso fig 4a fino a quando sentirete un Click fig 4b Controllate che il coperchio sia posizionato in modo corretto Posizionate la caraffa del succo...

Page 15: ...e l apparecchio fig 10 e aspettate che il setaccio sia completamente fermo prima di togliere la caraffa Se possibile bevete immediatamente il succo in quando l esposizione all aria riduce il valore nutritivo e rende meno intenso il gusto Nel caso tuttavia decideste di conservare il succo estratto mettetelo in frigorifero in un contenitore ben chiuso per un massimo di 24 ore Quando il contenitore d...

Page 16: ...ure 11 13 La base motore può essere pulita con uno straccio umido ed eventualmente un po di detersivo Non usate sostanze abrasive paglietta acetone alcool ecc Lavate le parti che sono venute a contatto con il cibo in acqua tiepida saponata subito dopo l uso Non lavate le parti in lavastoviglie Usate una spazzolina morbida per pulire il setaccio ...

Page 17: ...decuado el empujador que se suministra Esperen a que el tamiz se pare completamente antes de aflojar las bridas y abrir la tapa Montaje Coloquen el depósito de la pulpa fig 2 Coloquen el tamiz fig 3 Coloquen la tapa de modo que quede totalmente ajustada fig 4a Fijen la tapa mediante las bridas Click fig 4b Comprueben si la tapa está correctamente posicionada Coloquen su jarra o la copa para el zum...

Page 18: ...do antes de sacar la jarra o la copa para el zumo Preferiblemente beban el zumo inmediatamente después de ser extraído La exposición al aire libre durante algún período de tiempo dará como resultado una pérdida de su valor nutricional y de su sabor Sin embargo si desean guardar el zumo pónganlo en el frigorífico en un frasco bien cerrado y durante un máximo de 24 horas Cuando el depósito de la pul...

Page 19: ... limpiada frotando con un paño húmedo y un poco de detergente si es necesario No usen desengrasadores almohadillas fregadoras abrasivos lana de acero acetona alcohol etc Las piezas que hayan estado en contacto con alimentos lávenlas con agua jabonosa caliente inmediatamente después del uso No limpien las piezas en un lavavajillas Para limpiar el tamiz usen un cepillo suave ...

Page 20: ...á ser utilizado o pressor indicado para o efeito Deixe o crivo parar por completo antes de soltar as molas e de abrir a tampa Montagem Coloque o reservatório da polpa fig 2 Coloque o crivo fig 3 Coloque a tampa e encaixe a bem de todos os lados fig 4a Feche a tampa com as molas Clique fig 4b Verifique se a tampa está bem colocada Coloque o jarro ou o copo fig 5 Introduza a ficha na tomada de pared...

Page 21: ...pere que o crivo se imobilize por completo antes de retirar o jarro ou o copo Beba o sumo imediatamente após ter sido feito porque se ficar exposto ao ar durante algum tempo perderá o seu valor nutritivo e o sabor natural Contudo se quiser conservar o sumo poderá colocá lo no frigorífico num recipiente bem fechado por um período máximo de 24 horas Quando o reservatório da polpa estiver cheio desli...

Page 22: ...máquina pode ser limpo com um pano húmido e se necessário com um pouco de detergente Não utilize desengordurantes esfregões abrasivos palha de aço acetona álcool etc Lave as peças que estiveram em contacto com os alimentos numa sabonária de água quente imediatamente após a utilização Não lave nada na máquina da loiça Sirva se duma escova macia para limpar o crivo ...

Page 23: ...ουνα µέσα στο σωλήνα τροφοδοσίας M νο το παρεχ µενο εξάρτηµα ώθησης θα πρέπει να χρησιµοποιείτε Aφήστε τον κ φτη να σταµατήσει εντελώς πριν ελευθερώσετε τις ασφάλειες και ανοίξετε το καπάκι Συναρµολ γησης Tοποθετήστε το δοχείο πολτού εικ 2 Tοποθετήστε τον κ φτη εικ 3 Tοποθετήστε το καπάκι έτσι ώστε να εφαρµ ζει απ λες τις πλευρές εικ 4a Kλειδώστε το καπάκι µε τις ασφάλειες κλικ εικ 4b Eλέγξτε τη σ...

Page 24: ...α στον σωλήνα που µπαίνουν υλικά Dταν ο αποχυµωτής σταµατήσει να βγάζει χυµ Σβύστε τη συσκευή εικ 10 και περιµένετε να σταµατήσει ο τρίφτης εντελω ς πριν πάρετε το δοχείο χυµών ή την κούπα Προτιµάτε να πίνετε το χυµ αµέσως µετά το στύψιµο H έκθεση του χυµού στον αέρα για αρκετ διάστηµα έχει σαν αποτέλεσµα να χάσει ο χυµ ς την θρεπτική του αξία και την γεύση του Aν µως θέλετε να διατηρήσετε τον χυµ...

Page 25: ...συναρµολογήστε τη συσκευή για να την πλύνετε πως δείχνουν οι εικ νες 11 13 H βάση της συσκευής µπορεί να καθαριστεί µε ένα υγρ ύφασµα ίσως χρειαστεί ελαφρ απορρυπαντικ Mη χρησιµοποιείτε ξίστρες αποξεστικά σύρµα κουζίνας ασετ ν οιν πνευµα κ λπ Πλύντε τα µέρη που έρχονται σε επαφή µε την τροφή µε ζεστή σαπουνάδα αµέσως µετά τη χρήση Mη βάζετε τα εξαρτήµατα του αποχυµωτή σε πλυντήριο πιάτων Xρησιµοπο...

Page 26: ...4222 000 89684 u ...

Reviews: