Kneading dough
with the metal kneading hook
™
-
Please note: always use the kneading tube
during kneading.
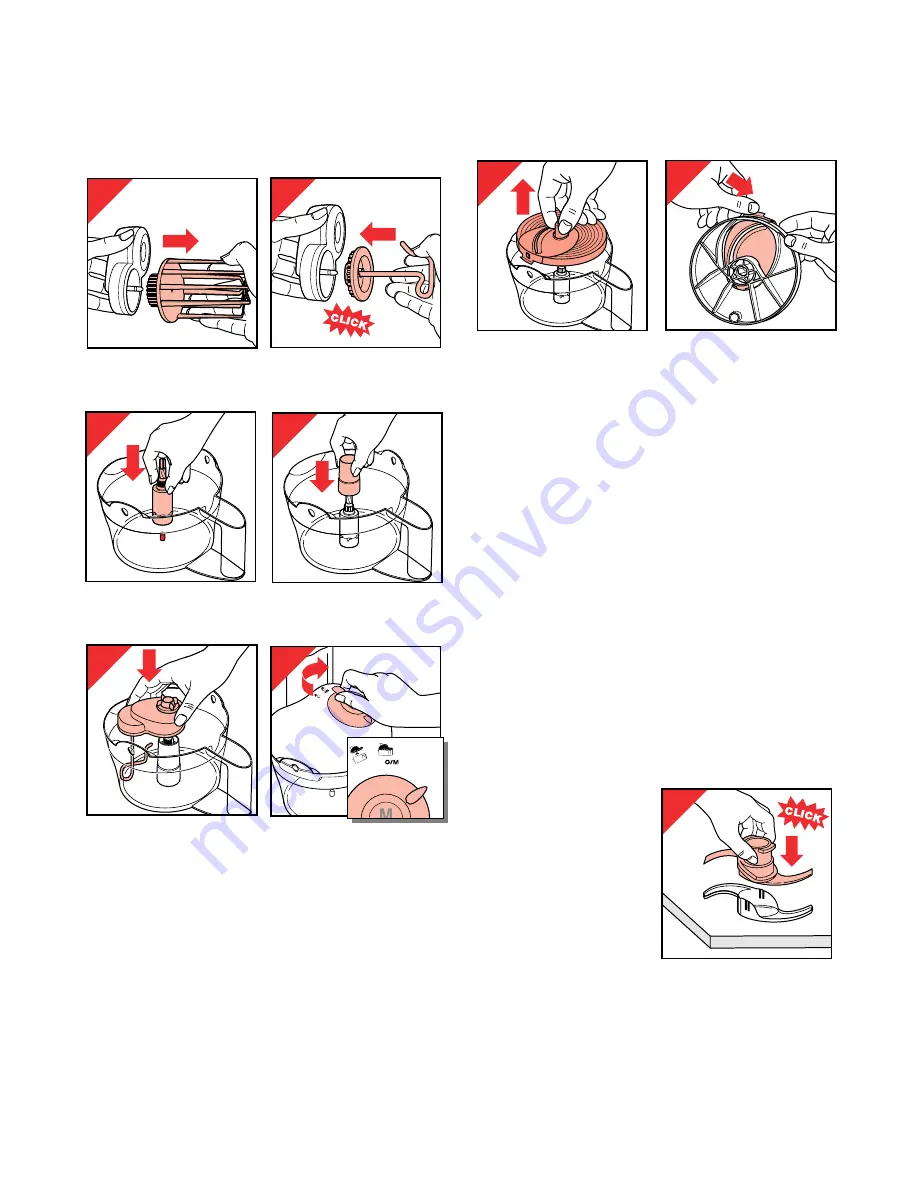
- If required: Pull the whisk out of the gear box
(fig. 29) and firmly insert the kneading hook (fig. 30).
- First place the coupler and the kneading tube
(figs. 31 and 32).
- Place the kneading hook on the coupler (fig. 33).
- Finally, put the ingredients into the bowl.
- Place the cover and the motor unit (fig. 3-4).
Put the pusher into the food chute to shut it off.
- Set the control ring to speed 5 (fig. 34).
Tips - kneading
• Never exceed the maximum quantity indicated for
flour.
• For bread dough and yeast dough first put the water,
yeast and sugar into the bowl. Later add the other
ingredients. The kneading time depends on the type
of bread dough but will be between three and four
minutes.
• Never forget to disassemble and clean the gear box
after kneading.
8
After use
- To release the motor unit and lid turn the control
ring to position
1
(fig. 6, 7).
- Lift the accessory and the coupler from the bowl
(fig. 35).
After that, you can empty the bowl.
- After slicing or shredding: release the insert from the
insert disc holder (fig. 36). Make sure the insert is
not pointing toward you while doing so. Take care:
the cutting edges are very sharp!
Cleaning and storage
• Always remove the mains plug from the wall socket
before cleaning the motor unit.
• The motor unit may be wiped with a damp cloth.
Never immerse the motor unit in water. Never pour
water over it.
• Wash the items which have been in contact with the
food in warm soapy water immediately after use.
• Take care when cleaning the metal blade and slicing
and shredding inserts: the cutting edges are very
sharp! These items can also be cleaned in a
dishwasher.
• Ensure that the cutting edges do not come into
contact with hard objects as this might make them
blunt.
• Place the protective cap
back on to the metal
blade after cleaning
(fig. 37).
30
31
32
34
1 • 2
• 3
• 4
•
5
33
35
36
37
29
CLICK


