background image

23

Video setup

On

[Video Setup Page]

, you can set the 

following options:

[TV Type]

Change this setting if the video does not appear 
correctly. By default, this setting matches the 
most common setting for TVs in your country.

[PAL]

 – For TV with PAL color system.

[NTSC]

 – For TV with NTSC color 

system. 

[Multi]

 – For TV that is compatible 

with both PAL and NTSC.

[TV Display]

The TV format determines the aspect ratio of 
display according to the type of TV you have 
connected.

[4:3 Pan Scan]

 – For 4:3 screen TV: 

full-height display with the trimmed 
sides.

[4:3 Letter Box]

 – For 4:3 screen TV: 

wide-screen display with black bars on 
the top and bottom of the screen.

[16:9 Wide  Screen]

 – For wide-

screen TV: display ratio 16:9.

[Progressive]

Turn on or off progressive scan mode.

[Picture Settings]

Select a predefi ned set of picture color settings 
or customize your personal setting.

[Standard]

 – original color setting.

[Bright]

 – vibrant color setting.

[Soft]

 – warm color setting.

[Personal]

 – customize the color 

setting. Adjust the level of brightness, 
contrast, sharpness/tint and color 
saturation.

4:3 Letter Box (LB)

4:3 Pan Scan (PS)

16:9 (Wide Screen)

[15 mins]

,

[30 mins]

,

[45 mins]

,

[60

mins]

 – select the count down time 

before the apparatus switches to 
standby.

[Off]

 – disable sleep mode.

[DivX(R) VOD  Code]

Display the DivX® registration code.

Tip

Enter this DivX registration code when you rent or 

purchase video from www.divx.com/vod. The DivX 
videos rented or purchased through the DivX® VOD 
(Video On Demand) service can be played only on the 
device to which it is registered.

Audio setup

On

[Audio Setup Page]

, you can set the 

following options:

[HDMI Audio]

When you connect this apparatus and TV with 
an HDMI cable, select the audio output setting 
for this connection.

[On]

 – the sound is output through 

both your TV and this apparatus. If 
the audio format on the disc is not 
supported, it is downmixed to two-
channel sound (Linear-PCM). 

[Off]

 – disable audio output from the 

TV. The sound is only output through 
this apparatus.

[Night Mode]

Make loud sound level softer and soft sound 
level louder so that you can watch the DVD 
movies at a low volume, without disturbing 
others.

[Off]

 – enjoy surround sound with its 

full dynamic range.

[On]

 – enjoy quiet viewing at night 

(DVDs only).

English

EN

Summary of Contents for HSB2351/98

Page 1: ...Register your product and get support at www philips com welcome HSB2351 98 EN User manual 7 Ԛ ʹ ...

Page 2: ... DVD Home Theater System 7 Introduction 7 What s in the box 7 Overview of the main unit 8 Overview of the remote control 9 3 Connect 11 Place the unit 11 Attach speakers to the main unit 11 ConnectTV 11 Connect audio cables 13 Connect FM antenna 13 Connect power 13 4 Get started 15 Prepare the remote control 15 Turn on 15 Find the correct viewing channel 15 Select the correctTV system 15 Select me...

Page 3: ...your volume control at a low setting Slowly increase the sound until you can hear it comfortably and clearly without distortion Listen for reasonable periods of time Prolonged exposure to sound even at normally safe levels can also cause hearing loss Be sure to use your equipment reasonably and take appropriate breaks Be sure to observe the following guidelines when using your headphones Listen at...

Page 4: ...ar what s around you You should use caution or temporarily discontinue use in potentially hazardous situations Do not use headphones while operating a motorized vehicle cycling skateboarding etc it may create a traffic hazard and is illegal in many areas Caution Use of controls or adjustments or performance of procedures other than herein may result in hazardous radiation exposure or other unsafe o...

Page 5: ...nd the ENERGY STAR mark are registered U S marks Manufactured under license from Dolby Laboratories Dolby Pro Logic and the double D symbol are trademarks of Dolby Laboratories Other trademarks and trade names are those of their respective owners This apparatus includes this label Note The type plate is located on the bottom of the apparatus HDMI and HDMI logo and High Definition Multimedia Interfa...

Page 6: ... your purchase and welcome to brand To fully benefit from the support that brand offers register your product at www brand com welcome This DVD HomeTheater System is designed to complement your home perfectly Enjoy the DVD HomeTheater System with multi channel surround sound and excellent picture quality Introduction With this unit you can watch video from DVD VCD SVCD or USB devices enjoy audio fr...

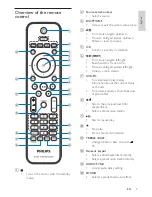
Page 7: ...ustments or performance of procedures other than herein may result in hazardous radiation exposure or other unsafe operation a SOURCE Select a source b MP3 LINK Jack for an external audio device c Turn on the unit or switch to standby mode d Stop play Erase a preset radio station e VOL Adjust volume f Skip to the previous next title chapter track Select a preset radio station b c a e h d g f i j l...

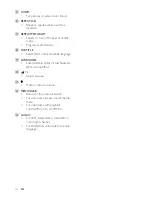
Page 8: ...out the current status or the disc For pictures display a thumbnail view of picture files h Skip to the previous next title chapter track Select a preset radio station i Start or pause play j Stop play Erase a preset radio station k TREBLE BASS Change treble or bass Use with l Numeric keypad Select a title chapter track directly Select a preset radio station directly m AUDIO SYNC Access audio delay...

Page 9: ... Select DVD or DivX subtitle language s SURROUND Enable disable DolbyVirtual Speakers DVS sound effect t Adjust volume u Mute or restore volume v MENU BACK Return to the previous screen For video discs access or exit the disc menu For video discs with playback control PBC turn on off PBC w AUDIO ForVCD select stereo mono left or mono right channel For DVD DivX video select an audio language EN ...

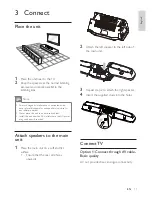
Page 10: ... to theTV 2 Keep the speakers at the normal listening ear level and directly parallel to the listening area Note To avoid magnetic interference or unwanted noise never place this apparatus and speakers too close to any radiation devices Never place this unit in an enclosed cabinet Install this unit near the AC outlet where the AC power plug can be easily reached Attach speakers to the main unit 1 ...

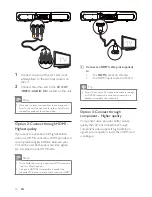
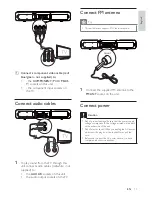
Page 11: ... white yellow to the AV input sockets on theTV 2 Connect the other end to the AV OUT VIDEO AUDIO L R sockets on the unit Note If you want to listen to sound from the unit instead of fromTV connect the video cable yellow only Do not connect the audio cable red and white Option 2 Connect through HDMI Highest quality If you want to experience full high definition video use HDMI connection HDMI provide...

Page 12: ...er always pull the plug from the socket Never pull the cord Before you connect the AC power ensure you have completed all other connections FM ANT a Connect a component video cable red blue green not supplied to the COMPONENT Pr Cr Pb Cb Y sockets on this unit the component input sockets on theTV Connect audio cables 1 To play sound from theTV through this unit connect audio cables red white not s...

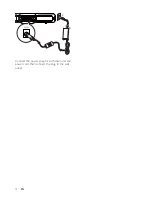
Page 13: ...14 Connect the power adaptor with main unit and power cord then connect the plug to the wall outlet b c EN ...

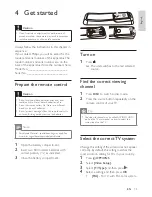
Page 14: ... may result in hazardous radiation exposure or other unsafe operation Always follow the instructions in this chapter in sequence If you contact Philips you will be asked for the model and serial number of this apparatus The model number and serial number are on the back of the apparatus Write the numbers here Model No __________________________ Serial No ___________________________ Prepare the rem...

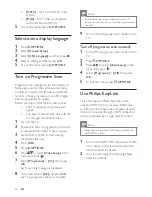
Page 15: ...ontrols NTSC ForTV with NTSC color system Multi ForTV that is compatible with both PAL and NTSC 5 To exit the menu press OPTIONS Select menu display language 1 Press OPTIONS 2 Select General Setup 3 Select OSD Language and then press 4 Select a setting and then press OK 5 To exit the menu press OPTIONS Turn on Progressive Scan Progressive scan displays twice the number of frames per seconds than i...

Page 16: ...em Standby When you connect this unit to devices that support standby mode you can use the remote control of this unit to switch this unit and all connected HDMI devices to standby mode You can also use the remote control from any of the connected HDMI devices to perform one touch standby One touch audio play System Audio Control When you connect this unit to HDMI CEC compliant devices the unit ca...

Page 17: ...ress MENU BACK to access the menu Sync audio output with video play If the video play is slower than the audio output sound does not match with the pictures you can delay the audio output to match the video 5 Play Note With some disc file types play may differ Play discs Caution Never look at the laser beam inside the unit Risk of product damage Never play discs with accessories such as disc stabil...

Page 18: ...me as the file name of the video Play MP3 WMA picture files You can play MP3 WMA picture files copied onto a CD R RW recordable DVD or USB device 1 Insert a disc or connect a USB device 2 Select a source For discs press DISC For USB devices press USB A contents menu is displayed 3 Select a folder then press OK 4 Select a file to play then press 1 Press and hold AUDIO SYNC until AUDIO SYNC XXX is displ...

Page 19: ...he disc Mono Left Mono Right Stereo To return to the main menu press until the Previous folder is selected then press OK To stop play press To pause or resume play press To skip to the previous next file press Play control Select repeat shuffle play options 1 During play press REPEAT PROGRAM repeatedly to select a repeat option or the shuffle play mode To resume normal play press REPEAT PROGRAM repea...

Page 20: ...Note This feature is only available for DVDs DivX videos recorded with multiple audio languages 1 Press AUDIO repeatedly to select an audio language Select a subtitle language Note This feature is only available for DVDs DivX videos recorded with multiple audio languages 1 Press SUBTITLE repeatedly to select an available subtitle language Picture view options Start slideshow of pictures 1 During p...

Page 21: ...r Switches to standby automatically after the preset time 6 Adjust settings 1 Press OPTIONS 2 Select a setup page 3 Select an option and then press 4 Select a setting and then press OK To return to the previous menu press To exit the menu press OPTIONS General setup On General Setup Page you can set the following options EasyLink If this unit is connected to HDMI CEC compliantTV devices all connec...

Page 22: ...rast sharpness tint and color saturation 4 3 Letter Box LB 4 3 Pan Scan PS 16 9 Wide Screen 15 mins 30 mins 45 mins 60 mins select the count down time before the apparatus switches to standby Off disable sleep mode DivX R VOD Code Display the DivX registration code Tip Enter this DivX registration code when you rent or purchase video from www divx com vod The DivX videos rented or purchased throug...

Page 23: ...or change the password see Preference Setup Password PBC Turns on or off the content menu ofVCDs SVCDs with PBC playback control feature On display index menu when you load a disc for play Off skip the menu and start play from the first title MP3 JPEG Nav Select to display the folders or display all the files HDMIVideo Select the HDMI video output resolution that is compatible with yourTV display ca...

Page 24: ...Menu display all the files Password Set or change the password for locked discs and play restricted DVDs 1 Press the numeric keys to enter 0000 or your last set password at Old Password field 2 Enter the new password at New Password field 3 Enter the new password again at Confirm PWD field 4 Press OK to exit the menu Note If you forget the password enter 0000 before you set a new password DivX Subtitle...

Page 25: ...tion directly 7 Tune to FM radio stations 1 Ensure that you have connected and fully extended the supplied FM antenna 2 Press RADIO 3 Press and hold 4 When the frequency indication starts to change release the button The FM tuner tunes to a station with strong reception automatically 5 Repeat steps 3 4 to tune to more stations To tune to a weak station Press repeatedly until you find optimal recept...

Page 26: ...ame time Select a preset sound effect 1 During play press SOUND repeatedly to select CLASSIC Concert ROCK Action Sports Gaming Lounge Drama Night Select surround sound effect DVS DolbyVirtual Speaker technology creates a highly compelling 5 1 channel listening experience from as few as two speakers It is an ideal entertainment solution for locations where space for multiple speaker setup is limite...

Page 27: ... sockets and to the audio output sockets on the audio player For audio players with headphone sockets Connect a 3 5mm audio cable not supplied to the MP3 LINK socket and to the headphone socket on the audio player For audio players with optical sockets Connect an optical cable not supplied to the OPTICAL IN socket and to the optical output socket on the audio player 2 Select the AUDIO SOURCE or MP...

Page 28: ...ut 1 0Vp p 75ohm HDMI CEC Output 1 3a USB Direct Version 2 0 Dimensions Main Unit W x H x D 800 x 140 x 97 mm Weight With Packing 5 kg 10 Product information Note Product information is subject to change without prior notice Specifications Amplifier Rated Output Power 2X50WRMS Frequency Response 20 20kHz 3dB Signal to Noise Ratio 67dB Aux Input 500mv RMS 20kohm Disc LaserType Semiconductor Disc Diam...

Page 29: ... format Supported disc formats DigitalVideo Discs DVDs Video CDs VCDs SuperVideo CDs SVCDs DigitalVideo Discs Rewritable DVD RW Compact Discs CDs Picture Kodak JPEG files on CDR W DivX R disc on CD R W DivX 3 11 4 x and 5 x WMA Supported MP3 CD formats ISO 9660 Max title album name 12 characters Max title number plus album 255 Max nested directory 8 levels Max album number 32 Max MP3 track number 9...

Page 30: ...ries Aim the remote control directly at the sensor on the front of the unit 11 Troubleshooting Warning Never remove the casing of this apparatus To keep the warranty valid never try to repair the system yourself If you encounter problems when using this apparatus check the following points before requesting service If the problem remains unsolved go to the Philips web site www philips com welcome ...

Page 31: ... system again As a power saving feature the system turns off automatically 15 minutes after disc play reaches the end and no control is operated Poor radio reception Increase the distance between the unit and yourTV orVCR Fully extend the FM antenna Connect an outdoor FM antenna instead Unable to select Progressive Scan Ensure the component video mode is set to YUV No sound on HDMI connection You ...

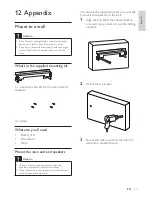
Page 32: ...ssional personnel to safely mount the product to a wall Risk of injury Ensure that no supply ducts such as gas water or electricity are harmed when you drill the holes What s in the supplied mounting kit 1 x wall mount bracket for the main unit and speakers 4 x screws What else you ll need Electric drill Screwdriver Pencil Mount the main unit and speakers Caution To find a suitable mounting locatio...

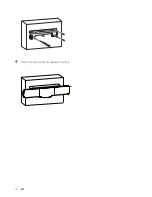
Page 33: ...34 4 Hook the main unit and speakers in place EN ...

Page 34: ...d digital multichannel audio It delivers high quality picture and sound quality completely free from noise HDMI is fully backward compatible with DVI As required by the HDMI standard connecting to HDMI or DVI products without HDCP High bandwidth Digital Content Protection will result in noVideo or Audio output 13 Glossary A Analog audio Sound that has not been turned into numbers Analog sound is a...

Page 35: ...p 1 or MPEG 1 Audio Layer 3 With the MP3 format one CD R or CD RW can contain about 10 times more data than a regular CD P Parental control A function of the DVD to limit playback of the disc by the age of the users according to the limitation level in each country The limitation varies from disc to disc when it is activated playback will be prohibited if the software s level is higher than the us...

Page 36: ... 2009 Koninklijke Philips Electronics N V All rights reserved Document order number HSB2351_98_UM_V1 0 ...

Reviews: