background image

34

EN

Disc does not play high-definition video.

• 

Make sure that the disc contains high-

definition video.

• 

Make sure that the TV supports high-

definition video. 

• 

Use an HDMI cable to connect to the TV.

Sound

No sound from home theater speakers.

• 

If no sound comes from the rear speakers, 

pair up the rear speakers with the main 

unit (see 'Pair up the rear speakers' on 

page 8).

• 

Connect the audio cable from your home 

theater to your TV or other devices. 

You do not need a separate audio 

connection when the home theater and 

TV are connected through an 

HDMI ARC


connection.

• 

Set up the audio for the connected device.

• 

Reset your home theater to its factory 

settings (see 'Restore default settings' on 

page 27), then switch it off and switch on 

again.

• 

On your home theater, press 

SOURCE


repeatedly to select the correct audio 

input.

Distorted sound or echo.

• 

If you play audio from the TV through the 

home theater, make sure that the TV is 

muted.

Audio and video are not synchronized.

• 

1) Press  . 

2)  Press the 

Navigation buttons

 (left/right) 

to select 

[Audio sync]

, and then press 

OK

3)  Press the 

Navigation buttons

 (up/

down) to synchronize the audio with 

the video.

Play

Cannot play a disc.

• 

Clean the disc.

• 

Make sure that the home theater supports 

the type of disc (see 'Media formats' on 

page 29).

• 

Make sure that the home theater supports 

the region code of the disc (see 'Region 

codes' on page 29).

• 

If the disc is a DVD±RW or DVD±R disc, 

make sure that it is finalized. 

Cannot play a DivX file.

•  Make sure that the DivX file is encoded 

according to the 'Home Theater Profile' 

with the DivX encoder.

•  Make sure that the DivX file is complete.

DivX or RMVB/RM subtitles do not display 

correctly.

•  Make sure that the subtitle file name is 

the same as the movie file name

 (see 

'Subtitles' on page 17).

• 

Select the correct character set:  

1) Press  .  

2) Select 

[Character set]

.  

3) Select the supported character set.  

4) Press 

OK

Cannot read the contents of a USB storage 

device.

• 

Make sure that the format of the USB 

storage device is compatible with the 

home theater.

•  Make sure that the file system on the USB 

storage device is supported by the home 

theater.

'No entry' or 'x' sign appears on the TV.

• 

The operation is not possible.

EasyLink does not work.

• 

Make sure that the home theater is 

connected to a Philips brand EasyLink TV, 

and the EasyLink option is turned on (see 

'Set up EasyLink (HDMI-CEC control)' on 

page 11).

Summary of Contents for HTB5520/93

Page 1: ...www philips com support User manual Always there to help you Register your product and get support at HTB5520 93 HTB5550 93 HTB5580 93 Question Contact Philips ...

Page 2: ......

Page 3: ... Connect Bluetooth via NFC 17 Data files 17 USB storage devices 18 Audio video and picture options 18 Radio 19 External audio device 20 Voole 21 Stream multimedia via Miracast 21 Browse PC through DLNA 22 Karaoke 23 Choose sound 24 5 Change settings 25 Language settings 25 Picture and video settings 26 Audio settings 26 Parental control settings 26 Display settings 27 Energy saving settings 27 Spe...

Page 4: ...wall mountable products use only the supplied wall mount bracket Secure the wall mount to a wall that can support the combined weight of the product and the wall mount Koninklijke Philips N V bears no responsibility for improper wall mounting that results in accident injury or damage For speakers with stands use only the supplied stands Secure the stands to the speakers tightly Place the assembled...

Page 5: ... manufactured with high quality materials and components which can be recycled and reused Never dispose of your product with other household waste Please inform yourself about the local rules on the separate collection of electrical and electronic products and batteries The correct disposal of these products helps prevent potentially negative consequences on the environment and human health Your p...

Page 6: ...he support that Philips offers e g notification of product software upgrade register your product at www philips com welcome Main unit This section includes an overview of the main unit a Open Close Open or close the disc compartment b Play Pause Start pause or resume play c Stop Stop play d SOURCE Select an audio video radio source or Bluetooth mode for the home theater e Volume Increase or decre...

Page 7: ...avigation buttons Navigate menus In radio mode press left or right to start auto search In radio mode press up or down to tune the radio frequency f OK Confirm an entry or selection g Return to a previous menu screen In radio mode press and hold to erase the current preset radio stations h Color buttons Select tasks or options for Blu ray discs i Load or eject the disc j Play Start or resume play ...

Page 8: ...N Audio input from an external device such as MP3 player 3 5mm jack d USB Audio video or picture input from a USB storage device Connect a USB mass storage to access BD Live Note When you connect an MP3 player to the home theater with a 3 5mm audio cable make sure that you connect the MP3 player to the AUDIO IN connector not to the MIC 1 or MIC 2 connector to ensure normal function of the home the...

Page 9: ...ls the indicator blinks at a slower rate c b a d 3 Connect and set up This section helps you connect your home theater to aTV and other devices and then set it up For information about the basic connections of your home theater and accessories see the quick start guide Note For identification and supply ratings see the type plate at the back or bottom of the product Before you make or change any c...

Page 10: ...ightly behind it 5 SUBWOOFER subwoofer Place the subwoofer at least one meter to the left or right of theTV Leave about 10 centimeter clearance from the wall 6 Wireless box receiver Place the wireless box in between the rear speakers for cable connection Pair up the rear speakers For the first time connection pair up the rear speakers with the home theater via the supplied wireless box receiver Wh...

Page 11: ...h as volume control for both the TV and the home theater see Set up EasyLink HDMI CEC control on page 11 TV 3 If you cannot hear theTV audio through your home theater set up the audio manually see Set up the audio on page 12 Option 2 Connect to TV through standard HDMI Best quality video If yourTV is not HDMI ARC compliant connect your home theater to theTV through a standard HDMI connection 1 Usi...

Page 12: ... a digital optical cable Best quality audio 1 Using an optical cable connect the OPTICAL connector on your home theater to the OPTICAL OUT connector on theTV or other device The digital optical connector might be labeled SPDIF or SPDIF OUT TV Option 2 Connect audio through a digital coaxial cable Good quality audio 1 Using a coaxial cable connect the COAXIAL connector on your home theater to the C...

Page 13: ... then switch theTV to the correct source for your home theater Enable EasyLink 1 Press Home 2 Select Setup and then press OK 3 Select EasyLink EasyLink On 4 On yourTV and other connected devices turn on HDMI CEC control For details see the user manual of theTV or other devices On yourTV set the audio output to Amplifier instead ofTV speakers For details see theTV user manual EasyLink controls With...

Page 14: ...er to a network router for a network setup and enjoy Streamed multimedia content see Browse PC through DLNA on page 22 Voole see Voole on page 21 BD Live applications see BD Live on Blu ray on page 16 Software update see Update software through the Internet on page 29 Caution Familiarize yourself with the network router media server software and networking principles If necessary read documentatio...

Page 15: ...ge and compatibility use 802 11n router 1 Press Home 2 Select Setup and then press OK 3 Select Network Network installation Wireless Wi Fi and then press OK 4 Follow the onscreen instructions to select and set up the wireless network If connection fails select Retry and then press OK w w w 5 Select Finish and then press OK to exit To view the network settings select Setup Network View wireless set...

Page 16: ...play disc When the home theater is switched on the disc automatically plays 1 Press Home 2 Select Setup and then press OK 3 Select Preference Auto play disc On The feature is turned on To turn off the feature select Off The disc will not automatically play Auto play video sequentially If two or more video files are available in the same folder from a USB storage device or PC via DLNA connection th...

Page 17: ... can play Blu ray 3D video Read the 3D health warning before playing a 3D disc What you need A 3DTV A pair of 3D glasses that are compatible with your 3DTV A 3D Blu ray video A high speed HDMI cable 1 Using the high speed HDMI cable connect your home theater to a 3D compatibleTV 2 Make sure that the 3D video setting is enabled Press Home select Setup Video Watch 3D video Auto To turn off 3D output...

Page 18: ...uch as an iPad iPhone iPod touch Android phone or laptop and then you can listen to the audio files stored on the device through your home theater speakers What you need A Bluetooth device which supports Bluetooth profile A2DP and with Bluetooth version as 2 1 EDR The operational range between the home theater and a Bluetooth device is approximately 10 meters 30 feet 1 Press to select Bluetooth mo...

Page 19: ...eater and BT always displayed on the display panel 3 Select and play audio files or music on your NFC device To break the connection tap again the NFC device onto the NFC tag on the home theater Data files Your home theater can play pictures audio and video files contained in a disc or a USB storage device Before you play a file check that the file format is supported by your home theater see File...

Page 20: ... need A USB storage device that is formatted for FAT or NTFS file systems and complies with the Mass Storage Class A media file in one of the supported file formats see File formats on page 30 Note If you use a USB extension cable USB HUB or USB multi reader the USB storage device may not be recognized 1 Connect a USB storage device to the USB connector on your home theater 2 Press Home 3 Select B...

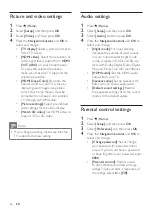
Page 21: ...rn off the repeat mode Picture settings Select a predefined color setting Picture options While viewing a picture zoom into the picture rotate it add animation to a slideshow and change the picture settings 1 Press The picture options menu appears 2 Press the Navigation buttons and OK to select and change the following settings Info Display picture information Rotate 90 Rotate the picture 90 degre...

Page 22: ... Fine tune a radio frequency Press to stop the installation of radio stations Press and hold to erase the preset radio station Button Action Manual 1 Press 2 Press to select your preset 3 Press again to store the radio station Automatic Press and hold for three seconds to reinstall the radio stations SUBTITLE AUDIO Toggle between the stereo and mono sounds Tuning grid In some countries you can tog...

Page 23: ...refer to a related user manual for details Make sure that Miracast is enabled on this home theater press and select Setup Network Miracast break in On 1 Press to display the home menu screen of this home theater 2 On the Miracast source device initiate the search for this home theater and select this home theater when it is found refer to the source device s user manual for details If this is the ...

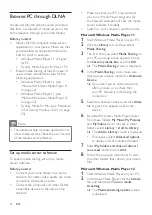
Page 24: ...ows you to run Media Player programs or the firewall s exemption list has the media server software included Switch on your computer and the router Microsoft Windows Media Player 11 1 Start Windows Media Player on your PC 2 Click the Library tab and then select Media Sharing 3 The first time you select Media Sharing on your PC a pop up screen appears Check the Share my media box and click OK The M...

Page 25: ...screen is displayed 4 Type a name for your media server and then click Save changes 5 Back in theTwonky Media screen select Basic Setup and Sharing The Sharing screen is displayed 6 Browse and select folders to share and then select Save Changes Your Macintosh rescans the folders automatically so that they are ready to share Play files from your PC Note Before you play multimedia content from the ...

Page 26: ...urround sound or stereo sound Sound Select a sound mode Sound options Description Audio sync Delay the audio to match the video Auto volume Reduce sudden changes in volume for example duringTV commercials 3 Select an option and then press OK 4 Press to exit If you do not press a button within a minute the menu exits automatically Surround sound mode Experience an immersive audio experience with su...

Page 27: ... Select Auto volume and then press OK 3 Press the Navigation buttons up down to select On or Off 4 Press OK to confirm 5 Change settings The home theater settings are already configured for optimal performance Unless you have a reason to change a setting we recommend that you keep the default setting Note You cannot change a setting that is grayed out To return to the previous menu press To exit t...

Page 28: ... settings 1 Press Home 2 Select Setup and then press OK 3 Select Audio and then press OK 4 Press the Navigation buttons and OK to select and change Night mode For quiet listening decrease the volume of loud sounds on your home theater Night mode is only available in DVDs and Blu ray discs with Dolby Digital Dolby Digital Plus and DolbyTrue HD soundtracks HDMI audio Set the HDMI audio output from y...

Page 29: ...r 30 minutes of inactivity This timer works only when a disc or USB play is paused or stopped Sleep timer Set the duration of the sleep timer so that the home theater is switched to standby after the specified period Speaker settings 1 Press Home 2 Select Setup and then press OK 3 Select Advanced and then press OK 4 Press the Navigation buttons and OK to select and change Enhanced audio Select On ...

Page 30: ...ry Do not use a USB hard drive A computer with Internet access An archive utility that supports the ZIP file format Step 1 Download the latest software 1 Connect a USB flash drive to your computer 2 In your web browser go to www philips com support 3 At the Philips Support website find your product and locate the Software and drivers The software update is available as a zip file 4 Save the zip fi...

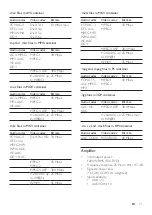
Page 31: ...takes about 5 minutes to complete Once complete the home theater automatically switches off and restarts If it does not disconnect the power cord for a few seconds and then reconnect it 7 Product specifications Note Specifications and design are subject to change without notice Region codes The type plate on the back or bottom of the home theater shows which regions it supports Media formats AVCHD...

Page 32: ... 648 Mbps AC 3 640kbps DTS core 1 54 Mbps MPEG 912 kbps MP3 Up to 320 kbps WMA Up to 192 kbps WMA Pro Up to 768kbps Exten sion Con tainer Audio codec Bit rate AAC HE AAC Up to 192 kbps flac FLAC FLAC Up to 24 bit per sample ra RM AAC HE AAC Up to 192 kbps RM COOK 96469 bps ogg OGG Vorbis Variable bit rate maximum block size 4096 FLAC Up to 192kHz sampling rate OGGPCM No limitation MP3 Upto 320 kbp...

Page 33: ...s HD 30 Mbps MPEG 1 MPEG 2 40 Mbps MPEG 4 ASP 38 4 Mbps H 264 AVC up to HiP 5 1 25 Mbps WMV9 45 Mbps m2ts files in MKV container Audio codec Video codec Bit rate PCM AC 3 DTS core MPEG MP3 WMA AAC HE AAC DD MPEG 1 MPEG 2 40 Mbps MPEG 4 ASP 38 4 Mbps H 264 AVC up to HiP 5 1 25 Mbps WMV9 45 Mbps mpg and mpeg files in PS container Audio codec Video codec Bit rate PCM DTS core MPEG MP3 MPEG 1 MPEG 2 4...

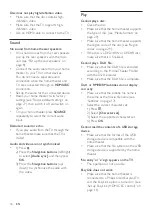
Page 34: ...40V 50 Hz Power consumption 160 W Standby power consumption 0 5 W Dimensions W x H x D 435 x 58 x 293 mm Weight 2 66 kg Operating temperature and humidity 0 C to 45 C 5 to 90 humidity for all climates Storage temperature and humidity 40 C to 70 C 5 to 95 Subwoofer Output power 166 W RMS 10 THD Impedance 3 ohm Speaker drivers 203 mm 8 woofer Dimensions WxHxD 235 x 367 x 310 mm Weight 4 6 kg Cable l...

Page 35: ...tric shock Never remove the casing of the product To keep the warranty valid never try to repair the product yourself If you have problems using this product check the following points before you request service If you still have a problem get support at www philips com support Main unit The buttons on the home theater do not work Disconnect the home theater from the power supply for a few minutes...

Page 36: ...tion buttons up down to synchronize the audio with the video Play Cannot play a disc Clean the disc Make sure that the home theater supports the type of disc see Media formats on page 29 Make sure that the home theater supports the region code of the disc see Region codes on page 29 If the disc is a DVD RW or DVD R disc make sure that it is finalized Cannot play a DivX file Make sure that the DivX...

Page 37: ... theater is connected to theTV through an HDMI cable Switch to the correct HDMI source on theTV Bluetooth A device cannot connect with the home theater The device does not support the compatible profiles required for the home theater You have not enabled the Bluetooth function of the device See the user manual of the device on how to enable the function The device is not correctly connected Connec...

Page 38: ...rce device s user manual 9 Notice This section contains the legal and trademark notices Copyright This item incorporates copy protection technology that is protected by U S patents and other intellectual property rights of Rovi Corporation Reverse engineering and disassembly are prohibited This product incorporates proprietary technology under license fromVerance Corporation and is protected by U ...

Page 39: ...nts for open source software used in this product are included on a separate leaflet RMVB end user agreement Notes to End User By using this product with RealNetworks software and services the end user agrees to the following terms of REALNETWORKS INC End User may only use the software for private non commercial use in accordance with the terms of RealNetworks EULA End User is not allowed to modif...

Page 40: ...a 7574 Kurdish 7585 Lao 7679 Latina 7665 Latvian 7686 Letzeburgesch 7666 Limburgan Limburger 7673 Lingala 7678 Lithuanian 7684 Luxembourgish 7666 Macedonian 7775 Malagasy 7771 Magyar 7285 Malayalam 7776 Maltese 7784 Manx 7186 Maori 7773 Marathi 7782 Marshallese 7772 Moldavian 7779 Mongolian 7778 Nauru 7865 Navaho Navajo 7886 Ndebele North 7868 Ndebele South 7882 Ndonga 7871 Nederlands 7876 Nepali ...

Page 41: ... 27 auto subtitle shift 27 auto volume 25 B batteries 33 BD Live 16 Bluetooth 16 Blu ray 14 BonusView 15 brightness 27 C change password 26 character set 17 clear BD Live memory 16 connect to TV 9 connectors 6 control buttons disc 15 control buttons USB 15 D data files 17 deep color 26 default settings 27 device name 13 disc language 25 disc menu 25 display panel 27 DivX 17 E Easylink HDMI CEC 11 ...

Page 42: ... radio 19 region codes 29 remote control 5 repeat 18 S shuffle 18 sleep timer 27 slide animation 19 software update 28 software version 28 sound 24 speaker position 7 speaker setup 11 speaker specifications 29 subtitle language 25 subtitle position 27 surround sound 24 synchronize picture and sound 15 T troubleshooting network 36 troubleshooting picture 33 troubleshooting play 34 troubleshooting s...

Page 43: ...s an official DivX Certified device that plays DivX video Visit divx com for more information and software tools to convert your files into DivX videos ABOUT DIVXVIDEO ON DEMAND This DivX Certified device must be registered in order to play purchased DivXVideo on Demand VOD movies To obtain your registration code locate the DivXVOD section in your device setup menu Go to vod divx com for more info...

Page 44: ...his hazardous substance contained in all of the homogeneous materials for this part is below the limit requirement in GB T 26572 表示该有害物质至少在该部件的某一均质材料中的含量超出 GB T 26572 规定的限量要求 Indicates that this hazardous substance contained in at least one of the homogeneous materials used for this part is above the limit requirement in GB T 26572 10 环保使用期限 Environmental Protection Use Period 此标识指期限 十年 电子电气产品中的有害...

Page 45: ......

Page 46: ...fications are subject to change without notice 2014 Koninklijke Philips N V All rights reserved Trademarks are the property of Koninklijke Philips N V or their respective owners HTB5520 5550 5580_93_UM_V4 0 ...

Reviews: