background image

8

EN

4  Use your 

SoundBar

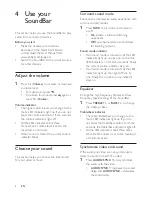
This section helps you use the SoundBar to play 

audio from connected devices.

Before you start

• 

Make the necessary connections 

described in the Quick Start Guide 

or download the User Manual from 

www.philips.com/support.

• 

Switch the SoundBar to the correct source 

for other devices.

Adjust the volume

Press 

+/-

 (

Volume

) to increase or decrease 

a volume level.

• 

To mute sound, press  .

• 

To restore the sound, press   again or 

press 

+/-

 (

Volume

).

Volume indicator

• 

The higher volume level you change to, the 

more LED indicators light up. If you do not 

press the volume button for three seconds, 

the volume indicators light off. 

• 

All the LED indicators blink three 

times when a volume level is set to the 

maximum or minimum.

• 

When sound is muted, the current source 

indicator blinks.

Choose your sound

This section helps you choose the ideal sound 

for your video or music.

Surround sound mode

Experience an immersive audio experience with 

surround sound modes.

Press 

SURR

 to turn surround mode on 

or off. 

• 

On

: Create a surround listening 

experience. 

• 

Off

: Two-channel stereo sound. Ideal 

for listening to music.

Sound mode indicator

• 

If surround mode is turned on, all the LED 

indicators light up one by one, with all the 

LED indicators on for three seconds. Finally 

the current source indicator stays on.

• 

If surround mode is turned off, all the LED 

indicators light up, then light off one by 

one. Finally the current source indicator 

stays on.

Equalizer

Change the high frequency (treble) and low 

frequency (bass) settings of the SoundBar.

Press 

/-

 or 

BASS +/-

 to change 

the treble or bass.

Treble/bass indicator

• 

The more treble/bass you change to, the 

more LED indicators light up. If you do 

not press the treble/bass button for three 

seconds, the treble/bass indicators light off. 

• 

All the LED indicators blink three times 

when treble or bass is set to the maximum 

or minimum value.

Synchronize video and sound

If the audio and video are not synchronized, 

delay the audio to match the video.

Press 

AUDIO SYNC +/-

 to synchronize 

the audio with the video.

• 

AUDIO SYNC +

 increases the sound 

delay, and 

AUDIO SYNC -

 decreases 

the sound delay.

Summary of Contents for HTL1180B

Page 1: ...HTL1180B www philips com support User manual Always there to help you Register your product and get support at Question Contact Philips ...

Page 2: ......

Page 3: ...ar 4 Main unit 4 Remote control 5 Connectors 6 3 Connect 6 Placement 6 Connect audio fromTV and other devices 7 4 Use your SoundBar 8 Adjust the volume 8 Choose your sound 8 MP3 player 9 USB storage devices 9 Auto standby 10 Apply factory settings 10 Update software 10 5 Wall mount 10 6 Product specifications 11 7 Troubleshooting 12 ...

Page 4: ... near naked flames or other heat sources including direct sunlight Never insert objects into the ventilation slots or other openings on the product Where the mains plug or an appliance coupler is used as the disconnect device the disconnect device shall remain readily operable Disconnect the product from the power outlet before lightning storms When you disconnect the power cord always pull the pl...

Page 5: ...eries out of reach of children Ensure that the battery compartment is completely secure after you replace the battery If the battery compartment cannot be completely secured discontinue use of the product Keep out of reach of children and contact the manufacturer This is CLASS II apparatus with double insulation and no protective earth provided Care for your product Use only microfiber cloth to cl...

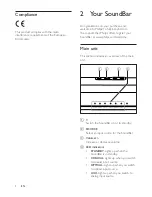
Page 6: ...at www philips com welcome Main unit This section includes an overview of the main unit a Switch the SoundBar on or to standby b SOURCE Select an input source for the SoundBar c Volume Increase or decrease volume d LED indicators STANDBY Lights up when the SoundBar is in standby COAXIAL Lights up when you switch to coaxial input source OPTICAL Lights up when you switch to optical input source AUX ...

Page 7: ...UDIO IN Switch your audio source to the MP3 connection 3 5mm jack a b c d e g f h i j k USB Switch your audio source to the USB connection c REPEAT Select or turn off repeat mode in USB mode d Volume Increase or decrease volume e Mute or restore volume f BASS Increase or decrease bass g NIGHT Turn night mode on or off h TREBLE Increase or decrease treble i SURR Toggle between stereo and virtual su...

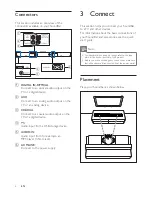
Page 8: ...evice e AUDIO IN Audio input from for example an MP3 player 3 5mm jack f AC MAINS Connect to the power supply b a c d f e 3 Connect This section helps you connect your SoundBar to aTV and other devices For information about the basic connections of your SoundBar and accessories see the quick start guide Note For identification and supply ratings refer to the type plate at the back or bottom of the...

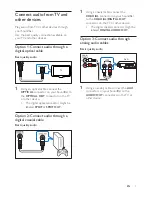
Page 9: ...TV or other device The digital optical connector might be labeled SPDIF or SPDIF OUT Option 2 Connect audio through a digital coaxial cable Best quality audio TV 1 Using a coaxial cable connect the COAXIAL connector on your SoundBar to the COAXIAL DIGITAL OUT connector on theTV or other device The digital coaxial connector might be labeled DIGITAL AUDIO OUT Option 3 Connect audio through analog au...

Page 10: ... 1 Press SURR to turn surround mode on or off On Create a surround listening experience Off Two channel stereo sound Ideal for listening to music Sound mode indicator If surround mode is turned on all the LED indicators light up one by one with all the LED indicators on for three seconds Finally the current source indicator stays on If surround mode is turned off all the LED indicators light up th...

Page 11: ...ntrol 3 Press the buttons on the MP3 player to select and play audio files or music USB storage devices Enjoy audio on a USB storage device such as an MP3 player and USB flash memory etc What you need A USB storage device that is formatted for FAT file systems and complies with the Mass Storage Class An MP3 file on a USB storage device 1 Connect a USB storage device to the SoundBar 2 Press USB on ...

Page 12: ...ort to check if the latest software version is available 5 Wall mount Note Improper wall mounting may result in accident injury or damage If you have any query contact Consumer Care in your country Before wall mounting make sure the wall can support the weight of your SoundBar Screw length diameter Depending on the type of wall mounting your SoundBar make sure that you use screws of a suitable len...

Page 13: ... 60958 3 Optical TOSLINK Sampling frequency MP3 8 kHz 11 kHz 12 kHz 16 kHz 22 kHz 24 kHz 32 kHz 44 1 kHz 48 kHz Constant bit rate MP3 8 kbps 320 kbps USB Compatibility Hi Speed USB 2 0 Class support USB Mass Storage Class MSC File system FAT16 and FAT32 Supports MP3 file formats Main unit Power supply 100 240V 50 60 Hz Power consumption 25 W Standby power consumption 0 5 W Speaker impedance 8 ohm ...

Page 14: ...ww philips com support Main unit The buttons on the SoundBar do not work Disconnect the SoundBar from the power supply for a few minutes then reconnect Sound No sound from SoundBar speakers Connect the audio cable from your SoundBar to yourTV or other devices Reset your SoundBar to its factory settings On the remote control select the correct audio input Make sure that the SoundBar is not muted Di...

Page 15: ...13 Dolby and the double D symbol are registered trademarks of Dolby Laboratories ...

Page 16: ...tice 2014 WOOX Innovations Limited All rights reserved Philips and the Philips Shield Emblem are registered trademarks of Koninklijke Philips N V and are used by WOOX Innovations Limited under license from Koninklijke Philips N V HTL1180B_12_UM_V1 0 ...

Reviews: