background image

46

English

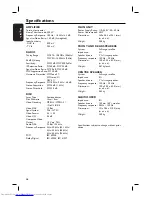
Specifi cations

AMPLIFIER 

Total output power
Home Theatre mode: 200 W 
Frequency Response:  180 Hz – 18 kHz / ±3 dB
Signal-to-Noise Ratio: > 60 dB (A-weighted)
Input Sensitivity 
- AUX In :       

500 mV

- TV In:    


250 mV

RADIO 

Tuning Range:   

FM 87.5–108 MHz (50kHz)


MW 531–1602 kHz (9kHz)

26 dB Quieting 
Sensitivity:      

FM 22 dBf, MW 5000μV/m

IF Rejection Ratio:    FM 60 dB, MW 24 dB
Signal-to-Noise Ratio: FM 50 dB, MW 30 dB
MW Suppression Ratio: FM 30 dB
Harmonic Distortion: FM Mono 3%


FM Stereo 3%


MW 5%

Frequency Response  FM 180 Hz–9 kHz / ±6 dB
Stereo Separation 

FM 26 dB (1 kHz)

Stereo Threshold 

FM 23.5 dB

DISC

Laser Type     

Semiconductor

Disc Diametre 

12cm / 8cm

Video Decoding 

MPEG-1 / MPEG-2 /   


/ DivX 3/4/5/6 

Video DAC    

12 Bits

Signal System   

PAL / NTSC

Video Format  

4:3 / 16:9

Video S/N     

56 dB 

Composite Video 
Output    


1.0 Vp-p, 75Ω

Audio DAC    

24 Bits / 96 kHz

Frequency Response  4 Hz–20 kHz (44.1 kHz)


4 Hz–22 kHz (48 kHz)


4 Hz–44 kHz (96 kHz)

PCM        

IEC 60958

Dolby Digital   

IEC 60958, IEC 61937

MAIN UNIT

Power Supply Rating:  110~240 V; 50~60 Hz 
Power Consumption: 40 W
Dimensions:    

360 x 48.5 x 324.1 (mm)


(w x h x d)

Weight:    


2.58  kg

FRONT AND REAR SPEAKERS

System:    


Full range satellite

Impedance:    

4 Ω

Speaker drivers: 

3” full range speaker

Frequency response:  150 Hz – 20 kHz 
Dimensions:    

100 x 95.5 x 83.5 (mm)


(w x h x d)

Weight:    


0.47  kg/each

CENTRE SPEAKER

System:    


Full range satellite

Impedance:    

8 Ω

Speaker drivers: 

3” full range speaker

Frequency response:  150 Hz – 20 kHz 
Dimensions:    

100 x 95.5 x 83.5 (mm)


(w x h x d)

Weight:    


0.52  kg

SUBWOOFER


Impedance:    

8 Ω

Speaker drivers: 

165 mm (6.5”) woofer

Frequency response:  40 Hz – 150 Hz 
Dimensions:    

131 x 386 x 315.5 (mm)


(w x h x d)

Weight:    


3.60  kg

Specifi cations subject to change without prior 
notice.

Summary of Contents for HTS3000

Page 1: ...YSTEM HTS3000 HTS3010 Read your Quick Start Guide and or User Manual first for quick tips that make using your Philips product more enjoyable Register your product and get support at www philips com welcome User Manual ...

Page 2: ...2 Home Theater System 12 home theater Home Theater System Home Theater System Home Theater System ...

Page 3: ...tories Dolby Pro Logic and the double D symbol are trademarks of Dolby Laboratories Windows Media and the Windows logo are trademarks or registered trademarks of Microsoft Corporation in the United States and or other countries DivX DivX UCertified and associated logos are trademarks of DivX Inc and are used under license This product incorporates copyright protection technology that is protected ...

Page 4: ...574 Kurdish 7585 Lao 7679 Latina 7665 Latvian 7686 Letzeburgesch 7666 Limburgan Limburger 7673 Lingala 7678 Lithuanian 7684 Luxembourgish 7666 Macedonian 7775 Malagasy 7771 Magyar 7285 Malayalam 7776 Maltese 7784 Manx 7186 Maori 7773 Marathi 7782 Marshallese 7772 Moldavian 7779 Mongolian 7778 Nauru 7865 Navaho Navajo 7886 Ndebele North 7868 Ndebele South 7882 Ndonga 7871 Nederlands 7876 Nepali 786...

Page 5: ...5 English Hindi Index English 6 Hindi 47 ...

Page 6: ...order VCR 17 Basic Setup Getting Started 18 21 Finding the correct viewing channel 18 Switching to different play source 18 Setting language preferences 19 On screen display OSD language 19 Audio Subtitle and Menu language for DVD playback 19 20 Setting the TV Display 20 Setting up Progressive Scan feature 21 Setting the speakers channels 22 Disc Playback Disc Operations 23 31 Playable discs 23 Pl...

Page 7: ...tup Page 34 Video Setup Page 35 Preference Page 36 37 Radio Tuning Radio Operations 38 39 Tuning to radio stations 38 Presetting radio stations 38 Using auto install 38 39 Using automatic preset 39 Using manual preset 39 Selecting a preset radio station 39 Deleting a preset radio station 39 Others Sound and Volume Controls 40 Volume control 40 Selecting surround sound 40 Selecting digital sound ef...

Page 8: ...and dust This unit must not be exposed to dripping or splashing Never place any object or items that can damage this unit e g liquid filled objects lighted candles Accessories supplied 1 subwoofer 2 front speakers 2 rear speakers 1 centre speaker 1 remote control with batteries 1 composite video cable yellow 1 FM wire antenna 1 AM MW loop antenna 1 power cable Quick Start Guide Cleaning discs To c...

Page 9: ...starts pauses playback RADIO starts auto radio installation for first time setup f SOURCE Selects the relevant active source mode DISC FM AM MW TV or AUX g SURROUND Selects multi channel surround or stereo mode h STOP Exits an operation DISC stops playback RADIO press and hold this button to erase the current preset radio station i VOL Adjusts the volume level 1 2 4 5 6 3 7 8 9 ...

Page 10: ...urns off repeat or shuffle mode f SETUP Enters or exits the system setup menu g DISPLAY Displays the current status or disc information Selects a different viewing angle of a DVD movie if available h PLAY PAUSE u DISC starts pauses playback RADIO starts auto radio installation for first time setup i STOP x Exits an operation DISC stops playback RADIO press and hold this button to erase the current...

Page 11: ...o back to the previous menu For VCD version 2 0 only During playback display the disc title menu or return to the main menu s PREVí NEXT ë DISC skips to the previous or next title chapter track RADIO selects a preset radio station t MUTE Mutes or restores the volume u VOL Adjusts the volume level v SURROUND Selects multi channel surround or stereo mode w Numeric keypad 0 9 Enters a track title num...

Page 12: ...t the remote sensor iR on the front panel E Select the source you wish to control by pressing the DISC RADIO TV or AUX button on the remote control F Then select the desired function for example í ë CAUTION Remove batteries if they are exhausted or if the remote control is not to be used for a long time Never mix batteries old and new or carbon and alkaline etc Batteries contain chemical substance...

Page 13: ...cing each other or hang on the wall D Place the subwoofer at the corner of the room Otherwise keep it at least one metre away from the TV Helpful Hints The placement diagram shown here is only a guideline that provides great system performance You may find other placement choices that are more suitable for your room layout that provide the sound experience you enjoy To avoid magnetic interference ...

Page 14: ...belled as A V In Video In Composite or Baseband on the TV Option 2 Connecting to a Progressive ScanTV or component video input The progressive scan video quality is only available when using Y Pb Pr connection and a progressive scan TV is required It provides superior picture quality when watching DVD movies A Connect the component video cables red blue green not supplied from the Y Pb Pr sockets ...

Page 15: ...to the matching sockets at the rear of the main unit Make sure that the colours of the plugs and sockets are matched Helpful Hint To prevent unwanted noise never place the speakers too close to the main unit subwoofer AC power adapter TV or any other radiation sources REAR LEFT REAR RIGHT SUBWOOFER FRONT CENTRE FRONT LEFT FRONT RIGHT ...

Page 16: ...t supplied Helpful Hints Adjust the position of the antennas for optimal reception Position the antennas as far away as possible from your TV VCR or other radiation source to prevent any unwanted interference Step 5 Connecting the power cord Notes For power supply rating refer to the rear or bottom of the main unit Turning off to standby mode does not disconnect the unit from mains When all the co...

Page 17: ... on the remote control as the sound source that you want to listen to Connecting to cable box satellite receiver and recorder VCR You can connect the audio output from an audio video device e g DVD Recorder VCR Cable Satellite Box to this Home Theatre System in order to enjoy the multi channel surround sound capabilities Connect an audio cable red white not supplied from the AUDIO IN AUX sockets o...

Page 18: ...etween the lowest and highest channels and may be called FRONT A V IN VIDEO etc Refer to your TVs user manual on how to select the correct input on your TV Getting Started Switching to different play source Press the SOURCE button on the front panel repeatedly to select DISC FM AM MW TV AUX DISC Or Press DISC RADIO TV or AUX on the remote control Press DISC to switch to DISC mode Press RADIO to to...

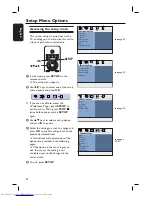
Page 19: ...itle and Menu language for DVD playback You can select your preferred language settings for DVD playback If the selected language is recorded on the DVD disc this unit automatically plays the disc in that language Otherwise the disc s default language will be used instead A Press Ç twice to stop playback if any then press SETUP B Press repeatedly to select Preference Page C Use keys to select one ...

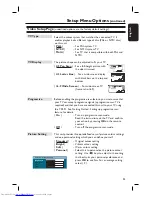
Page 20: ...e connected The format you select must be available on the disc If it is not the setting for TV display will not affect the picture during playback A In disc mode press SETUP on the remote control B Press repeatedly to select Video Setup Page C Press to highlight TV Display in the menu and press Video Setup Page TV Type TV Display Progressive Picture Setting 4 3 Pan Scan 4 3 Letter Box 16 9 Wide S...

Page 21: ...press OK to confirm Video Setup Page TV Type TV Display Progressive Picture Setting Off On F Read the notification message on the TV and confirm your action by selecting the in the menu and press OK There will be no picture on your TV at this state until you have turned on the progressive scan mode on your TV G Turn on your TV progressive scan mode refer to your TVs user manual A message appears o...

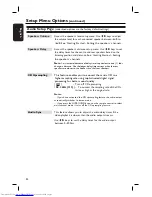
Page 22: ...Center Subwoofer Rear Left Rear Right 0dB 0dB 0dB 0dB 0dB 0dB Speakers Level Setup D Use keys to set the volume level for each speaker 6dB 6dB and press OK to confirm E Use keys to highlight Speakers Delay and press Audio Setup Page Speakers Volume Speakers Delay CD Upsampling Audio Sync Center Rear Left Rear Right Speakers Distance Setup 0ms 0ms 0ms F Use keys to set the delay times 0 ms 15 ms fo...

Page 23: ...function is not available on the current disc or at the current time Never put any objects other than discs on the disc tray Doing so may cause the disc player to malfunction Playing a disc A Press SOURCE repeatedly until DISC appears on the display panel or press DISC on the remote control B Turn on the TV to the correct viewing channel for this unit The blue DVD background screen appears on the ...

Page 24: ... can press í to start playback from the beginning This is a power saving feature this unit automatically switches to standby mode if you do not press any buttons within 15 minutes after a disc has stopped playing Selecting various repeat shuffle functions The available of the repeat play options and shuffle play mode are vary depending on the disc type While playing a disc press REPEAT on the remo...

Page 25: ...rom the programming menu select the track chapter and press OK D Once complete select Start on the screen and press OK to start playback Playback starts from the selected track under the programmed sequence E To exit the programme menu select Exit in the menu and press OK Other playback features for video discs DVD VCD SVCD DISPLAY AUDIO SYNC ZOOM AUDIO TITLE DISC MENU SUBTITLE ANGLE Note The oper...

Page 26: ...hanges according to the chosen time or to the selected title chapter track Zooming in out This option allows you to zoom in or out the picture on the TV and to pan through the picture A During playback press ZOOM repeatedly to select a different zoom factor Playback continues B Use keys to pan through the zoomed image C Press ZOOM repeatedly to return to the original size Changing subtitle languag...

Page 27: ...d video is to delay audio by an equal amount A Press AUDIO SYNC B Within five seconds use the VOL to set the audio output delay times 0 200 ms If the volume control is not used within five seconds it resumes its normal volume control function Helpful Hint Set your preferred default AUDIO SYNC setting in the setup menu see Setup Menu Options Audio Setup Page Playback Control VCD only Playback Contr...

Page 28: ...il pictures It divides a disc into six portions at regular intervals and displays them on one screen Track Interval View the content of a single track in six thumbnail pictures It divides a single track into six portions at regular intervals and displays them on one screen This option is only available during playback mode Exit Menu 01 02 03 04 05 06 Disc Operations continued To go to the previous...

Page 29: ...the selected file and continue through to the end of the folder During playback Press í ë to playback another track file in the current folder Press m M to fast reverse forward search for a music track To select another folder from the current disc press repeatedly to highlight Previous folder and press OK to return to the root menu Press REPEAT repeatedly to access various play modes D To stop pl...

Page 30: ...EXIF format typically used by almost all digital cameras It cannot display Motion JPEG progressive JPEG and other JPEG formats or pictures in formats other than JPEG or sound clips associated with pictures Preview function A During playback press x 12 thumbnail pictures will be displayed on the TV B Press í ë to display the other pictures on the previous next page C Use keys to select one of the p...

Page 31: ...onto a recordable disc See Setup Menu Options General Setup Page DivX R VOD code for details A Insert a DivX disc B Use keys to navigate to the title you want to play C Press OK to start playback During playback If the DivX disc has multilingual subtitles you can press SUBTITLE on the remote control to change the subtitle language If the DivX title has different audio tracks you can press AUDIO on...

Page 32: ...t the setting you wish to change and press OK to confirm and go back to the previously selected item Instructions and explanations of the options are provided in the following pages If the option in the menu is grayed out that means the setting is not available or cannot be changed in the current state E To exit press SETUP General Setup Page Disc Lock Display Dim Program OSD Language Screen Saver...

Page 33: ...nu See Programming disc tracks for details OSD Language Select the menu language for this unit s on screen display Screen Saver The screen saver prevents damage to the TV screen by avoiding exposure to a static image for too long On Switch to TV screen saver mode when playback has been stopped or paused for more than 5 minutes Off Turn off the screen saver function Sleep The sleep timer enables th...

Page 34: ... when the rear speakers are closer to the listener than the front speakers CD Upsampling This feature enables you to convert the music CD to a higher sampling rate using sophisticated digital signal processing for better sound quality Off Turn off CD upsampling 88 2 kHz X2 To convert the sampling rate of the CDs twice as high as the original rate Notes If you have activated the CD upsampling featu...

Page 35: ...n accept progressive signals a progressive scan TV is required and that you have connected this unit to your TV using the Y Pb Pr See Getting Started Setting up progressive scan feature for details On Turn on progressive scan mode Read the instructions on the TV and confirm your action by pressing OK on the remote control Off Turn off the progressive scan mode Picture Setting This unit provides th...

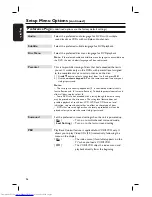
Page 36: ...ry dependent 1 is considered material that is least offensive and 8 is most offensive To disable parental controls and allow all discs to play select 8 Some DVDs are not encoded with a rating though the movie rating may be printed on the disc cover The rating level feature does not prohibit playback of such discs VCD SVCD and CD have no level indication so parental control has no effect on these t...

Page 37: ...our existing six digit password at Old Password Note When doing this for the first time or if you forget your existing password key in 136900 3 Enter the new six digit password at New Password 4 Enter the new six digit password again at Confirm PWD 5 Press OK to confirm and exit the menu DivX Subtitle Select the font type that supports the recorded DivX subtitle Central Europe Display Central Euro...

Page 38: ...reception is found Presetting radio stations You can store up to 40 FM and 20 AM MW preset radio stations in the memory There are three different ways to program the radio stations Using auto install for first time setup only Using automatic preset Using manual preset Helpful Hints This unit exits presetting mode if no button is pressed within 20 seconds If no stereo signal is detected or less tha...

Page 39: ...ing to store your favourite radio stations A Tune to your desired radio station see Tuning to radio stations B Press PROGRAM C Use í ë keys to select a preset number that you want to store the current radio station D Press PROGRAM to store Selecting a preset radio station A Press RADIO to select FM or AM MW band B Use í ë keys to select a preset radio stations or use the numeric keypad on the remo...

Page 40: ...nd of the musical style you are playing Press SOUND to select the available sound effect Movies Music Description CONCERT CLASSIC Flat and pure sound mode Ideal for listening to classical music and watching live concert DVDs DRAMA JAZZ Clear mid and high range Recreates the atmosphere of a live club with the artist just in front of you Good for Jazz music and watching dramas ACTION ROCK Enhanced l...

Page 41: ...ftware starts to install on this unit automatically Note Never unplug or turn off this unit during the upgrade E When the disc compartment opens remove the CD R The software upgrading is in process F Once complete it turns off to standby mode automatically Other Features Setting the Sleep timer The sleep timer enables this unit to switch to standby mode automatically at a preset time Press SLEEP o...

Page 42: ... the DVD screen Press DISC to select disc mode Check the video connection Sometimes a small amount of picture distortion may appear This is not a malfunction The disc is dirty Clean the disc Adjust the volume Check the speaker connections and settings Make sure that the audio cables are connected and press SOURCE to select the correct input source for example TV or AUX to choose the device that yo...

Page 43: ... the DVD disc Depending on the TV it may not be possible to change the aspect ratio The features may not be available on the DVD Changing the language for the sound or subtitle is prohibited on this DVD Press STOP button twice before selecting the system setup menu Depending on the disc availability some menu items cannot be selected Ensure that the DivX file is encoded according to the Home Theat...

Page 44: ...PEG 4 based video compression technology developed by DivX Networks Inc that can shrink digital video to sizes small enough to be transported over the internet while maintaining high visual quality Dolby Digital A surround sound system developed by Dolby Laboratories containing up to six channels of digital audio front left and right surround left and right centre and subwoofer Dolby Surround Pro ...

Page 45: ...y Region code A system allowing discs to be played only in the region designated This unit will only play discs that have compatible region codes You can find the region code of your unit by looking at the product label Some discs are compatible with more than one region or ALL regions Surround A system for creating realistic three dimensional sound fields full of realism by arranging multiple spe...

Page 46: ... 16 9 Video S N 56 dB Composite Video Output 1 0 Vp p 75Ω Audio DAC 24 Bits 96 kHz Frequency Response 4 Hz 20 kHz 44 1 kHz 4 Hz 22 kHz 48 kHz 4 Hz 44 kHz 96 kHz PCM IEC 60958 Dolby Digital IEC 60958 IEC 61937 MAIN UNIT Power Supply Rating 110 240 V 50 60 Hz Power Consumption 40 W Dimensions 360 x 48 5 x 324 1 mm w x h x d Weight 2 58 kg FRONT AND REAR SPEAKERS System Full range satellite Impedance...

Page 47: ...47 ...
Page 48: ...CLASS 1 LASER PRODUCT Meet Philips at the Internet http www philips com welcome Sgpjp 0731 94 1 HTS3000 HTS3010 ...

Reviews: