background image

21

English

Setting up Progressive Scan 
feature

(for Progressive Scan TV only)
The progressive scan displays twice the 
number of frames per second than 
interlaced scanning (ordinary normal TV 
system). With nearly double the number 
of lines, progressive scan offers higher 
picture resolution and quality.

Before you start...

Ensure that you have connected this unit 
to a progressive scan TV using the 
Y Pb Pr connection (see ‘Option 2: 
Connecting to a Progressive Scan TV or 
component video input’).

A

 Turn on the TV to the correct viewing 

channel for this unit.


Make sure that the TVs progressive 

scan mode is turned off (or set to 
interlaced mode). Refer to your TVs user 
manual.

B

 Turn on this unit and press 

DISC/USB


on the remote control.

C

 Press 

SETUP

 on the remote control.

D

 Press   repeatedly to select { 

Video 

Setup Page

 }.

E

 Move to { 

Progressive

 } > { 

On

 } in the 

menu and press 

OK

 to confi rm.

Video Setup Page

TV Type
TV Display

Progressive

Picture Setting

Off

On

F

 Read the notifi cation message on the TV 

and confi rm your action by selecting the

 in the menu and press 

OK

.


There will be no picture on your TV 
at this state until you have turned 
on the progressive scan mode on 
your TV.

G

 Turn on your TV progressive scan mode, 

refer to your TVs user manual.

 A message appears on the TV.

H

 Confi rm your action by selecting the

 in the menu and press 

OK

.


The setup is now completed and you 

can start to enjoy the high quality picture.

If no picture is displayed

A

 Press 

OPEN/CLOSE


ç

.

B

 Press   on the remote control.

C

 Press 

AUDIO

 on the remote control. 

Helpful Hints:
–  If a blank/distorted screen appears, wait 
for 15 seconds for the auto recovery.
–  There are some progressive scan TVs that 
are not fully compatible with this unit, 
resulting in an unnatural picture when 
playing back a DVD VIDEO disc in the 
progressive scan mode. In such a case, turn 
off the progressive scan feature on this unit 
and your TV.

Getting Started 

(continued)

1_hts3156_98_eng2_final820.indd   21

1_hts3156_98_eng2_final820.indd   21

2008-05-09   5:18:58 PM

2008-05-09   5:18:58 PM

Summary of Contents for HTS3156

Page 1: ...ort at www philips com welcome EN DVD HomeTheater System 6 ZH_CN DVD 家庭影院系统 52 ZH_TW DVD 家庭劇院系統 98 MS_MY SistemTeater Rumah DVD 144 1_hts3156_98_eng2_final820 indd 1 1_hts3156_98_eng2_final820 indd 1 2008 05 09 5 18 50 PM 2008 05 09 5 18 50 PM ...

Page 2: ...go refers to the period 10 years during which the toxic or hazardous substances or elements contained in electronic information products will not leak or mutate so that the use of these substances or elements will not result in any severe environmental pollution any bodily injury or damage to any assets ℸ 䆚ᣛᳳ䰤 Ѩᑈ ˈ Ё ⱘ ᆇ 䋼 ܗ ℷᐌՓ ⱘᴵӊϟϡӮথ さ বˈ Փ 䆹 ѻકϡӮᇍ ๗䗴៤Ϲ䞡 ᶧ ᇍ Ҏ䑿ǃ䋶ѻ䗴៤Ϲ䞡ᤳᆇⱘᳳ䰤DŽ This logo refers to ...

Page 3: ...STIONS REGARDING OUR TV SET COMPATIBILITY WITH THIS MODEL 525p AND 625p DVD PLAYER PLEASE CONTACT OUR CUSTOMER SERVICE CENTER Manufactured under license from Dolby Laboratories Dolby Pro Logic and the double D symbol are trademarks of Dolby Laboratories Manufactured under license under U S Patent s 5 451 942 5 956 674 5 974 380 5 978 762 6 487 535 other U S and worldwide patents issued pending DTS...

Page 4: ...urgesch 7666 Limburgan Limburger 7673 Lingala 7678 Lithuanian 7684 Luxembourgish 7666 Macedonian 7775 Malagasy 7771 Magyar 7285 Malayalam 7776 Maltese 7784 Manx 7186 Maori 7773 Marathi 7782 Marshallese 7772 Moldavian 7779 Mongolian 7778 Nauru 7865 Navaho Navajo 7886 Ndebele North 7868 Ndebele South 7882 Ndonga 7871 Nederlands 7876 Nepali 7869 Norsk 7879 Northern Sami 8369 North Ndebele 7868 Norweg...

Page 5: ... only unless otherwise authorised by Macrovision Corporation Reserve engineering or disassembly is prohibited Ensure that the power outlet is always within reach If abnormal situations occur fully disconnect power unplug the power cord from the power outlet Index 通过此网站注册您的产品并获得支持 www philips com welcome 98 Bahasa Melayu 144 Bahasa Melayu Where the MAINS plug or an appliance coupler is used as the ...

Page 6: ...rrect viewing channel 18 Switching to different play source 18 Setting language preferences 19 On screen display OSD language 19 Audio Subtitle and Menu language for DVD playback 19 20 Setting up Progressive Scan feature 21 Setting the speakers channels 22 Disc Playback Disc Operations 23 31 Playable discs 23 Playing a disc 23 Basic playback controls 24 Selecting various repeat shuffle functions 2...

Page 7: ...e setup menu 35 40 General Setup Page 36 Audio Setup Page 37 Video Setup Page 38 Preference Page 39 40 Radio Tuning Radio Operations 41 42 Tuning to radio stations 41 Changing tuning grid 41 Presetting radio stations 41 42 Using auto install 41 Using automatic preset 42 Using manual preset 42 Selecting a preset radio station 42 Deleting a preset radio station 42 Others Sound and Volume Controls 43...

Page 8: ...lashing Never place any object or items that can damage this unit e g liquid filled objects lighted candles Accessories supplied 1 subwoofer 2 front speakers 2 rear speakers 1 centre speaker 1 remote control with batteries 1 composite video cable yellow 1 FM wire antenna 1 AM MW loop antenna 1 power cable Quick Start Guide Cleaning discs To clean a disc use a micro fibre cleaning cloth and wipe th...

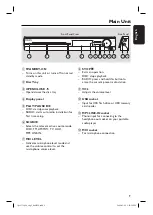
Page 9: ...d use the volume control to set the microphone volume level h STOP Exits an operation DISC stops playback RADIO press and hold this button to erase the current preset radio station i VOL Adjusts the volume level j USB socket Input for USB flash drive or USB memory card reader k MP3 LINE IN socket Phono input for connecting to the headphone out socket on your portable audio player l MIC socket For ...

Page 10: ...e system setup menu g DISPLAY Displays the current status or disc information Selects a different viewing angle of a DVD movie if available h PLAY PAUSE u DISC starts pauses playback RADIO starts auto radio installation for first time setup i STOP x Exits an operation DISC stops playback RADIO press and hold this button to erase the current preset radio station j TV VOL Adjusts the volume of the T...

Page 11: ...c title menu or return to the main menu r PREVí NEXT ë DISC skips to the previous or next title chapter track RADIO selects a preset radio station s MUTE Mutes or restores the volume t VOL Adjusts the volume level u SURROUND Selects multi channel surround or stereo mode v Numeric keypad 0 9 Enters a track title number of the disc Enters a number of a preset radio station w SOUND Selects a predefin...

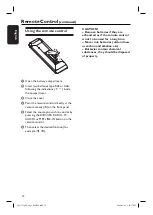
Page 12: ...ish to control by pressing the DISC USB RADIO TV AUX DI or MP3 LINE IN button on the remote control F Then select the desired function for example í ë CAUTION Remove batteries if they are exhausted or if the remote control is not to be used for a long time Never mix batteries old and new or carbon and alkaline etc Batteries contain chemical substances they should be disposed of properly 1_hts3156_...

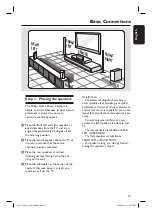
Page 13: ... at the corner of the room Otherwise keep it at least one metre away from the TV Helpful Hints The placement diagram shown here is only a guideline that provides great system performance You may find other placement choices that are more suitable for your room layout that provide the sound experience you enjoy To avoid magnetic interference never position the front speakers too close to your TV Th...

Page 14: ...eo input socket or labeled as A V In Video In Composite or Baseband on the TV It provides good picture quality Option 2 Connecting to a Progressive ScanTV or component video input The progressive scan video quality is only available when using Y Pb Pr connection and a progressive scan TV is required It provides superior picture quality when watching DVD movies A Use the component video cables red ...

Page 15: ... the colours of the plugs and sockets are matched Helpful Hint To prevent unwanted noise never place the speakers too close to the main unit subwoofer AC power adapter TV or any other radiation sources REAR LEFT REAR RIGHT SUBWOOFER FRONT CENTRE FRONT LEFT FRONT RIGHT Main Unit rear 1_hts3156_98_eng2_final820 indd 15 1_hts3156_98_eng2_final820 indd 15 2008 05 09 5 18 57 PM 2008 05 09 5 18 57 PM ...

Page 16: ...as far away as possible from your TV VCR or other radiation source to prevent any unwanted interference Step 5 Connecting the power cord Notes For power supply rating refer to the rear or bottom of the main unit Turning off to standby mode does not disconnect the unit from mains A When all the connections are complete set the voltage selector to the local power line voltage B Connect the AC power ...

Page 17: ...plied to connect the AUDIO IN TV sockets on the main unit to the AUDIO OUT sockets on the connected device OR Use an audio cable not supplied to connect the AUDIO IN AUX sockets on the main unit to the AUDIO OUT sockets on the connected device To listen to the audio output from this connection press TV or AUX DI to get the sound output from the speakers SPEAKERS AM MW DVD Recorder VCR Cable Satell...

Page 18: ...elect the correct input on your TV Getting Started Switching to different play source On the main unit Press the SOURCE button on the front panel repeatedly to select DISC FM AM MW TV AUX MP3 LINE IN DISC Or On the remote control ZOOM Press DISC USB repeatedly to hear the audio output from the external device Press DISC to switch to DISC mode Press USB to switch to USB mode Press RADIO to switch t...

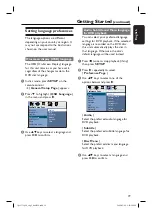
Page 19: ...t your preferred language settings for DVD playback If the selected language is recorded on the DVD disc this unit automatically plays the disc in that language Otherwise the disc s default language will be used instead A Press Ç twice to stop playback if any then press SETUP B Press repeatedly to select Preference Page C Use keys to select one of the options below and press English Chinese Simp F...

Page 20: ...ful Hints During DVD playback you can press the AUDIO and SUBTITLE on the remote control to change the audio and subtitle languages respectively However this does not change the default settings you have made here For some DVDs the subtitle audio disc menu language can only be changed via the DVD disc menu Getting Started continued 1_hts3156_98_eng2_final820 indd 20 1_hts3156_98_eng2_final820 indd...

Page 21: ... Progressive Picture Setting Off On F Read the notification message on the TV and confirm your action by selecting the in the menu and press OK There will be no picture on your TV at this state until you have turned on the progressive scan mode on your TV G Turn on your TV progressive scan mode refer to your TVs user manual A message appears on the TV H Confirm your action by selecting the in the ...

Page 22: ... Right 0dB 0dB 0dB 0dB 0dB 0dB Speakers Level Setup D Use keys to set the volume level for each speaker 6dB 6dB and press OK to confirm E Use keys to highlight Speakers Delay and press Audio Setup Page Speakers Volume Speakers Delay CD Upsampling Audio Sync Center Rear Left Rear Right Speakers Distance Setup 0ms 0ms 0ms F Use keys to set the delay times 0 ms 15 ms for centre and rear speakers that...

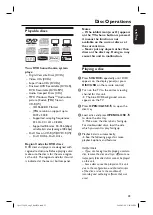
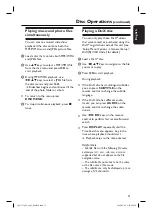
Page 23: ... the current time Never put any objects other than discs on the disc tray Doing so may cause this unit to malfunction Playing a disc A Press SOURCE repeatedly until DISC appears on the display panel or press DISC USB on the remote control B Turn on the TV to the correct viewing channel for this unit The blue DVD background screen appears on the TV C Press OPEN CLOSE ç to open the disc tray D Load ...

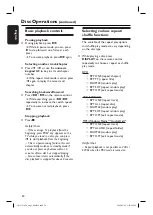
Page 24: ...itches to standby mode if you do not press any buttons within 15 minutes after a disc has stopped playing Screen saver starts automatically if the disc playback is stopped for about 5 minutes Selecting various repeat shuffle functions The available of the repeat play options and shuffle play mode are vary depending on the disc type While playing a disc press DISPLAY on the remote control repeatedl...

Page 25: ... Once complete select Start on the screen and press OK to start playback Playback starts from the selected track under the programmed sequence E To exit the programme menu select Exit in the menu and press OK Other playback features for video discs DVD VCD SVCD DISPLAY AUDIO SYNC ZOOM AUDIO TITLE DISC MENU SUBTITLE ZOOM VOCAL KARAOKE Note The operating features described here might not be possible...

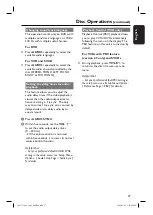
Page 26: ...ion allows you to zoom and pan through the picture on the TV A During playback press ZOOM repeatedly to select a different zoom factor Playback continues B Use keys to pan through the zoomed image C Press ZOOM repeatedly to return to the original size Changing subtitle language This operation works only on DVDs with multiple subtitle languages You can change the language you want while playing a D...

Page 27: ...ve seconds use the VOL to set the audio output delay times 0 200 ms If the volume control is not used within five seconds it resumes its normal volume control function Helpful Hint Set your preferred default AUDIO SYNC setting in the setup menu see Setup Menu Options Audio Setup Page Audio Sync for details Playback Control VCD only Playback Control PBC playback allows you to play VCDs SCVDs intera...

Page 28: ...r intervals and displays them on one screen Track Interval View the content of a single track in six thumbnail pictures It divides a single track into six portions at regular intervals and displays them on one screen This option is only available during playback mode Exit Menu 01 02 03 04 05 06 Disc Operations continued To go to the previous or next page press í ë To return to the main menu select...

Page 29: ...lder During playback Press í ë to playback another file in the current folder Press m M to fast reverse forward search for a music track To select another folder from the current disc press repeatedly to highlight Previous folder and press OK to return to the root menu Press DISPLAY repeatedly to access various play modes D To stop playback press x Helpful Hints You can set to display or skip the ...

Page 30: ...annot display progressive JPEG Motion JPEG or pictures in formats other than JPEG or sound clips associated with pictures Preview function A During playback press x 12 thumbnail pictures will be displayed on the TV B Press í ë to display the other pictures on the previous next page C Use keys to select one of the pictures and press OK to start playback D Press DISC MENU to return to Picture CD men...

Page 31: ...etails A Load a DivX disc B Use keys to navigate to the file you want to play C Press OK to start playback During playback If the DivX disc has multilingual subtitles you can press SUBTITLE on the remote control to change the subtitle language If the DivX title has different audio tracks you can press AUDIO on the remote control to change the audio stream Use m M keys on the remote control to perf...

Page 32: ...Karaoke Microphone setting A Press KARAOKE to access Microphone Setup page Microphone Setup Mic Mic Volume Echo Level Key Score On4 3 Letter Box Off B In Microphone Setup page use keys to select the option for microphone settings and press OK to confirm Mic On Off To turn on or off the karaoke microphone Mic Volume Set the microphone volume level 0 20 Default setting is 10 Echo Level Set the Echo ...

Page 33: ...he device numbers may vary from different card readers D Select the file to play and press u For more playback information see Playing a MP3 WMA disc Playing a JPEG image file slideshow or Playing a DivX disc for details E Before removing the USB device press x to stop playback or press DISC USB to switch to disc mode Helpful Hints The USB socket does not support the connection of other USB device...

Page 34: ...his unit to the headphone output socket on your portable audio player B Press MP3 LINE IN on the remote control C Start playback on your portable audio player The music will be heard through the speakers D To stop playback press the STOP button on the portable audio player Helpful Hint Stop playback on your portable audio player before you switch this unit to another input source eg DISC USB RADIO...

Page 35: ...nations of the options are provided in the following pages If the option in the menu is greyed out that means the setting is not available or cannot be changed in the current state E To exit press SETUP General Setup Page Disc Lock Display Dim Program OSD Language Screen Saver Sleep DivX R VOD Code See General Setup Page on this Chapter Audio Setup Page Speakers Volume Speakers Delay CD Upsampling...

Page 36: ... Select the menu language for this unit s on screen display Screen Saver The screen saver prevents damage to the TV screen by avoiding exposure to a static image for too long On Switch to TV screen saver mode when playback has been stopped or paused for about 5 minutes Off Turn off the screen saver function Sleep The sleep timer enables the unit to switch to standby mode automatically after the se...

Page 37: ...kers are closer to the listener than the front speakers CD Upsampling This feature enables you to convert the music CD to a higher sampling rate using sophisticated digital signal processing for better sound quality Off Turn off CD upsampling 88 2 kHz X2 To convert the sampling rate of the CDs twice as high as the original rate Notes This function is not available if you switch to Multi channel mo...

Page 38: ...uired and that you have connected this unit to your TV using the Y Pb Pr See Getting Started Setting up progressive scan feature for details Off Turn off the progressive scan mode On Turn on progressive scan mode Read the instructions on the TV and confirm your action by pressing OK on the remote control Picture Setting This unit provides three predefined sets of picture colour settings and one pe...

Page 39: ... offensive To disable parental controls and allow all discs to play select 8 Some DVDs are not encoded with a rating though the movie rating may be printed on the disc cover The rating level feature does not prohibit playback of such discs VCD SVCD and CD have no level indication so parental control has no effect on these type of discs DVDs that are rated higher than the level you selected will no...

Page 40: ...ing this for the first time or if you forget your existing password key in 136900 3 Enter the new six digit password at New Password 4 Enter the new six digit password again at Confirm PWD 5 Press OK to confirm and exit the menu DivX Subtitle Select the font type that supports the recorded DivX subtitle Central Europe Display Central Europe fonts Cyrillic Display Cyrillic fonts Greek Display Greek...

Page 41: ...d u until GRID 9 or GRID 10 appears Presetting radio stations You can store up to 40 FM and 20 AM MW preset radio stations in the memory There are three different ways to program the radio stations Using auto install for first time setup only Using automatic preset Using manual preset Helpful Hints This unit exits presetting mode if no button is pressed within 20 seconds If no stereo signal is det...

Page 42: ...lect a preset number that you want to store the current radio station D Press PROGRAM to store Selecting a preset radio station A Press RADIO to switch to FM or AM MW band B Use í ë keys or use the numeric keypad 0 9 to select a preset radio stations The preset number and radio frequency appear on the display panel Deleting a preset radio station A In radio mode use í ë keys to select a preset rad...

Page 43: ...ble sound effect Movies Music Description CONCERT CLASSIC Flat and pure sound mode Ideal for listening to classical music and watching live concert DVDs DRAMA JAZZ Clear mid and high range Recreates the atmosphere of a live club with the artist just in front of you Good for Jazz music and watching dramas ACTION ROCK Enhanced low and high range for great sounding movie effects and atmosphere Great ...

Page 44: ... version of this unit C Write down the version number D Go to www philips com support to check the latest software version available for this unit E If the latest software version is higher than the software version of this unit download it and store onto a CD R F Insert the CD R to this unit and confirm upgrade operation The software upgrading is in process Note Never unplug or turn off this unit...

Page 45: ...he default mode as below 1 Press OPEN CLOSE ç 2 Press on the remote control 3 Press AUDIO on the remote control Check the video connection Sometimes a small amount of picture distortion may appear This is not a malfunction The disc is dirty Clean the disc Adjust the volume Check the speaker connections and settings Make sure that the audio cables are connected and press the correct source button f...

Page 46: ...D disc Depending on the TV it may not be possible to change the aspect ratio The features may not be available on the DVD Changing the language for the sound or subtitle is prohibited on this DVD Press STOP x button twice before selecting the system setup menu Depending on the disc availability some menu items cannot be selected Ensure that the DivX file is encoded according to the Home Theatre Pr...

Page 47: ...B flash drive format is not compatible with this unit Drive is formatted with a different file system which is not supported by this unit e g NTFS Large file size or high memory USB flash drive takes longer time to read and display on the TV 1_hts3156_98_eng2_final820 indd 47 1_hts3156_98_eng2_final820 indd 47 2008 05 09 5 19 03 PM 2008 05 09 5 19 03 PM ...

Page 48: ...nsported over the internet while maintaining high visual quality Dolby Digital A surround sound system developed by Dolby Laboratories containing up to six channels of digital audio front left and right surround left and right centre and subwoofer Dolby Surround Pro Logic II It is an improved matrix decoding technology that provides better spatiality and directionality on Dolby Surround programme ...

Page 49: ...n the region designated This unit will only play discs that have compatible region codes You can find the region code of your unit by looking at the product label Some discs are compatible with more than one region or ALL regions Surround A system for creating realistic three dimensional sound fields full of realism by arranging multiple speakers around the listener Title The longest section of a ...

Page 50: ...22 kHz 48 kHz 4 Hz 44 kHz 96 kHz PCM IEC 60958 Dolby Digital IEC 60958 IEC 61937 DTS IEC 60958 IEC 61937 MAIN UNIT Power Supply Rating 110 127 V 220 240 V Power Consumption 60 W Dimensions 360 x 55 x 332 mm w x h x d Weight 2 82 kg FRONT SPEAKERS System Full range satellite Impedance 4 Ω Speaker drivers 3 full range speaker Frequency response 150 Hz 20 kHz Dimensions 95 x 1184 x 73 7 mm w x h x d ...

Page 51: ...51 1_hts3156_98_eng2_final820 indd 51 1_hts3156_98_eng2_final820 indd 51 2008 05 09 5 19 04 PM 2008 05 09 5 19 04 PM ...

Reviews: