background image

12

Discs

Your home theater can play DVDs, VCDs, and 

CDs. It can also play discs that you’ve made at 

home, such as CD-R discs of photos and music.

What you need

• 

Audio and video connection between your 

home theater and the TV.

• 

An audio or a video disc.

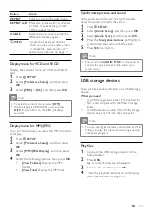
Play discs

1

  Insert a disc into the home theater.


»

Your TV switches to the correct source 

and the disc plays automatically. If it does 

not, press 

DISC

.

2

  Press the play buttons to control play (see 

‘Play buttons’ on page 12).

Play buttons

Button

Action

Navigation 

buttons

Navigate menus.

OK

Confirm an entry or selection.

 (

Play/

Pause

)

Start, pause or resume play.

Stop play.

 / 

Skip to the previous or next 

track, chapter or file.

 / 

Fast backwards or fast forwards. 

Press repeatedly to change the 

search speed.

Navigation 

buttons

 (left/

right)

Rotate the picture clockwise or 

counter-clockwise.

Navigation 

buttons

 (up/

down)

Flip the picture vertically or 

horizontally.

SUBTITLE

Select subtitle language for 

video.

DISC

Access or exit the disc menu.

AUDIO 

SYNC

Select an audio language or 

channel.

 SCREEN 

FIT

Fit the picture format to the TV 

screen.

ZOOM

Zoom into a video scene or 

picture.

5  Use your home 

theater

This section helps you use the home theater to 

play media from a wide range of sources.

Before you start

• 

Make the necessary connections described 

in the Quick start guide and the user 

manual.

• 

Switch the TV to the correct source for the 

home theater.

Choose sound

This section helps you choose the ideal sound for 

your video or music.

Sound mode

Select predefined sound modes to suit your 

video or music.

1

 Press 

SOUND

 repeatedly to select a sound 

mode.

• 

MOVIE

: Enjoy a cinematic audio 

experience, specially enhanced for 

movies.

• 

MUSIC

: Recreate the original recording 

environment of your music, in the 

studio or at a concert.

• 

ORIGINAL

: Experience the original 

sound of your movies and music, 

without added sound effects.

• 

NEWS

: Hear every word with 

optimized speech and clear vocals.

• 

GAMING

: Enjoy thrilling arcade 

sounds, ideal for action-packed video 

games or loud parties.

Surround sound mode

Experience an immersive audio experience with 

surround sound modes.

1

 Select 

SURR

 repeatedly to select a 

surround mode.

• 

DOLBY VS

: Creates a highly 

compelling 5.1 channel listening 

experience.

• 

STEREO

: Two-channel stereo sound. 

Ideal for listening to music.

EN

Summary of Contents for HTS3201

Page 1: ...Register your product and get support at www philips com welcome HTS3201 ...

Page 2: ......

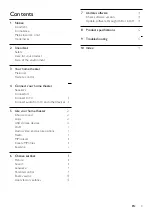
Page 3: ...re of the environment 6 3 Your home theater 6 Main unit 6 Remote control 7 4 Connect your home theater 8 Speakers 8 Connectors 9 Connect toTV 10 Connect audio fromTV and other devices 10 5 Use your home theater 12 Choose sound 12 Discs 12 USB storage devices 13 DivX 14 Audio video and picture options 14 Radio 15 MP3 player 16 Create MP3 files 16 EasyLink 17 6 Change settings 18 Picture 18 Sound 18...

Page 4: ...MI licensing LLC in the United States and other countries CLASS 1 LASER PRODUCT 1 Notice This section contains the legal and trademark notices Copyright This item incorporates copy protection technology that is protected by U S patents and other intellectual property rights of Rovi Corporation Reverse engineering and disassembly are prohibited Copyright in the UK Recording and playback of material...

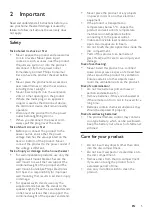
Page 5: ...re you use your home theater If damage is caused by failure to follow instructions the warranty does not apply Safety Risk of electric shock or fire Never expose the product and accessories to rain or water Never place liquid containers such as vases near the product If liquids are spilt on or into the product disconnect it from the power outlet immediately Contact Philips Consumer Care to have th...

Page 6: ...hen this crossed out wheeled bin symbol is attached to a product it means that the product is covered by the European Directive 2002 96 EC Please inform yourself about the local separate collection system for electrical and electronic products Please act according to your local rules and do not dispose of your old products with your normal household waste Correct disposal of your old product helps...

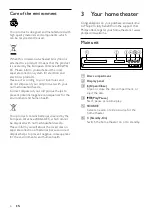
Page 7: ...ht to fast backward or fast forward press up or down to slow backward or slow forward In radio mode press left or right to search a radio station press up or down to fine tune a radio frequency e OK Confirm an entry or selection f BACK Return to a previous menu screen g Previous Next Skip to the previous or next track chapter or file In radio mode select a preset radio station h Mute Mute or resto...

Page 8: ...epeat play or turn off the repeat mode o CREATE MP3 ZOOM Access the create MP3 menu Zoom into a video scene or picture Press the Navigation buttons left right to select a zoom factor p SCREEN FIT Fit the picture format to the TV screen q SUBTITLE Select subtitle language for video r AUDIO SYNC Select an audio language or channel Press and hold to access audio delay setting then press to delay the ...

Page 9: ...r subwoofer 1 Seating position This is the center of your listening area 2 SPEAKER LEFT speaker left and SPEAKER RIGHT speaker right speakers Placethe left and right speakers in the front and equidistant from the main unit in an arc so that the two speakers are at same distance from your seating position For best effect point the speakers towards the seating position and place the speakers close t...

Page 10: ... connections in this user manual are only recommendations You can use other connections too TV Connect to TV Connect your home theater to a TV to watch videos You can listen to audio from TV programs through your home theater speakers Use the best quality connection available on your home theater and TV Option 1 Connect to TV through HDMI Best quality video With a standard HDMI connection you need...

Page 11: ...e theater to the OPTICAL OUT connector on the TV or other device The digital optical connector might be labeled SPDIF SPDIF OUT or OPTICAL Option 2 Connect audio through analog audio cables Basic quality audio Using an analog cable connect the AUX connectors on your home theater to the AUDIO OUT connectors on the TV or other device TV VCR EN ...

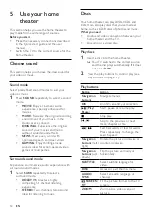
Page 12: ...e picture format to the TV screen ZOOM Zoom into a video scene or picture 5 Use your home theater This section helps you use the home theater to play media from a wide range of sources Before you start Make the necessary connections described in the Quick start guide and the user manual Switch the TV to the correct source for the home theater Choose sound This section helps you choose the ideal so...

Page 13: ...ent browser is displayed 3 Select a file and then press OK 4 Press the playback buttons to control play see Play buttons on page 12 Button Action REPEAT Select or turn off repeat mode REPEAT A B Mark two points within a chapter or track to repeat play or turn off the repeat mode ANGLE Select video scenes recorded in different camera angels INFO Access the advanced options when you play your audio ...

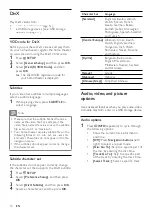
Page 14: ...page 12 a USB storage device see USB storage devices on page 13 VOD code for DivX Before you purchase DivX videos and play them on your home theater register the home theater on www divx com using the DivX VOD code 1 Press SETUP 2 Select General Setup and then press OK 3 Select DivX R VOD Code and then press OK The DivXVOD registration code for your home theater is displayed Subtitles If your vide...

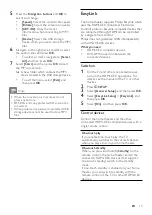
Page 15: ...s 1 Press INFO The video options menu is displayed 2 Press the Navigation buttons and OK to select and change Title Select a specific title Chapter Select a specific chapter Track Select a specific track for VCD SVCD only Audio Select audio language for video Subtitle Select subtitle language for video Angle Select video scenes recorded in different camera angels TT Time Skip to a specific part of...

Page 16: ...4 Track02 04 17 Track03 03 58 Track04 04 51 Track05 03 53 Track06 04 09 Track07 04 38 Speed Normal CRT ID3 Yes Device USB1 Tune stations 1 Connect the FM antenna as described in the Quick start guide 2 Press RADIO If you have already installed the radio stations the last channel that you listened to is played If you have not installed any radio stations the message AUTO INSTALL PRESS PLAY appears ...

Page 17: ...uch standby When you press and hold Standby on the remote control the home theater and all the connected HDMI CEC devices that support one touch standby switch to the standby mode If one touch standby is enabled on your home theater you can switch to standby with the remote control of the TV or other HDMI CEC devices 5 Press the Navigation buttons and OK to select and change Speed Select the write...

Page 18: ...ess SETUP 2 Select Audio Setup and then press OK 3 Select HDMI Audio Off and then press OK 6 Change settings This section helps you to change the settings of your home theater Caution Most of the settings are already configured with the best value for your home theater Unless you have a reason to change a setting it is best to leave it at the default value Note You cannot change a setting that is ...

Page 19: ... then press OK A message prompts you to enter the password 4 Enter the password with the Numeric buttons 5 Select an age rating and then press OK To play all discs irrespective of the rating select level 8 or Off Language Select a language for the home menu audio and subtitles Home menu 1 Press SETUP 2 Select General Setup and then press OK 3 Select OSD Language and then press OK 4 Select a menu l...

Page 20: ...iscs on your home theater 1 While playing a disc press SETUP 2 Select General Setup and then press OK 3 Select Disc Lock Lock and then press OK A message prompts you to enter the password 4 Enter the password with the Numeric buttons The disc is locked To play the locked disc enter the password Energy saving Save energy by changing the following settings Auto standby When playing a disc or a USB s...

Page 21: ...rsion on www philips com support Check software version 1 Press SETUP 2 Select Preference Setup and then press OK 3 Select Version Info and then press OK The software version is displayed Update software through USB or CD R What you need A CD R or a USB flash drive with at least 75MB of memory The USB flash drive must be FAT formatted Do not use a USB hard drive A computer with Internet access An ...

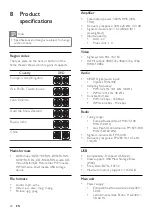
Page 22: ...M 200 Hz 12 5 kHz 6 dB USB Compatibility Hi Speed USB 2 0 Class support USB Mass Storage Class MSC File system FAT16 FAT32 Maximum memory support 160 GB Main unit Power supply Europe China Russia India 220 240V 50 Hz Latin America Asia Pacific 110 240V 50 60 Hz 8 Product specifications Note Specifications and design are subject to change without notice Region codes The type plate on the back or bo...

Page 23: ...a new cable Press to open the disc compartment and then 1 on the remote control to restore the default picture resolution Wait for 10 seconds for auto recovery or change the HDMI video setting see Picture resolution on page 18 Disc does not play high definition video Make sure that the disc contains high definition video Make sure that the TV supports high definition video Use an HDMI cable to con...

Page 24: ...factory settings see Apply factory settings on page 20 then switch it off and switch on again On your home theater press SOURCE repeatedly to select the correct audio input Distorted sound or echo If you play audio from the TV through the home theater make sure that the TV is muted Audio and video are not synchronized 1 Press and hold AUDIO SYNC 2 Press within five seconds to synchronize the audio...

Page 25: ...language audio 19 disc menu 19 onscreen menu 19 subtitle 19 10 Index A amplifier 22 audio HDMI audio 18 predefined modes 12 quality 10 settings 18 source 11 specifications 22 audio language 19 audio options 14 auto standby 20 B brightness 20 C care environment 6 product 5 connect audio analog cable 11 audio optical cable digital 11 audio from TV and other devices 10 speakers 9 TV Composite 10 TV H...

Page 26: ...ntal rating 19 password 19 picture 18 power 20 restore 20 screen saver 20 sleep timer 20 subtitle language 19 video 18 sleep timer 20 M main unit overview 6 specifications 22 troubleshooting 23 media formats 22 MP3 connector 9 create MP3 16 display contents 13 play 16 N night mode 12 O one touch play 17 one touch standby 17 options picture 15 overview connectors 9 HDMI CEC 17 main unit 6 remote co...

Page 27: ...und 12 synchronize picture and sound 13 troubleshooting 24 speakers connect 9 position 8 specifications 23 surround sound 12 subtitle character set 14 language 19 subwoofer specifications 23 synchronize picture and sound 13 T time search 15 titles 15 trademarks 4 troubleshooting connection 23 main unit 23 picture 23 play 24 sound 24 U update software check current version 21 update 21 USB format 2...

Page 28: ...Language Code ...

Page 29: ... 2011 Koninklijke Philips Electronics N V All rights reserved sgpjp_1126 12_v1 ...

Reviews: