background image

7

English

Care of the environment


Your product is designed and manufactured with 

high quality materials and components, which 

can be recycled and reused.


When this crossed-out wheeled bin symbol is 

attached to a product it means that the product 

is covered by the European Directive 2002/96/

EC. Please inform yourself about the local 

separate collection system for electrical and 

electronic products.

Please act according to your local rules and 

do not dispose of your old products with your 

normal household waste.

Correct disposal of your old product helps to 

prevent potential negative consequences for the 

environment and human health.


Your product contains batteries covered by the 

European Directive 2006/66/EC, which cannot 

be disposed with normal household waste.

Please inform yourself about the local rules on 

separate collection of batteries because correct 

disposal helps to prevent negative consequences 

for the environmental and human health.

• 

Never place the product or any objects 

on power cords or on other electrical 

equipment.

• 

If the product is transported in 

temperatures below 5°C, unpack the 

product and wait until its temperature 

matches room temperature before 

connecting it to the power outlet.

• 

Visible and invisible laser radiation when 

open. Avoid exposure to beam.

• 

Do not touch the disc optical lens inside the 

disc compartment.

• 

Parts of this product can be made of 

glass. Handle with care to avoid injury and 

damage.

Risk of overheating! 

• 

Never install this product in a confined 

space. Always leave a space of at least four 

inches around the product for ventilation. 

Ensure curtains or other objects never 

cover the ventilation slots on the product.

Risk of contamination!

• 

Do not mix batteries (old and new or 

carbon and alkaline, etc.).

• 

Remove batteries if they are exhausted or 

if the remote control is not to be used for a 

long time.

• 

Batteries contain chemical substances, they 

should be disposed of properly.

Risk of swallowing batteries!

• 

The product/remote control may contain a 

coin type battery, which can be swallowed. 

Keep the battery out of reach of children at 

all times!

Care for your product

• 

Do not insert any objects other than discs 

into the disc compartment.

• 

Do not insert warped or cracked discs into 

the disc compartment.

• 

Remove discs from the disc compartment 

if you are not using the product for an 

extended period of time.

• 

Use only microfiber cloth to clean the 

product.

EN

Summary of Contents for HTS3551

Page 1: ...ervejledning DE Benutzerhandbuch EL Εγχειρίδιο χρήσης ES Manual del usuario FI Käyttöopas FR Mode d emploi IT Manuale utente NL Gebruiksaanwijzing NO Brukerhåndbok PT Manual do utilizador SV Användarhandbok TR Kullanım kılavuzu EN indd Sec3 1 EN indd Sec3 1 4 4 2011 2 35 15 PM 4 4 2011 2 35 15 PM ...

Page 2: ......

Page 3: ...ntact Philips 4 2 Notice 4 Copyright 4 Compliance 4 Mains fuse UK only 4 Open source software 5 Trademarks 5 3 Important 6 Safety 6 Care for your product 7 Care of the environment 7 4 Your home theater 8 Main unit 8 Remote control 8 5 Connect your home theater 10 Speakers 10 Connectors 11 Connect toTV 11 Connect audio fromTV and other devices13 Internet 14 6 Use your home theater 15 Choose sound 1...

Page 4: ...lug a BS 1362 approval and the ASTA approval mark Contact your dealer if you are not sure about what type of fuse to use Caution To conform with the EMC directive 2004 108 EC do not detach the plug from the power cord 1 Help and support Find answers to many frequently answered questions FAQs on your product at www philips com FAQs If you have a problem refer to the frequently asked questions FAQs ...

Page 5: ...egistration code locate the DivX VOD section in your device setup menu Go to vod divx com for more information on how to complete your registration Open source software Philips Electronics Singapore Pte Ltd hereby offers to deliver upon request a copy of the complete corresponding source code for the copyrighted open source software packages used in this product for which such offer is requested b...

Page 6: ...orms When you disconnect the power cord always pull the plug never the cable Risk of short circuit or fire Before you connect the product to the power outlet ensure that the power voltage matches the value printed on the back or bottom of the product Never connect the product to the power outlet if the voltage is different Risk of injury or damage to the home theater For wall mountable products us...

Page 7: ... C unpack the product and wait until its temperature matches room temperature before connecting it to the power outlet Visible and invisible laser radiation when open Avoid exposure to beam Do not touch the disc optical lens inside the disc compartment Parts of this product can be made of glass Handle with care to avoid injury and damage Risk of overheating Never install this product in a confined...

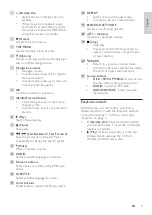
Page 8: ...fit from the support that Philips offers register your home theater at www philips com welcome Main unit a Disc compartment b Open Close Open or close the disc compartment or eject the disc c Play Pause Start pause or resume play d Stop Stop play e Standby On Switch the home theater on or to standby f SOURCE Select an audio or video source for the home theater g Increase or decrease volume h Displ...

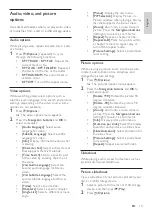
Page 9: ...he TV from standby and then play a disc a Standby On Switch the home theater on or to standby When EasyLink is enabled press and hold for at least three seconds to switch all connected HDMI CEC compliant devices to standby b Home Access the home menu c TOP MENU Access the main menu of a disc d Options Access more play options while playing a disc or a USB storage device e Navigation buttons Naviga...

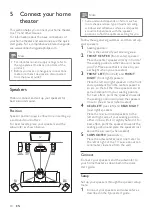
Page 10: ...h it or slightly behind it For best effect point the speakers towards the seating position and place the speakers just above the ear level when seated 5 SUBWOOFER subwoofer Place the subwoofer at least one meter to the left or right of the TV Leave about ten centimeter clearance from the wall Connect Connect your speakers and the subwoofer to your home theater as described in the quick start guide...

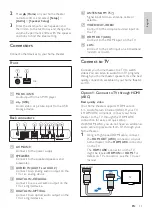
Page 11: ...MI cable connect the HDMI OUT ARC connector on your home theater to the HDMI ARC connector on the TV The HDMI ARC connector on the TV might be labeled HDMI IN or HDMI For details on TV connectors see the TV user manual TV 2 Press Home on your home theater remote control and select Setup Audio Speaker Setup 3 Enter the distance for each speaker and then listen to the test tones and change the volum...

Page 12: ...home theater the video is automatically displayed onTV and the audio is automatically played on the home theater 3 If audio from the TV does not play automatically on your home theater set up the audio manually see Set up audio for connected devices on page 13 Option 2 Connect to TV through HDMI Best quality video If your TV is not HDMI ARC compliant connect your home theater to the TV through a s...

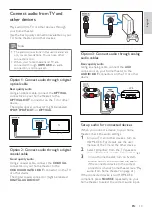
Page 13: ...eater to select the correct audio input VCR Connect audio from TV and other devices Play audio from TV or other devices through your home theater Use the best quality connection available on your TV home theater and other devices Note The audio connections in this user manual are only recommendations You can use other connections too When your home theater and TV are connected through HDMI ARC an ...

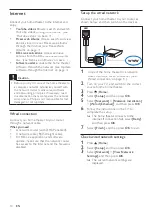
Page 14: ...owse search and watch YouTube videos through the Internet see YouTube videos on page 21 Picasa web albums Access search and view photos stored in your Picasa web albums through the Internet see Picasa Web Albums on page 21 BD Live applications Access exclusive services from the BD Live enabled Blu ray discs see BD Live on Blu ray on page 17 Software update update the home theater software through ...

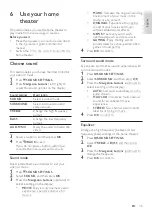
Page 15: ... Navigation buttons up down to change the frequency 4 Press OK to confirm 6 Use your home theater This section helps you use the home theater to play media from a wide range of sources Before you start Make the necessary connections described in the Quick start guide and the user manual Switch the TV to the correct source for the home theater Choose sound This section helps you choose the ideal so...

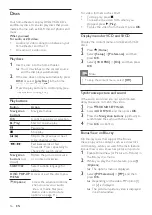
Page 16: ...ideo PIP option 1 or 2 is displayed The picture in picture video is displayed in a small window Discs Your home theater can play DVDs VCDs CDs and Blu ray discs It can also play discs that you ve made at home such as CD R discs of photos and music What you need For audio or 2D video Audio and video connection between your home theater and the TV An audio or a video disc Play discs 1 Insert a disc ...

Page 17: ...iles from a USB storage device connect your home theater to a TV through an HDMI cable 4 Select 2nd Audio Language or 2nd Subtitle Language and then press OK 5 Select the language and then press OK Note To turn off the Bonus View press Options select PIP Selection Off and then press OK BD Live on Blu ray On Blu ray discs with BD Live content access additional features such as internet chats with t...

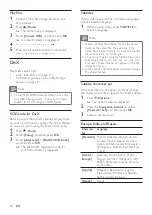
Page 18: ...talian Kurdish Latin Norwegian Portuguese Spanish Swedish and Turkish Central Europe Albanian Croat Czech Dutch English German Hungarian Irish Polish Romanian Slovak Slovene and Sorbian Cyrillic Bulgarian Belorussian English Macedonian Moldavian Russian Serbian and Ukrainian Greek Greek Play files 1 Connect the USB storage device to the home theater 2 Press Home The home menu is displayed 3 Select...

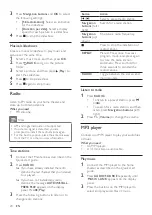
Page 19: ...f your pictures stored in your disc or a USB storage device 1 Select a picture from a disc or USB storage device and then press Play 2 Press Options Audio video and picture options Use advanced features when you play audio video or media files from a disc or a USB storage device Audio options While playing audio repeat an audio track a disc or a folder 1 Press Options repeatedly to cycle through t...

Page 20: ...tion buttons and OK to select the following settings Slide Animation Select an animation for the slideshow Duration per slide Select a display speed for each picture in a slideshow 4 Press to stop the slideshow Musical slideshows Create a musical slideshow to play music and pictures at the same time 1 Select a music track and then press OK 2 Press BACK and go to the picture folder 3 Select a pictu...

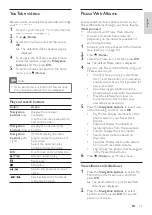
Page 21: ...s that are tagged in the Picasa Web Albums 6 Press Home to exit Picasa menu View albums and slideshows 1 Press the Navigation buttons to select My Photos from the Picasa menu and then press OK The photo albums in your Picasa Web Albums are displayed 2 Press the Navigation buttons to select a photo and then press OK to view the photo in full screen YouTube videos Browse search and watchYouTube vide...

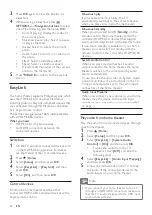
Page 22: ...o map the audio of the connected device to the audio inputs on your home theater Note If you connect your home theater to the TV through an HDMI ARC connection make sure that the TV audio is mapped to the ARC input on your home theater 3 Press OK again to view the photos in a slideshow 4 While viewing a slideshow press OPTIONS and Navigation buttons to select one of the following and then press OK...

Page 23: ...udio format Off Disable audio from the TV 7 Change settings This section helps you to change the settings of your home theater Caution Most of the settings are already configured with the best value for your home theater Unless you have a reason to change a setting it is best to leave it at the default value Note You cannot change a setting that is grayed out To return to the previous menu press B...

Page 24: ...ssword menu is displayed 4 Follow the instructions on the TV to set or change password If you do not have a password or you have forgotten enter 0000 5 Press OK Night mode For quiet listening decrease the volume of loud sounds when you play discs Night mode is only available for Dolby encoded DVD and Blu ray discs 1 Press Home 2 Select Setup and then press OK 3 Select Audio Night Mode On and then ...

Page 25: ...er than your child s age 1 Press Home 2 Select Setup and then press OK 3 Select Preference Parental Control and then press OK A message prompts you to enter the password 4 Enter the password with the Numeric buttons 5 Select an age rating and then press OK To play all discs irrespective of the rating select level 8 or Off Energy saving Save energy by changing the following settings Auto standby Wh...

Page 26: ...rom your computer 8 Update software To continue to get the best features and support for your home theater update the software regularly Compare the version of your current software with the latest version on www philips com support Check software version 1 Press Home 2 Select Setup and then press OK 3 Select Advanced Version Info and then press OK The software version is displayed Update software...

Page 27: ...Russia India China A A A A C C C C Asia Pacific Taiwan Step 2 Update the software Caution Before you connect the USB flash drive to your home theater make sure that there is no disc in the disc compartment and the disc compartment is closed 1 Connect the USB flash drive to your home theater 2 Switch your TV to the correct source for your home theater 3 Press Home and then select Setup 4 Select Adv...

Page 28: ...MPEG 1 MPEG 2 20 Mbps peak 40 Mbps MPEG 1 MPEG 2 20 Mbps peak 40 Mbps Audio formats Your home theater supports the following audio files Extension Container Audio codec Bit rate mp3 MP3 MP3 32 kbps 320 kbps wma ASF WMA 64 kbps 160 kbps aac AAC AAC HE AAC 192 kbps wav WAV PCM 1 4 Mbps m4a MKV AAC 192 kbps mka MKA PCM 27 648 Mbps mka MKA Dolby Digital 640 kbps mka MKA DTS core 1 54 Mbps mka MKA MPEG...

Page 29: ...InP DVD CD Wave length 405 7 nm 7 nm BD 655 10 nm 10 nm DVD 790 10 nm 20 nm CD Output power Max ratings 20 mW BD 6 mW DVD 7 mW CD Amplifier Total output power 300W RMS 30 THD Frequency response 20 Hz 20 kHz 3 dB Signal to noise ratio 65 dB CCIR A weighted Input sensitivity AUX1 AUX2 1000 mV Music i Link 500 mV Video Signal system PAL NTSC HDMI output 480i 576i 480p 576p 720p 1080i 1080p 1080p24 Au...

Page 30: ...d Cannot play a DivX file Make sure that the DivX file is encoded according to the Home Theater Profile with the DivX encoder Make sure that the DivX file is complete 10 Troubleshooting Warning Risk of electric shock Never remove the casing of the product To keep the warranty valid never try to repair the product yourself If you have problems using this product check the following points before yo...

Page 31: ...s of a USB storage device Make sure that the format of the USB storage device is compatible with the home theater Make sure that the file system on the USB storage device is supported by the home theater No entry or x sign appears on the TV The operation is not possible EasyLink does not work Make sure that the home theater is connected to a Philips brand EasyLink TV and the EasyLink option is on ...

Page 32: ...l notices 4 connect audio analog cable 13 audio coaxial cable digital 13 audio optical cable digital 13 audio from TV and other devices 13 home network 14 speakers 10 TV Composite 12 TV HDMI ARC 11 TV HDMI 12 connectors back connectors 11 front connectors 11 control disc play 16 Easylink HDMI CEC 9 main unit 8 parental control 24 radio 20 USB storage device 16 copyright protection 4 D disable BD L...

Page 33: ... to radio 20 specifications 29 tune stations 20 ratings 25 recycling 7 region codes 27 remote control batteries 29 overview 8 repeat 19 M main unit overview 8 specifications 29 troubleshooting 30 manually setup speakers 10 media formats 27 microphone 11 MP3 connector 11 play 20 multimedia content from disc 16 from USB storage device 17 N network home network 14 settings 14 update home theater soft...

Page 34: ... settings 14 wired connection 14 Y YouTube videos 21 S safety disposal 7 use of the product 6 screen saver 25 settings audio 23 default 25 disc language 24 HDMI audio 23 HDMI video 23 HDMI CEC 22 menu language 24 parental rating password 24 ratings 25 password 24 picture 23 power 25 ratings 25 resolution 23 restore 25 screen saver 25 sleep timer 25 subtitle language 24 video 23 setup speakers manu...

Page 35: ...Lao 7679 Latina 7665 Latvian 7686 Letzeburgesch 7666 Limburgan Limburger 7673 Lingala 7678 Lithuanian 7684 Luxembourgish 7666 Macedonian 7775 Malagasy 7771 Magyar 7285 Malayalam 7776 Maltese 7784 Manx 7186 Maori 7773 Marathi 7782 Marshallese 7772 Moldavian 7779 Mongolian 7778 Nauru 7865 Navaho Navajo 7886 Ndebele North 7868 Ndebele South 7882 Ndonga 7871 Nederlands 7876 Nepali 7869 Norsk 7879 Nort...

Page 36: ... 2011 Koninklijke Philips Electronics N V All rights reserved Sgpam_1128 HTS3551_12 WesternEu v4 ...

Reviews: