background image

4

For speakers with stands, use only the 
supplied stands. Secure the stands 
to the speakers tightly. Place the 
assembled stands on fl at, level surfaces 
that can support the combined weight 
of the speaker and stand.

Never place the product or any objects 
on power cords or on other electrical 
equipment.

If the product is transported in 
temperatures below 5°C, unpack the 
product and wait until its temperature 
matches room temperature before 
connecting it to the power outlet.

Visible and invisible laser radiation 
when open. Avoid exposure to beam.

Do not touch the disc optical lens 
inside the disc compartment.

Risk of overheating! 

Never install this product in a confi ned 
space. Always leave a space of at least 
four inches around the product for 
ventilation. Ensure curtains or other 
objects never cover the ventilation 
slots on the product.

Risk of contamination!

Do not mix batteries (old and new or 
carbon and alkaline, etc.).

Remove batteries if they are exhausted 
or if the remote control is not to be 
used for a long time.

Batteries contain chemical substances, 
they should be disposed of properly.

Product care

Do not insert any objects other than 
discs into the disc compartment.

Do not insert warped or cracked discs 
into the disc compartment.

Remove discs from the disc 
compartment if you are not using the 
product for an extended period of 
time.

Only use microfi ber cloth to clean the 
product.

2 Important

Read and understand all instructions before you use 
your home theater. If damage is caused by failure to 
follow instructions, the warranty does not apply.

Safety

Risk of electric shock or fi re!

Never expose the product and 
accessories to rain or water. Never 
place liquid containers, such as vases, 
near the product. If liquids are spilt on 
or into the product, disconnect it from 
the power outlet immediately. Contact 
Philips Consumer Care to have the 
product checked before use.

Never place the product and 
accessories near naked fl ames or other 
heat sources, including direct sunlight.

Never insert objects into the ventilation 
slots or other openings on the product.

Where the mains plug or an appliance 
coupler is used as the disconnect 
device, the disconnect device shall 
remain readily operable.

Disconnect the product from the 
power outlet before lightning storms. 

When you disconnect the power cord, 
always pull the plug, never the cable.

Risk of short circuit or fi re!

Before you connect the product to the 
power outlet, ensure that the power 
voltage matches the value printed on 
the back or bottom of the product. 
Never connect the product to the 
power outlet if the voltage is different.

Risk of injury or damage to the home theater!

For wall-mountable products, use 
only the supplied wall mount bracket. 
Secure the wall mount to a wall that 
can support the combined weight 
of the product and the wall mount. 
Koninklijke Philips Electronics N.V. 
bears no responsibility for improper 
wall mounting that results in accident, 
injury or damage.

EN

Summary of Contents for HTS5560

Page 1: ...Register your product and get support at www philips com welcome HTS5560 HTS5580 HTS5590 ...

Page 2: ......

Page 3: ... of your old product and batteries 5 3D health warning 5 3 Your home theater 6 Main unit 6 Remote control 6 4 Connect your home theater 9 Connectors 9 Connect to theTV 10 Connect audio fromTV or other devices 11 Connect to a computer network and the Internet 12 Connect a wireless module 13 5 Use your home theater 13 Before you start 13 Access the home menu 13 Choose your sound 14 Play a disc 15 Us...

Page 4: ...demarks of Blu ray Disc Association Java and all other Java trademarks and logos are trademarks or registered trademarks of Sun Microsystems Inc in the United States and or other countries 1 Notice Copyright This item incorporates copy protection technology that is protected by U S patents and other intellectual property rights of Rovi Corporation Reverse engineering and disassembly are prohibited...

Page 5: ... Sony Corporation DLNA the DLNA Logo and DLNA CERTIFIED are trademarks service marks or certification marks of the Digital Living Network Alliance For HTS5580 and HTS5590 only Manufactured under licence from Dolby Laboratories Dolby Pro Logic and the double D symbol are trademarks of Dolby Laboratories Manufactured under license under U S Patent s 5 451 942 5 956 674 5 974 380 5 978 762 6 226 616 ...

Page 6: ...oth to clean the product 2 Important Read and understand all instructions before you use your home theater If damage is caused by failure to follow instructions the warranty does not apply Safety Risk of electric shock or fire Never expose the product and accessories to rain or water Never place liquid containers such as vases near the product If liquids are spilt on or into the product disconnect ...

Page 7: ... visual system is not fully developed yet Disposal of your old product and batteries Your product is designed and manufactured with high quality materials and components which can be recycled and reused When this crossed out wheeled bin symbol is attached to a product it means that the product is covered by the European Directive 2002 96 EC Please inform yourself about the local separate collectio...

Page 8: ...r your home theater at www philips com welcome Main unit a Disc compartment b Open Close Opens or closes the disc compartment c Play Pause Starts pauses or resumes play d Stop Stops play In radio mode erases the current preset radio station e Standby On Switches the home theater on or to standby f SOURCE Selects an audio video source for the home theater g Skips to the previous or next track chapt...

Page 9: ... connected HDMI CEC compliant devices to standby b Home Accesses the home menu c SOUND SETTINGS Accesses or exits various sound options d Navigation buttons Navigates menus In radio mode press left or right to start auto search e OK Confirms an entry or selection f OPTIONS Accesses more play options during playback In radio mode programs radio stations g Volume Increases or decreases volume h Play...

Page 10: ...olume Increases or decreases volume k Pause Pauses play l Source buttons Color buttons Blu ray discs Selects tasks or options AUDIO SOURCE Selects an audio input source DOCK for iPod Switches to Philips Dock for iPod iPhone RADIO Switches to FM radio DISC Switches to disc source m Alphanumeric buttons Enters values or letters using SMS style entry n TOP MENU Accesses the main menu of a video disc ...

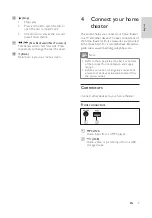
Page 11: ...ings Before you make or change any connections ensure that all devices are disconnected from the power outlet Connectors Connect other devices to your home theater Front connectors a MP3 LINK Audio input from an MP3 player b USB Audio video or picture input from a USB storage device p Stop Stops play Press and hold to eject the disc or open the disc compartment In radio mode erases the current pre...

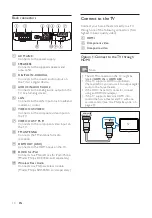
Page 12: ...TV Back connectors a AC MAINS Connects to the power supply b SPEAKERS Connects to the supplied speakers and subwoofer c DIGITAL IN COAXIAL Connects to the coaxial audio output on the TV or a digital device d AUDIO IN AUX 1 AUX 2 Connects to the analog audio output on the TV or an analog device e LAN Connects to the LAN input on a broadband modem or router f VIDEO OUT VIDEO Connects to the composit...

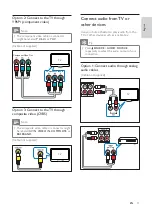
Page 13: ...through analog audio cables Cable not supplied 2 1 TV 2 1 Option 2 Connect to the TV through YPbPr component video Note The component video cable or connector might be labeled Y Cb Cr or YUV Cable not supplied Option 3 Connect to the TV through composite video CVBS Note The composite video cable or connector might be labeled AV IN VIDEO IN COMPOSITE or BASEBAND Cable not supplied ComponentVideo Ou...

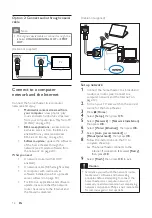
Page 14: ...s not responsible for lost damaged or corrupt data LAN www Option 2 Connect audio through coaxial cable Note The digital coaxial cable or connector might be labeled COAXIAL DIGITAL OUT or SPDIF OUT Cable not supplied Connect to a computer network and the Internet Connect the home theater to a computer network and enjoy Multimedia content streamed from your computer view photos play music and watch...

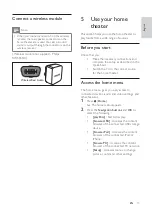
Page 15: ... Navigation buttons and OK to select the following play Disc Starts disc play browse USB Accesses the content browser of the connected USB storage device browse iPod Accesses the content browser of the connected iPod or iPhone browse PC Accesses the content browser of the connected PC network Setup Accesses menus to change picture sound and other settings Connect a wireless module Note When you co...

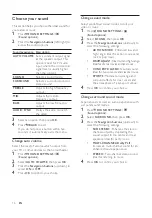
Page 16: ...lti channel sound for an enhanced movie experience STEREO Two channel stereo sound Ideal for listening to music 4 Press OK to confirm your choice Choose your sound This section helps you choose the ideal sound for your video or music 1 Press SOUND SETTINGS Sound options 2 Press the Navigation buttons left right to access the sound options Sound experience Description AUTO VOLUME Sets a constant ou...

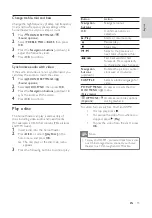
Page 17: ...HDMI cable Change treble mid and bass Change the high frequency treble mid frequency mid and low frequency bass settings of the home theater to suit your video or music 1 Press SOUND SETTINGS Sound options 2 Select TREBLE MID or BASS then press OK 3 Press the Navigation buttons up down to adjust the frequency level 4 Press OK to confirm Synchronize audio with video If the audio and video are not s...

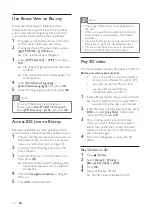
Page 18: ...lay your Blu ray 3D disc The 3D video is displayed in 2D Use BonusView on Blu ray Blu ray discs that support the BonusView feature also known as Picture In Picture allow you to view special content such as a director s commentary while watching the main feature 1 If necessary enable BonusView or Picture In Picture in the Blu ray disc menu 2 During playback of the main feature press OPTIONS Options...

Page 19: ...s options menu appears 2 Press the Navigation buttons and OK to select and adjust Rotate 90 Rotates the picture 90 degree clockwise Rotate 90 Rotates the picture 90 degree counter clockwise Play from a USB storage device The home theater is fitted with a USB connector that allows you to view pictures listen to music or watch movies stored on a USB storage device 1 Connect the USB storage device to...

Page 20: ... 2 Switch on the computer and router 3 Open Windows Media Player on the computer 4 Select Library Media Sharing then select settings to share your media 5 Select Library Add to Library then select settings to share the folder containing your media Zoom Zooms into a video scene or picture Press the Navigation buttons left right to select a zoom factor Info Displays picture information Duration per ...

Page 21: ...e tuning grid erases all preset radio stations 1 Press RADIO 2 Press Stop 3 Press and hold Play to toggle between 100 kHz and 50 kHz frequency 6 Select Advanced options then add the folders to share 7 Select Library Apply Media Information Changes to activate the changes In Macintosh OS X Twonky Media v4 4 2 1 Connect the home theater to a network router see Connect to a computer network and the I...

Page 22: ...and other connected devices See the manual of the TV or other devices for details 2 Press Home 3 Select Setup then press OK Play audio from TV or other devices Press SOURCE AUDIO SOURCE repeatedly to select the audio output of the connected device Play from an MP3 player Connect and play audio files from an MP3 player or other external audio devices 1 Connect the MP3 player to the home theater as ...

Page 23: ...ays colors with more shades and hues when the video content is recorded in Deep Color and the TV supports this feature Component Video Selects the component video resolution Copy protected DVDs can display only 480p 576p or 480i 576i 4 Select EasyLink EasyLink then press OK 5 Select On then press OK 6 You can now enjoy the following Philips EasyLink controls One touch play When you play a disc the...

Page 24: ...put Mapping Updates audio input mapping if there are new devices connected 5 Press OK to confirm your choice Blu ray 3D video Selects the 3 dimensional video output when you play a 3D video on your home theater The home theater must be connected to a 3D TV through HDMI Picture Settings Selects a predefined color setting 5 Press OK to confirm your choice Note The best setting is automatically selec...

Page 25: ...heater on www divx com using the DivX VOD code You cannot reset parental control setting to its default value Note The connected devices must be connected through HDMI and switched on Change preference settings 1 Press Home 2 Select Setup then press OK 3 Select Preference then press OK 4 Select and adjust the following settings Menu language Selects the on screen display menu language Audio Select...

Page 26: ...e you might damage the home theater 7 Update software To check for new updates compare the current software version of your home theater with the latest software version if available on the Philips web site Check software version 1 Press Home 2 Select Setup then press OK 3 Select Advanced Version Info then press OK The software version is displayed Update software from the network 1 Prepare the in...

Page 27: ...urope Russia China India 220 240V 50Hz Latin America Asia Pacific 110 127V 220 240V 50 60Hz switchable Power consumption 135 W Standby power consumption 0 9 W Dimensions WxHxD 435 x 58 x 358 mm Weight 3 87 kg 8 Product specifications Note Specification and design are subject to change without notice Region code The type plate on the back or bottom of the home theater shows which regions it support...

Page 28: ...uto recover Check if the HDMI cable is faulty Replace with a new HDMI cable No picture on the Component Y Pb Pr connection If the HDMI video connection is set to Auto or 1080p 24Hz there is no video output through the component connection Change the HDMI video setting or remove the HDMI connection No high definition video signal on the TV Ensure that the disc contains high definition video Ensure t...

Page 29: ...e pictures from my iPod iPhone on theTV Connect a yellow composite cable from the dock to the TV Switch the TV to the AV VIDEO source corresponding to the yellow composite cable Press PLAY on the iPod or iPhone to start the slideshow Sound No sound Ensure that the audio cables are connected and select the correct input source for example SOURCE AUDIO SOURCE for the device you want to play No sound...

Page 30: ... 17 DLNA 18 The audio is interrupted when I play music from my iPod or iPhone in the docking station Ensure that you have installed the latest firmware on your iPod or iPhone For more information refer to the support website of your iPod or iPhone My 3D video plays in 2D mode Ensure that your home theater is connected to your 3D TV through HDMI Ensure that your disc is a Blu ray 3D disc Ensure tha...

Page 31: ...15 rotate pictures 17 S safety 4 settings audio 22 EasyLink 22 parental control 23 preferences 23 slideshow animation 17 duration 17 play from iPod iPhone 20 play musical slideshow 18 software update 24 version 24 E EasyLink settings 20 22 F file formats 25 H HDMI CEC see Easylink 20 I Internet BD Live 16 connect 12 software update 24 iPod play 20 slideshow 20 L language audio 17 23 disc menu 23 on...

Page 32: ...ooting 27 subtitle language 17 23 subtitle shift 17 23 system audio control 20 T time search video 17 title 17 troubleshooting 26 TV audio from TV 11 20 connect 10 U USB play 17 software update 24 V video options 17 synchronize with audio 15 W wireless wireless module 13 EN ...

Page 33: ... Lao 7679 Latina 7665 Latvian 7686 Letzeburgesch 7666 Limburgan Limburger 7673 Lingala 7678 Lithuanian 7684 Luxembourgish 7666 Macedonian 7775 Malagasy 7771 Magyar 7285 Malayalam 7776 Maltese 7784 Manx 7186 Maori 7773 Marathi 7782 Marshallese 7772 Moldavian 7779 Mongolian 7778 Nauru 7865 Navaho Navajo 7886 Ndebele North 7868 Ndebele South 7882 Ndonga 7871 Nederlands 7876 Nepali 7869 Norsk 7879 Nor...

Page 34: ... 2010 Koninklijke Philips Electronics N V All rights reserved sgp t_10 _v ...

Reviews: