background image

12


EN

Connect video cables

This section describes how to connect this 
DVD Home Theatre unit to your TV so to 
enable viewing of disc play.

Select the best video connection that your TV 
can support.

Option 1:

• 

 Connect to HDMI socket (for a 

HDMI, DVI or HDCP-compliant TV).

Option 2:

• 

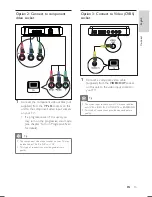
 Connect to component video 

socket (for a standard TV or Progressive 
Scan TV).

Option 3:

• 

 Connect to Video (CVBS) socket 

(for a standard TV).

 Note

You must connect this unit directly to a TV.

• 

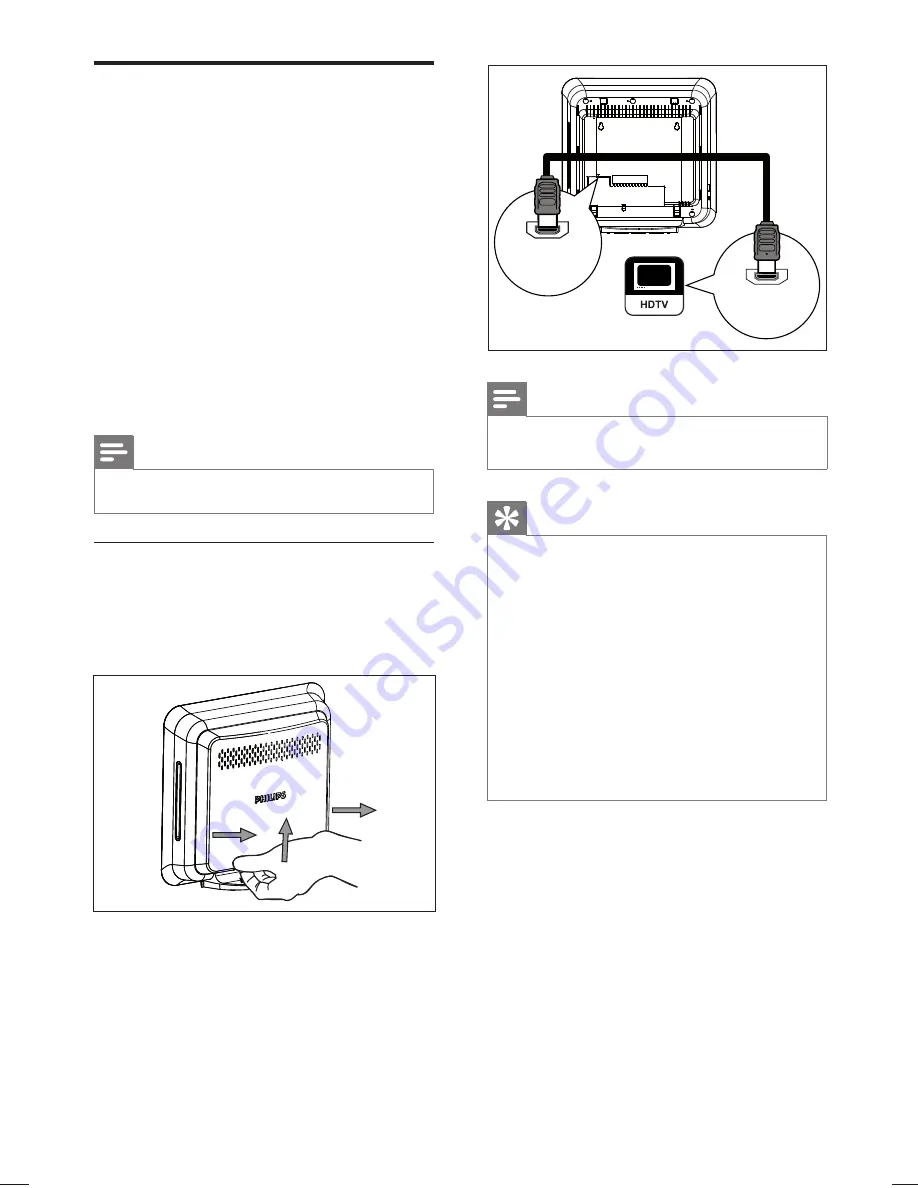
Option 1: Connect to HDMI socket 

Before you connect, remove the rear 
cover of the main unit by pushing it 
upwards and outwards.

Connect a HDMI cable (supplied) from the 

HDMI OUT

 on this unit to the HDMI IN 

socket on your TV.

HDMI IN

HDMI 
OUT

 Note

The HDMI connector is only compatible with HDMI 

• 

compliant TVs and DVI-TVs.


Tip

To optimise the video output, see chapter ‘Adjust 

• 

settings’ > 

[ Video Setup ]

 > 

[ Advanced Picture ]


for details. 
This unit is HDMI CEC compatible.  It enables 

• 

connected TV/device to control each other over 
HDMI, see chapter ‘Activate EasyLink control’ for 
details. 
Use a HDMI/DVI adaptor in case your TV has only 

• 

a DVI connection. An extra audio connection is 
needed to complete this connection.
To route the audio from your TV to this DVD Home 

• 

Theatre unit, connect an audio cable from the audio 
input on this unit to the audio output on your TV.
This type of connections provide best picture quality.

• 

Summary of Contents for HTS9810

Page 1: ...HTS9810 Register your product and get support at www philips com welcome EN DVD Home Theatre System 5 ES_LA Sistema Home Theatre DVD 53 PT_BR DVD Home Theater System 101 ...

Page 2: ...e LEA CUIDADOSAMENTE ESTE INSTRUCTIVO ANTES DE USAR SU APARATO Philips Mexicana S A de C V no se hace responsable por daños o desperfectos causados por Maltrato descuido o mal uso presencia de insectos o roedores cucarachas ratones etc Cuando el aparato no haya sido operarado de acuerdo con el instructivo del uso fuera de los valores nominales y tolerancias de las tensiones voltaje frecuencia cicl...

Page 3: ...CONSUMERS SHOULD NOTE THAT NOT ALL HIGH DEFINITION TELEVISION SETS ARE FULLY COMPATIBLE WITH THIS PRODUCT AND MAY CAUSE ARTIFACTS TO BE DISPLAYED IN THE PICTURE IN CASE OF 525 OR 625 PROGRESSIVE SCAN PICTURE PROBLEMS IT IS RECOMMENDED THAT THE USER SWITCH THE CONNECTION TO THE STANDARD DEFINITION OUTPUT IF THERE ARE QUESTIONS REGARDING OUR TV SET COMPATIBILITY WITH THIS MODEL 525p AND 625p DVD PLA...

Page 4: ...rved DivX DivX Ultra Certified and associated logos are trademarks of DivX Inc and are used under license Official DivX Ultra Certified product Plays all versions of DivX video including DivX 6 with enhanced playback of DivX media files and the DivX Media Format Windows Media and the Windows logo are trademarks or registered trademarks of Microsoft Corporation in the United States and or other cou...

Page 5: ...orrect viewing channel 20 Start Ambisound setup 20 Turn on Progressive Scan 22 Optimise wireless transmission 23 Adjust speakers output 24 Activate EasyLink control 25 Select a play source 26 5 Play 27 Play from disc 27 Play video 28 Play music 31 Play photo 32 Play from USB device 33 Play from portable media player 34 Play from radio 34 6 Adjust sound 37 Control the volume 37 Adjust Bass Treble 3...

Page 6: ...ted 1 Important Safety and important notice Warning Risk of fire or electric shock Ensure that air can circulate freely through the ventilation holes on this unit Allow at least 5 10 cm clearance around the unit Never place this unit remote control or batteries near naked flames or other heat sources including direct sunlight Never place this unit on other electrical equipment Keep away from this ...

Page 7: ...r HDMI It enables the connected devices to control each other with a single remote control Note Philips does not guarantee 100 interoperability with all HDMI CEC devices Ambisound Philips Ambisound technology reproduces multi channel surround sound with fewer speakers to give an embracing surround experience without the hassle of setting up a full range of speaker systems USB direct and MP3 link S...

Page 8: ...switch to FM or AM MW band AUX DI MP3 LINK switch to AUX 1 2 3 INPUT OPTICAL INPUT 1 2 COAXIAL INPUT or MP3 LINK that corresponds to the socket you used to connect the external device d INFO Display the current status or disc information Display photo files in 12 thumbnails view e OPTIONS Access or exit Options menu this menu provides various setting options f u Play Pause Start or pause disc play...

Page 9: ...e m OK Confirm an entry or selection n Cursor buttons v V b B Navigate through the on screen menu Press left or right for fast backward or forward search RADIO press up or down to tune the radio frequency RADIO press left or right to start auto search o BACK TITLE Return to the previous display menu For DVD go to title menu For VCD version 2 0 or SVCD with PBC turned on return to the menu during p...

Page 10: ...disc play RADIO start auto radio installation only available for first time setup f AMBISOUND Select different types of surround sound output g Z Eject Eject or pull in the disc h Display panel Right side panel i Disc compartment Left side panel j MP3 LINK socket To connect portable audio player k USB socket To connect USB flash drive USB memory reader or digital camera Tip Control buttons on this...

Page 11: ...e devices are disconnected from the power outlet Place the unit You can place the main unit on top of a table or mount it on the wall REAR LEFT FRONT LEFT REAR RIGHT FRONT RIGHT SUBWOOFER 1 Place this DVD Home Theatre unit near to the TV 2 Place the speaker system as per the diagram shown above Find the most suitable placement based on your room layout and set up to ensure optimum sound performanc...

Page 12: ...rds 2 Connect a HDMI cable supplied from the HDMI OUT on this unit to the HDMI IN socket on your TV HDMI IN HDMI OUT Note The HDMI connector is only compatible with HDMI compliant TVs and DVI TVs Tip To optimise the video output see chapter Adjust settings Video Setup Advanced Picture for details This unit is HDMI CEC compatible It enables connected TV device to control each other over HDMI see ch...

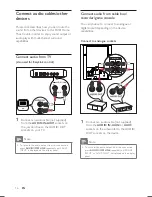
Page 13: ...pter Turn on Progressive Scan for details Tip The component video input socket on your TV may be labelled as Y Pb Cb Pr Cr or YUV This type of connections provide good picture quality Option 3 Connect to Video CVBS socket 1 Connect a composite video cable supplied from the VIDEO OUT socket on this unit to the video input socket on your TV Tip The video input socket on your TV may be labelled as A ...

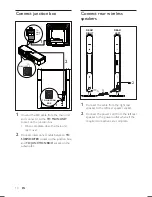
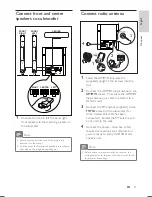
Page 14: ...he main unit rear cover 2 Connect interconnect cable between TO SUBWOOFER socket on the junction box and TO JUNCTION BOX socket on the subwoofer Connect rear wireless speakers REAR RIGHT REAR LEFT 2 1 1 Connect the cable from the right rear speaker to the left rear speaker socket 2 Connect the power cord from the left rear speaker to the power outlet when all the required connections are complete ...

Page 15: ...he AM MW loop antenna supplied upright to fix its claw into the slot 2 Connect the AM MW loop antenna to the AM MW socket Then place the AM MW loop antenna on a shelf or attach it to a stand or wall 3 Connect the FM antenna supplied to the FM75Ω socket on the subwoofer for some models this cable has been connected Extend the FM antenna and fix its ends to the wall 4 Connect the power cord when all...

Page 16: ... TV Note To listen to the audio output from this connection press AUX DI MP3 LINK repeatedly until AUX1 INPUT is displayed on the display panel Connect audio from cable box recorder game console You can choose to connect to analogue or digital socket depending on the device capabilities Connect to analogue sockets AUX 2 AUX 3 R L 1 Connect an audio cable not supplied from the AUDIO IN AUX2 or AUX3...

Page 17: ... device Note To listen to the audio output from this connection press AUX DI MP3 LINK repeatedly until OPTICAL INPUT 1 or OPTICAL INPUT 2 is displayed on the display panel Connect portable media player MP3 1 Connect a 3 5mm stereo audio cable supplied from the MP3 LINK socket on this unit to the phone socket on your portable media player such as MP3 player Note To listen to the audio output from t...

Page 18: ...persons to mount the unit 1 Pull up the catch to remove the main unit rear cover 2 Remove the screws and detach the DVD Home Theatre stand 3 Place two screws on the wall The distance between two screws is 15cm 4 Hook the DVD Home Theatre unit firmly onto the screws slide through the key holes to lock into position ...

Page 19: ...ve the batteries Control a play source 1 Select the source you wish to control by pressing the DISC USB RADIO or AUX DI MP3 LINK button 2 Then select the desired function for example í ë Navigate through the menu 1 Point the remote control directly at the remote sensor on this unit and select the desired function 2 Use the following buttons on the remote control to navigate through the on screen m...

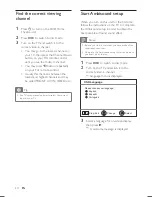
Page 20: ...ser manual on how to select the correct input on your TV Start Ambisound setup When you turn on this unit for the first time follow the instructions on the TV to complete the Ambisound setup in order to obtain the best possible surround sound effect Note Before you start ensure that you have made all the required connections Complete the Ambisound setup for this unit before you insert a disc to pl...

Page 21: ... the condition of the room then press B Rear Speaker Placement menu is displayed Select the placement of the rear speakers in your room Select Rear Speaker Placement Back Change Against side wall 0 5m Against both wall 0 5m Against back wall 0 5m Against both wall 0 5m 6 Select the rear speakers placement in the room then press B 7 The speaker setting is complete press B to exit This DVD Home Thea...

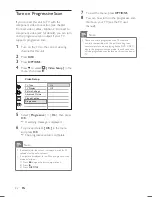
Page 22: ...ive On then press OK A warning message is displayed 6 To proceed select OK in the menu and press OK The progressive setup is complete Note If a blank distorted screen is displayed wait for 15 seconds for the auto recover If no picture displayed turn off the progressive scan mode as follows 1 Press Z to open the disc compartment 2 Press B 3 Press SUBTITLE 7 To exit the menu press OPTIONS 8 You can ...

Page 23: ...er then press OK 5 Press and hold CONNECT on the left rear speaker to start pairing the receiver to the transmitter The light flashes while in pairing mode A confirmation message is displayed once the pairing process is complete Pairing has to be done within 30 seconds and audio is muted during this process REAR LEFT 6 Press OK to confirm and exit Change the frequency channel You can change the fr...

Page 24: ...Right Center Subwoofer Rear Left Rear Right 0dB 0dB 0dB 0dB 0dB 0dB 5 Press b B to adjust the volume level then press OK The test tone is emitted from the speaker which you are adjusting Repeat the above setting for other speakers until all the speakers output level sounds equally balance To set the output delay time centre and rear speakers only 6 Select Speakers Delay in the menu then press B Sp...

Page 25: ...le to render the audio signals from the active source It switches automatically to the corresponding audio input and output the sound from its speaker system Before you can enjoy this function you have to map the audio inputs to the connected devices You can use any HDMI CEC TV device remote control to adjust the volume Note To enable one touch play function a video disc must be placed in the disc...

Page 26: ...ess OK Repeat steps 8 9 to map other connected devices 10 To exit the menu press OPTIONS Select a play source On the main unit 1 Press SOURCE repeatedly to select DISC USB RADIO FM RADIO AM MW OPTICAL INPUT 1 2 COAXIAL INPUT AUX 1 2 3 INPUT MP3 LINK DISC On the remote control Press DISC to switch to DISC mode Press USB to switch to USB mode Press RADIO to switch to FM or AM MW band Press AUX DI MP...

Page 27: ...d video files are not supported Play a disc Caution Never place any objects other than discs into the disc compartment Ensure ample space is available at the right hand side for ease of disc handling 1 Insert a disc with its label facing out For double sided disc load the side to play faces out To view disc play turn on the TV to the correct viewing channel for this DVD Home Theatre unit 2 To stop...

Page 28: ...y forward play is possible Change video play 1 Play a title 2 Use the remote control to change the video play Button Action Change audio language Only applicable to discs with multiple audio language or channel Change subtitle language Only applicable to discs with multiple subtitle language Toggle through various repeat shuffle play mode or turn off repeat mode Repeat options vary depending on th...

Page 29: ...arts play from the first title During playback you can press BACK to return to the menu if the PBC mode is on Tip The default setting for PBC is on To change the default setting see chapter Adjust settings Preference Setup PBC for details Sync audio output with video play If the video play is slower than the audio output sound does not match with the pictures you can delay the audio output to matc...

Page 30: ...ss DISC or USB A contents menu is displayed 3 Select a title to play then press u 4 Use the remote control to control the title Button Action Change subtitle language Change audio language track Stop play For DivX Ultra video press this button again to display the contents menu Display DivX Ultra video information Note Only those DivX videos that were rented or purchased using the DivX registratio...

Page 31: ...files with mp3 or wma extensions 1 Insert a disc or USB that contains the MP3 WMA music 2 Press DISC or USB A contents menu is displayed 3 Select a folder then press OK 4 Select a track to play then press u To return to the main menu press v until Previous folder is selected then press OK Note For CDs recorded in multiple sessions only the first session is played This unit does not support MP3PRO ...

Page 32: ... due to the large number of songs photos compiled onto one disc If the JPEG photo is not recorded with an exif type file the actual thumbnail picture will not be shown on the display It will be replaced with a blue mountain thumbnail picture This unit can only display digital camera pictures according to the JPEG EXIF format typically used by almost all digital cameras It cannot display Motion JPE...

Page 33: ...3 WMA WMV9 DivX Ultra or JPEG files that are stored on such devices 1 Connect USB flash drive or USB memory card reader to the USB socket on this unit 2 Press USB A contents menu is displayed 3 Select a file to play then press u For more information see chapters Play music Play photo Play video for details 4 To stop play press x or remove the USB device Tip If the device does not fit into the USB ...

Page 34: ... your portable media player Note Control playback is only possible on your portable media player Stop play on the portable media player before you switch to other play media source Play from radio Check if the FM antenna has been connected to the subwoofer If not connect the supplied FM antenna to the FM 75Ω socket and fix its ends to the wall Note For China Latin America region only if you want t...

Page 35: ...t time you turn on to radio mode Listen to radio 1 Press RADIO repeatedly to select FM or AM MW band 2 Use the remote control to control the radio Button Action Select a preset radio station m M Tune the radio frequency backward forward Toggle between FM stereo and FM mono mode Press and hold this button to delete the preset station from the preset list The preset number for other radio stations r...

Page 36: ... the above step it exits the preset mode 5 Press í ë or the number buttons to select a preset number to store 6 Press PROGRAM to confirm Change tuning grid In some countries the frequency step between adjacent channels in FM band is 50 kHz or 100 kHz AM MW band is 9 kHz or 10 kHz Note This feature only applicable for certain region Change tuning grid erases all preset radio stations 1 Press RADIO ...

Page 37: ... or music you play DVD Multi channel source AMBISOUND 9 1 default setting 9 1 multi channel output with embracing Ambisound Ideal for maximised movie experience MULTI CHANNEL 5 1 5 1 multi channel output for a standard movie experience AMBISOUND STEREO 9 1 Duplicate Ambisound stereo to front and rear speakers Ideal for a party AMBISOUND STEREO Enhanced stereo sound from your two front speakers CD ...

Page 38: ... mid and high range Recreates the atmosphere of a live club with the artist just in front of you Good for Jazz music and watching dramas CONCERT CLASSIC Flat and pure sound mode Ideal for listening to classical music and watching live concert DVDs GAMING PARTY Slightly enhanced low range and strong mid range ideal for party music and video gaming SPORTS Moderate mid range and surround effects for ...

Page 39: ...ink This feature is only applicable if this unit is connected to HDMI CEC compliant TV device It enables all the linked devices response or react to certain commands simultaneously with one touch control Options Descriptions Auto Wake up TV It wake ups your TV automatically when you press PLAY to power up this unit and start disc play if a video disc is found in the disc compartment To disable thi...

Page 40: ...The next time you want to play this disc or unlock it you need to enter the password Unlock all discs can be played Tip To set or change your password go to Preference Setup Password Display Dim Change the brightness level of the display panel to suit the lighting in your room 100 normal brightness 70 medium brightness 40 dimmest display OSD Language Select the default on screen menu language Scre...

Page 41: ...he DivX VOD Video On Demand service can be played only on the device to which it is registered Audio setup 1 Press OPTIONS General Setup menu is displayed 2 Press V to select Audio Setup then press B 3 Select an option then press OK Audio Setup Ambisound Setup HDMI Audio Speaker Volume Speaker Delay Night Mode Wireless 4 Select a setting then press OK To return to the previous menu press BACK To e...

Page 42: ...to the listening position will not sound too loud To start press 1 OK Select a speaker in the menu then 2 press b B to adjust the volume level Press 3 OK to confirm and exit Tip The test tone is emitted from the speaker while adjusting volume level Speakers Delay When the centre or rear speakers are placed closer to the listening position than the front speakers set the delay time for these speake...

Page 43: ...th other wireless devices in the room Options Descriptions Auto It selects the best channel to operate automatically Channel A Frequency corresponding to Wi Fi channel 1 Channel B Frequency corresponding to Wi Fi channel 6 Channel C Frequency corresponding to Wi Fi channel 11 Video setup 1 Press OPTIONS General Setup menu is displayed 2 Press V to select Video Setup then press B 3 Select an option...

Page 44: ...etting Personal customise the colour setting Set the level of brightness contrast tint and colour saturation in the menu then press OK Advanced Picture This is an advanced setting to optimise the video output This option is only applicable for video connection through HDMI or Component Video with Progressive Scan output DCDi Turn on or off Directional Correlation Deinterlacing feature It fills the...

Page 45: ...It detects and selects the best supported video resolution automatically 480p 576p 720p 1080i 1080p Select a video resolution that best supported by your TV See your TVs manual for details Note If the setting is not compatible with your TV a blank screen appears Wait for 15 seconds for auto recover or press HDMI repeatedly until the picture appears Closed Caption for certain region only Turn on or...

Page 46: ... language For some DVDs the subtitle audio language can only be changed from the disc menu To select the languages that are not listed in the menu select Others Then check the Language Code list at the back of this user manual and enter the respective 4 digit language code Parental Restrict access to DVDs that are unsuitable for your children These types of DVDs must be recorded with ratings To st...

Page 47: ...he menu Note If you forget your 4 digit password enter 0000 before you set a new password DivX Subtitle Select a character set that supports the DivX subtitle Standard English Irish Danish Estonian Finnish French German Italian Portuguese Luxembourgish Norwegian Bokmål and Nynorsk Spanish Swedish Turkish Central Europe Polish Czech Slovak Albanian Hungarian Slovene Croatian Serbian Latin script Ro...

Page 48: ...download it and store onto a CD R or USB flash drive 6 Connect the software update cable supplied between SOFTWARE UPDATE socket on the left rear speaker and subwoofer 7 Insert the CD R or USB flash drive to this unit 8 Press DISC or USB then follow the instruction on the TV to confirm update operation Note Do not remove the CD R or USB when software updating is in progress 9 Once software update ...

Page 49: ...240V 50Hz Power consumption 60 W Standby power consumption 0 5W USB Compatibility Hi Speed USB 2 0 Class support UMS USB Mass Storage Class Radio Tuning range FM 87 5 108 MHz 50 100 kHz MW 531 1602 kHz 9 kHz MW 530 1700 kHz 10 kHz 26dB quieting sensitivity FM 20 dBf MW 4μV m IF rejection ratio FM 60 dB MW 45 dB Signal to noise ratio FM 60 dB MW 40 dB Harmonic distortion FM 3 MW 5 Frequency respons...

Page 50: ...you have to switch to its default mode Press 1 Z to eject the disc if any Press 2 b for TV type Press 3 SUBTITLE No picture on HDMI connection Check if the HDMI cable is faulty Replace a new HDMI cable If this happens when you change the HDMI video resolution press HDMI repeatedly until the picture appears Warning Risk of electric shock Never remove the casing of this unit To keep the warranty val...

Page 51: ...in the menu then press OK Select a channel option then press 3 OK No sound from rear wireless speakers Check if all the connections to the wireless speakers are properly connected and connect the power cable Press AMBISOUND to turn on the Ambisound mode See chapter Getting Started Optimise wireless transmission for proper wireless setup Play DivX video files cannot be played Ensure that the DivX f...

Page 52: ...ication that provides a secure transmission of digital contents between different devices to prevent unauthorised copyright JPEG A very common digital still picture format A still picture data compression system proposed by the Joint Photographic Expert Group which features small decrease in image quality in spite of its high compression ratio Files are recognised by their file extension JPG or JP...

Page 53: ...85 Lao 7679 Latina 7665 Latvian 7686 Letzeburgesch 7666 Limburgan Limburger 7673 Lingala 7678 Lithuanian 7684 Luxembourgish 7666 Macedonian 7775 Malagasy 7771 Magyar 7285 Malayalam 7776 Maltese 7784 Manx 7186 Maori 7773 Marathi 7782 Marshallese 7772 Moldavian 7779 Mongolian 7778 Nauru 7865 Navaho Navajo 7886 Ndebele North 7868 Ndebele South 7882 Ndonga 7871 Nederlands 7876 Nepali 7869 Norsk 7879 N...

Page 54: ...150 ...

Page 55: ...151 ...

Page 56: ...152 ...

Page 57: ... T N O M 1 5 3 1 3 7 4 3 8 9 O T E N O H L E O C 6 5 4 6 1 1 6 3 4 7 O R I E Z A U J 6 8 7 2 4 2 2 3 6 4 O C N A R B O T A P 4 3 3 4 2 2 7 3 2 3 E A I R U M 9 6 9 4 4 2 5 3 9 9 Z I R T A R E P M I 2 0 0 1 1 1 6 3 4 7 O R I E Z A U J 0 9 5 6 2 2 2 3 2 4 A S S O R G A T N O P 9 1 4 2 1 7 5 5 3 O H N I B M A Z U M 2 4 1 3 2 4 6 3 9 9 S A R I E R D E P 1 2 0 4 8 7 3 1 7 S A T I E R F E D O R U A L 1 5...

Page 58: ...154 ...

Page 59: ...155 ...

Page 60: ...156 ...

Page 61: ...157 ...

Page 62: ... 2008 Philips Consumer Lifestyle All right reserved 12nc 3139 245 30992 sgpjp 0841 59 3 ...

Reviews: