CONTENTS
Clip
1
INSTALLING TELEPHONE AND BASE STATION
2
moves to the left, or displays the previous entry.
moves to the right, or displays the following entry.
validates the entry.
press: removes a character during entry. press and hold:
exit any mode (programming, phonebooks or lists).
Modes:
list of last incoming calls.
list of last numbers dialled (redial key).
program the telephone.
1.
CONTENTS
2.
INSTALLING TELEPHONE AND BASE STATION
• Inserting/Replacing batteries
• Charging/Recharging the telephone
• Installing another KALA 200 handset
3.
PRESENTATION OF TELEPHONE AND ACCESSORIES
4.
5.
• Placing a call on hold/Transferring a call
6.
• Deleting an entry from the phonebook
7.
USING THE ANSWERING MACHINE (TAM)
• Activating/Deactivating the answering machine
• Accessing the answering machine
• Listening to messages on your answering machine
• Deleting messages from your answering machine
• Listening to your recorded message
• Recording/Changing the outgoing message
• Recording an internal message
• Remote control of the answering machine
8.
THE LIST OF REDIAL NUMBERS AND INCOMING CALL LOG
9.
• Example: selecting and navigating
10.
• Answering machine programming options
• How to register the handset with another base station
• Earpiece programming options
• Other indirect programming options
11.
12.
13.
14.
Kala 200 V
ox
(
TD
6533
)
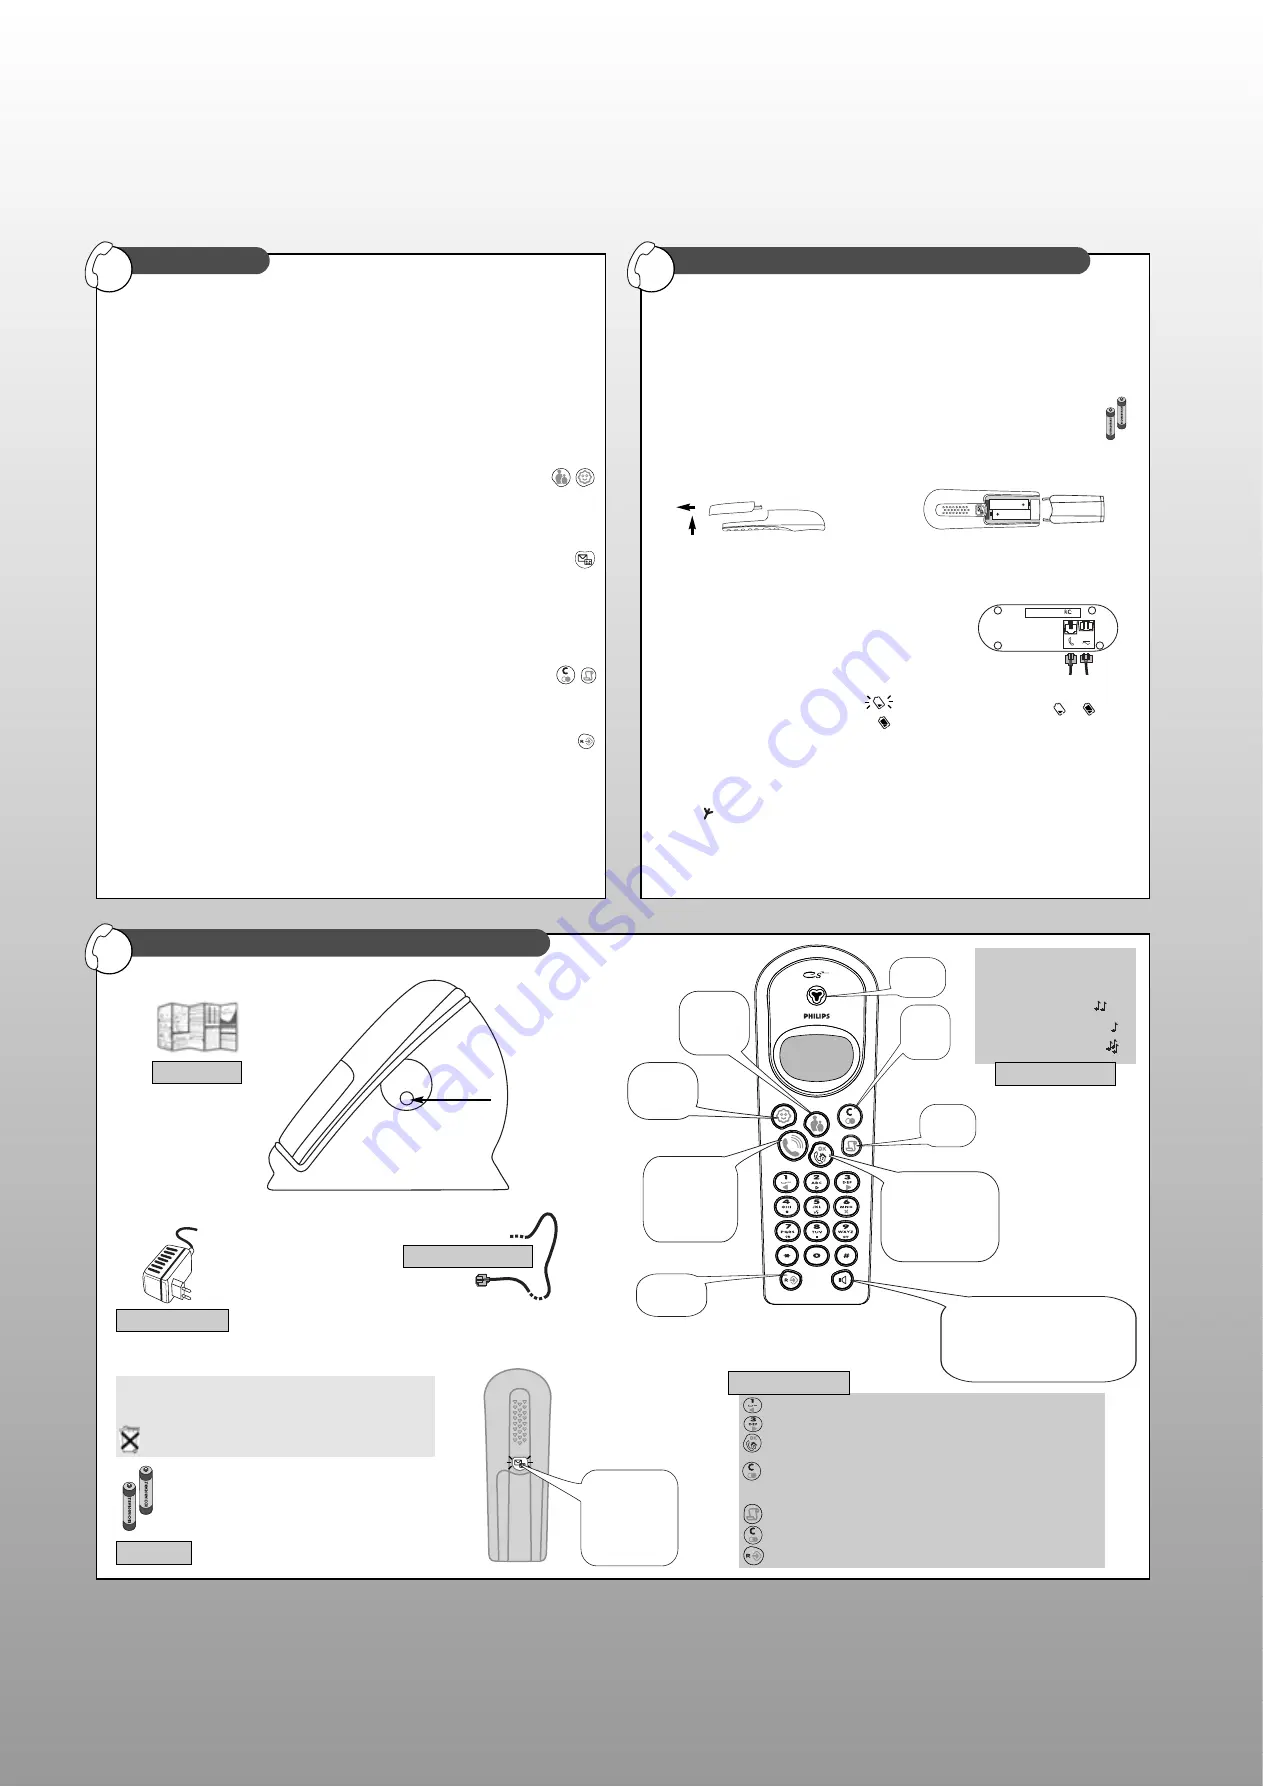
Placing the base station
In order to reduce the risk of interference, place the base station at least 1m away from any other
electrical appliance (telephone, television, computer, etc.)
The base station should be placed on a flat surface.
The base station should not be kept in a damp room, near a heat source or close to obstacles such
as thick walls or metallic structures.
Inserting/Replacing batteries
Your handset is powered by two rechargeable AA/R6 batteries.
Only
AA 600 mAh rechargeable
batteries should be used as replacements.
Never use non rechargeable batteries.
1. Slide down the cover
2. Insert batteries following the diagram.
on the back of the telephone.
3. Close the cover.
Telephone connection
On the bottom of the base station:
1. Connect the power supply (
B
) into the base station then
plug the power adaptor into the easily accessible wall
socket.
2. Connect the telephone cord (
A
) to the base station and
then to the PTT wall socket.
Place the handset on the base station (charging unit).
Charging/Recharging the telephone
While the batteries are being charged,
flashes on the screen and shows
.
When the battery icon on the display shows
, the batteries are fully charged.
You will hear a validation beep when you place the handset on the base station.
On first use or when new batteries have been inserted, charge the batteries for
at least 24 hours
.
You will hear a beep when you activate the telephone if the batteries need to be charged.
Telephone range
Your telephone has a range of : 50m indoors - 350m outdoors.
The
symbol on the display indicates that the handset is connected on the base station.
Installing another KALA 200 handset
You can register up to 4 handsets with your base station (See Page 10 Programming options).
Additional handsets do not require additional telephone connections but do need a power
supply adaptor. The reference of Additional Kala 200 handsets is TD 6830.
A
B
1
2
+
-
+
-
Mains adapter
User guide
Programming
key
Redial
list key
Call
log key
Earpiece
The batteries contain Cadmium and must be disposed of in compliance
with the waste disposal regulations. Never use non-rechargeable
batteries. The manufacturer assumes no responsibility for non-respect
of these regulations.
The crossed-out dustbin signifies that the battery should not be
disposed of with general household waste.
+
-
+
-
Batteries
Direct access
to listen to mes-
sages and program
some functions of
the answering
machine. This back
lit key also
indicates new
messages.
Family
phonebook
key
Friends
phonebook
key
Talk key
To make
an external call,
end an external
call, and answer
an external call.
To call all internal
handsets recognised
by the base station or
put a call on hold
(with hold music).
(“internal call” key).
Press
1x : activate loudspeaker
2x : increase or decrease the volume
of the loudspeaker
3x : deactivate loudspeaker
Use this button to increase or decrease
the volume depending on the setting
you have previously chosen.
How to optimise batteries lifespan
If you plan not to use your phone for at least 15 days,
we would suggest you to remove the batteries from
the handset if you disconnect the mains power.
PRESENTATION OF TELEPHONE AND ACCESSORIES
3
The handset may also be placed
on the base station with the key-
pad face-up.
The key located
on the base sta-
tion side can be
used to make all
handsets ring at
the same time.
When using your telephone,
3 beep types will
be heard:
• the error beep
,
• the validation beep ,
• the invitation beep
.
Beep indicators
Only use the power and telephone cables
supplied with the telephone.
Telephone cable
Functions keys:
A
B
Summary of Contents for KALA Vox 200
Page 1: ......


