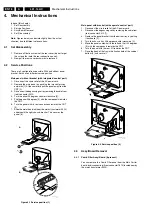
Mechanical Instructions
4.
4.3.2
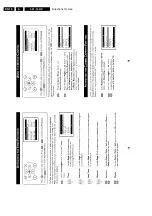
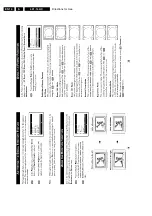
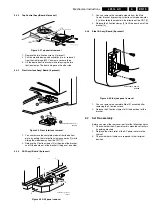
Top Control Assy/Board (if present)
Figure 4-3 Top control removal
1.
Remove the two fixation screws (if present).
2.
Pull the module down and backwards (w.o.w. release it
from the front hinge [M]). You must use some force.
3.
Lift the board from its bracket while releasing the two
fixation clamps. The board hinges on the other side.
4.3.3
Front Interface Assy/ Board (if present)
Figure 4-4 Front interface removal
1.
You can remove the complete module from the bottom
plate, by pulling the two fixation clamps upwards [1] while
sliding the module away from the CRT [2].
2.
Release the 2 fixation clamps [3] at the side of the bracket,
and lift the board out of the bracket (it hinges at one side).
4.3.4
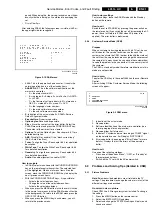
DAF Assy/ Board (if present)
Figure 4-5 DAF panel removal
1.
You can remove the complete module from the Main
Carrier bracket, by pressing its fixation clamp downwards
[1] while sliding the module in the direction of the CRT [2].
2.
Release the 2 fixation clamps [3] to lift the board out of the
bracket [4].
4.3.5
Side I/O Assy/ Board (if present)
Figure 4-6 Side jack panel removal
1.
You can remove the complete Side I/O assembly after
removing the 2 fixation screws.
2.
Release the 2 fixation clamps to lift the board out of the
bracket.
4.4
Set Re-assembly
Before you mount the rear cover, perform the following checks:
1.
Check whether the AC power cord is mounted correctly in
its guiding brackets.
2.
Re-place the strain relief of the AC power cord into the
cabinet.
3.
Check whether all cables are replaced in their original
position.
CL 06532012_003.eps
030200
M
Top control board
2
3
1
1
3
CL 06532130_018.eps
021000
CL 26532119_060.eps
181202
3
2
3
4
1
CL 06532012_004.eps
030200
Summary of Contents for L01.1L AC
Page 6: ...Directions for Use EN 6 L01 1L AC 3 3 Directions for Use 3 1 16 9 Sets ...
Page 7: ...Directions for Use EN 7 L01 1L AC 3 ...
Page 8: ...Directions for Use EN 8 L01 1L AC 3 ...
Page 9: ...Directions for Use EN 9 L01 1L AC 3 ...
Page 10: ...Directions for Use EN 10 L01 1L AC 3 ...
Page 11: ...Directions for Use EN 11 L01 1L AC 3 ...
Page 12: ...Directions for Use EN 12 L01 1L AC 3 ...
Page 13: ...Directions for Use EN 13 L01 1L AC 3 ...
Page 14: ...Directions for Use EN 14 L01 1L AC 3 ...
Page 15: ...Directions for Use EN 15 L01 1L AC 3 ...
Page 16: ...Directions for Use EN 16 L01 1L AC 3 Personal Notes ...
Page 17: ...Directions for Use EN 17 L01 1L AC 3 3 2 4 3 Sets Personal Notes ...
Page 42: ...Spare Parts List EN 82 L01 1L AC 10 10 Spare Parts List Not applicable yet ...
Page 43: ...Revision List EN 83 L01 1L AC 11 11 Revision List First release ...

